When using Elasticsearch with a Kibana instance, the user can take advantage of the Kibana web interface to test or query data from the Elasticsearch indexes really easy and fast with the REST APIs. Developing, testing or experimenting is easy in the Kibana Dev tools Console, where indexes could be created, deleted, populated and many more without the need of anything except a modern browser. The Elasticsearch REST API is here – https://www.elastic.co/guide/en/elasticsearch/reference/current/indices-create-index.html, which points always to the current (latest) version of the Elasticseach version and the versions may be changed, for example, here is the link for the 7.17 branch. Using the Dev Tools Console is simpler even than the curl from the command-line, because the user does not need to add additional (curl or not) arguments and parameters for authentication, headers, metadata for data typing and so on. Just type the API commands and add data if they need. In fact, in the Elasticsearch site most examples use the REST API, so it is just as easy as copy and past in the console text area.
SCREENSHOT 1) Log in the Kibana instance and then navigate to the Dev tools on the left menu and then choose Console.
Management Dev Tools Console
SCREENSHOT 2) The console shows the last state, which in this case is empty, because it is opened for the first time.
Write the REST API in the left and execute by click over the play button and expect the output in JSON format in the right. Dev tools Console overview Keep on reading!
This is the part 2 of the Fedora 39 KDE Plasma Desktop review – Review of freshly installed Fedora 39 KDE Plasma Desktop (KDE GUI)
In part 2 only the System Settings of KDE Plasma is presented – the central place to configure and tweak the KDE Plasma – the graphical desktop environment with customizable layouts and panels, virtual desktops and sophisticated widgets. Some of the settings require an administrative account and whenever it is necessary the Plasma platform shows an authentication dialog to escalate privileges.
It worth mentioning the KDE Platform versions in Fedora 39:
KDE Plasma version: 5.27.8, upgradable to 5.27.10
KDE Frameworks version: 5.110.0, upgradable to 5.113.0
QT version: 5.15.10, upgradable to 5.15.12
The System Settings reflects the above versions and the functionality they incorporate.
The main components are:
Appearance
Workspace
Workspace Behavior
Windows Management
Shortcuts
Startup and Shutdown
Search
Personalization
Notifications
Users
Reginal Settings
Accessibility
Applications
KDE Wallet
Online Accounts
User Feedback
Network
Connections
Settings
Hardware
Input Devices
Display and Monitor
Audio
Multimedia
Power Management
Bluetooth
Color Management
KDE Connect
Printers
Removable Storage
Thunderbolt
System Administration
About this System
Software Update
System Settings may also be started from the console with
myuser@mydesktop ~ $ systemsettings
Here are the System Setting screenshots:
SCREENSHOT 1) Click on System Settings to launch the “System Settings” program.
View and edit KDE and some Linux system settings. Main Menu – Favorites Keep on reading!
After the tutorial on how to install Fedora 39 KDE Plasma Desktop this tutorial is mainly to see what to expect from a freshly installed Fedora 39 KDE Plasma Desktop – the look and feel of the new KDE GUI (version 5.27.4 of KDE Plasma). The Fedora 39 KDE Plasma Desktop is part of Fedora spins – https://spins.fedoraproject.org/kde/
Here the user can find how to Install Fedora 39 KDE Plasma Desktop (KDE GUI). Here it worth mentioning the included versions of KDE software for Fedora 39:
KDE Plasma version: 5.27.8, upgradable to 5.27.10
KDE Frameworks version: 5.110.0, upgradable to 5.113.0
QT version: 5.15.10, upgradable to 5.15.12
The idea of this article is just to see what to expect from Fedora 39 KDE Plasma – the look and feel of the GUI, the default installed programs and their look and how to do some basic steps with them, it is included also screenshots of the KDE settings program. Here you’ll find more than 250 screenshots and not so many texts we do not want to turn this review of many texts and version information and 3 meaningless screenshots, which you could not see anything for the user interface because these days it is the primary goal of a Desktop system. You can expect more of this kind of review in the future. The big missing is the Kate Advanced Text Editor, which is not installed by default in this release.
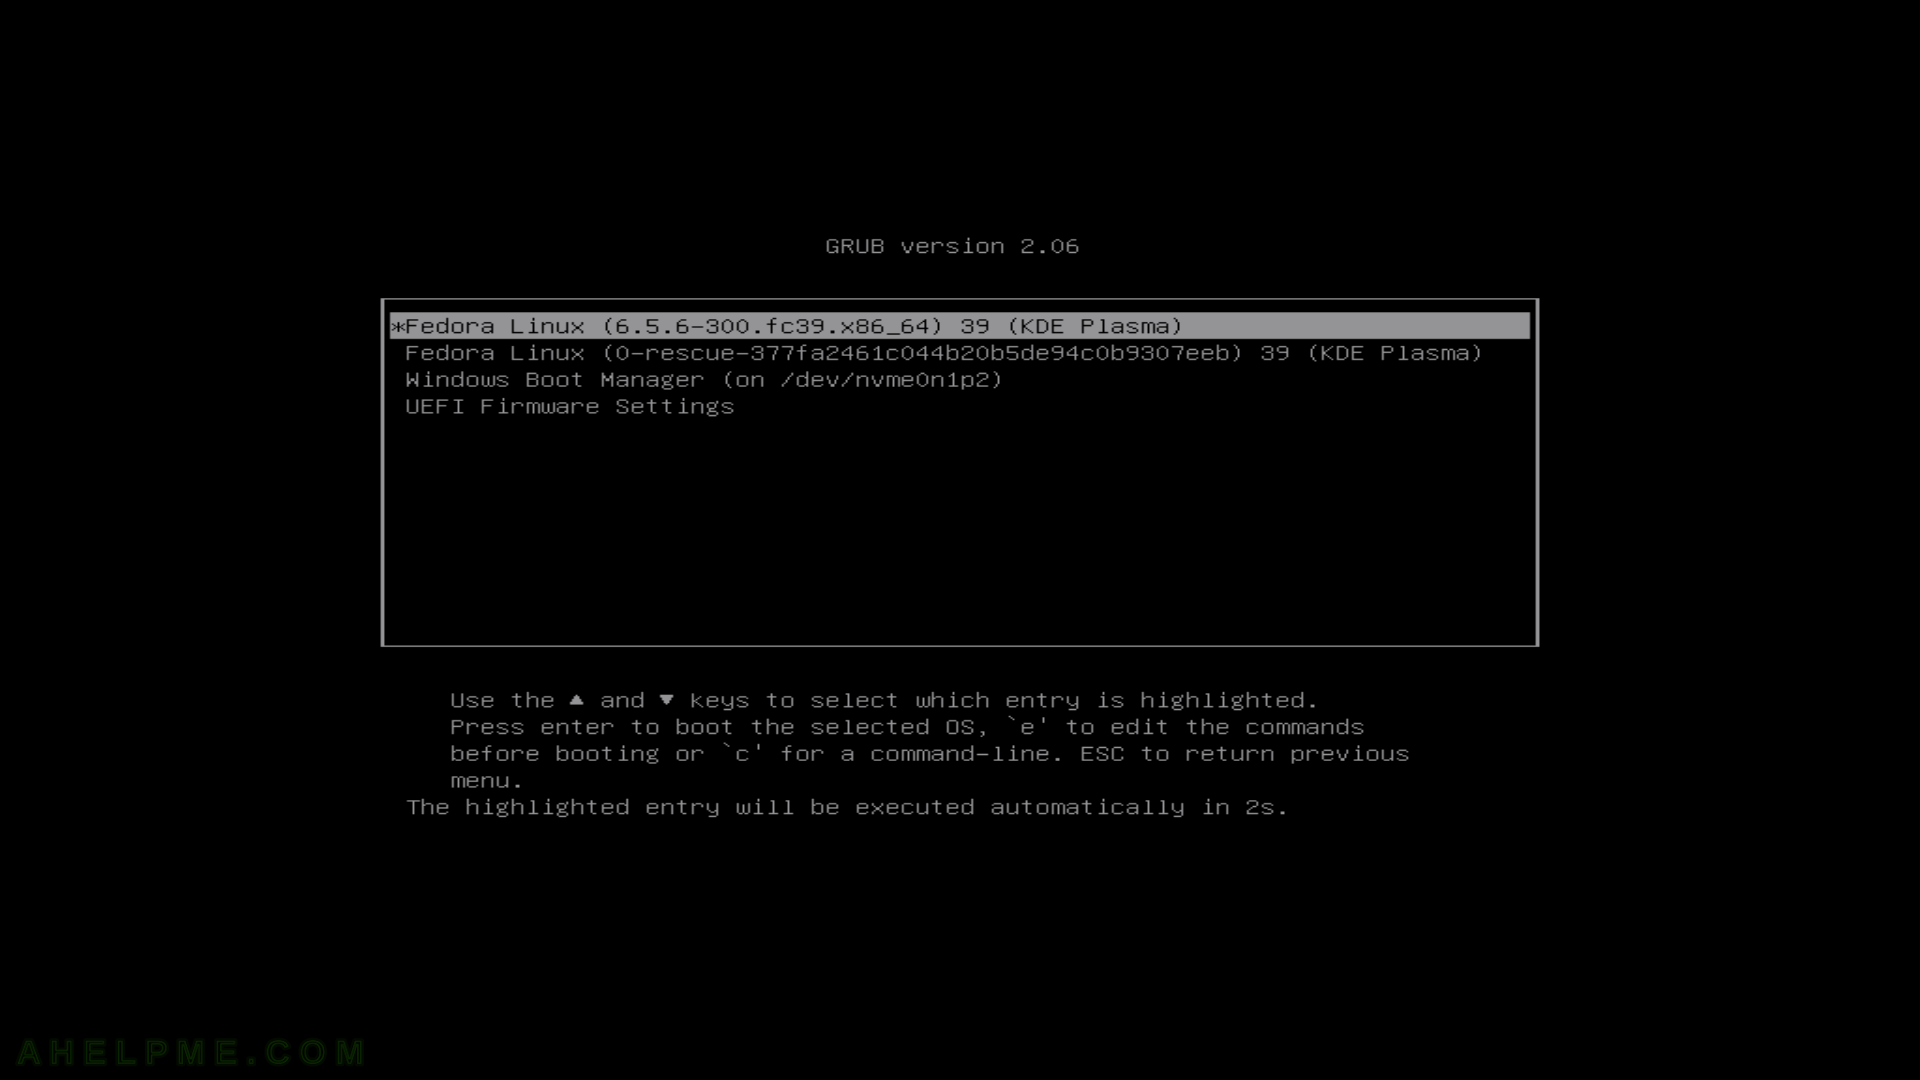
This article is the first part of reviewing the Fedora 39 KDE Plasma. The second article contains KDE System Settings screenshots and it is Review of freshly installed Fedora 39 KDE Plasma Desktop part 2 – System Settings.
Some of the interesting screenshots
Logging
KDE Plasma Overview with Panel Toolbox
Fedora KDE main menu
Plasma Widgets
Activities
Install/Update applications with Discover
review of multiple installed GUI applications and games.
Dolphin – the KDE File Manager
KWrite – Text Editor
Kontact – manage email, calendar, contacts and other personal data with one application. It includes KMail, KAddressBook, KOrganizer, Akregator, and more.
KDE Partition Manager – manage disks and partitions.
Konsole – KDE’s Terminal Emulator
System Monitor – monitor the system.
KFind – Find Files/Folders – advanced files and folder search.
KGpg – a simple interface for GnuPG. A powerful encryption utility.
Klipper – clipboard manager for the KDE interface.
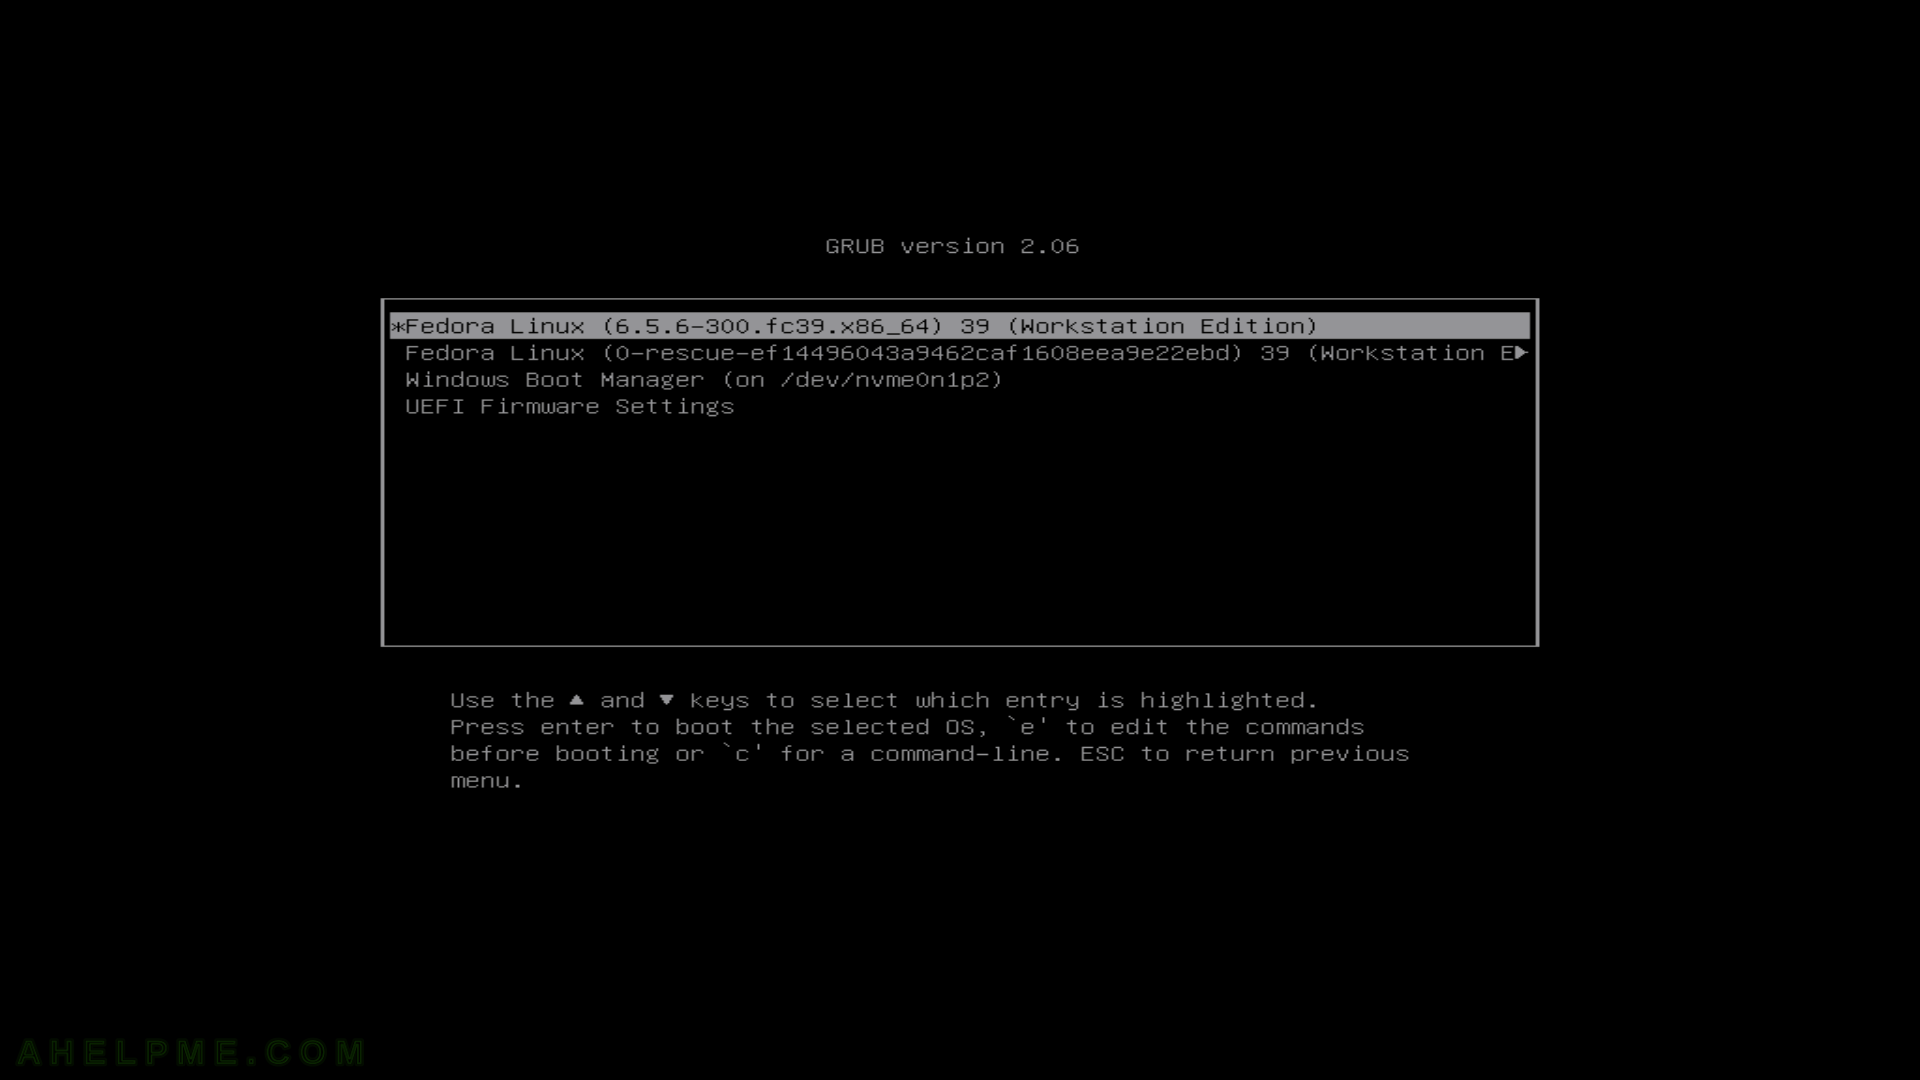
This article will show the simple steps of installing a modern Linux Distribution like Fedora 39 KDE Plasma with KDE for the user graphical interface. First, it is offered the basic steps for installing the Operating system and then there are some screenshots of the installed system and its look and feel of it. Here is another article available with more screenshots of the installed and working Fedora 39 KDE Plasma – Review of freshly installed Fedora 39 KDE Plasma Desktop (KDE GUI). If the user is interested in Gnome as a graphical interface there are two articles on how to install Fedora 39 Workstation Edition, which comes with GNOME – Install Fedora Workstation 39 (Gnome GUI) and Review of freshly installed Fedora 39 Workstation (Gnome GUI).
This is the simplest setup. One hard disk device in the system is installed, which is detected as sda and the entire disk will be used for the installation of Fedora 39 KDE Plasma. All disk information in sda disk device will be permanently deleted by the installation wizard!
The Fedora 39 KDE Plasma Desktop comes with
Xorg X11 server – 1.20.14 and Xorg X11 server XWayland 23.2.2 is used by default
It is a LIVE image so you can try it before installing it. The easiest way is just to download the image and burn it to a DVD disk or to flush a USB drive with the ISO. Just use the Linux command dd and a USB flash drive. It’s worth mentioning the dd command will destroy all data on the USB drive and overwrite it with the Fedora KDE Live ISO, so be sure to use a UBS Flash, which data is not important or with no data on it. The dd command uses the ISO as input and the output is the USB drive in Linux device form as /dev/sd?. For the following dd command, the USB drive is /dev/sdd
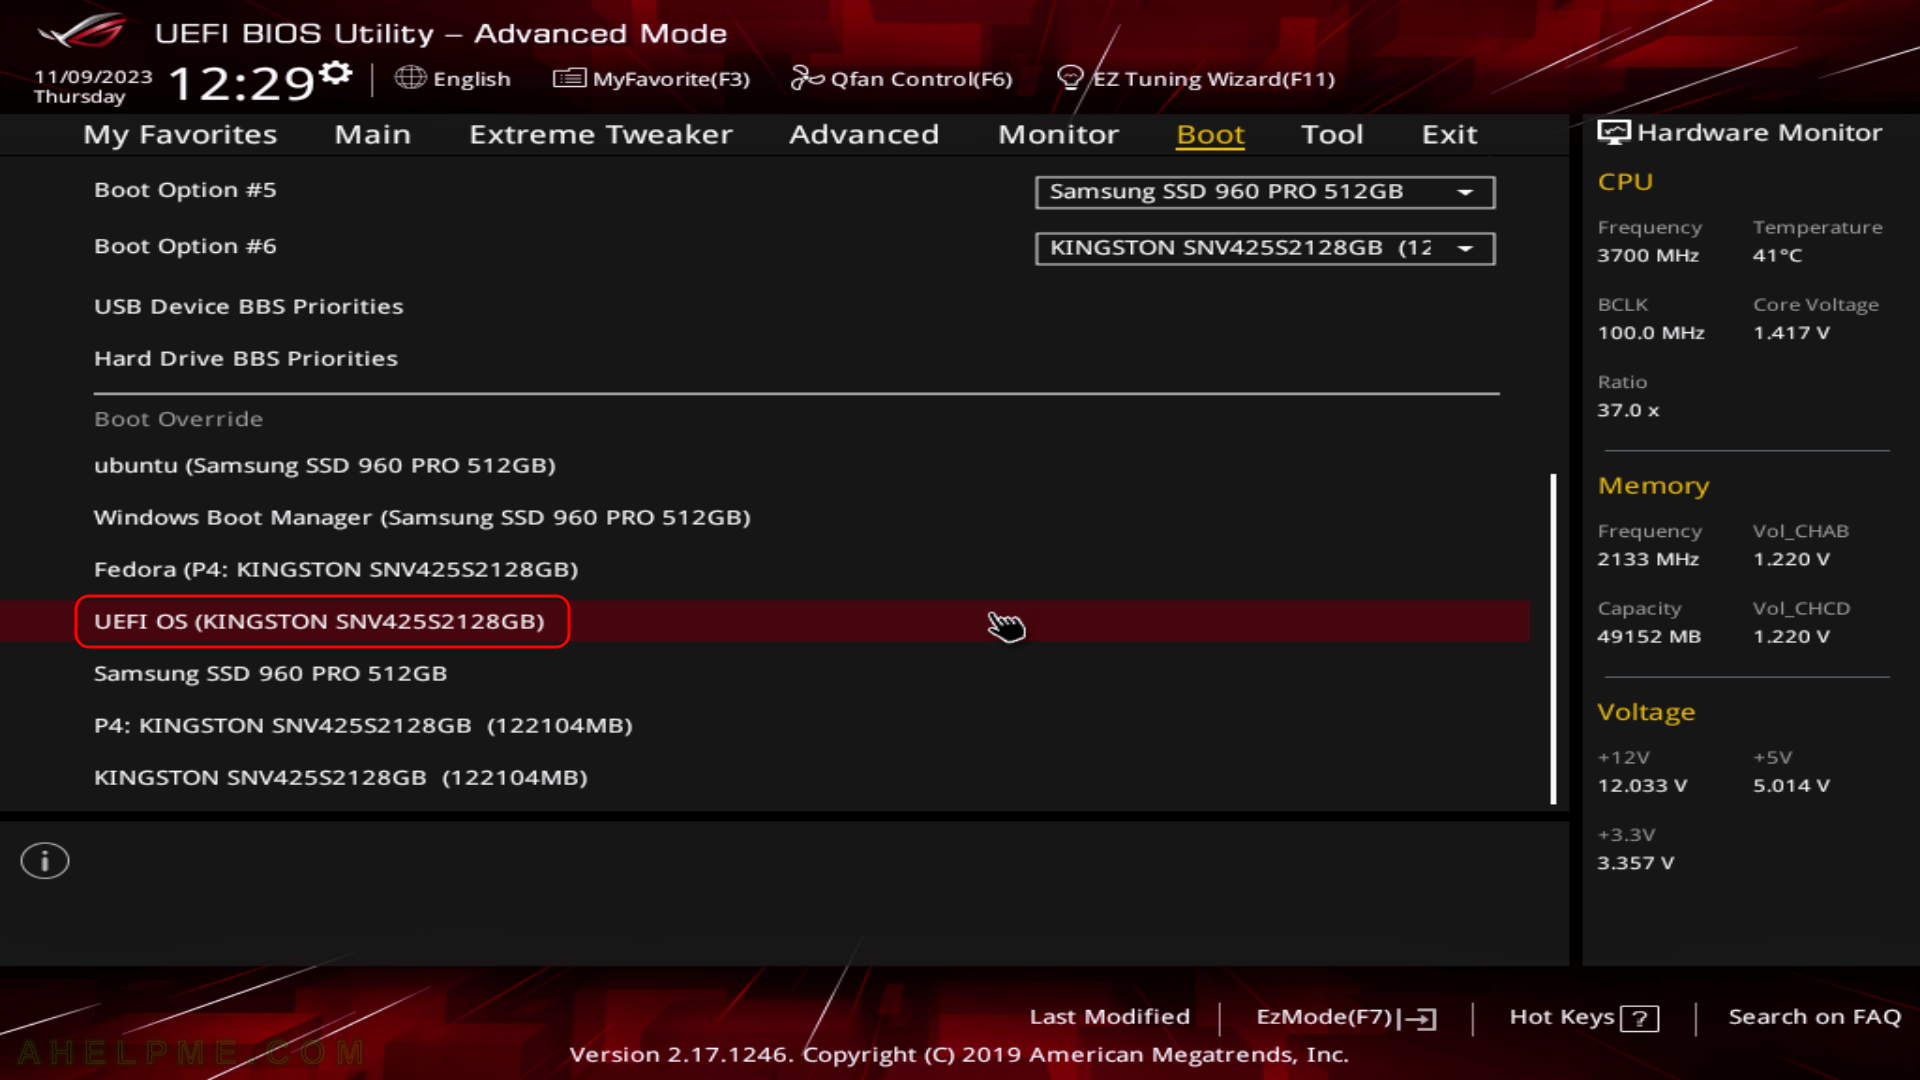
SCREENSHOT 1) Boot from the UEFI USB Drive Kingston device.
It is the same as the USB CD/DVD-ROM bootable removable drive. Choose the UEFI USB CD/DVD drive and boot the installation live drive. UEFI BIOS DVD-ROM boot Keep on reading!
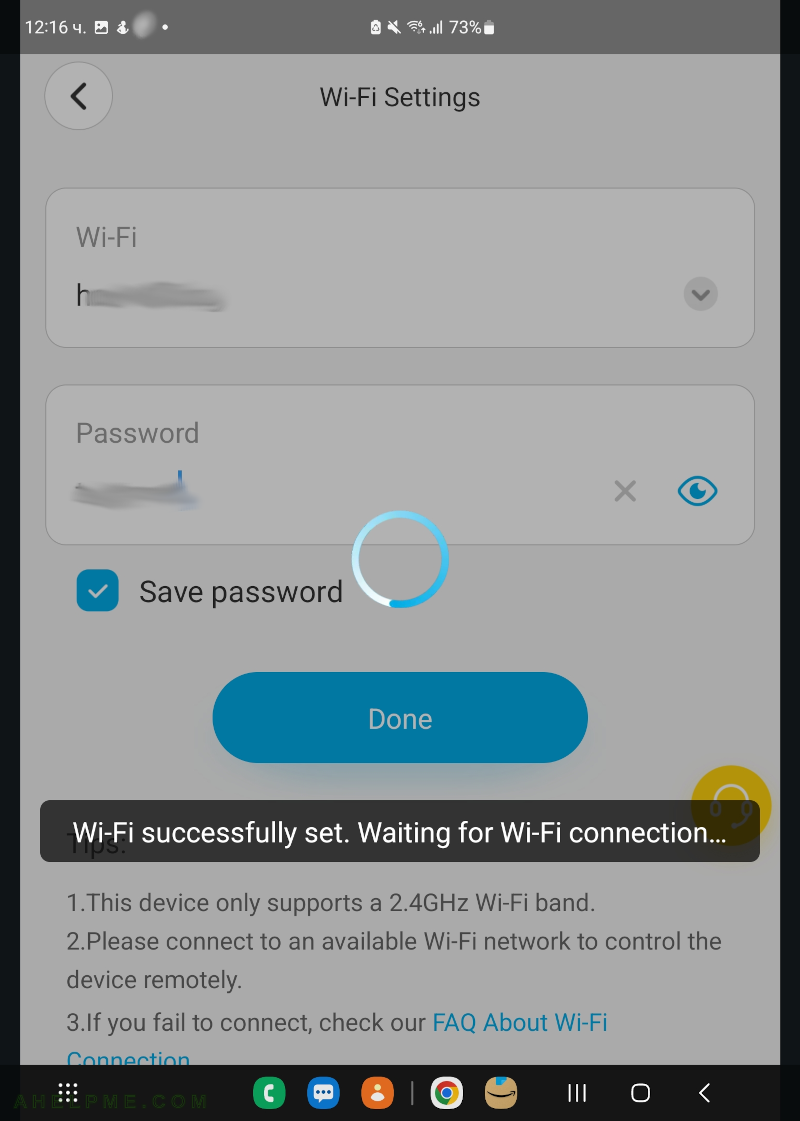
Govee WiFi Thermometer Hygrometer (model H5179) uses 3 AA batteries, which may last year or two depending on the period of pushing the data to the severs in the Internet (i.e. using the Wi-Fi module). The device may suddenly to begin losing Wi-Fi connection or even stop connecting to it, which is an indicator that the batteries should be replaced. Despite that the battery indicator in the app is full, the batteries probably supply low voltage to the electronics in the device that’s why the Wi-Fi begins not to work properly! The device may have kept normal Bluetooth operation for several month leaving the user wondering what is going on! In fact, problems with the Wi-Fi module is the first signal for a battery replacement.
There three screenshots of a device, which works perfectly fine without the Wi-Fi. It reports via Bluetooth the temperature and keeps track of it, but cannot connect to the Wi-Fi, despite it says the Wi-Fi settings are successfully saved.
SCREENSHOT 1) In the device settings the Wi-Fi is successfully set and the device immediately tries connecting.
This article will show the simple steps of installing a modern Linux Distribution like Fedora 39 Workstation Edition with Gnome for the graphical user interface. First, it is offered the basic steps for installing the Operating system and then there are some screenshots of the installed system and its look and feel. Soon another article will show more screenshots of the installed and working Fedora 39 (Gnome and KDE plasma) – so the user may decide which of them to try first.
This is the most straightforward setup. One hard disk device in the system is installed, which is detected as sda and the entire disk will be used for the installation of Fedora Workstation 39. All disk information in sda disk device will be permanently deleted by the installation wizard!
The Fedora 39 Workstation comes with
Xorg X11 server – 1.20.14 and Xorg X11 server XWayland 23.2.2 is used by default
The following ISO is used for the installation process: https://download.fedoraproject.org/pub/fedora/linux/releases/39/Workstation/x86_64/iso/Fedora-Workstation-Live-x86_64-39-1.5.iso
It is a LIVE image so you can try it before installing. The easiest way is just to download the image and burn it to a DVD disk (or make a bootable USB flash drive) and then follow the installation below.
The simplest way to make a bootable USB drive is to just use the Linux command dd. First, download the ISO file above and then plug the USB drive into the computer and find out the device name, it should be something of /dev/sda or /dev/sdb or /dev/sdc (execute the dmesg command in the console and check the last lines for the USB drive detection and its device name like /dev/sd?). After knowing the USB device name issue the dd command to overwrite it with the ISO. Note, all data will be lost if you use the following command with the device name mentioned in the command line.
After staring a new LXC container, the syslog program (Syslog-ng) began to throw thousands of errors with this kind of message:
Dec  1 10:50:36 srv kernel: SELinux: inode_doinit_use_xattr:  getxattr returned 2 for dev=0:43 ino=-6977140995289226736
Dec  1 10:50:36 srv kernel: SELinux: inode_doinit_use_xattr:  getxattr returned 2 for dev=0:43 ino=-6551465724643968476
Dec  1 10:50:36 srv kernel: SELinux: inode_doinit_use_xattr:  getxattr returned 2 for dev=0:43 ino=-5980833553552494142
Dec  1 10:50:36 srv kernel: SELinux: inode_doinit_use_xattr:  getxattr returned 2 for dev=0:43 ino=-8820947409424952637
Dec  1 10:50:36 srv kernel: SELinux: inode_doinit_use_xattr:  getxattr returned 2 for dev=0:43 ino=-8270463809263745561
Dec  1 10:50:36 srv kernel: SELinux: inode_doinit_use_xattr:  getxattr returned 2 for dev=0:43 ino=-7923279144252216900
Dec  1 10:50:36 srv kernel: SELinux: inode_doinit_use_xattr:  getxattr returned 2 for dev=0:43 ino=-6181977668994943343
Dec  1 10:50:36 srv kernel: SELinux: inode_doinit_use_xattr:  getxattr returned 2 for dev=0:43 ino=-7585065875445167421
Dec  1 10:50:36 srv kernel: SELinux: inode_doinit_use_xattr:  getxattr returned 2 for dev=0:43 ino=-7923279144252216900
Dec  1 10:50:36 srv kernel: SELinux: inode_doinit_use_xattr:  getxattr returned 2 for dev=0:43 ino=-5826517164673898101
Dec  1 10:50:36 srv kernel: SELinux: inode_doinit_use_xattr:  getxattr returned 2 for dev=0:43 ino=-7585065875445167421
Dec  1 11:01:01 h3 rsyslogd[1147]: imjournal: 3871493 messages lost due to rate-limiting (20000 allowed within 600 seconds)
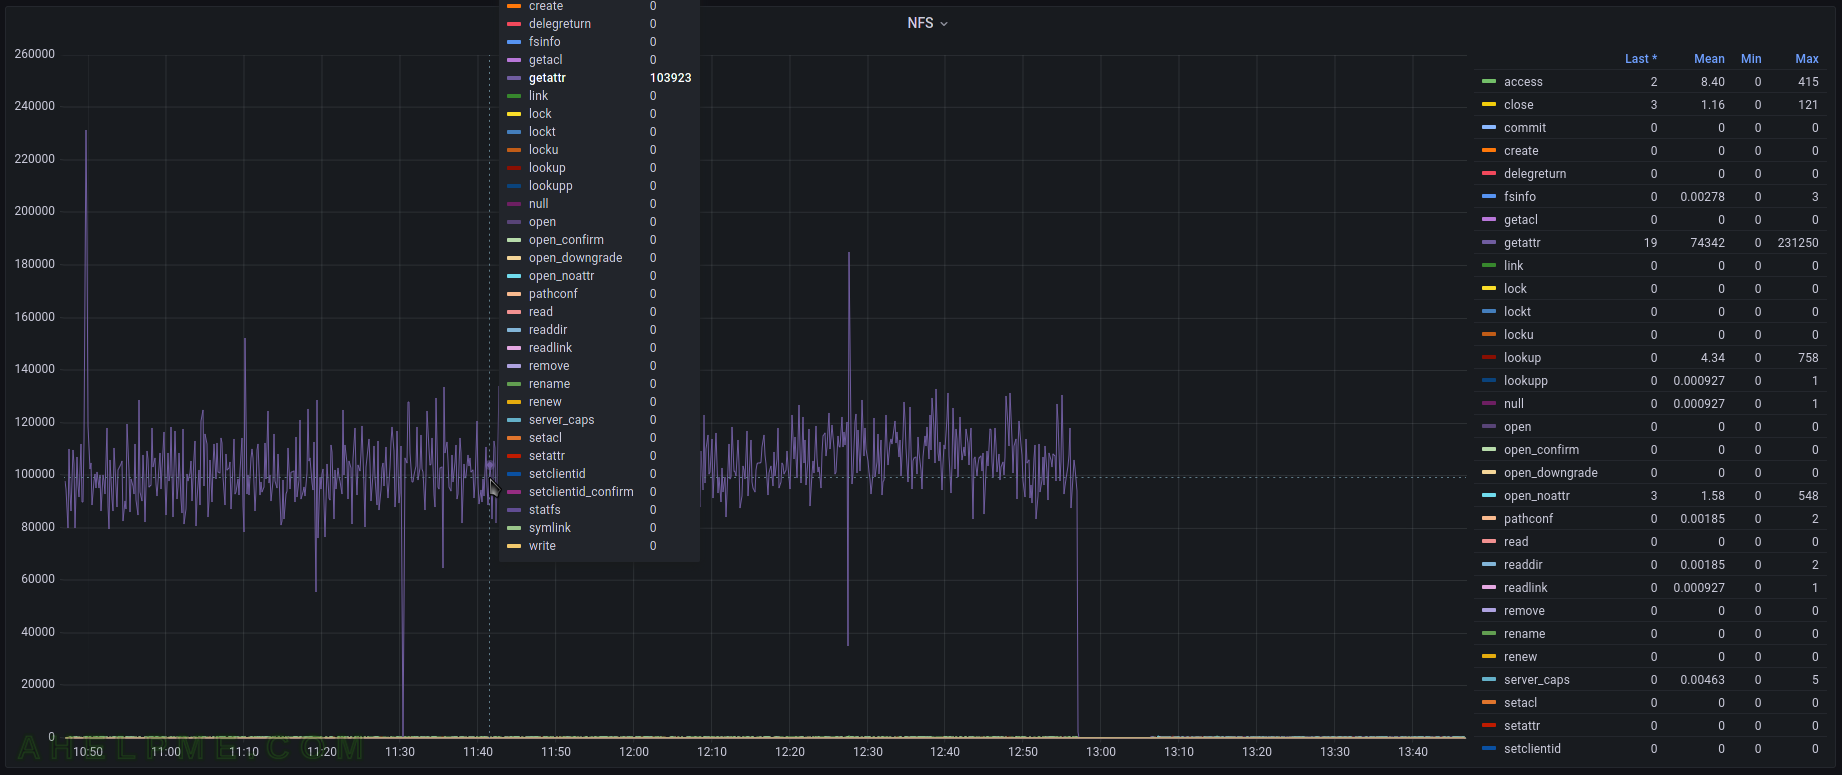
These messages were logged in thousands. The same time, the NFS statistics showed a strange peak of using getattr. Something was calling getattr thousands times per second. Despite there were no SELinux blocks in audit.log as the dmesg suggested the SELinux might be blamed.
The LXC container is an application container, which has mound bind directory from the host server. The very same directory is an local NFS share (using NFS-Ganesha) of a GlusterFS volume and the PHP files are situated there. kernel SELinux inode_doinit_use_xattr getxattr returned 2 nfsstat getattr graph
So the LXC container reads the PHP files from this NFS share. There were no issues to access the files and the application LXC worked just fine.
The problem disappeared when the NFS share was remounted with SELinux permissions using the context word:
All the files are of SELinux label httpd_sys_rw_content_t and after restarting the LXC container there were no SELinux lines in the dmesg and the syslog logs. The administrator should configure the right SELinux permissions to the LXC bound directories. More on why SELinux sometimes does not report on blocks in the audit.log here – Selinux permission denied and no log in audit.log.
A strange behavior has been monitored in a storage server holding more than 20 millions of files, which is not a really big figure, because we have storage with more than 300 millions of files. The server has a RAID5 of 4 x 10T HGST Ultrastar He10 and storage partition formatted with ext4 filesystem with total of 27T size. Despite the inodes are only 7% and the free space is at 80%, the server began to experience high load averages with almost no IO utilization across the disks and the RAID device.
So the numbers are:
20% free space.
93% free inodes.
no IO disk utilization above 10-20% of any of the disks. In fact, the IO above 10% is very rear.
really high loads above the number of the server’s cores. The server has 8 virtual processors under Linux and the loads are constantly above 10-14.
no Disk Sleep blocked processes or Running to justify the high load.
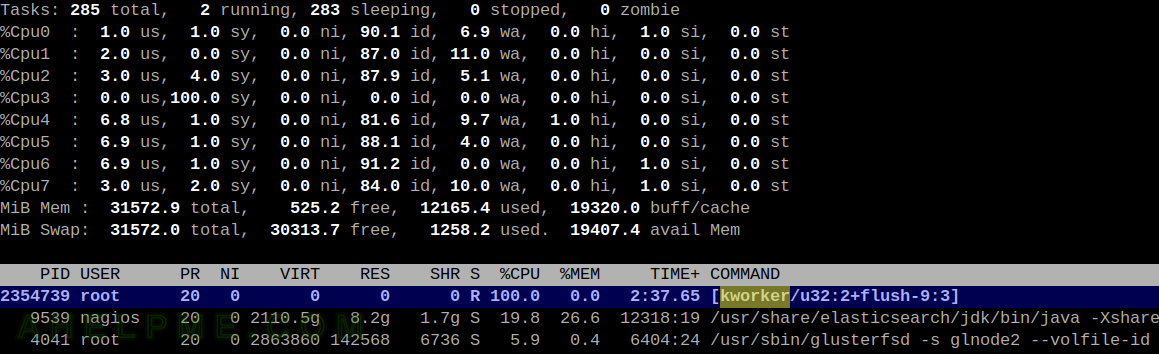
the top command reports one or two kernel processes with 100% running – kworker/u32:1+flush-9:3 (so flushing the data takes so many time?)
If the problem were related to the disks or hardware, it would probably have been seen a high utilization across the disks, because the physical operations would need more time to execute. The high IO utilization across any disk, in deed, may result in a high system time (i.e. kernel time). Apparently, there is no high IO utilization across the disks and even no Disk Sleep blocked processes.
The FlameGraph tool may help to suggest the area where the problem related to.
First, install the git and perf tool (there are two interesting links about it with examples – link1 and link2):
[root@srv ~]# perf record -F 99 -a -g -- sleep 60
[ perf record: Woken up 24 times to write data ]
[ perf record: Captured and wrote 7.132 MB perf.data (35687 samples) ]
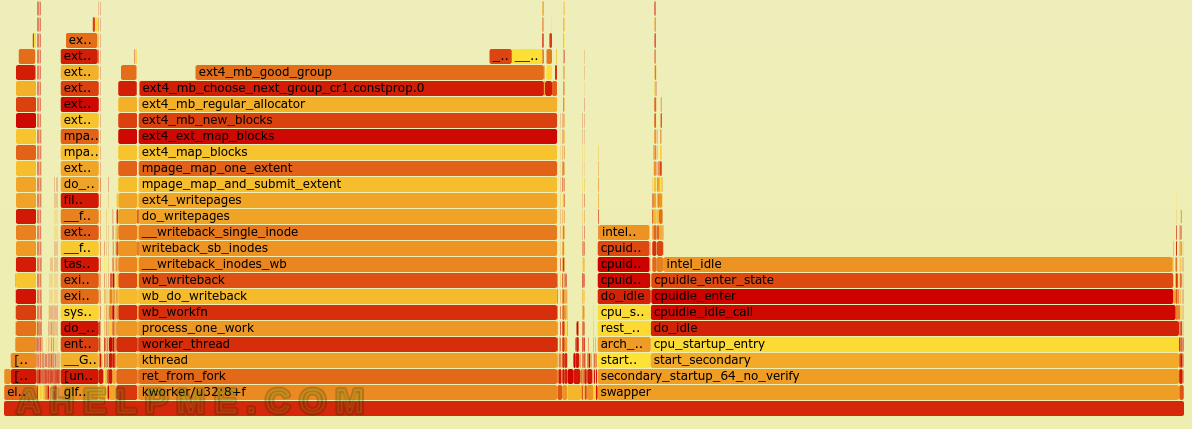
And generate a SVG image of all the function, which are executed during this time frame of 60 seconds. It will give a good picture of what has been executed and how much time it took in the kernel and user space.
The SVG are shared bellow. It turned out most of the time during this sample period of 60 seconds, the Linux kernel was in ext4_mb_good_group, which is related to the EXT4 file system.
What fixed the problem (for now) – By removing files it was noticed the system time went down and the load went down, too. Then, after removing approximately a million files, the server performance returned to normal as the average other storage server (this one has unique hardware setup). So by removing files, i.e. INODES from the ext4 file system, the load average and the server ext4 performance were completely different from what it had been before.
The interesting part the inodes never went above 7% (around 24 million of 454 million available) and the free space never went down 20%, but when a good deal of files were removed, the bad ext4 performance disappeared. It still could be related to the physical disks or some strange ext4 bug, but this article is intended to report this behavior and to propose a some kind of a solution (even though a workaround).
SCREENSHOT 1) The kernel process running at 100% – kworker/u32:2-flush-9:3.
kernel process running at 100%
SCREENSHOT 2) Almost half of the time was spent at ext4 related calls.
ext4 and ext4_mb_good_group half of the time spent Keep on reading!
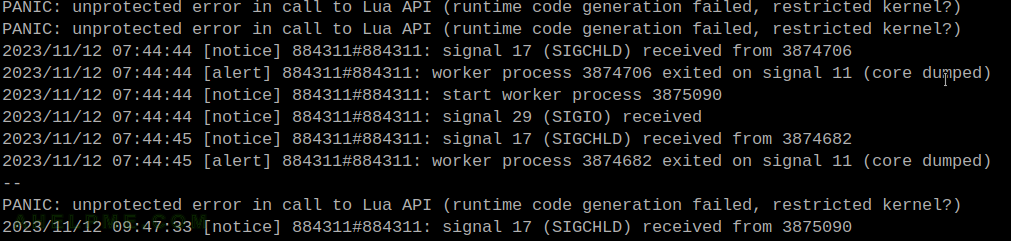
runtime code generation failed restricted kernel
The CentOS 8 (CentOS Stream 9, too) might prevent to successfully execute a Lua code in NGINX web server with the modules like ngx_http_lua_module because of insufficient SELinux rules. By default, the web server is not allowed to execute programs that require memory addresses that are both executable and writable. Using Lua code may even crash with a core dump and restart of the NGIX worker process. The error logs contains information for the incident:
PANIC: unprotected error in call to Lua API (runtime code generation failed, restricted kernel?)
In fact, the error message hints what is going on – that the kernel prevents the execution of a code, which might be an addition limit enforced to this system.
Searching through the SELinux audit log shows the solution by enable the httpd_execmemSELinux boolean.
[root@srv ]# ausearch -c 'nginx' --raw | audit2allow


#============= httpd_t ==============

#!!!! This avc can be allowed using the boolean 'httpd_execmem'
allow httpd_t self:process execmem;
Apparently, the Lua code used needs a privileges to execute a code in the memory addresses (execmem). So when using the OpenResty ngx_http_lua_module, which is not distributed with the NGINX server, the server administrator should enable to true the SELinux boolean – httpd_execmem with:
setsebool -P httpd_execmem=1
The “-P” is going to make the value persistent over reboots.
Note, the official manual for the SELinux boolean. By enabling the httpd_execmem, several SELinux rules are applied, which may make the web server less secure, because the web server process is allowed to execute code in the memory.
– httpd_execmem
When enabled, this Boolean allows httpd to execute programs that require memory addresses that are both executable and writable. Enabling this Boolean is not recommended from a security standpoint as it reduces protection against buffer overflows, however certain modules and applications (such as Java and Mono applications) require this privilege.
We use technologies like cookies to store and/or access device information. We do this to improve browsing experience and to show (non-) personalized ads. Consenting to these technologies will allow us to process data such as browsing behavior or unique IDs on this site. Not consenting or withdrawing consent, may adversely affect certain features and functions.
Functional
Always active
The technical storage or access is strictly necessary for the legitimate purpose of enabling the use of a specific service explicitly requested by the subscriber or user, or for the sole purpose of carrying out the transmission of a communication over an electronic communications network.
Preferences
The technical storage or access is necessary for the legitimate purpose of storing preferences that are not requested by the subscriber or user.
Statistics
The technical storage or access that is used exclusively for statistical purposes.The technical storage or access that is used exclusively for anonymous statistical purposes. Without a subpoena, voluntary compliance on the part of your Internet Service Provider, or additional records from a third party, information stored or retrieved for this purpose alone cannot usually be used to identify you.
Marketing
The technical storage or access is required to create user profiles to send advertising, or to track the user on a website or across several websites for similar marketing purposes.