Technical details of Fedora Workstation 31 (Gnome GUI)

This article is for those of you who do not want to install a whole new operating system only to discover some technical details about the default installation like disk layout, packages included, software versions, and so on. Here we are going to review in several sections what is like to have a default installation of Fedora Workstation 31 (Gnome) using a real not virtual machine!
The kernel is 5.3.7 it detects successfully the Threadripper 1950X AMD and the system is stable (we booted in UEFI mode).

Software

With Fedora 31 (Workstation Edition) you can have

  • linux kernel – 5.3.7 (5.3.7-301.fc31.x86_64)
  • Graphical User Interface
    • Xorg X server (Xwayland) – 1.20.5
    • GNOME (the GUI) – 3.34.1
    • K Desktop Environment – ships with https://spins.fedoraproject.org/en/kde/ Use this spin to install KDE.
  • System
    • linux-firmware – version: 20190923, release: 20191022-103.fc31.
    • QT – 5.12.5
    • libc – 2.30
    • GNU GCC – 9.2.1
    • OpenSSL – 1.1.1d
    • coreutils – 8.31
    • yum – Depricated and replaced with dnf
    • dnf – 4.2.9
    • cups – 2.2.12
    • rsyslog – 8.1907.0
    • NetworkManager – 1.20.4
  • Servers
    • Apache – 2.4.41
    • Nginx – 1.16.1
    • MySQL server – 8.0.17
    • MariaDB server – 10.3.17
    • PostgreSQL – 11.5
  • Programming
    • PHP – 7.3.10
    • python – 2.7.17 and also includes 3.7.4
    • perl – 5.30.0
    • ruby – 2.6.5
    • OpenJDK – 11.0.4.11 and also includes 1.8.0.222.b10
    • Go – 1.13.1
    • Rust – 1.38.0
    • Subversion – 1.12.2
    • Git – 2.23.0

Note: Not all of the above software comes installed by default. The versions above are valid for the intial release so in fact, these are the minimal versions you get with Fedora 31and installing and updating it after the initial date may update some of the above packages with new versions.
The installation procedure you can find here – Install Fedora Workstation 31 (Gnome GUI).
Installed packages are 1653 occupying 6.9G space:.

[root@srv ~]# dnf list installed|wc -l
1653
[root@srv ~]# df -h /
Filesystem                               Size  Used Avail Use% Mounted on
/dev/mapper/fedora_localhost--live-root   69G  6.9G   59G  11% /

Keep on reading!

Install Fedora Workstation 31 (Gnome GUI)

This tutorial will show you the simple steps of installing a modern Linux Distribution like Fedora 31 Workstation with Gnome for the user graphical interface. First, we present the basic steps for installing the Operating system in addition to your present operating systems (here we also have Windows 10) and then you can see some screenshots of the installed system and the look and feel of it. We have other tutorials showing more screenshots of the installed and working Fedora 31 (Gnome and KDE plasma) – so you can decide which of them to try first – coming soon.

The Fedora 31 Workstation comes with

  • Xorg X server – 1.20.5 XWayland is used by default
  • GNOME (the GUI) – 3.34.1
  • linux kernel – 5.3.7

Check out our article about what software is included in comming soon.

The installation process is very similar to the old Fedora Workstation 27, Fedora Workstation 28, Fedora Workstation 29, Install Fedora Workstation 30 (Gnome GUI) , in fact the main difference is the creation of an user, which the setup is not responsible anymore, the creation of an user is done by the first boot after installation. Our system was pretty good – Asus X399 with AMD Ryzen Threadripper 1950X and NVIDIA 1080 Ti and the setup loaded successfully and there were no problems till the end.

We used the following ISO for the installation process:

https://download.fedoraproject.org/pub/fedora/linux/releases/31/Workstation/x86_64/iso/Fedora-Workstation-Live-x86_64-31-1.9.iso

It is a LIVE image so you can try it before installing. The easiest way is just to download the image and burn it to a DVD disk and then follow the installation below:

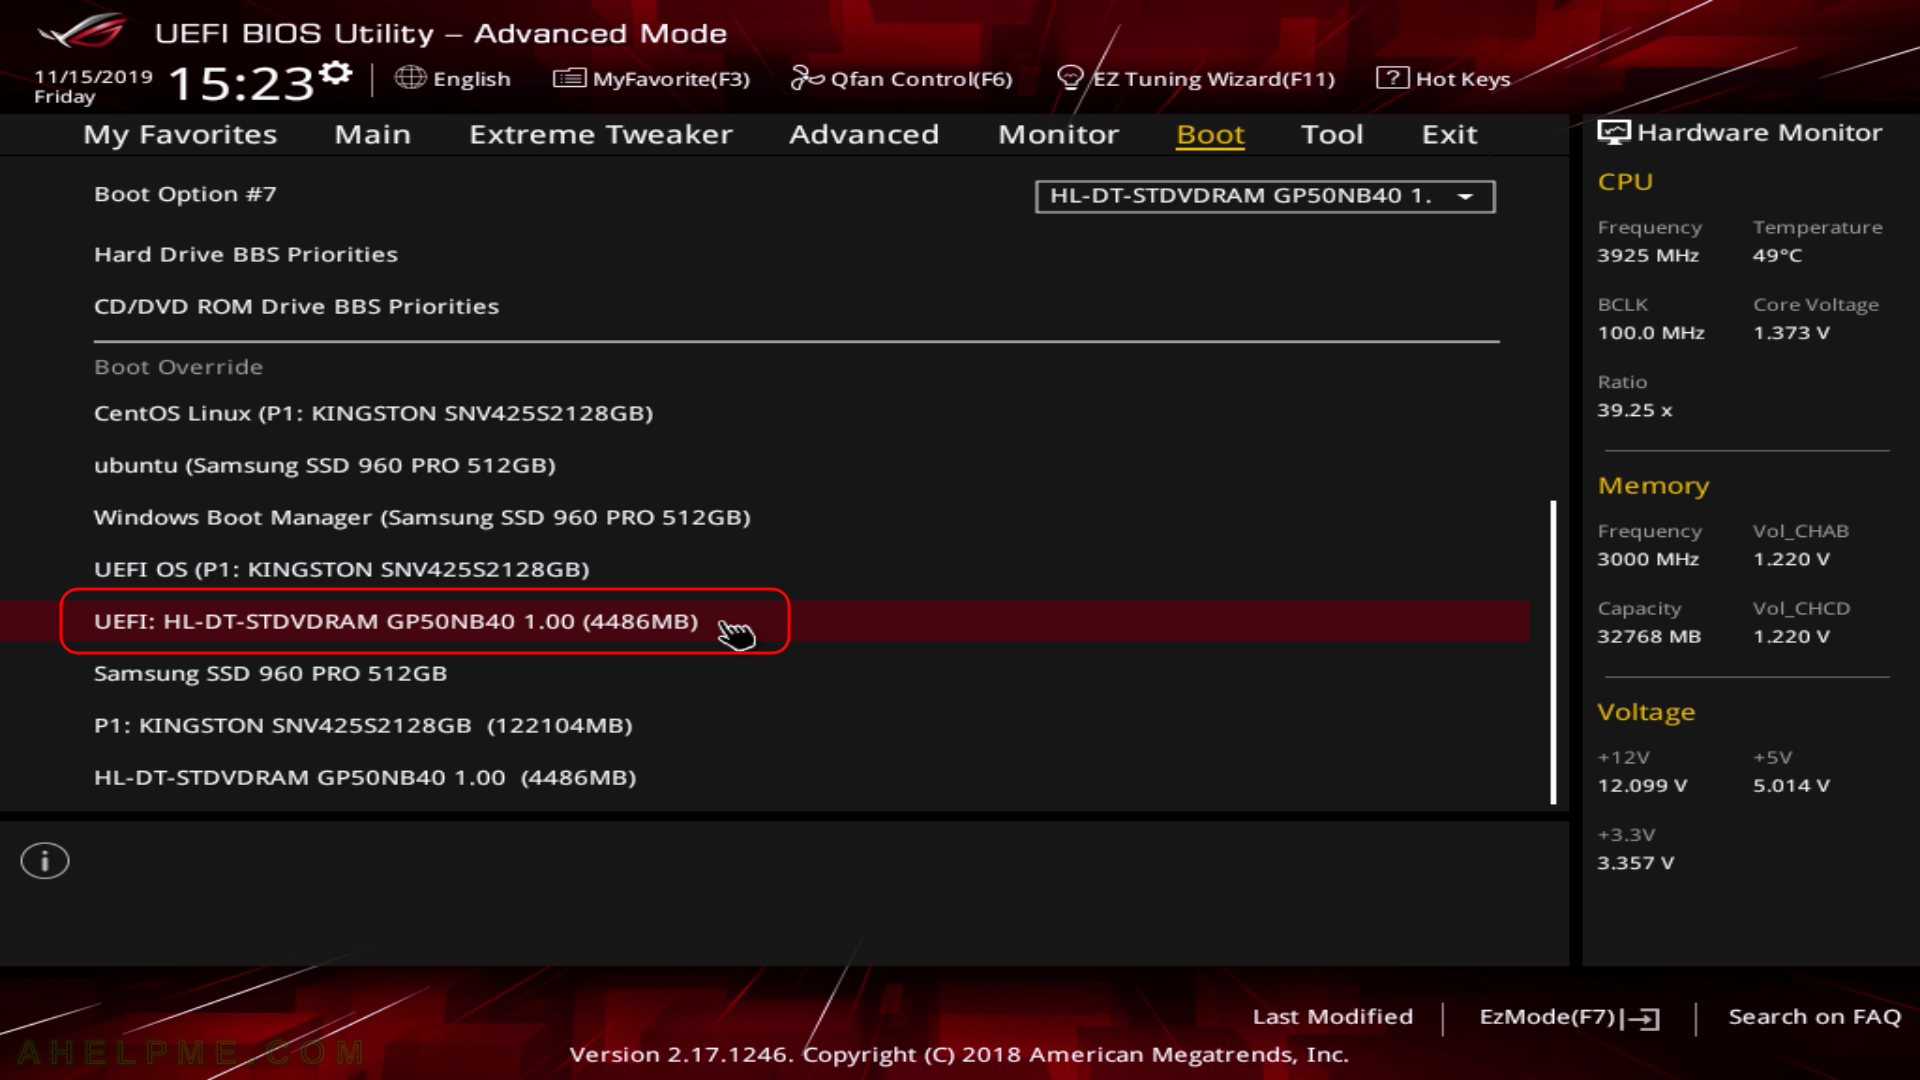
SCREENSHOT 1) Here is our “UEFI BIOS->Boot->Boot Override” and in most modern motherboard you can choose to override the default boot devices.

Choose the “UEFI: HL-DT-STDVDRAM…” to boot and install Fedora Workstation 31 with UEFI support. You should do this, because most of the new hardware like video cards would not work properly without beeing in UEFI mode.

main menu
Boot from DVD/USB Installation

Keep on reading!

Install CentOS 8 over the old OS and preserve the storage partitions

Always put your root partition separate from the storage (aka data) partitions. root partition should be only for system files and nothing more! Keeping this simple rule you may easily change your operating system (or clean install or clean upgrade) without deleting the user’s data thus preserving the old storage partitions.
Our storage has 2 storage partitions, which means they hosts only data and no system files and there are separate partitions for Linux booting (grub2) and system files (root partition). Here is the partitions layout:

[root@srv0 ~]# parted /dev/sda --script print
Model: AVAGO SMC3108 (scsi)
Disk /dev/sda: 48.0TB
Sector size (logical/physical): 512B/4096B
Partition Table: gpt
Disk Flags: 

Number  Start   End     Size    File system  Name  Flags
 1      1049kB  53.7GB  53.7GB                     raid
 2      53.7GB  54.8GB  1075MB                     raid
 3      54.8GB  55.0GB  211MB   fat16              raid
 4      55.0GB  69.4GB  14.4GB                     raid
 5      71.8GB  48.0TB  47.9TB  ext4

[root@srv0 ~]# parted /dev/sdb --script print
Model: AVAGO SMC3108 (scsi)
Disk /dev/sdb: 48.0TB
Sector size (logical/physical): 512B/4096B
Partition Table: gpt
Disk Flags: 

Number  Start   End     Size    File system  Name  Flags
 1      1049kB  53.7GB  53.7GB                     raid
 2      53.7GB  54.8GB  1075MB                     raid
 3      54.8GB  55.0GB  211MB   fat16              raid
 4      55.0GB  69.4GB  14.4GB                     raid
 5      71.8GB  48.0TB  47.9TB  ext4
[root@srv0 ~]# df -h
Filesystem      Size  Used Avail Use% Mounted on
devtmpfs         16G     0   16G   0% /dev
tmpfs            16G     0   16G   0% /dev/shm
tmpfs            16G  250M   16G   2% /run
tmpfs            16G     0   16G   0% /sys/fs/cgroup
/dev/md127       50G  1.7G   45G   4% /
/dev/md125      991M  133M  792M  15% /boot
/dev/md124      201M   12M  190M   6% /boot/efi
/dev/sda5        44T   23T   22T  52% /mnt/storage1
/dev/sdb5        44T   14T   30T  32% /mnt/storage2
tmpfs           3.2G     0  3.2G   0% /run/user/0

Of course, when there are partitions above 2T the GPT is mandatory.
You can skip the software RAID1 setup if you use only one controller or you have system partitions only in one disk (virtual drive and so on). Here we have two hardware controllers, which we want to use both for the system partitions.
4 RAID1 devices:

  1. EFI partition (/boot/efi)
  2. swap partition
  3. boot parition (/boot)
  4. root partition (/)

The best practice is have total between 30G and 50G for the 4 partitions (in fact, boot partition could be skipped). Have in mind most modern Linux distributions cannot be installed on less than 10G~20G and for optimal results just separate between 30G and 50G for 4 partitions above (or 3 if you choose to skip the boot one).

Upgrade to CentOS 8 with clean install over our old CentOS 7 system partitions preserving the big data partitions.

Couple of things before start:

  • UEFI installation will be selected. So boot in UEFI mode.
  • IPMI KVM is used to install the new Linux distribution – CentOS 8
  • The installation disk is mounted in the Virtual CD/DVD IPMI KVM device – with Mount and boot ISO file from windows share in Supermicro IPMI Virtual media (CD-ROM)
  • All system parititions will be removed (grub, boot, root) and a clean minimal installation will be performed.
  • Network installation – using CentOS-8-x86_64-1905-boot.iso

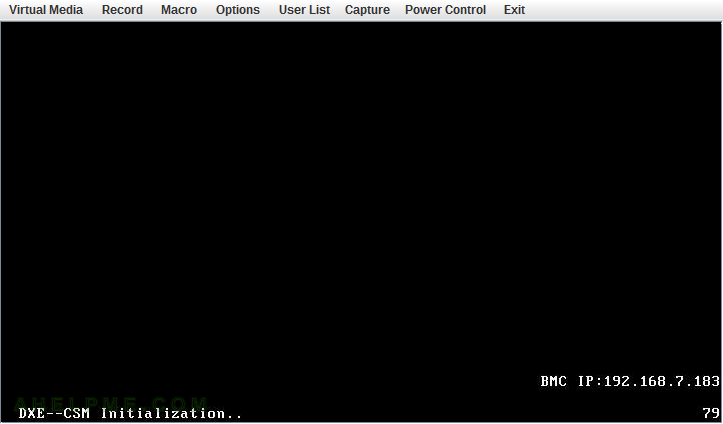
SCREENSHOT 1) The Server is starting. This is the IPMI KVM window. Press F11 to Boot in Boot Menu.

main menu
SUPERMICRO Server starting – KVM

Keep on reading!

Install gitlab-ce (community edition) in docker container with HTTPS and docker registry

This article is a howto install of the official docker gitlab-ce (GitLab Community Edition). GitLab maintains a docker image in the Docker registry and this is the best way to install GitLab.
In this article you are going to learn how:

  • to install the GitLab CE in docker
  • to enable HTTPS (SSL) web support to your GitLab
  • to enable the docker registry functionality of GitLab

To install GitLab docker image in your Linux distribution all you need is a working docker environment and started docker daemon. As you know, installing software with docker will allow you to keep your main system clean and let you use a fined tuned installation from the official developer (creator). As mentioned already, the GitLab maintains an official GitLab image in the Docker Registry so you may expect everything to work smoothly and better than if you make an installation in a clean Linux distribution like CentOS, Ubuntu and so on. In this article, we will include the most important docker commands to control and configure the GitLab docker container and even if you are not familiar with the Docker software they are simple enough to use them and prefer this method over GitLab normal installation.

GitLab has integrated the Docker Container Registry in GitLab Container Registry and now with GitLab you can have a local Docker registry containing all project’s docker images!

Just to note, the Docker Registry is the place for the Docker (aka Linux) images.
Using GitLab Container Registry with CI/CD (continuous integration and continuous delivery) you can create automatically test, staging, development and production docker images.
Keep on reading!

Debug Ubuntu preseed failure – select and install software

Preparing the preseed for unattended installation sometimes could be challenging. This article presents the right way to analyze an installation failure in one of the main steps – “select and install software”.
There is a ubuntu installation preseed file for our Bionic unattended installation, which uses the “pkgsel” to install first packages in the new system:

d-i pkgsel/include string openssh-server wget vim git python gpg ntp
d-i pkgsel/upgrade select full-upgrade
d-i pkgsel/update-policy select unattended-upgrades

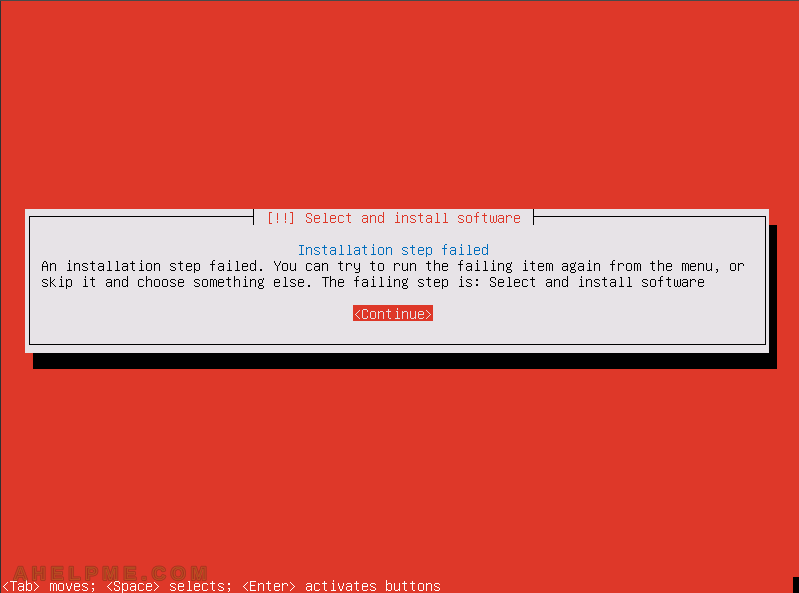
When an installation step in the preseed of a unattended installation fails the setup stops with a “Continue” confirmation.

main menu
“select and install software” – step failed

Here is what you can do to check what exactly fails in step “select and install software”:

  1. Start a shell in the current installation boot. Press “Ctrl+Alt+F2” to start the shell. You may use “Ctrl+Alt+F3” and “Ctrl+Alt+F4” for two more consoles and “Ctrl+Alt+F1” to return to the installation wizard.
  2. Check the /var/log/syslog, in which file the debconf writes the logging information.
  3. Find the lines where the step “select and install software” starts and look for errors after that. In this file, you can see all the step titles during, which the setup passes and they are named the same way the windows’ titles during the installation wizard.

Here is the real world output

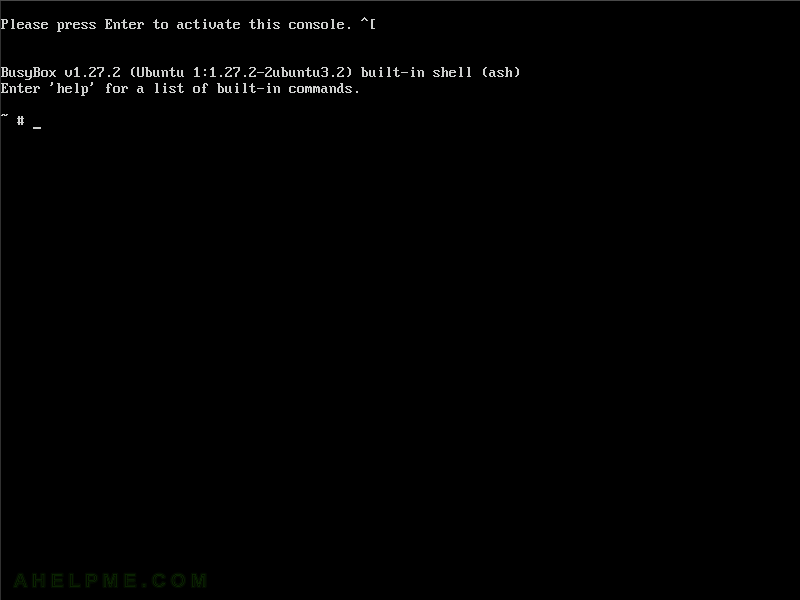
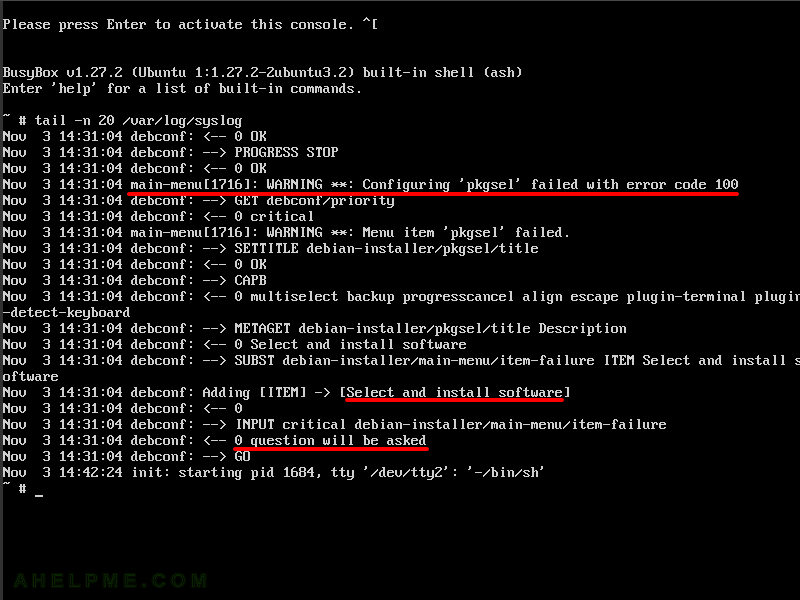
Presing the “CTRL+ALT+F2” to start the BusyBox built-in shell, which is ash not bash!

Be careful there are some difference between ash and bash.

main menu
Installation wizard – BusyBox built-in shell (ash)

Last 20 lines shows the problem – pkgsel failed to install packages in step “select and install software”.

The installation wizard stops.

main menu
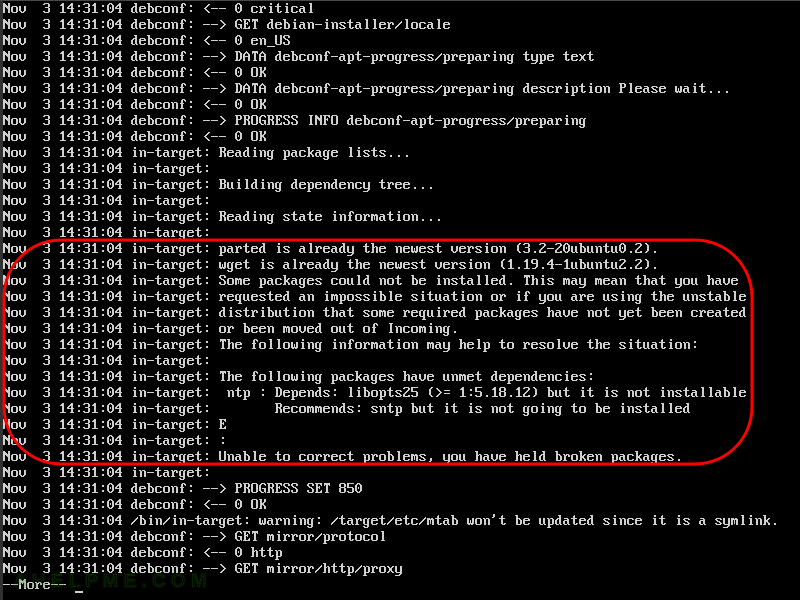
debconf logging using syslog – pkgsel

The problem is in the package “ntp”, the setup cannot install the “ntp” package because of unmet dependencies.

Because it is not so important to install ntp at this stage we added the package to the script executed in “preseed/late_command” and removed the package from the pkgsel line in the preseed file. In general, our problem was because we set local repositories for the bionic packages, but the setup cannot update list of available packages when the you set Bionic mirror to be unofficial local repository.

main menu
Package because of unmet dependencies

bonding – write error – device or resource busy – operation not permitted

Recently, there was a little bit of confusion when following the article about activating network bonding without ifenslave – How to enable Linux bonding without ifenslave. At first, there were couple of errors:

livecd ~ # echo balance-alb > /sys/class/net/bond0/bonding/mode
-bash: echo: write error: Device or resource busy
livecd ~ # echo "+enp129s0f0" > /sys/class/net/bond0/bonding/slaves
-bash: echo: write error: Operation not permitted

Or similar error when changing the bonding mode:

livecd ~ # echo 4 > /sys/class/net/bond0/bonding/mode
-bash: echo: write error: Directory not empty
livecd ~ # echo 802.3ad > /sys/class/net/bond0/bonding/mode
-bash: echo: write error: Directory not empty

The server just booted in rescue live cd and there is no active network configuration:

SCREENSHOT 1) Apparently, the /sys/class/net/bond0/bonding/mode and /sys/class/net/bond0/bonding/slaves are in read only state.

No writes means no new configuration could be installed and the bonding cannot be configured (reconfigured).

main menu
device or resource busy – operation not permitted

Bonding mode could be changed only when the bonding device is in DOWN state.

Network interfaces could be added to the boding device only if they were in DOWN state, too.

In addition, changing bonding mode could only happen if there were no network interfaces added to the bonding interface.

Keep on reading!

Adding bonding interface to CentOS 8 – editing configuration files only

This article shows what files to add if you want to add a bonding interface under CentOS 8 without invoking the Network manager command utility.
Our goal is to use one boding group with the name bond0 in LACP (aka 802.3ad) mode (but it could be any of the other types) with two networks 10Gbps interfaces. The setup resented here uses NetworkManager, which handles the loading of bonding module properly.

In fact, the network-scripts are now deprecated and they are missing from the system (but they still exist in the additional package – “network-scripts”, who knows till when? do not rely on them!).

The configuration files are with the same syntax as under CentOS 7, but this time the network manager parses them. The ifup and ifdown still exist and they just call the Network manager when executed (unless the “network-scripts” package is installed). If you need to enable bonding without any configuration files (for emergency situations) you may still use – How to enable Linux bonding without ifenslave

What do you need:

  • Ensure you have installed: “iputils” and “NetworkManager” packages
    dnf install -y NetworkManager iputils
    
  • Ensure the NetworkManager service is running
    systemctl enable NetworkManager
    systemctl start NetworkManager
    

STEP 1) Configure the bonding device

The boding interface’s name will be bond0 and the configuration will be located in /etc/sysconfig/network-scripts/ifcfg-bond0

BONDING_OPTS="mode=4 miimon=100"
TYPE=Bond
BONDING_MASTER=yes
BOOTPROTO=none
IPADDR0=192.168.0.100
PREFIX0=24
GATEWAY0=192.168.0.1
DNS1=8.8.8.8
DNS2=8.8.4.4
IPV4_FAILURE_FATAL=no
NAME=bond0
UUID=e19e2059-2e31-4143-915a-cdc11d19c9d6
DEVICE=bond0
ONBOOT=yes

Keep on reading!

CentOS 8 dracut-initqueue timeout and could not boot – warning /dev/disk/by-id/md-uuid- does not exist – inactive raids

Booting the CentOS 8 failed with

dracut-initqueue timeout and could not boot – warning /dev/disk/by-id/md-uuid- does not exist

we have an article on the subject for CentOS 7 – CentOS 7 dracut-initqueue timeout and could not boot – warning /dev/disk/by-id/md-uuid- does not exist and we continue with another issue with the same error.
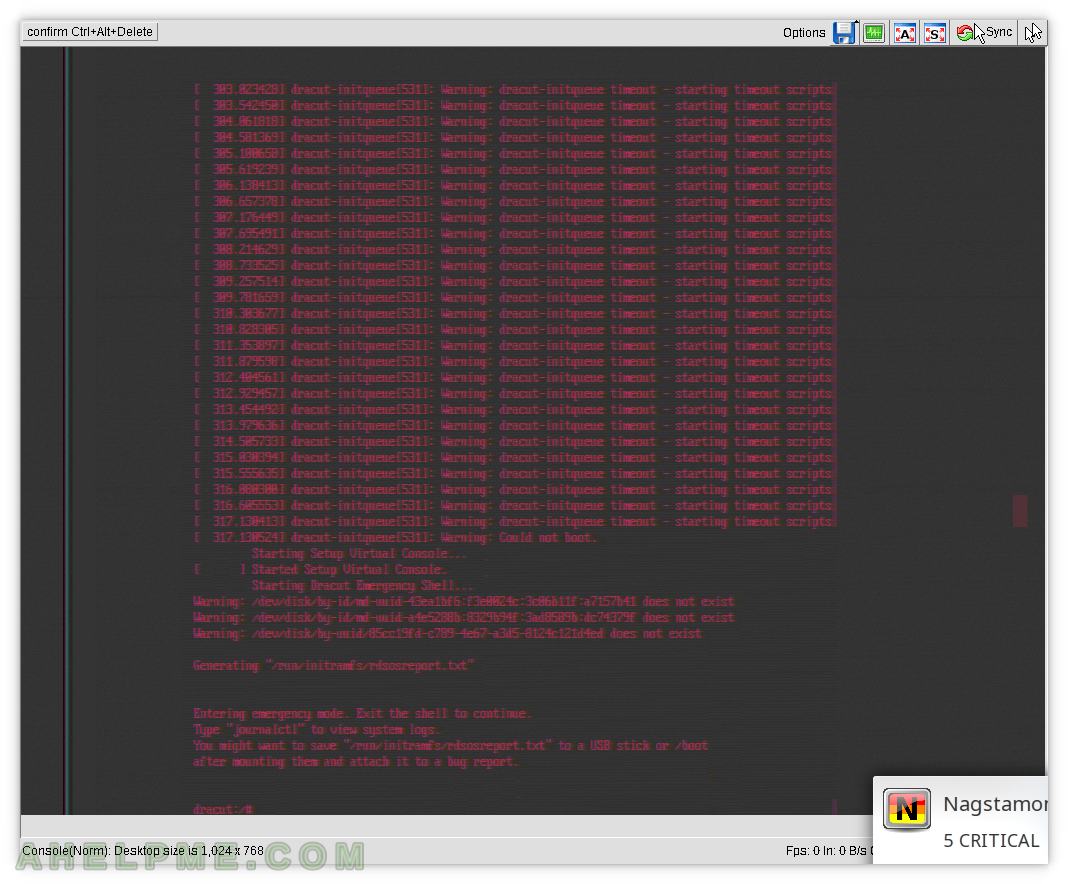
Most times when you get this error there is a mistake in some UUID for the file system or the RAID devices. But this time our software raid was autodetected with the right disks but it ended in INACTIVE STATE. Software raid in INACTIVE STATE cannot be used so we are in “Emergency mode”:

SCREENSHOT 1) Without root partition the boot process enters the dracut emergency mode.

main menu
Entering emergency mode

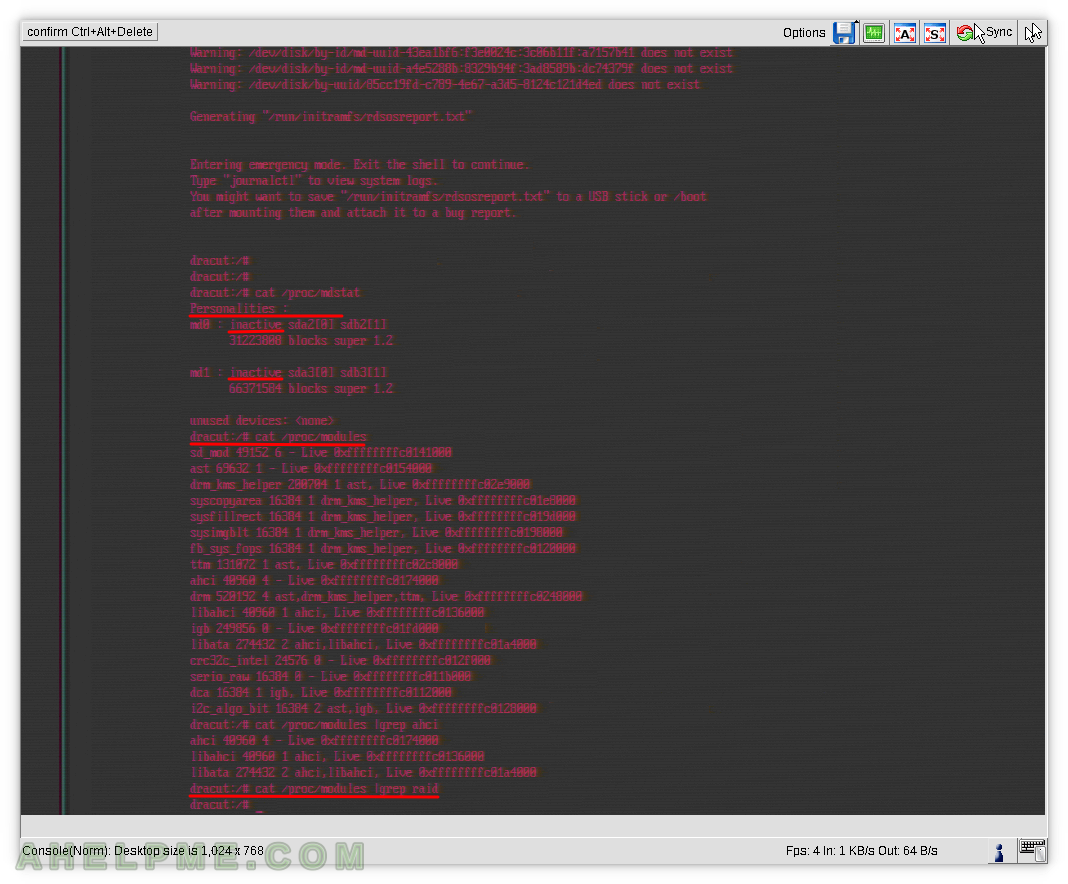
SCREENSHOT 2) Software md raid device information – missing “Personalities” for the raid groups.

Loaded modules in the kernel and missing raid kernel modules.

main menu
Missing raid1 kernel module in initram file

To summarize it up:

  • The disks are detected, so we drivers for SATA/SAS controller is loaded correctly.
  • The software raid autodetected the MD devices, but they are in “INACTIVE STATE”. The RAID “Personalities” is missing.

Keep on reading!

Gentoo – updating perl and problems like perl-core/ is blocking virtual/perl-

When upgrading Perl under Gentoo it’s almost typical to have blocks of the kind:

[blocks B      ] <perl-core/File-Path-2.160.0 ("<perl-core/File-Path-2.160.0" is blocking virtual/perl-File-Path-2.160.0)
[blocks B      ] <perl-core/Module-CoreList-5.201.905.220 ("<perl-core/Module-CoreList-5.201.905.220" is blocking virtual/perl-Module-CoreList-5.201.905.220)
[blocks B      ] <perl-core/Archive-Tar-2.320.0 ("<perl-core/Archive-Tar-2.320.0" is blocking virtual/perl-Archive-Tar-2.320.0)

These blocks appeared when we tried updaring the Perl 5.26 to 5.30 (dev-lang/perl-5.30.0:0/5.30::gentoo from dev-lang/perl-5.26.2:0). This update is a major update.
So what does it mean?
The virtual package and the perl-core package should be the same version, but it appears there are no corresponding same versions to the virtual package versions (). The problem is that the update depends on a newer version of File-Path, Module-CoreList, and Archive-Tar but there are only virtual packages with the required versions. Virtual packages are just meta-packages and they do not install any module. First, what are the virtual/[perl-module] and perl-core/[perl-module]:

  • perl-core/[perl-module] – perl independent modules. In fact, the same module may be independent and it may be part of the build-in packages from the Perl main package – dev-lang/perl. Sometimes you may choose the independent package, because of a newer version than the version included in the dev-lang/perl package.
  • virtual/[perl-module] – perl meta-package, which ensures the installation of the module. The module could be an independent package from above or module, which is included in the main Perl package (in dev-lang/perl)

To solve the blocks of this kind “perl-core/ is blocking virtual/perl-” you must check for a newer version of perl-core/* if there is no newer version, just to remove the package and let the setup (emerge) use the module included in dev-lang/perl.

In our case, there are no newer versions of the three packages and we remove them with:

emerge -Cv perl-core/File-Path perl-core/Module-CoreList perl-core/Archive-Tar

And then emerge with no problems the new version of Perl with:

emerge --verbose --verbose-conflicts --backtrack=200000 $(qlist -IC|grep perl|sort|uniq) media-gfx/inkscape media-gfx/imagemagick dev-php/pecl-imagick

For detail explaination of why we use verbose-conflicts, backtrack, qlist and three excplicitly added packages you may read our article on similar subject – Gentoo updating perl with many masked and blocked packages
You may read the offcial documentation for more information – https://wiki.gentoo.org/wiki/Perl#Introduction

Updating our Perl from dev-lang/perl-5.26.2:0 to dev-lang/perl-5.30.0:0/5.30

Keep on reading!

nano – Error opening terminal: unknown under chroot or (docker) container

A quick tip for GNU Nano – the text editor. Ever receiving the terminal error when using nano?

[root@srv ~]# nano                                                        
Error opening terminal: unknown.
[root@srv ~]#

Under chroot or container (like docker) environment try exporting the TERM environment:

export TERM=linux

And then execute nano the chances are you will enter nano normally and do your work (faster than vim 🙂 )?

You may use it without exporting to your shell, but just the for the nano:

TERM=linux nano