Install CentOS Stream 9 booting VNC installer with kexec

Lately, dedicated servers come with Remote management consoles like IPMI KVM or iLO, or DRAC, but they are still slow to initiate the process of installing a system.

main menu
kexec execute

Consider a server (dedicated or not) should be installed in a remote colocation with the help of only the server’s network. The system administrator just receives an administrative shell access and nothing more and the server should be installed with the proper and secured software, in this case, the CentOS Stream 9. Using kexec the user can boot a new kernel from a different Linux Distribution and initiate automated network installation of the system and it is not needed any Remote management consoles. The only thing needed is the ability of the current system/kernel to be able to use kexec, which is pretty standard for 8 to 10 years old Linux systems. There is a good chance the colocations’ rescue CD/DVD/USB flash drives or the PXE rescue images support kexec, because they tend to upgrade their rescue systems, which the user may boot if he has problems.
Still, using kexec to initiate another kernel or Linux Distribution like CentOS Stream 9 with VNC installer, for example, it a powerful tool to safely replace a currently running system with only shell access.
This article has chosen to start the CentOS Stream 9 VNC installer just for demonstration purposes. Booting a downloaded kernel may be used for just anything from booting a system over the network, booting an installer, booting an unattended automation installation, and so on. There are a couple of simple things to check before booting the new kernel.
This article will show just one use case – reinstalling a system with CentOS Stream 9 over the network using the CentOS VNC Install. The purpose is to show how simple, fast, and easy is to install a modern Linux system only by having console access. No scripts are required if manual installation is performed.
To boot a CentOS Stream 9 VNC Installer the kexec command needs the following options.

The kexec commands need the following options:

  • Networkingdevice interface name, IP, netmask, gateway and DNS servers
  • Kernel options – these options will initiate scripts from the initramfs.
  • inst.vnc – a kernel option, which will start a VNC server with no password on the default port and network device. Using it with another inst.vncpassword=[PASSWORD] the VNC server will require the password – [PASSWORD]. The password should be a maximum of 8 characters because the VNC server will not start if it is with more!
  • inst.repo=[HTTP/HTTPS://repository] – a kernel option, which sets the CentOS HTTP/HTTPS repository.

The kexec command to boot the CentOS Stream 9 VNC Installer is:

kexec --initrd=./initrd.img -l ./vmlinuz --command-line="bootdev=eno1 ip=10.10.10.20::10.10.10.1:24:srv.example.com:eno1:none nameserver=8.8.8.8 inst.vnc inst.vncpassword=cha3hae4ahZaqueev1ee inst.repo=https://mirror.stream.centos.org/9-stream/BaseOS/x86_64/os/"

The kernel (i.e. vmlinuz) and the initramfs (i.e. initrd.img) should be downloaded in the current directory before executing the above command. The above line will order the kernel to load the new kernel, but to boot it another command must be executed:

kexec -e

Keep on reading!

lxc_attach_run_shell: 1333 Permission denied – failed to exec shell

An annoying error when using the LXC container tools like lxc-attach, which is really simple to fix.

[root@srv ~]# lxc-attach -n db-cluster-3
lxc_container: attach.c: lxc_attach_run_shell: 1333 Permission denied - failed to exec shell
[root@srv ~]#

This error just reports the bash shell in the container cannot be started and the SELinux audit file adds some errors, too:

type=AVC msg=audit(1665745824.682:24229): avc:  denied  { entrypoint } for  pid=20646 comm="lxc-attach" path="/usr/bin/bash" dev="md3" ino=111806476 scontext=system_u:system_r:unconfined_service_t:s0 tcontext=unconfined_u:object_r:var_log_t:s0 tclass=file
type=SYSCALL msg=audit(1665745824.682:24229): arch=c000003e syscall=59 success=no exit=-13 a0=24412c6 a1=7ffe87c07170 a2=2443870 a3=7ffe87c08c60 items=0 ppid=20644 pid=20646 auid=0 uid=0 gid=0 euid=0 suid=0 fsuid=0 egid=0 sgid=0 fsgid=0 tty=pts12 ses=3304 comm="lxc-attach" exe="/usr/bin/lxc-attach" subj=unconfined_u:unconfined_r:unconfined_t:s0-s0:c0.c1023 key=(null)
type=PROCTITLE msg=audit(1665745824.682:24229): proctitle=6C78632D617474616368002D6E0064622D636C75737465722D33
type=AVC msg=audit(1665745824.682:24230): avc:  denied  { entrypoint } for  pid=20646 comm="lxc-attach" path="/usr/bin/bash" dev="md3" ino=111806476 scontext=system_u:system_r:unconfined_service_t:s0 tcontext=unconfined_u:object_r:var_log_t:s0 tclass=file
type=SYSCALL msg=audit(1665745824.682:24230): arch=c000003e syscall=59 success=no exit=-13 a0=7f08b5e579a0 a1=7ffe87c07170 a2=2443870 a3=7ffe87c08c60 items=0 ppid=20644 pid=20646 auid=0 uid=0 gid=0 euid=0 suid=0 fsuid=0 egid=0 sgid=0 fsgid=0 tty=pts12 ses=3304 comm="lxc-attach" exe="/usr/bin/lxc-attach" subj=unconfined_u:unconfined_r:unconfined_t:s0-s0:c0.c1023 key=(null)
type=PROCTITLE msg=audit(1665745824.682:24230): proctitle=6C78632D617474616368002D6E0064622D636C75737465722D33

So clearly, the problem is in SELinux, and turn it off temporarily with

setenforce 0

Turning off the SELinux is not the right thing! There are two aspects to the problem:

  • Missing SELinux rules, which are installed with a special package container-selinux
  • Wrong SELinux permissions for the LXC container’s root directory. In most cases, the user just changes the default /var/lib/lxc/[container] to something new and the LXC works, but it breaks some LXC parts.

Installing container-selinux is easy:

dnf install -y container-selinux

Or the old yum:

yum install -y container-selinux

Then check the SELinux attributes with:

[root@srv ~]# ls -altrZ /mnt/storage/servers/mycontainer/
drwxr-xr-x. root root unconfined_u:object_r:var_log_t:s0 ..
-rw-r--r--. root root unconfined_u:object_r:var_log_t:s0 config
drwxrwx---. root root unconfined_u:object_r:var_log_t:s0 .
drwxr-xr-x. root root unconfined_u:object_r:var_log_t:s0 rootfs

The problem is var_log_t, which is an SELinux file context and it should be container_var_lib_t. Stop the container and fix the permissions. If the default directory (/var/lib/lxc) were used, it would not have this problem. Adding the SELinux file context definition to the new directory is mandatory when changing the directory root of a container:

[root@srv ~]# semanage fcontext -a -t container_var_lib_t '/mnt/storage/servers/mycontainer(/.*)?'
[root@srv ~]# restorecon -Rv /mnt/storage/servers/mycontainer/
restorecon reset /mnt/storage/servers/mycontainer context unconfined_u:object_r:var_log_t:s0->unconfined_u:object_r:container_var_lib_t:s0
.....
.....
restorecon reset /mnt/storage/servers/mycontainer/config context unconfined_u:object_r:var_log_t:s0->unconfined_u:object_r:container_var_lib_t:s0

All files permissions under /mnt/storage/servers/mycontainer/ should be fixed with the restorecon. Start the LXC container and try to attach it with lxc-attach. Now, there should not be any errors:

[root@srv ~]# lxc-attach -n mycontainer
[root@mycontainer ~]#

The files’ context is the right one – container_var_lib_t:

[root@srv ~]# ls -altrZ /mnt/storage/servers/mycontainer/
drwxr-xr-x. root root unconfined_u:object_r:var_log_t:s0 ..
-rw-r--r--. root root unconfined_u:object_r:container_var_lib_t:s0 config
drwxrwx---. root root unconfined_u:object_r:container_var_lib_t:s0 .
drwxr-xr-x. root root unconfined_u:object_r:container_var_lib_t:s0 rootfs

More on LXC containershttps://ahelpme.com/category/software/lxc/.

DNF install and conflicting requests – nothing provides module(platform:el8) needed by module

Here there are broken modules in the DNF package manager. It was a result of an upgrade, but it may occur if some unofficial repositories mess up with them:
On every DNF command, there are multiple problem-reporting lines about conflicts in different DNF modules.

[root@srv ~]# dnf info epel-release
Last metadata expiration check: 0:13:42 ago on Tue Oct 11 13:11:51 2022.
Modular dependency problems:

 Problem 1: conflicting requests
  - nothing provides module(platform:el8) needed by module httpd:2.4:8050020211112043353:b4937e53.x86_64
 Problem 2: conflicting requests
  - nothing provides module(platform:el8) needed by module nginx:1.14:8000020191007205758:55190bc5.x86_64
 Problem 3: conflicting requests
  - nothing provides module(platform:el8) needed by module nodejs:10:8030020210304194401:30b713e6.x86_64
 Problem 4: conflicting requests
  - nothing provides module(platform:el8) needed by module perl:5.26:8000020190628020724:55190bc5.x86_64
 Problem 5: conflicting requests
  - nothing provides module(platform:el8) needed by module perl-IO-Socket-SSL:2.066:8030020201222215140:1e4bbb35.x86_64
 Problem 6: conflicting requests
  - nothing provides module(platform:el8) needed by module perl-libwww-perl:6.34:8030020201223164340:b967a9a2.x86_64
 Problem 7: conflicting requests
  - nothing provides module(platform:el8) needed by module php:7.2:8020020200507003613:2c7ca891.x86_64
 Problem 8: conflicting requests
  - nothing provides module(platform:el8) needed by module satellite-5-client:1.0:8010020191114035551:cdc1202b.x86_64
 Problem 9: conflicting requests
  - nothing provides module(platform:el8) needed by module virt:rhel:8050020211221192853:b4937e53.x86_64
Installed Packages
Name         : epel-release
Version      : 9
Release      : 4.el9
Architecture : noarch
Size         : 25 k
Source       : epel-release-9-4.el9.src.rpm
Repository   : @System
From repo    : epel
Summary      : Extra Packages for Enterprise Linux repository configuration
URL          : http://download.fedoraproject.org/pub/epel
License      : GPLv2
Description  : This package contains the Extra Packages for Enterprise Linux (EPEL) repository
             : GPG key as well as configuration for yum.

The DNF package manager offers modules to group software. Each module may have one or multiple streams, representing the major version of the software it groups in a single entity. As can be seen above from the DNF output, the module name is httpd and the stream is 2.4. It is clear the module httpd is responsible for the installation of Apache Web server. More on the subject here – https://docs.fedoraproject.org/en-US/modularity/using-modules/

To fix the problems above and clear the errors just reset the modules to their initial default state with:

dnf module reset httpd

Keep on reading!

Run LXC Ubuntu 22.04 LTS container with bridged network under CentOS Stream 9

In continuation of the previous article Run LXC CentOS Stream 9 container with bridged network under CentOS Stream 9, this time the LXC container will be Ubuntu 22.04 LTS Jammy Jellyfish.
To receive a better understanding why to use LXC or a much detailed information of some steps in this article it is better to visit the previously mention article and the original Run LXC CentOS 8 container with bridged network under CentOS 8.

STEP 1) Install the needed software EPEL repository and the LXC and its dependencies

To install LXC software the EPEL CentOS Stream 9 repository must be installed. At present, the LXC included in CentOS Stream 9 EPEL repository is 4.0.

dnf install -y epel-release
dnf install -y lxc lxc-templates container-selinux
dnf install -y wget tar

lxc-templates uses template “download” to download different Linux distribution images from http://images.linuxcontainers.org/, which now redirects to http://uk.lxd.images.canonical.com/ (an Ubuntu lxd images mirror).
The container-selinux should be installed only if the host, i.e. the CentOS Stream 9 install, is with enabled SELinux. The packages offers additional SELinux rules or for the LXC and LXC tools like lxc-attach and more.

STEP 2) Create a Ubuntu 22.04 LTS with the help of LXC templates

[root@srv ~]# lxc-create --template download -n mycontainer -- --dist centos --release 9-Stream --arch amd64

In addition, there is a “–variant” option along with “--dist” and “--release” to specify which variant to install – default, cloud, desktop or other. There is a variant column in the table on the images’ page mentioned above.
Keep on reading!

Run LXC CentOS Stream 9 container with bridged network under CentOS Stream 9

In continue of the previous article with CentOS 8 – Run LXC CentOS 8 container with bridged network under CentOS 8, here is an updated version with CentOS Stream 9 running LXC container. In this case, the LXC container is CentOS Stream 9, too.
Under CentOS 8, the LXC software is from branch 3.x, but in CentOS Stream 9 the LXC is 4.x and there are some differences in the LXC configuration file.
It’s worth mentioning the differences between docker/podman containers and LXC from the previous article:

  • Multiprocesses.
  • Easy configuration modification. Even hot-plugin supported.
  • Unprivileged Linux containers.
  • Complex network setups. Multiple network interfaces connected to different networks, for example.
  • Live systemd, i.e. systemd or SysV init are booted as usual. Much of the software relies on systemd/udev features and in many cases, it is really hard to run software without a systemd or init process

Here are the steps to boot a CentOS Stream 9 container under CentOS Stream 9 host server:

STEP 1) Install EPEL repository.

EPEL CentOS Stream 9 repository now includes LXC 4.0 software.

dnf install -y epel-release

STEP 2) Install LXC software and start LXC service.

At present, the LXC software version is 4.0.12. The package lxc-templates includes template scripts to create a Linux distribution environment like CentOS, Ubuntu, Debian, Gentoo, ArchLinux, Oracle, Alpine, and many others and it also includes the configuration templates to start these Linux distributions. In fact, lxc-templates now includes a download script to download images from the Internet.

dnf install -y lxc lxc-templates container-selinux
dnf install -y wget tar

The wget and tar are required if LXC templates installation is going to be performed.
There is an additional package for container’s SELinux, which should be installed before starting the LXC service, because some of the SELinux rules may not apply in the system. If the SELinux is disabled the installation of container-selinux package might be skipped.

STEP 3) Create a CentOS Stream 9 container with the help of LXC templates and run it.

Use the lxc-templates to prepare a CentOS Stream 9 container environment. The currently available containers are listed here http://images.linuxcontainers.org/, which now redirects to http://uk.lxd.images.canonical.com/ (an Ubuntu lxd images mirror). Check out the URL and choose the right container. Here the CentOS Stream 9 amd64, i.e. release 9-Stream, is used.

[root@srv ~]# lxc-create --template download -n mycontainer -- --dist centos --release 9-Stream --arch amd64

In addition, there is a “–variant” option along with “--dist” and “--release” to specify which variant to install – default, cloud, desktop or other. There is a variant column in the table on the images’ page mentioned above.
Keep on reading!

Install CentOS Stream 9 Workstation (Gnome GUI)

This is the latest CentOS version with a graphical interface Gnome for a workstation. If you are a developer or just a Linux user, which want to have a pretty stable Operating System, the CentOS Stream 9 may be an option for you. CentOS Stream 9 is based and follows the RedHat Enterprise Linux 9 – paid Linux for the enterprise world, which is available for free thanks to the Open-source Software. CentOS Stream 9 will receive all the updates from the paid Linux system RHEL 9 and the support will be 10 years from now. 5 years of full support and 5 more years of security updates. The use of CentOS Stream 9 assures the user to have a stable and secure Linux operating system, which will not bring fundamental changes and breaks things periodically as of a more enthusiastic Linux Distributions. More information for the system here – Software and technical details of CentOS Stream 9 minimal install and Software comparison Ubuntu server 22.04 LTS vs CentOS Stream 9 head-to-head
The CentOS Stream 9 has a generic installation wizard for multiple type of installations – server, server with gui, user workstation and so on. This article is to show what options to enable to install a user workstation with CentOS Stream 9 with a graphical interface – Gnome. Most of the people think CentOS as a server Linux Distribution, but in fact, it is ideal for a workstation, too, especially with the grade of stability and security these days.
This article uses network installation with the following media: http://mirror.stream.centos.org/9-stream/BaseOS/x86_64/iso/CentOS-Stream-9-latest-x86_64-boot.iso which always points to the latest release of the CentOS Stream 9. The network installation will choose automatically the best mirror to download the packages for the system. There is an option to use an off-line installation with an 8G ISO disk. Check out for more ISOs here – http://mirror.stream.centos.org/9-stream/BaseOS/x86_64/iso/

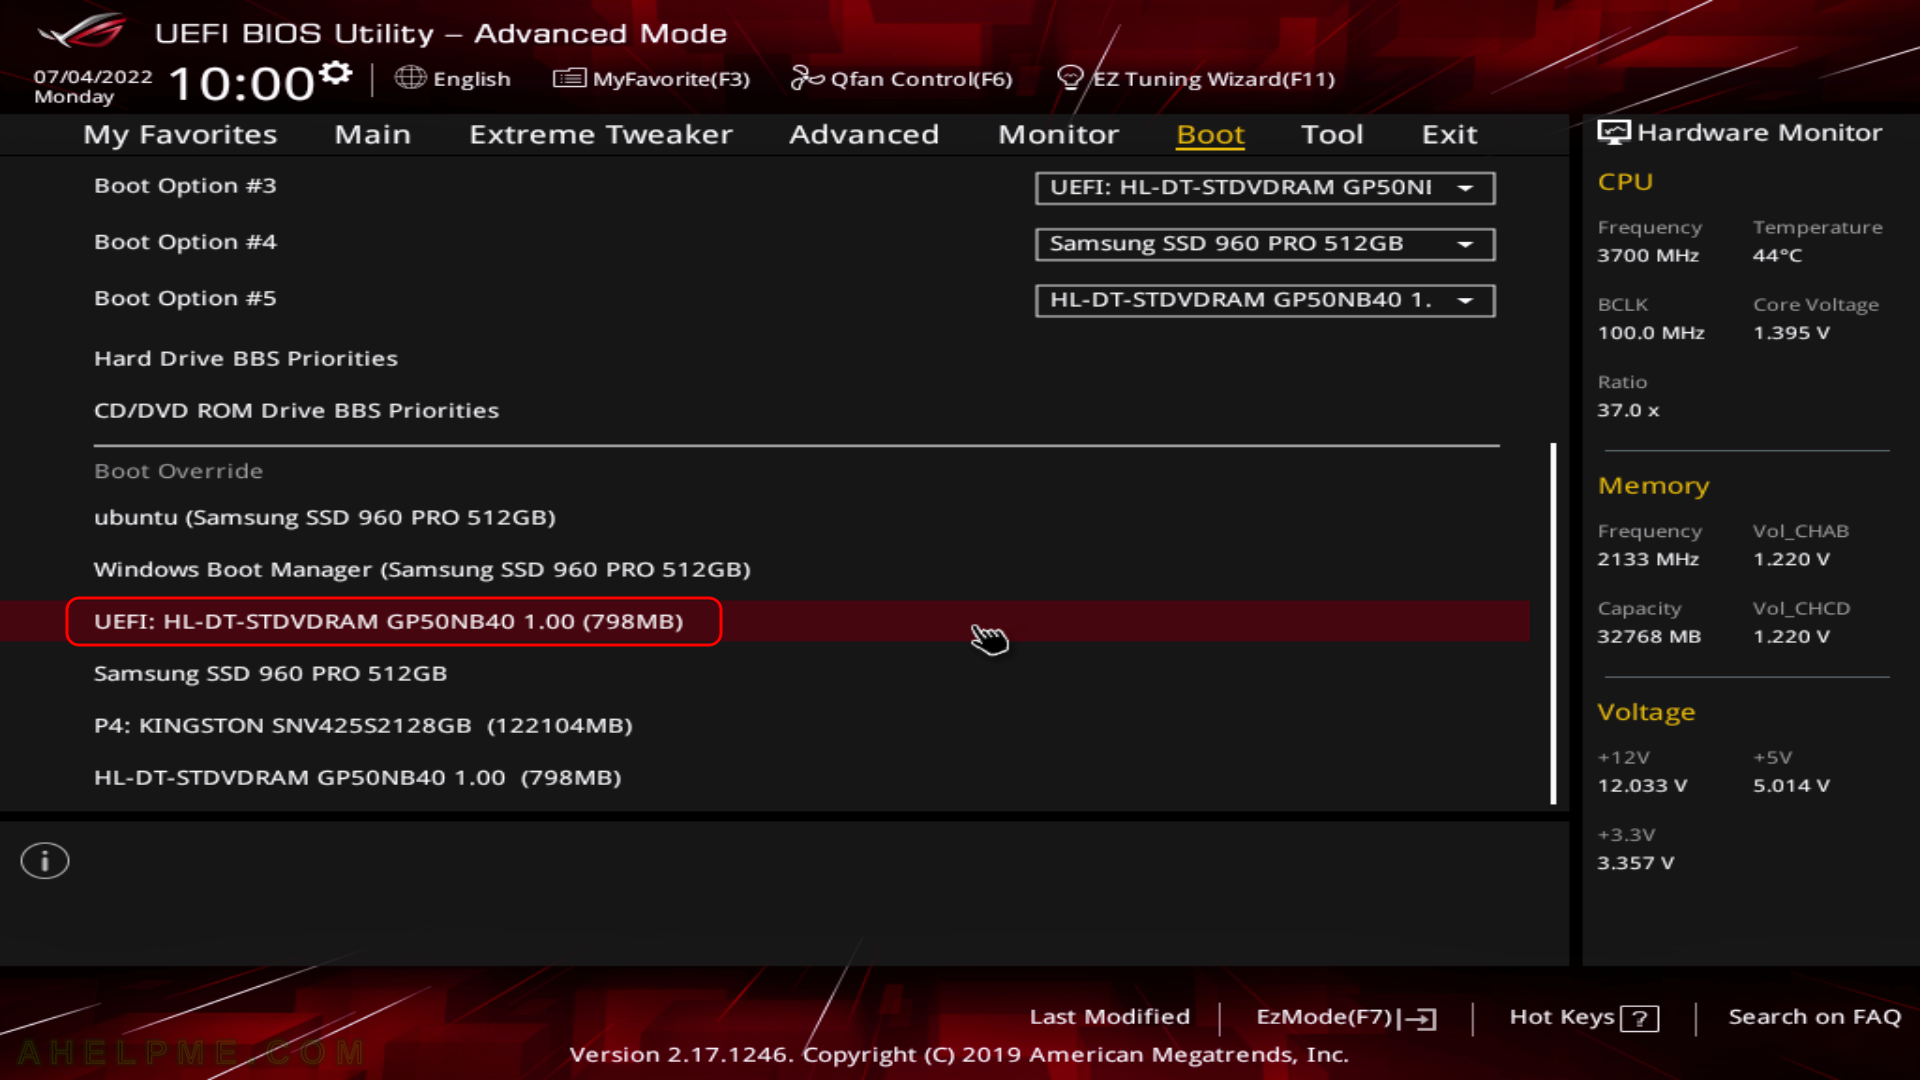
SCREENSHOT 1) Boot from the UEFI DVD-ROM device.

It is the same with the USB bootable removable drive. Choose the UEFI USB drive and boot the installation live drive.

main menu
UEFI BIOS DVD-ROM boot

Keep on reading!

Software comparison Ubuntu server 22.04 LTS vs CentOS Stream 9 head-to-head

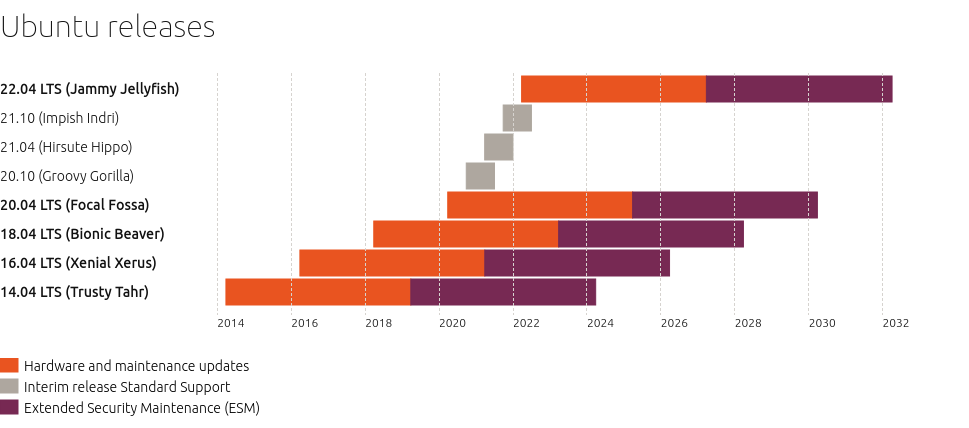
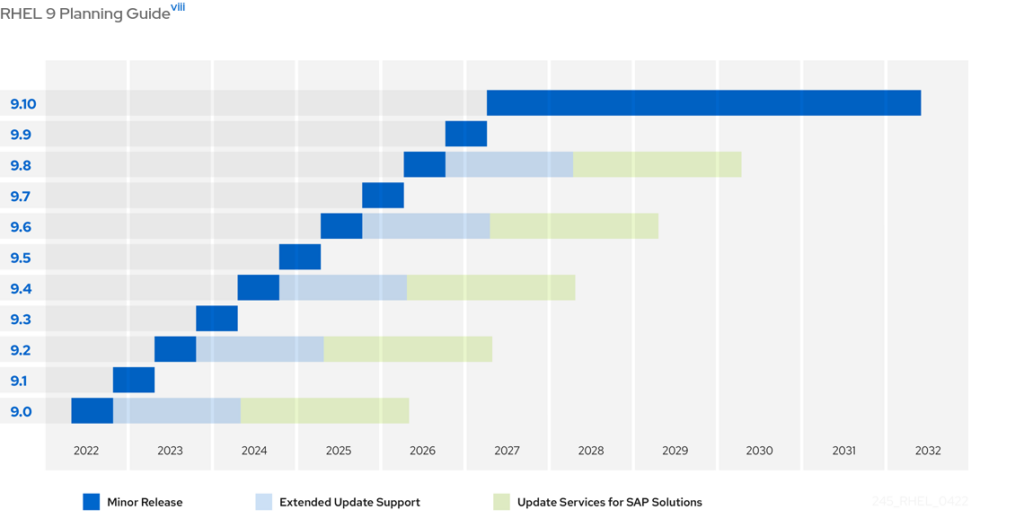
The following article compares two different and very popular for servers Linux distros with Ubuntu Server 22.04 LTS (Jammy) and CentOS Stream 9. These are the latest versions released in the past month. Bear in mind, that they have different release cycle, but the these are the system with log support up to 2032! The two Linux distors Ubuntu Server 22.04 LTS (Jammy) and CentOS Stream 9 support is till 2032! Here is the links to their life cycle and what kind of support could be expected in the time frame of 10 years:

In the Desktop world upgrading to the new and latest version of a Linux distribution is almost mandatory, but in the server world, upgrading is more complicated. The first step in updating a server is to check what software versions come with the new distribution version and then check whether the running custom (application) software supports the software versions. For example, updating to a new distribution version, which comes with PHP 8.1, but the current application supports only 7.4 is not very wise and in addition, the current version may have years of support in the future.

Lately, with the virtualization and container software and it is more common to choose a long-living Linux distribution for the host and more short-living with bleeding edge technologies for the guest environments. So check out the Fedora 36 Server Edition articles in the site – Minimal network installation of Fedora 36 Server, Software and technical details of Fedora Server 36 including cockpit screenshots and the comparison software table between Ubuntu 22.04 LTS and Fedora 36 Server EditionSoftware comparison Ubuntu server 22.04 LTS vs Fedora 36 server edition – head-to-head.

Software comparison table – Ubuntu 22.06 LTS vs CentOS Stream 9 (20220606.0) as of June 2022:

SoftwareUbuntu 22.04CentOS Stream 9
Support10 years (April 2032)10 years (31.03.2032)
Linux kernel5.15.05.14.0
libc2.352.34
OpenSSL.
3.0.2
1.1.1k
3.0.1
GNU GCC9.4.0
10.3.0
11.2.0
12-20220302
.
.
11.3.1
.
PHP8.18.0.13
Python2.7.18
3.10.4
.
3.9.10
Perl5.34.05.32.1
Ruby3.03.0.3
OpenJDK8u312-b07
11.0.15
17.0.3
18~36ea-1
1.8.0.332.b09
11.0.15.0.10
17.0.3.0.7
.
Go lang1.13.8
1.17.3
1.18.1
.
1.17.5
.
Rust1.58.11.61.0
llvm11.1.0
12.0.1
13.0.1
14.0.0
.
.
.
14.0.0
nodejs12.22.9
.
.
16.14.0
Subversion1.14.11.14.1
Git2.34.12.31.1
Apache2.4.522.4.53
Nginx1.18.01.20.1
MySQL server8.0.298.0.28
MariaDB10.6.710.5.13
PostgreSQL14.213.7
SQLite2.8.17
3.37.2
.
3.34.1
Xorg X server1.22.1.11.20.11
Gnome Shell42.040.10
qemu6.27.0.0
docker|podman20.10.124.1.0
lxc5.0.0.

For more detailed overview the two systems check out the following articles – Software and technical overview of Ubuntu server 22.04 LTS and Software and technical details of CentOS Stream 9 minimal install.

Copy of the Life cycle plans of Ubuntu server 22.04 and CentOS Stream 9 (Red Hat Enterprise Linux 9) of the official sources only for time-freeze feature:

Ubuntu 22.04 LTS
CentOS Stream 9 (RHEL 9)

rsync server under CentOS 8 with SELinux enabled

Here is a quick and useful tip on how to run a rsync daemon under CentOS 8 with SELinux in Enforcing mode.
There are three basic steps:

  1. rsync daemon installation and configuration.
  2. firewall configuration.
  3. SELinux configuration.

STEP 1) rsync daemon installation and configuration.

Under CentOS 8 rsync daemon files are in a separate rpm package rsync-daemon (more on the subject rsync daemon in CentOS 8):

[root@srv ~]# dnf install -y rsync-daemon
Last metadata expiration check: 2:45:48 ago on Thu Apr  7 07:40:42 2022.
Dependencies resolved.
==============================================================================================================
 Package                     Architecture          Version                        Repository             Size
==============================================================================================================
Installing:
 rsync-daemon                noarch                3.1.3-14.el8                   baseos                 43 k

Transaction Summary
==============================================================================================================
Install  1 Package

Total download size: 43 k
Installed size: 17 k
Downloading Packages:
rsync-daemon-3.1.3-14.el8.noarch.rpm                                           98 kB/s |  43 kB     00:00    
--------------------------------------------------------------------------------------------------------------
Total                                                                          81 kB/s |  43 kB     00:00     
Running transaction check
Transaction check succeeded.
Running transaction test
Transaction test succeeded.
Running transaction
  Preparing        :                                                                                      1/1 
  Installing       : rsync-daemon-3.1.3-14.el8.noarch                                                     1/1 
  Running scriptlet: rsync-daemon-3.1.3-14.el8.noarch                                                     1/1 
  Verifying        : rsync-daemon-3.1.3-14.el8.noarch                                                     1/1 

Installed:
  rsync-daemon-3.1.3-14.el8.noarch                                                                            

Complete!

Keep on reading!

Replace current interface configuration with a bridge device using nmcli (NetworkManager)

This article shows how the primary network interface could be replaced by a bridge device and the network interface becomes a part of the bridge as a slave device without reboot or restart of the server. Using nmcli under CentOS 8 (and probably any other Linux distribution like Ubuntu, which uses NetworkManager to configure network devices).
The main steps are:

  1. Create a connection profile of a bridge device.
  2. Set the same network configuration as the primary network to the bridge device.
  3. Create a connection profile for the primary interface device as a slave network device to the newly created bridge.
  4. Delete the current primary connection, which is using the primary network device and configuration.
  5. Reload the bridge connection profile to take effect. The bridge device will actually begin to work.

The main goal is not to reboot the server or lose the connection to the server. The primary network interface is the only connection on the server and losing it the server is going to be unreachable. So the last two steps should be performed in the background or a script or a detached terminal (like screen).
Here are all the commands in one place:

nmcli connection add type bridge ifname br0 con-name br0 ipv4.method manual ipv4.addresses "192.168.0.20/24" ipv4.gateway "192.168.0.1" ipv4.dns "8.8.8.8 1.1.1.1"
nmcli con add type bridge-slave ifname enp0s3 master br0
nmcli con del "enp0s3"; nmcli con reload "br0" &

Here is the detailed information for the above commands:
Keep on reading!

libelf was not found in the pkg-config search path

Building from source under CentOS the user may stumble on some compilation errors and most of them are for missing -devel packages. Here is such example with not so easy to find the name of a missing library:

[/tmp/netdata-libbpf-El77Ld/libbpf-0.0.9_netdata-1/src]# env CFLAGS=-fPIC CXXFLAGS= LDFLAGS= BUILD_STATIC_ONLY=y OBJDIR=build DESTDIR=.. make install 
Package libelf was not found in the pkg-config search path.
Perhaps you should add the directory containing `libelf.pc'
to the PKG_CONFIG_PATH environment variable
No package 'libelf' found
mkdir -p build/staticobjs
cc -I. -I../include -I../include/uapi -DCOMPAT_NEED_REALLOCARRAY -fPIC -D_LARGEFILE64_SOURCE -D_FILE_OFFSET_BITS=64   -c bpf.c -o build/staticobjs/bpf.o
cc -I. -I../include -I../include/uapi -DCOMPAT_NEED_REALLOCARRAY -fPIC -D_LARGEFILE64_SOURCE -D_FILE_OFFSET_BITS=64   -c btf.c -o build/staticobjs/btf.o
btf.c:17:18: fatal error: gelf.h: No such file or directory
 #include <gelf.h>
                  ^
compilation terminated.
make: *** [build/staticobjs/btf.o] Error 1
 FAILED   

The missing development library file is with the name: elfutils-libelf-devel. Installing the package with yum or dnf will resolve the above error:

yum install -y elfutils-libelf-devel

Or for CentOS 8 and newer Fedora versions:

dnf install -y elfutils-libelf-devel