Caching NFS files with cachefilesd

A great tool for caching a network filesystem like NFS mounts is cachefilesd! It is easy to use it and a good deal of stats can be retrieved from the tool. More on how it works here https://www.kernel.org/doc/Documentation/filesystems/caching/fscache.txt

Here are quick steps to cache an NFS mounts (it works with NFS-Ganesha servers, too):

  1. Install the daemon tool cachefilesd
  2. Check the configuration file /etc/cachefilesd.conf. In most cases, no need to edit the file! Just check the disk limits if they are good.
  3. Start the cachefilesd daemon.
  4. Mount the network directories with “fsc” option. Umount and mount them all if they’ve been already mounted. The fsc is mandatory option to enable file cacheing of a network mount.
  5. Check stats to see if the file cching is working properly.

The example below is under CentOS 8, but it is almost the same in most Linux distributions.

STEP 1) Install the daemon tool cachefilesd

This is straight forward, just install it with the package manager:

[root@srv ~]# dnf install cachefilesd
Last metadata expiration check: 2:33:44 ago on Tue 08 Dec 2020 07:18:01 AM UTC.
Dependencies resolved.
=============================================================================================================================================================================================
 Package                                        Architecture                              Version                                            Repository                                 Size
=============================================================================================================================================================================================
Installing:
 cachefilesd                                    x86_64                                    0.10.10-4.el8                                      BaseOS                                     43 k

Transaction Summary
=============================================================================================================================================================================================
Install  1 Package

Total download size: 43 k
Installed size: 71 k
Is this ok [y/N]: y
Downloading Packages:
cachefilesd-0.10.10-4.el8.x86_64.rpm                                                                                                                         3.1 MB/s |  43 kB     00:00    
---------------------------------------------------------------------------------------------------------------------------------------------------------------------------------------------
Total                                                                                                                                                        2.8 MB/s |  43 kB     00:00     
Running transaction check
Transaction check succeeded.
Running transaction test
Transaction test succeeded.
Running transaction
  Preparing        :                                                                                                                                                                     1/1 
  Installing       : cachefilesd-0.10.10-4.el8.x86_64                                                                                                                                    1/1 
  Running scriptlet: cachefilesd-0.10.10-4.el8.x86_64                                                                                                                                    1/1 
  Verifying        : cachefilesd-0.10.10-4.el8.x86_64                                                                                                                                    1/1 

Installed:
  cachefilesd-0.10.10-4.el8.x86_64                                                                                                                                                           

Complete!

STEP 2) Check the configuration file and tune for your system.

In most cases, the defaults in /etc/cachefilesd.conf are good to start with:

dir /var/cache/fscache
tag mycache
brun 10%
bcull 7%
bstop 3%
frun 10%
fcull 7%
fstop 3%

# Assuming you're using SELinux with the default security policy included in
# this package
secctx system_u:system_r:cachefiles_kernel_t:s0

The directory where the cache will reside and the lines with the percentages are for disk space limitation. “brun 10%” means cache can runs freely till the disk space drops below 10%. “bcull 7%” – culling the cache when the free space drops below “7%” and more in the man page (or https://linux.die.net/man/5/cachefilesd.conf).
So if one maintains disk free space below 10% the configuration file should be edited.

STEP 3) Start the cachefilesd daemon.

And enable on boot to start automatically.

[root@srv ~]# systemctl start cachefilesd
[root@srv ~]# systemctl enable cachefilesd
Created symlink /etc/systemd/system/multi-user.target.wants/cachefilesd.service → /usr/lib/systemd/system/cachefilesd.service.
[root@srv ~]# systemctl status cachefilesd
● cachefilesd.service - Local network file caching management daemon
   Loaded: loaded (/usr/lib/systemd/system/cachefilesd.service; enabled; vendor preset: disabled)
   Active: active (running) since Tue 2020-12-08 10:01:24 UTC; 11s ago
 Main PID: 29786 (cachefilesd)
    Tasks: 1 (limit: 408616)
   Memory: 2.5M
   CGroup: /system.slice/cachefilesd.service
           └─29786 /usr/sbin/cachefilesd -n -f /etc/cachefilesd.conf

Dec 08 10:01:24 srv systemd[1]: Starting Local network file caching management daemon...
Dec 08 10:01:24 srv systemd[1]: Started Local network file caching management daemon.
Dec 08 10:01:24 srv cachefilesd[29786]: About to bind cache
Dec 08 10:01:24 srv cachefilesd[29786]: Bound cache
Dec 08 10:01:24 srv cachefilesd[29786]: Daemon Started

The status command shows the daemon cachefilesd is running. But does it cache?

STEP 4) Mount the network filesystems with option fsc

To make cachefilesd cache a network mount the option fsc must be included in the mount options. Remount may not work correctly, so to be sure a full umount/mount should be executed. Here is an example /etc/fstab file:

192.168.0.1:/mnt/storage /mnt/storage  nfs defaults,hard,intr,noexec,nosuid,_netdev,fsc,vers=4 0 0

And then mount with simple command:

mount /mnt/storage

Check whether the mounts if the FS cache is used. FSC must be “yes”.

[root@srv ~]# cat /proc/fs/nfsfs/volumes
NV SERVER   PORT DEV          FSID                              FSC
v4 c0a80001  801 0:41         d4098a2af096148:ec7560388cbe5b83  yes

There is a proc file for cache statistics:

[root@srv ~]# cat /proc/fs/fscache/stats
FS-Cache statistics
Cookies: idx=49 dat=4385599 spc=0
Objects: alc=43666 nal=0 avl=43666 ded=36002
ChkAux : non=0 ok=12289 upd=0 obs=761
Pages  : mrk=24915179 unc=24492585
Acquire: n=4385648 nul=0 noc=0 ok=4385648 nbf=0 oom=0
Lookups: n=43666 neg=31372 pos=12294 crt=31372 tmo=0
Invals : n=1 run=1
Updates: n=0 nul=0 run=1
Relinqs: n=4377930 nul=0 wcr=0 rtr=0
AttrChg: n=0 ok=0 nbf=0 oom=0 run=0
Allocs : n=0 ok=0 wt=0 nbf=0 int=0
Allocs : ops=0 owt=0 abt=0
Retrvls: n=751549 ok=716860 wt=21436 nod=34689 nbf=0 int=0 oom=0
Retrvls: ops=751549 owt=9158 abt=0
Stores : n=550412 ok=550412 agn=0 nbf=0 oom=0
Stores : ops=33238 run=583650 pgs=550412 rxd=550412 olm=0
VmScan : nos=23963352 gon=0 bsy=0 can=0 wt=0
Ops    : pend=9160 run=784788 enq=26874960 can=0 rej=0
Ops    : ini=1301962 dfr=265 rel=1301962 gc=265
CacheOp: alo=0 luo=0 luc=0 gro=0
CacheOp: inv=0 upo=0 dro=0 pto=0 atc=0 syn=0
CacheOp: rap=0 ras=0 alp=0 als=0 wrp=0 ucp=0 dsp=0
CacheEv: nsp=761 stl=0 rtr=0 cul=0

And here is the cache directory filled with files. If there are no files, the FS cache is not used, probably the mount is not mounted with FSC! Umount and mount the mounts again.

[root@srv ~]# find /var/cache/fscache|head -n 20
/var/cache/fscache
/var/cache/fscache/graveyard
/var/cache/fscache/cache
/var/cache/fscache/cache/@4a
/var/cache/fscache/cache/@4a/I03nfs
/var/cache/fscache/cache/@4a/I03nfs/@84
/var/cache/fscache/cache/@4a/I03nfs/@84/Jc0010800840000cG0400
/var/cache/fscache/cache/@4a/I03nfs/@84/Jc0010800840000cG0400/@68
/var/cache/fscache/cache/@4a/I03nfs/@84/Jc0010800840000cG0400/@68/J1100000000000Q0goaWH946iIn7oUMELrd80000000040000g00Kb000wFe000jt000oG3000000040000g000000000
/var/cache/fscache/cache/@4a/I03nfs/@84/Jc0010800840000cG0400/@68/J1100000000000Q0goaWH946iIn7oUMELrd80000000040000g00Kb000wFe000jt000oG3000000040000g000000000/@8b
/var/cache/fscache/cache/@4a/I03nfs/@84/Jc0010800840000cG0400/@68/J1100000000000Q0goaWH946iIn7oUMELrd80000000040000g00Kb000wFe000jt000oG3000000040000g000000000/@8b/EA0g00sg0200n8000000ixBMHyy9gdcUm_O8ewl7XMW1n8cXgyl60
/var/cache/fscache/cache/@4a/I03nfs/@84/Jc0010800840000cG0400/@68/J1100000000000Q0goaWH946iIn7oUMELrd80000000040000g00Kb000wFe000jt000oG3000000040000g000000000/@8b/EA0g00sg0200n8000000ixBMHyy9gdcUm_O8ewl7XZG2n84qfxl60
/var/cache/fscache/cache/@4a/I03nfs/@84/Jc0010800840000cG0400/@68/J1100000000000Q0goaWH946iIn7oUMELrd80000000040000g00Kb000wFe000jt000oG3000000040000g000000000/@8b/EA0g00sg0200n8000000ixBMHyy9gdcUm_O8ewl7XQM2n8IQ4El60
/var/cache/fscache/cache/@4a/I03nfs/@84/Jc0010800840000cG0400/@68/J1100000000000Q0goaWH946iIn7oUMELrd80000000040000g00Kb000wFe000jt000oG3000000040000g000000000/@8b/EA0g00sg0200n8000000ixBMHyy9gdcUm_O8ewl7XZO2n8Ms7kl60
/var/cache/fscache/cache/@4a/I03nfs/@84/Jc0010800840000cG0400/@68/J1100000000000Q0goaWH946iIn7oUMELrd80000000040000g00Kb000wFe000jt000oG3000000040000g000000000/@8b/EA0g00sg0200n8000000ixBMHyy9gdcUm_O8ewl7XvQ2n88dKgl60
/var/cache/fscache/cache/@4a/I03nfs/@84/Jc0010800840000cG0400/@68/J1100000000000Q0goaWH946iIn7oUMELrd80000000040000g00Kb000wFe000jt000oG3000000040000g000000000/@8b/EA0g00sg0200n8000000ixBMHyy9gdcUm_O8ewl7XV40o8cREC6b0
/var/cache/fscache/cache/@4a/I03nfs/@84/Jc0010800840000cG0400/@68/J1100000000000Q0goaWH946iIn7oUMELrd80000000040000g00Kb000wFe000jt000oG3000000040000g000000000/@8b/EA0g00sg0200n8000000ixBMHyy9gdcUm_O8ewl7X3Y1n8MHO_l60
/var/cache/fscache/cache/@4a/I03nfs/@84/Jc0010800840000cG0400/@68/J1100000000000Q0goaWH946iIn7oUMELrd80000000040000g00Kb000wFe000jt000oG3000000040000g000000000/@8b/EA0g00sg0200n8000000ixBMHyy9gdcUm_O8ewl7Xhkwn80f23zb0
/var/cache/fscache/cache/@4a/I03nfs/@84/Jc0010800840000cG0400/@68/J1100000000000Q0goaWH946iIn7oUMELrd80000000040000g00Kb000wFe000jt000oG3000000040000g000000000/@8b/EA0g00sg0200n8000000ixBMHyy9gdcUm_O8ewl7XEQ2n8IuAll60
/var/cache/fscache/cache/@4a/I03nfs/@84/Jc0010800840000cG0400/@68/J1100000000000Q0goaWH946iIn7oUMELrd80000000040000g00Kb000wFe000jt000oG3000000040000g000000000/@8b/EA0g00sg0200n8000000ixBMHyy9gdcUm_O8ewl7XoO2n8A7Bll60
[root@srv ~]# du -d 1 -h /var/cache/fscache
4.0K    /var/cache/fscache/graveyard
3.8G    /var/cache/fscache/cache
3.8G    /var/cache/fscache

There are 3.8G in the cache.

Create and export a GlusterFS volume with NFS-Ganesha in CentOS 8

GlusterFS built-in NFS server supports only NFS version 3. GlusterFS offers NFS exports using NFS-Ganesha, which supports NFS version 3 and 4 protocols.
NFS-Ganesha server is a user-mode file sharing server, which offers a GlusterFS plugin to export GlusterFS volumes. In the following article, the NSF-Ganesha and GlusterFS are installed and a simple GlusterFS volume is created and then exported through NFS 3 and 4 version protocols.
The version of the software in this article:

  • CentOS Stream release 8 (25.04.2021)
  • GlusterFS 8.4
  • NFS-Ganesha 3.5

STEP 1) Install GlusterFS.

dnf install -y centos-release-gluster
dnf install -y glusterfs-server

The first line will installs a new repository under the SIG management – https://wiki.centos.org/SpecialInterestGroup/Storage. The second line installs the GlusterFS server.

STEP 2) Install NFS-Ganesha.

dnf install -y centos-release-nfs-ganesha30
dnf install -y nfs-ganesha nfs-ganesha-gluster

The first line again installs a new repository under the SIG management and the second line installs the NFS-Ganesha server with Gluster plugin.

STEP 3) Create GlusterFS volume

Start the GlusterFS server and create a simple 3 replicas volume with:
Start the GlusterFS on all the three nodes and enable the GlusterFS communication between the three nodes using firewall-cmd utility. So execute the following commands:

systemctl start glusterd
firewall-cmd --permanent --new-zone=glusternodes
firewall-cmd --permanent --zone=glusternodes --add-source=192.168.0.200
firewall-cmd --permanent --zone=glusternodes --add-source=192.168.0.201
firewall-cmd --permanent --zone=glusternodes --add-source=192.168.0.202
firewall-cmd --permanent --zone=glusternodes --add-service=glusterfs
firewall-cmd --reload

On the first node create the GlusterFS volume. First, add the glnode2 and glnode3 to the cluster.

gluster peer probe glnode2
gluster peer probe glnode3
gluster volume create VOL1 replica 3 transport tcp glnode1:/mnt/storage/gluster/brick glnode2:/mnt/storage/gluster/brick glnode3:/mnt/storage/gluster/brick
gluster volume start VOL1

Keep on reading!

removing the default kernel in CentOS 8 – remove elrepo kernel

Removing the default kernel aka the loaded kernel in CentOS 8 maybe challenging because the package is protected and cannot be removed by the yum or dnf.
Here is the case: an elrepo kernel-ml loaded and the dnf prints it cannot remove the package, because it is protected:

[root@srv ~]# dnf remove kernel-ml kernel-ml-core kernel-ml-modules
Error: 
 Problem: The operation would result in removing the following protected packages: kernel-ml-core
(try to add '--skip-broken' to skip uninstallable packages or '--nobest' to use not only best candidate packages)
[root@srv ~]# uname -a
Linux srv.localhost 5.10.4-1.el8.elrepo.x86_64 #1 SMP Tue Dec 29 11:04:23 EST 2020 x86_64 x86_64 x86_64 GNU/Linux
[root@srv ~]# grubby --default-kernel
/boot/vmlinuz-5.10.4-1.el8.elrepo.x86_64

The system is booted up with the kernel we are trying to remove, which is impossible.

The solution is to set a new default kernel and load it. Then dnf will be able to remove the first kernel.

For CentOS 7, just use the yum instead of dnf command.
Using grubby is really easy and straightforward:

STEP 1) List all installed and available to boot kernels

[root@srv ~]# grubby --info=ALL |grep ^kernel
kernel="/boot/vmlinuz-5.10.4-1.el8.elrepo.x86_64"
kernel="/boot/vmlinuz-4.18.0-259.el8.x86_64"
kernel="/boot/vmlinuz-4.18.0-257.el8.x86_64"
kernel="/boot/vmlinuz-0-rescue-45e12f0814fd4947b99cbdcb88950361"

STEP 2) Select the kernel to load the next time

[root@srv ~]# grubby --set-default "/boot/vmlinuz-4.18.0-259.el8.x86_64"
The default is /boot/loader/entries/45e12f0814fd4947b99cbdcb88950361-4.18.0-259.el8.x86_64.conf with index 1 and kernel /boot/vmlinuz-4.18.0-259.el8.x86_64

Keep on reading!

Set up (802.3ad LACP) bonding when installing CentOS 8

This article is to show how the user could install CentOS 8 (the steps are the same with CentOS 7) with a much complex network setup such as Bonding device in 802.3ad mode (LACP – Link Aggregation Control Protocol).
The whole installation procedure is not included here, but there are couple of other article on the subject “Install CentOS 7 or CentOS 8”:

Similar configuration files will be generated as in Configure Bond (802.3ad LACP) device in CentOS 8 – configuration files

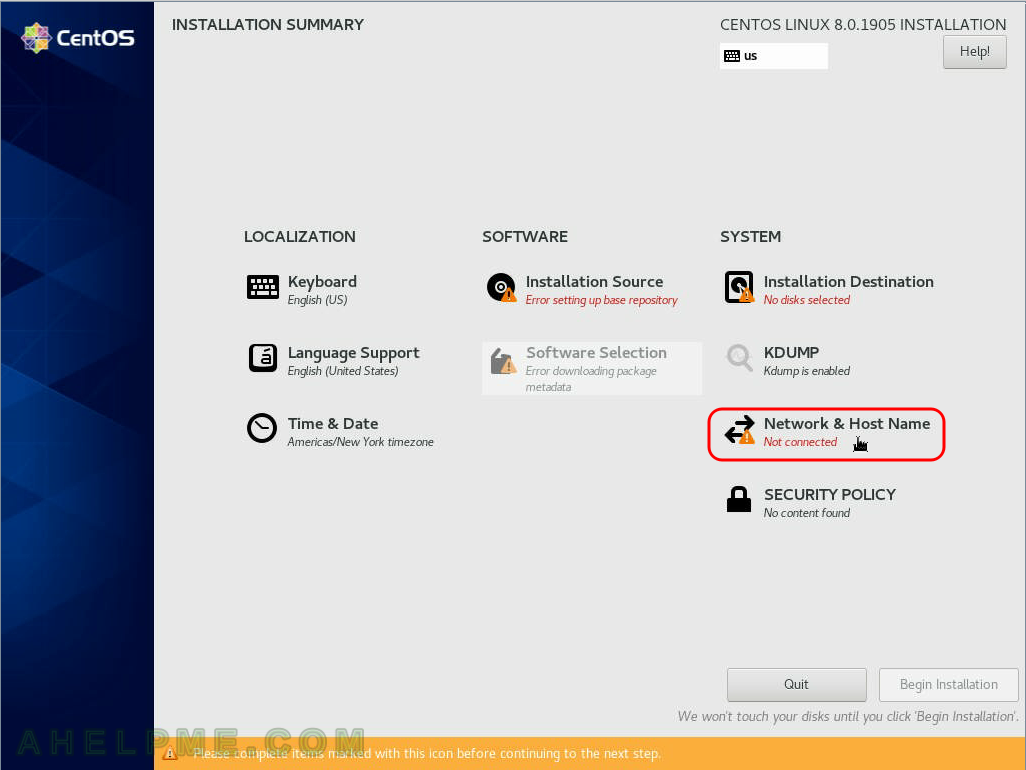
SCREENSHOT 1) Click on “Network and Host Name” to configure the machine networking.

main menu
Installation Summary – Network and Host Name

Keep on reading!

podman – Error adding network: failed to allocate for range 0: 10.88.0.46 has been allocated after server reboot

We’ve just stumbled on the following error with one of our podman CentOS 8 servers after restart:

[root@srv ~]# podman start mysql-slave
ERRO[0000] Error adding network: failed to allocate for range 0: 10.88.0.46 has been allocated to c97823be46832ddebbce29f3f51e3091620188710cb7ace246e173a7a981baed, duplicate allocation is not allowed 
ERRO[0000] Error while adding pod to CNI network "podman": failed to allocate for range 0: 10.88.0.46 has been allocated to c97823be46832ddebbce29f3f51e3091620188710cb7ace246e173a7a981baed, duplicate allocation is not allowed 
Error: unable to start container "mysql-slave": error configuring network namespace for container c97823be46832ddebbce29f3f51e3091620188710cb7ace246e173a7a981baed: failed to allocate for range 0: 10.88.0.46 has been allocated to c97823be46832ddebbce29f3f51e3091620188710cb7ace246e173a7a981baed, duplicate allocation is not allowed

Apparently, something got wrong, because the two containers were fine before restarting and they were multiple times stopped, started and restarted.

The solution is to remove IP-named files in /var/lib/cni/networks/podman and start the podman containers again.

It resembles to a bug https://github.com/containers/libpod/issues/3759, which should have already been closed by the new minor CentOS 8 releases.

The interesting part is that the container we are trying to start mysql-slave has c97823be46832ddebbce29f3f51e3091620188710cb7ace246e173a7a981baed, but it reports it cannot allocate it, because it has already been allocated to a container with the same ID. That’s the problem:

The IP-named files in /var/lib/cni/networks/podman were not removed when the podman container had stopped.

Typically, when a podman container executes a stop command, the process should remove the files in /var/lib/cni/networks/podman. Before restarting the CentOS 8 server you may need to stop the podman containers for now.

[root@srv ~]# cd /var/lib/cni/networks/podman
[root@srv podman]# ls -altr
total 24
-rwxr-x---. 1 root root    0  3 Dec  0,43 lock
drwxr-xr-x. 3 root root 4096  3 Dec  0,43 ..
-rw-r--r--. 1 root root   64  9 Dec 18,34 10.88.0.46
-rw-r--r--. 1 root root   64 16 Dec 12,01 10.88.0.47
-rw-r--r--. 1 root root   10  1 Mar  9,28 last_reserved_ip.0
-rw-r--r--. 1 root root   70  1 Mar  9,28 10.88.0.49
drwxr-xr-x. 2 root root 4096  1 Mar  9,28 .
[root@srv podman]# rm 10.88.0.46
rm: remove regular file '10.88.0.46'? y
[root@srv podman]# rm 10.88.0.47
rm: remove regular file '10.88.0.47'? y
[root@srv podman]# podman start mysql-slave
mysql-slave
[root@srv podman]# podman ps
CONTAINER ID  IMAGE                           COMMAND               CREATED       STATUS            PORTS  NAMES
c97823be4683  localhost/centos-mysql-5.6:0.9  /entrypoint.sh my...  2 months ago  Up 2 minutes ago         mysql-slave
e96134b31894  docker.io/example/client:latest   start-boinc.sh        2 months ago  Up 6 minutes ago         example-client
[root@srv podman]# ls -altr
общо 20
-rwxr-x---. 1 root root    0  3 Dec  0,43 lock
drwxr-xr-x. 3 root root 4096  3 Dec  0,43 ..
-rw-r--r--. 1 root root   70  1 Mar  9,28 10.88.0.49
-rw-r--r--. 1 root root   10  1 Mar  9,32 last_reserved_ip.0
-rw-r--r--. 1 root root   70  1 Mar  9,32 10.88.0.50
drwxr-xr-x. 2 root root 4096  1 Mar  9,32 .
[root@srv podman]#

We’ve deleted the old IPs (old by date!) 10.88.0.46 and 10.88.0.47 and the mysql-slave container started successfully.

firewalld and podman (or docker) – no internet in the container and could not resolve host

If you happen to use CentOS 8 you have already discovered that Red Hat (i.e. CentOS) switch to podman, which is a fork of docker. So probably the following fix might help to someone, which does not use CentOS 8 or podman. For now, podman and docker are 99.99% the same.
So creating and starting a container is easy and in most cases one command only, but you may stumble on the error your container could not resolve or could not connect to an IP even there is a ping to the IP!
The service in the container may live a happy life without Internet access but just the mapped ports from the outside world. Still, it may happen to need Internet access, let’s say if an update should be performed.
Here is how to fix podman (docker) missing the Internet access in the container:

  • No ping to the outside world. The chances you are missing
    sysctl -w net.ipv4.ip_forward=1
    

    And do not forget to make it permanent by adding the “net.ipv4.ip_forward=1” to /etc/sysctl.conf (or a file “.conf” in /etc/sysctl.d/).

  • ping to the outside IP of the container is available, but no connection to any service is available! Probably the NAT is not enabled in your podman docker configuration. In the case with firewalld, at least, you must enable the masquerade option of the public zone
    firewall-cmd --zone=public --add-masquerade
    firewall-cmd --permanent --zone=public --add-masquerade
    

    The second command with “–permanent” is to make the option permanent over reboots.

The error – Could not resolve host (Name or service not known) despite having servers in /etc/resolv.conf and ping to them!

One may think having IPs in /etc/resolv.conf and ping to them in the container should give the container access to the Internet. But the following error occurs:

[root@srv /]# yum install telnet
Loaded plugins: fastestmirror, ovl
Determining fastest mirrors
 * base: artfiles.org
 * extras: centos.mirror.net-d-sign.de
 * updates: centos.bio.lmu.de
http://mirror.fra10.de.leaseweb.net/centos/7.7.1908/os/x86_64/repodata/repomd.xml: [Errno 14] curl#6 - "Could not resolve host: mirror.fra10.de.leaseweb.net; Unknown error"
Trying other mirror.
http://artfiles.org/centos.org/7.7.1908/os/x86_64/repodata/repomd.xml: [Errno 14] curl#6 - "Could not resolve host: artfiles.org; Unknown error"
Trying other mirror.
^C

Exiting on user cancel
[root@srv /]# ^C
[root@srv /]# ping 8.8.8.8
PING 8.8.8.8 (8.8.8.8) 56(84) bytes of data.
64 bytes from 8.8.8.8: icmp_seq=1 ttl=56 time=5.05 ms
64 bytes from 8.8.8.8: icmp_seq=2 ttl=56 time=5.06 ms
^C
--- 8.8.8.8 ping statistics ---
2 packets transmitted, 2 received, 0% packet loss, time 1000ms
rtt min/avg/max/mdev = 5.050/5.055/5.061/0.071 ms
[root@srv ~]# cat /etc/resolv.conf 
nameserver 8.8.8.8
nameserver 8.8.4.4
[root@srv /]# ping google.com
ping: google.com: Name or service not known

The error 2 – Can’t connect to despite having ping to the IP!

[root@srv /]# ping 2.2.2.2
PING 2.2.2.2 (2.2.2.2) 56(84) bytes of data.
64 bytes from 2.2.2.2: icmp_seq=1 ttl=56 time=9.15 ms
64 bytes from 2.2.2.2: icmp_seq=2 ttl=56 time=9.16 ms
^C
[root@srv2 /]# mysql -h2.2.2.2 -uroot -p
Enter password: 
ERROR 2003 (HY000): Can't connect to MySQL server on '2.2.2.2' (113)
[root@srv2 /]#

Despite having ping the MySQL server on 2.2.2.2 and despite the firewall on 2.2.2.2 allows outside connections the container could not connect to it. And testing other services like HTTP, HTTPS, FTP and so on resulted in “unable to connect“, too. Simply because the NAT (aka masquerade is not enabled in the firewall).

rsync daemon in CentOS 8

Apparently, the team behind the CentOS 8 decided to split the rsync functionality to two packages – one for the client-side and for the server-side, despite the binary rsync is only one and offers the client-size and server-side.
So there two packages in CentOS 8:

  1. rsync – provides the client-side and server-side as usual
  2. rsync-daemon – provides configuration example file and the systemd to start it as a service.

So if you wonder where is your rsync service after installing the rsync package under CentOS 8 you must install additional package “rsync-daemon”.

Of course, you may just create anywhere “rsyncd.conf” (the best place for the configuration file is in /etc, but could be placed anywhere with “–config=PATH/FILE” option) file and start the daemon as usual with “–daemon” option included to have the rsync server-side up and running.

rsync --daemon --config=/etc/rsyncd.conf

Just create yourself the configuration “/etc/rsyncd.conf” file.

Install the rsync program – the client and the daemon

dnf install rsync

Install the configuration and systemd files

dnf install rsync-daemon

rsync and rsync-daemon files

The files included in the two packages:

[root@srv ~]# dnf repoquery -l rsync-daemon
Last metadata expiration check: 0:33:02 ago on Wed 22 Jan 2020 02:57:06 PM UTC.
/etc/rsyncd.conf
/etc/sysconfig/rsyncd
/usr/lib/systemd/system/rsyncd.service
/usr/lib/systemd/system/rsyncd.socket
/usr/lib/systemd/system/rsyncd@.service
/usr/share/man/man5/rsyncd.conf.5.gz
[root@srv ~]# dnf repoquery -l rsync
Last metadata expiration check: 0:33:06 ago on Wed 22 Jan 2020 02:57:06 PM UTC.
/usr/bin/rsync
/usr/lib/.build-id
/usr/lib/.build-id/6e
/usr/lib/.build-id/6e/bdbf5032a966a6293cea003621ba766ab36ff1
/usr/share/doc/rsync
/usr/share/doc/rsync/NEWS
/usr/share/doc/rsync/OLDNEWS
/usr/share/doc/rsync/README
/usr/share/doc/rsync/support
/usr/share/doc/rsync/support/Makefile
/usr/share/doc/rsync/support/atomic-rsync
/usr/share/doc/rsync/support/cvs2includes
/usr/share/doc/rsync/support/deny-rsync
/usr/share/doc/rsync/support/file-attr-restore
/usr/share/doc/rsync/support/files-to-excludes
/usr/share/doc/rsync/support/git-set-file-times
/usr/share/doc/rsync/support/instant-rsyncd
/usr/share/doc/rsync/support/logfilter
/usr/share/doc/rsync/support/lsh
/usr/share/doc/rsync/support/lsh.sh
/usr/share/doc/rsync/support/mapfrom
/usr/share/doc/rsync/support/mapto
/usr/share/doc/rsync/support/mnt-excl
/usr/share/doc/rsync/support/munge-symlinks
/usr/share/doc/rsync/support/rrsync
/usr/share/doc/rsync/support/rsync-no-vanished
/usr/share/doc/rsync/support/rsync-slash-strip
/usr/share/doc/rsync/support/rsyncstats
/usr/share/doc/rsync/support/savetransfer.c
/usr/share/doc/rsync/tech_report.tex
/usr/share/licenses/rsync
/usr/share/licenses/rsync/COPYING
/usr/share/man/man1/rsync.1.gz

Install CentOS 8 over the old OS and preserve the storage partitions

Always put your root partition separate from the storage (aka data) partitions. root partition should be only for system files and nothing more! Keeping this simple rule you may easily change your operating system (or clean install or clean upgrade) without deleting the user’s data thus preserving the old storage partitions.
Our storage has 2 storage partitions, which means they hosts only data and no system files and there are separate partitions for Linux booting (grub2) and system files (root partition). Here is the partitions layout:

[root@srv0 ~]# parted /dev/sda --script print
Model: AVAGO SMC3108 (scsi)
Disk /dev/sda: 48.0TB
Sector size (logical/physical): 512B/4096B
Partition Table: gpt
Disk Flags: 

Number  Start   End     Size    File system  Name  Flags
 1      1049kB  53.7GB  53.7GB                     raid
 2      53.7GB  54.8GB  1075MB                     raid
 3      54.8GB  55.0GB  211MB   fat16              raid
 4      55.0GB  69.4GB  14.4GB                     raid
 5      71.8GB  48.0TB  47.9TB  ext4

[root@srv0 ~]# parted /dev/sdb --script print
Model: AVAGO SMC3108 (scsi)
Disk /dev/sdb: 48.0TB
Sector size (logical/physical): 512B/4096B
Partition Table: gpt
Disk Flags: 

Number  Start   End     Size    File system  Name  Flags
 1      1049kB  53.7GB  53.7GB                     raid
 2      53.7GB  54.8GB  1075MB                     raid
 3      54.8GB  55.0GB  211MB   fat16              raid
 4      55.0GB  69.4GB  14.4GB                     raid
 5      71.8GB  48.0TB  47.9TB  ext4
[root@srv0 ~]# df -h
Filesystem      Size  Used Avail Use% Mounted on
devtmpfs         16G     0   16G   0% /dev
tmpfs            16G     0   16G   0% /dev/shm
tmpfs            16G  250M   16G   2% /run
tmpfs            16G     0   16G   0% /sys/fs/cgroup
/dev/md127       50G  1.7G   45G   4% /
/dev/md125      991M  133M  792M  15% /boot
/dev/md124      201M   12M  190M   6% /boot/efi
/dev/sda5        44T   23T   22T  52% /mnt/storage1
/dev/sdb5        44T   14T   30T  32% /mnt/storage2
tmpfs           3.2G     0  3.2G   0% /run/user/0

Of course, when there are partitions above 2T the GPT is mandatory.
You can skip the software RAID1 setup if you use only one controller or you have system partitions only in one disk (virtual drive and so on). Here we have two hardware controllers, which we want to use both for the system partitions.
4 RAID1 devices:

  1. EFI partition (/boot/efi)
  2. swap partition
  3. boot parition (/boot)
  4. root partition (/)

The best practice is have total between 30G and 50G for the 4 partitions (in fact, boot partition could be skipped). Have in mind most modern Linux distributions cannot be installed on less than 10G~20G and for optimal results just separate between 30G and 50G for 4 partitions above (or 3 if you choose to skip the boot one).

Upgrade to CentOS 8 with clean install over our old CentOS 7 system partitions preserving the big data partitions.

Couple of things before start:

  • UEFI installation will be selected. So boot in UEFI mode.
  • IPMI KVM is used to install the new Linux distribution – CentOS 8
  • The installation disk is mounted in the Virtual CD/DVD IPMI KVM device – with Mount and boot ISO file from windows share in Supermicro IPMI Virtual media (CD-ROM)
  • All system parititions will be removed (grub, boot, root) and a clean minimal installation will be performed.
  • Network installation – using CentOS-8-x86_64-1905-boot.iso

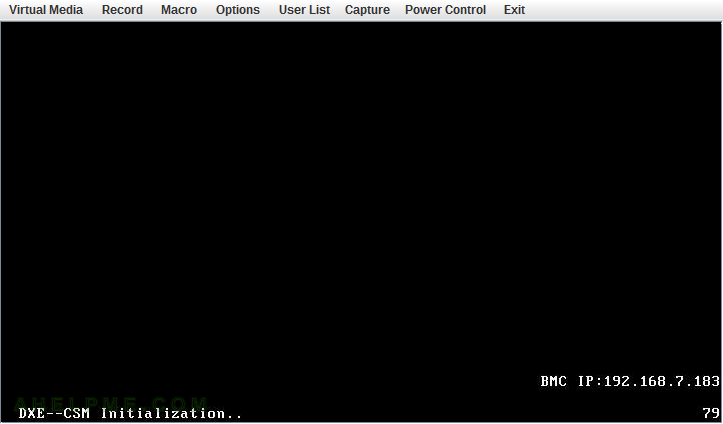
SCREENSHOT 1) The Server is starting. This is the IPMI KVM window. Press F11 to Boot in Boot Menu.

main menu
SUPERMICRO Server starting – KVM

Keep on reading!

Adding bonding interface to CentOS 8 – editing configuration files only

This article shows what files to add if you want to add a bonding interface under CentOS 8 without invoking the Network manager command utility.
Our goal is to use one boding group with the name bond0 in LACP (aka 802.3ad) mode (but it could be any of the other types) with two networks 10Gbps interfaces. The setup resented here uses NetworkManager, which handles the loading of bonding module properly.

In fact, the network-scripts are now deprecated and they are missing from the system (but they still exist in the additional package – “network-scripts”, who knows till when? do not rely on them!).

The configuration files are with the same syntax as under CentOS 7, but this time the network manager parses them. The ifup and ifdown still exist and they just call the Network manager when executed (unless the “network-scripts” package is installed). If you need to enable bonding without any configuration files (for emergency situations) you may still use – How to enable Linux bonding without ifenslave

What do you need:

  • Ensure you have installed: “iputils” and “NetworkManager” packages
    dnf install -y NetworkManager iputils
    
  • Ensure the NetworkManager service is running
    systemctl enable NetworkManager
    systemctl start NetworkManager
    

STEP 1) Configure the bonding device

The boding interface’s name will be bond0 and the configuration will be located in /etc/sysconfig/network-scripts/ifcfg-bond0

BONDING_OPTS="mode=4 miimon=100"
TYPE=Bond
BONDING_MASTER=yes
BOOTPROTO=none
IPADDR0=192.168.0.100
PREFIX0=24
GATEWAY0=192.168.0.1
DNS1=8.8.8.8
DNS2=8.8.4.4
IPV4_FAILURE_FATAL=no
NAME=bond0
UUID=e19e2059-2e31-4143-915a-cdc11d19c9d6
DEVICE=bond0
ONBOOT=yes

Keep on reading!

CentOS 8 dracut-initqueue timeout and could not boot – warning /dev/disk/by-id/md-uuid- does not exist – inactive raids

Booting the CentOS 8 failed with

dracut-initqueue timeout and could not boot – warning /dev/disk/by-id/md-uuid- does not exist

we have an article on the subject for CentOS 7 – CentOS 7 dracut-initqueue timeout and could not boot – warning /dev/disk/by-id/md-uuid- does not exist and we continue with another issue with the same error.
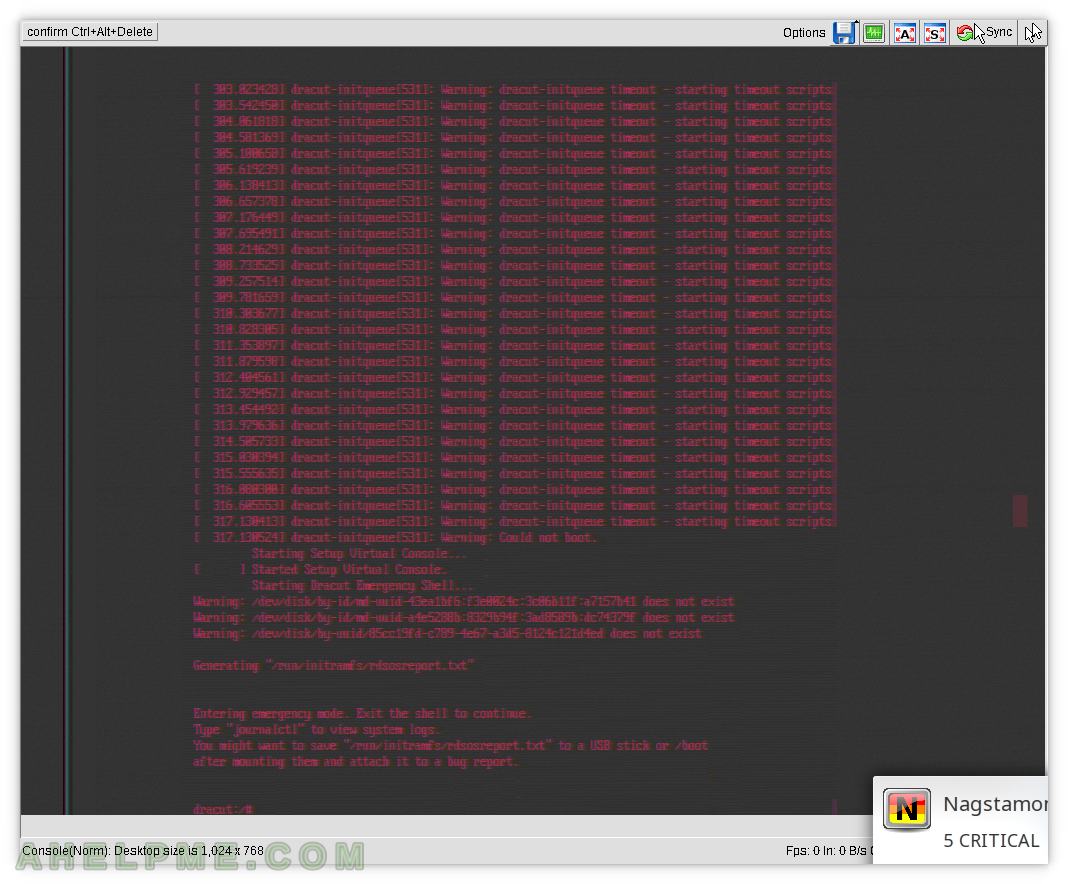
Most times when you get this error there is a mistake in some UUID for the file system or the RAID devices. But this time our software raid was autodetected with the right disks but it ended in INACTIVE STATE. Software raid in INACTIVE STATE cannot be used so we are in “Emergency mode”:

SCREENSHOT 1) Without root partition the boot process enters the dracut emergency mode.

main menu
Entering emergency mode

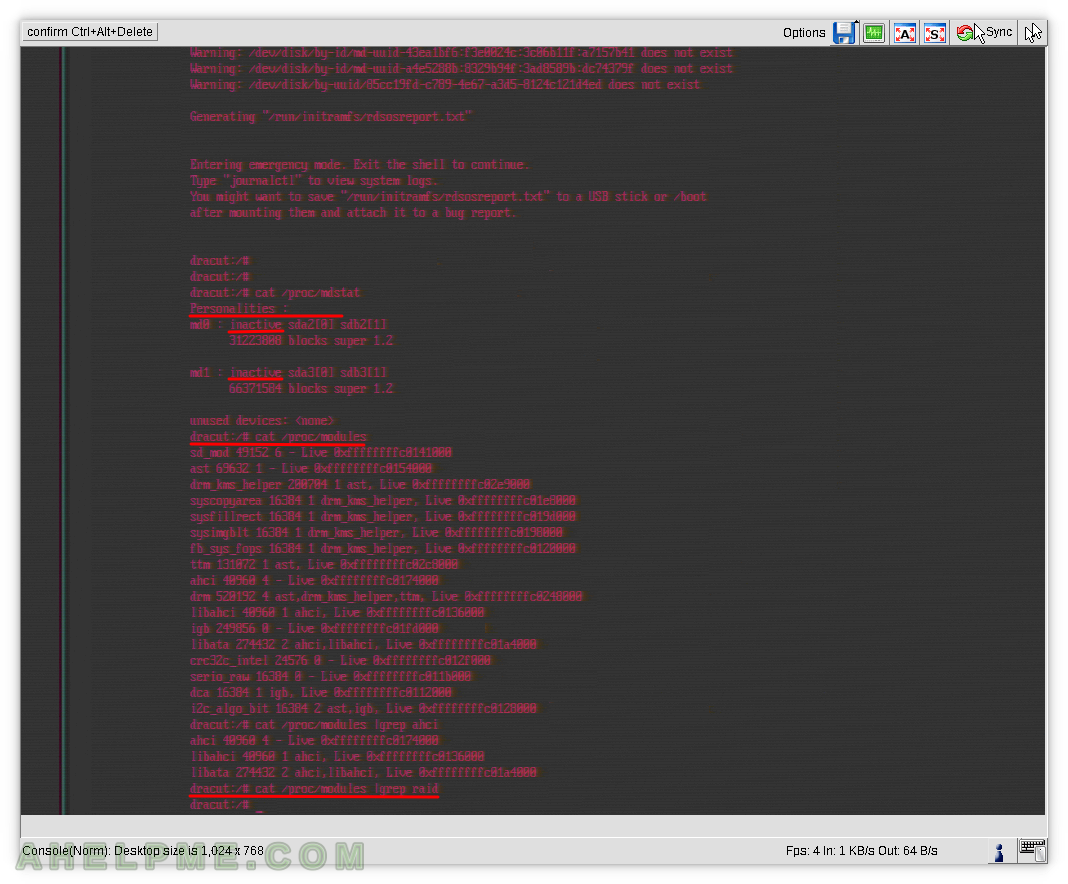
SCREENSHOT 2) Software md raid device information – missing “Personalities” for the raid groups.

Loaded modules in the kernel and missing raid kernel modules.

main menu
Missing raid1 kernel module in initram file

To summarize it up:

  • The disks are detected, so we drivers for SATA/SAS controller is loaded correctly.
  • The software raid autodetected the MD devices, but they are in “INACTIVE STATE”. The RAID “Personalities” is missing.

Keep on reading!