rsync server under CentOS 8 with SELinux enabled

Here is a quick and useful tip on how to run a rsync daemon under CentOS 8 with SELinux in Enforcing mode.
There are three basic steps:

  1. rsync daemon installation and configuration.
  2. firewall configuration.
  3. SELinux configuration.

STEP 1) rsync daemon installation and configuration.

Under CentOS 8 rsync daemon files are in a separate rpm package rsync-daemon (more on the subject rsync daemon in CentOS 8):

[root@srv ~]# dnf install -y rsync-daemon
Last metadata expiration check: 2:45:48 ago on Thu Apr  7 07:40:42 2022.
Dependencies resolved.
==============================================================================================================
 Package                     Architecture          Version                        Repository             Size
==============================================================================================================
Installing:
 rsync-daemon                noarch                3.1.3-14.el8                   baseos                 43 k

Transaction Summary
==============================================================================================================
Install  1 Package

Total download size: 43 k
Installed size: 17 k
Downloading Packages:
rsync-daemon-3.1.3-14.el8.noarch.rpm                                           98 kB/s |  43 kB     00:00    
--------------------------------------------------------------------------------------------------------------
Total                                                                          81 kB/s |  43 kB     00:00     
Running transaction check
Transaction check succeeded.
Running transaction test
Transaction test succeeded.
Running transaction
  Preparing        :                                                                                      1/1 
  Installing       : rsync-daemon-3.1.3-14.el8.noarch                                                     1/1 
  Running scriptlet: rsync-daemon-3.1.3-14.el8.noarch                                                     1/1 
  Verifying        : rsync-daemon-3.1.3-14.el8.noarch                                                     1/1 

Installed:
  rsync-daemon-3.1.3-14.el8.noarch                                                                            

Complete!

Keep on reading!

Installing single node Elasticsearch 7.16 and Kibana 7.16 behind nginx web server under CentOS 8

This article will show how to install two big software – Elasticsearch to store information and Kibana to visualize the information under CentOS 8. Elasticsearch is ideal to store big data such as logs from user activities or server logs – one central repository for data, which is structured properly and it could be easily accessed and manipulated with various software.
Kibana is used mainly for visualizing the data stored in the Elasticseach server and manage the Elasticsearch service by the web. ste

Here is a simple example: send the web servers logs in Elasticsearch and visual statistical data with Kibana.

Using the rpm repository for the two software is the best option for installation and in future upgrades.

STEP 1) Install the CentOS 8.

How to install CentOS 8 could be found here – How to do a network installation of CentOS 8 (8.0.1950) – minimal server installation.
Or if a container approach is needed, there is a how to with LXC containerRun LXC CentOS 8 container with bridged network under CentOS 8.

STEP 2) Install the Elasticsearch.

This installation and configuration is for single node server setup.
First, create a rpm repository file /etc/yum.repos.d/elasticsearch.repo and fill it with the Elasticsearch repository information:

[elasticsearch]
name=Elasticsearch repository for 7.x packages
baseurl=https://artifacts.elastic.co/packages/7.x/yum
gpgcheck=1
gpgkey=https://artifacts.elastic.co/GPG-KEY-elasticsearch
enabled=1
autorefresh=1
type=rpm-md

Then import the Elasticsearch GPG key and install the Elasticsearch software:

[root@loganalyzer ~]# rpm --import https://artifacts.elastic.co/GPG-KEY-elasticsearch
[root@loganalyzer ~]# dnf install elasticsearch
Last metadata expiration check: 0:00:19 ago on 11.12.2021 (Sat) 12:43:24 UTC.
Dependencies resolved.
==========================================================================================================================================
 Package            Architecture             Version                     Repository                                Size
==========================================================================================================================================
Installing:
 elasticsearch      x86_64                   7.16.0-1                    elasticsearch                             327 M

Transaction Summary
=========================================================================================================================================
Install  1 Package

Total download size: 327 M
Installed size: 526 M
Is this ok [y/N]: y
Downloading Packages:
elasticsearch-7.16.0-x86_64.rpm                                                                                 43 MB/s | 327 MB     00:07    
------------------------------------------------------------------------------------------------------------------------------------------
Total                                                                                                           43 MB/s | 327 MB     00:07     
Running transaction check
Transaction check succeeded.
Running transaction test
Transaction test succeeded.
Running transaction
  Preparing        :                                                                                                                                                                     1/1 
  Running scriptlet: elasticsearch-7.16.0-1.x86_64                                                                                                                                       1/1 
Creating elasticsearch group... OK
Creating elasticsearch user... OK

  Installing       : elasticsearch-7.16.0-1.x86_64                                                                                                                                       1/1 
  Running scriptlet: elasticsearch-7.16.0-1.x86_64                                                                                                                                       1/1 
### NOT starting on installation, please execute the following statements to configure elasticsearch service to start automatically using systemd
 sudo systemctl daemon-reload
 sudo systemctl enable elasticsearch.service
### You can start elasticsearch service by executing
 sudo systemctl start elasticsearch.service

Created elasticsearch keystore in /etc/elasticsearch/elasticsearch.keystore

[/usr/lib/tmpfiles.d/elasticsearch.conf:1] Line references path below legacy directory /var/run/, updating /var/run/elasticsearch → /run/elasticsearch; please update the tmpfiles.d/ drop-in file accordingly.

  Verifying        : elasticsearch-7.16.0-1.x86_64                                                                                                                                       1/1 

Installed:
  elasticsearch-7.16.0-1.x86_64                                                                                                                                                              

Complete!

The configuration files are placed in /etc/elasticsearch/:
Keep on reading!

Create and export a GlusterFS volume with NFS-Ganesha in CentOS 8

GlusterFS built-in NFS server supports only NFS version 3. GlusterFS offers NFS exports using NFS-Ganesha, which supports NFS version 3 and 4 protocols.
NFS-Ganesha server is a user-mode file sharing server, which offers a GlusterFS plugin to export GlusterFS volumes. In the following article, the NSF-Ganesha and GlusterFS are installed and a simple GlusterFS volume is created and then exported through NFS 3 and 4 version protocols.
The version of the software in this article:

  • CentOS Stream release 8 (25.04.2021)
  • GlusterFS 8.4
  • NFS-Ganesha 3.5

STEP 1) Install GlusterFS.

dnf install -y centos-release-gluster
dnf install -y glusterfs-server

The first line will installs a new repository under the SIG management – https://wiki.centos.org/SpecialInterestGroup/Storage. The second line installs the GlusterFS server.

STEP 2) Install NFS-Ganesha.

dnf install -y centos-release-nfs-ganesha30
dnf install -y nfs-ganesha nfs-ganesha-gluster

The first line again installs a new repository under the SIG management and the second line installs the NFS-Ganesha server with Gluster plugin.

STEP 3) Create GlusterFS volume

Start the GlusterFS server and create a simple 3 replicas volume with:
Start the GlusterFS on all the three nodes and enable the GlusterFS communication between the three nodes using firewall-cmd utility. So execute the following commands:

systemctl start glusterd
firewall-cmd --permanent --new-zone=glusternodes
firewall-cmd --permanent --zone=glusternodes --add-source=192.168.0.200
firewall-cmd --permanent --zone=glusternodes --add-source=192.168.0.201
firewall-cmd --permanent --zone=glusternodes --add-source=192.168.0.202
firewall-cmd --permanent --zone=glusternodes --add-service=glusterfs
firewall-cmd --reload

On the first node create the GlusterFS volume. First, add the glnode2 and glnode3 to the cluster.

gluster peer probe glnode2
gluster peer probe glnode3
gluster volume create VOL1 replica 3 transport tcp glnode1:/mnt/storage/gluster/brick glnode2:/mnt/storage/gluster/brick glnode3:/mnt/storage/gluster/brick
gluster volume start VOL1

Keep on reading!

Simple export of a ext4 directory with NFS Ganesha 3.5 server in CentOS 8 with SELinux enforcing

In fact, this article is a continuation of the previous NFS Ganesha article – Simple export of an ext4 directory with NFS Ganesha 3.5 server in CentOS 8 without SELinux because it has the same purpose to export a directory residing on an ext4 file system under CentOS 8 Stream, but this time the SELinux is enabled and it is in enforcing mode! There is a need for this additional article because the SELinux is not enabled in many user configurations (despite being wrong!) and the SELinux configuration may add complexity to the first article, which could lead to misleading thoughts. The previous article might be a little bit more detailed, so the reader could check it, too.
It’s worth mentioning the key points of NFS-Ganesha:

  • a user-mode file sharing server
  • supports NFS 3, 4.x and 9P
  • using plugins for different file systems
  • CentOS Storage Special Interest Group offers a file repository with NFS-Ganesha server
  • supports file systems like ext4, xfs, brtfs, zfs and more. There are sample configurations: https://github.com/phdeniel/nfs-ganesha/tree/master/src/config_samples
  • supports cluster and/or distributed file systems like GlusterFS, Ceph, GPFS, HPSS, Lustre
  • Current version 3.5 and it is included in the official SIG CentOS Storage Special Interest Group repository.

This article assumes the reader has a clean CentOS 8 Stream installation with SELinux in enforcing mode.

STEP 1) Install the repository and NFS-Ganesha software

NFS-Ganesha 3 packages are from the CentOS Storage SIG repository, which is a good repository and may be trusted.

dnf install -y centos-release-nfs-ganesha30
dnf install -y nfs-ganesha nfs-ganesha-vfs nfs-ganesha-selinux

STEP 2) Configuration for exporting a directory.

There are two files under /etc/ganesha/:

ganesha.conf
vfs.conf

ganesha.conf includes global configuration and NFS share configuration. Each export path begins with the keyword EXPORT followed by a block ebraced by brackets {}.
vfs.conf includes a simple example for the VFS plugin, but this configuration file is not used by the NFS Ganesha server. It is just a sample file.
Here is a simple configuration, which exports /mnt/storage with Read/Write permissions to a single IP. Just add at the end of the file /etc/ganesha/ganesha.conf contains:

 
EXPORT
{
        Export_Id = 2;
        Path = /mnt/storage1;
        Pseudo = /mnt/storage1;
        Protocols = 3,4;
        Access_Type = RW;
        Squash = None;
        FSAL
        {
                Name = VFS;
        }
        CLIENT
        {
                Clients = 192.168.0.12;
        }
}

STEP 3) Start the server and mount the exported directory. Configure the firewall.

Start the server, enable the service to start on boot and then configure the firewall to pass the NFS requests:

systemctl start nfs-ganesha
systemctl enable nfs-ganesha
firewall-cmd --permanent --zone=public --add-service=nfs
firewall-cmd --reload

Keep on reading!

Simple export of a ext4 directory with NFS Ganesha 3.5 server in CentOS 8 without SELinux

NFS Ganesha is a user-mode file sharing server, which supports NFS 3 and 4.x versions and 9P. NFS Ganesha has several interesting plugins that support exporting files from the cluster and distributed file systems like Ceph and Glusterfs Exporting a file system with NFS Ganesha is simple enough if you do not use SELinux or SELinux is in permissive mode!
This article is to show how to export a server’s directory using NFS protocol Just to note the NFS-Ganesha is tested and supports ext2/ext3/ext4, xfs, brtfs, zfs file systems as of version 3.5 (check the manual for xfs, brtfs and zfs exports – here are sample configurations for them https://github.com/phdeniel/nfs-ganesha/tree/master/src/config_samples). To be able to export a file directory the VFS Ganesha plugin is used. A clean install of minimal CentOS 8 Stream is used so the installation log may differ significantly from the user’s log but the user will see all the dependencies, which are required for this setup.

STEP 1) Install the repository and NFS-Ganesha software

NFS-Ganesha 3 packages are from the CentOS Storage SIG repository, which is a good repository and may be trusted.

dnf install -y centos-release-nfs-ganesha30
dnf install -y nfs-ganesha nfs-ganesha-vfs

STEP 2) Configuration for exporting a directory.

There are two files under /etc/ganesha/:

ganesha.conf
vfs.conf

ganesha.conf includes global configuration and NFS share configuration. Each export path begins with the keyword EXPORT followed by a block ebraced by brackets {}.
vfs.conf includes a simple example for the VFS plugin, but this configuration file is not used by the NFS Ganesha server. It is just a sample file.
Here is a simple configuration, which exports /mnt/storage with Read/Write permissions to a single IP. Just add at the end of the file /etc/ganesha/ganesha.conf contains:

 
EXPORT
{
        Export_Id = 2;
        Path = /mnt/storage1;
        Pseudo = /mnt/storage1;
        Protocols = 3,4;
        Access_Type = RW;
        Squash = None;
        FSAL
        {
                Name = VFS;
        }
        CLIENT
        {
                Clients = 192.168.0.12;
        }
}

STEP 3) Start the server and mount the exported directory. Configure the firewall.

Start the server, enable the service to start on boot and then configure the firewall to pass the NFS requests:

systemctl start nfs-ganesha
systemctl enable nfs-ganesha
firewall-cmd --permanent --zone=public --add-service=nfs
firewall-cmd --reload

Keep on reading!

CentOS 8 add a storage driver (megaraid_sas) when booting the installation disk

Installing CentOS 8 in relatively old hardware maybe a real challenge because of an old hardware device like storage, network, or both.
This article shows how to make the CentOS 8 Installation wizard detect the storage – a hardware controller AOC-USAS2LP-H8iR (smc2108 with LSI 2108). Unfortunately, the CentOS 8 (in fact, RHEL 8 removed the support, too) team decided to remove support for the LSI SAS2008/2108/2116 storage controllers by removing the “megaraid_sas” kernel driver. There are still servers in production with similar controllers, which were sold 4-5 years ago from the big vendors such as DELL, HP, and so on.

The method here is to boot the installation CD/USB with modified kernel boot parameters to include an URL link to the installation driver iso (where the megaraid_sas driver is included).

The offered way to load the megaraid_sas (or any other driver) includes:

  1. Use assisted driver update to load an elrepo driver ISO during the first stage of the CentOS 8 Installation Wizard. elrepo is a famous community efford – http://elrepo.org/tiki/tiki-index.php. More on the assited diver update here – https://access.redhat.com/documentation/en-us/red_hat_enterprise_linux/8/html/performing_an_advanced_rhel_installation/updating-drivers-during-installation_installing-rhel-as-an-experienced-user#performing-an-assisted-driver-update_updating-drivers-during-installation
  2. Configure the network of the server to be able to download the driver ISO in the early stage of the CentOS 8 Installation Wizard. Add boot parameters to set up a valid network configuration.

The installation CD/USB can download an iso with kernel drivers. And of course, to download a file from the Internet a network should be set in the earliest stage of the CentOS 8 installation wizard.
The added string to the boot CD/USB CentOS 8 Installation disk is:

 inst.dd=https://elrepo.org/linux/dud/el8/x86_64/dd-megaraid_sas-07.710.50.00-1.el8_2.elrepo.iso ip=10.10.10.10::10.10.10.1:255.255.255.0::enp8s0f0:off nameserver=8.8.8.8

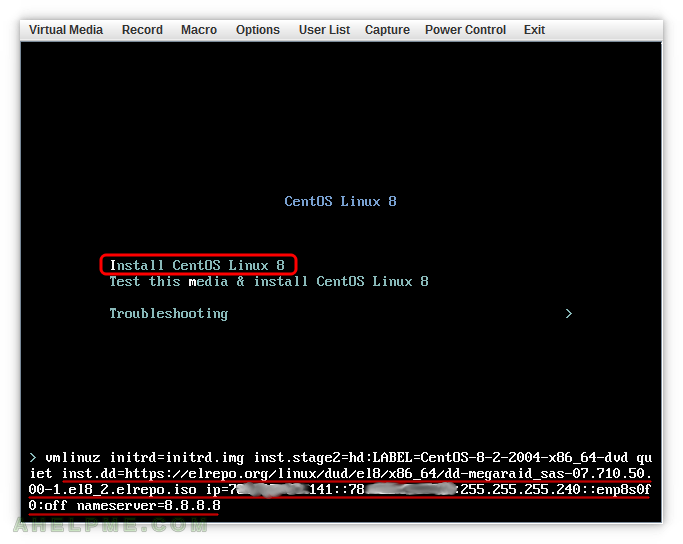
SCREENSHOT 1) Select with the arrows “Install CentOS Linux 8” and hit “TAB” button to edit the boot parameters.

As shown in the picture just add ” inst.dd=https://elrepo.org/linux/dud/el8/x86_64/dd-megaraid_sas-07.710.50.00-1.el8_2.elrepo.iso ip=10.10.10.10::10.10.10.1:255.255.255.0::enp8s0f0:off nameserver=8.8.8.8″. The “inst.dd” instructs the installation wizard where are the driver ISO located. The “ip” and “nameserver” command just sets a proper network in the early stage of the CentOS 8 Installation wizard to be able to download the driver ISO. Setting the network by these parameters is really important, because the download of the driver iso happens in this early stage of loading the installation wizard. Replace the IP and the whole network configuration if needed.

main menu
Installation wizard edit boot parameters

Keep on reading!

Configure Bond (802.3ad LACP) device in CentOS 8 – configuration files

Upgrading to a bond device is a common step when the server exhausts its current network port bandwidth.
The hardware setup of the bond example here is:

  • two 10G network cards – ens1f0 and ens1f0
  • bond name – bond0
  • bond mode – 802.3ad – Link Aggregation Control Protocol (LACP)

The systemd reconfiguration procedure consists of:

  • Stop the network target
    systemctl stop network
    
  • Set several configuration files – network device files for the network interfaces, bonding interface – master and slave devices.
  • Start the network target
    systemctl start network
    

*Note: the 802.3ad bonding mode needs aditional configuration in the switch of which the server is connected.

The example here is using CentOS 8 configuration file to make a permanent (i.e. persistent over reboots using the CentOS 8 network configuration files) bonding configuration.
Check out the official bonding documentation for all modes and options – https://www.kernel.org/doc/Documentation/networking/bonding.txt.

CONF 1) Configure the network interfaces.

The interface should be in down state in the configuration file.
Interface 1 – /etc/sysconfig/network-scripts/ifcfg-ens1f0:

TYPE=Ethernet
PROXY_METHOD=none
BROWSER_ONLY=no
BOOTPROTO=dhcp
DEFROUTE=yes
IPV4_FAILURE_FATAL=no
IPV6INIT=yes
IPV6_AUTOCONF=yes
IPV6_DEFROUTE=yes
IPV6_FAILURE_FATAL=no
IPV6_ADDR_GEN_MODE=stable-privacy
NAME=ens1f0
UUID=3b399a23-570e-45ed-9369-4ff5b87efb2c
DEVICE=ens1f0
ONBOOT=no

Interface 2 – /etc/sysconfig/network-scripts/ifcfg-ens1f1:

TYPE=Ethernet
PROXY_METHOD=none
BROWSER_ONLY=no
BOOTPROTO=dhcp
DEFROUTE=yes
IPV4_FAILURE_FATAL=no
IPV6INIT=yes
IPV6_AUTOCONF=yes
IPV6_DEFROUTE=yes
IPV6_FAILURE_FATAL=no
IPV6_ADDR_GEN_MODE=stable-privacy
NAME=ens1f1
UUID=ecdc5d5b-9739-4424-9d67-362411974281
DEVICE=ens1f1
ONBOOT=no

CONF 2) Configure bonding master device – create a bonding group bond0

This device should be started up at boot.
Bonding device 1 – with name bond0 – /etc/sysconfig/network-scripts/ifcfg-Bond_connection_1:

BONDING_OPTS="downdelay=200 miimon=100 mode=802.3ad updelay=200"
TYPE=Bond
BONDING_MASTER=yes
PROXY_METHOD=none
BROWSER_ONLY=no
BOOTPROTO=none
IPADDR=10.10.10.10
PREFIX=24
GATEWAY=10.10.10.1
DNS1=10.10.10.2
DNS2=10.10.10.3
DEFROUTE=yes
IPV4_FAILURE_FATAL=no
IPV6INIT=yes
IPV6_AUTOCONF=yes
IPV6_DEFROUTE=yes
IPV6_FAILURE_FATAL=no
IPV6_PRIVACY=no
IPV6_ADDR_GEN_MODE=stable-privacy
NAME="Bond connection 1"
UUID=f0a35f9a-20e4-484e-850c-689128642555
DEVICE=bond0
ONBOOT=yes

BONDING_OPTS are specific options for the bonding group with name bond0 and the bonding mode is set here, too.

CONF 3) Configure bonding slave devices – the two network cards

Adding the two network cards to the bonding group bond0. These devices should be started up at boot.
Interface 1 – /etc/sysconfig/network-scripts/ifcfg-bond0_slave_1:

HWADDR=90:E2:BA:8A:13:8C
TYPE=Ethernet
NAME="bond0 slave 1"
UUID=c49e0ced-6411-41fa-9a3b-a01a430664a7
DEVICE=ens1f0
ONBOOT=yes
MASTER=bond0
SLAVE=yes

Interface 2 – /etc/sysconfig/network-scripts/ifcfg-bond0_slave_2:

HWADDR=90:E2:BA:8A:13:8D
TYPE=Ethernet
NAME="bond0 slave 2"
UUID=90de1cad-1d9f-48cb-8e5a-7d8bfdde91d2
DEVICE=ens1f1
ONBOOT=yes
MASTER=bond0
SLAVE=yes

Dracut boot failed with missing device – exit and continue normal booting!

This issue deserves a much more article, in fact, a straightforward tip:

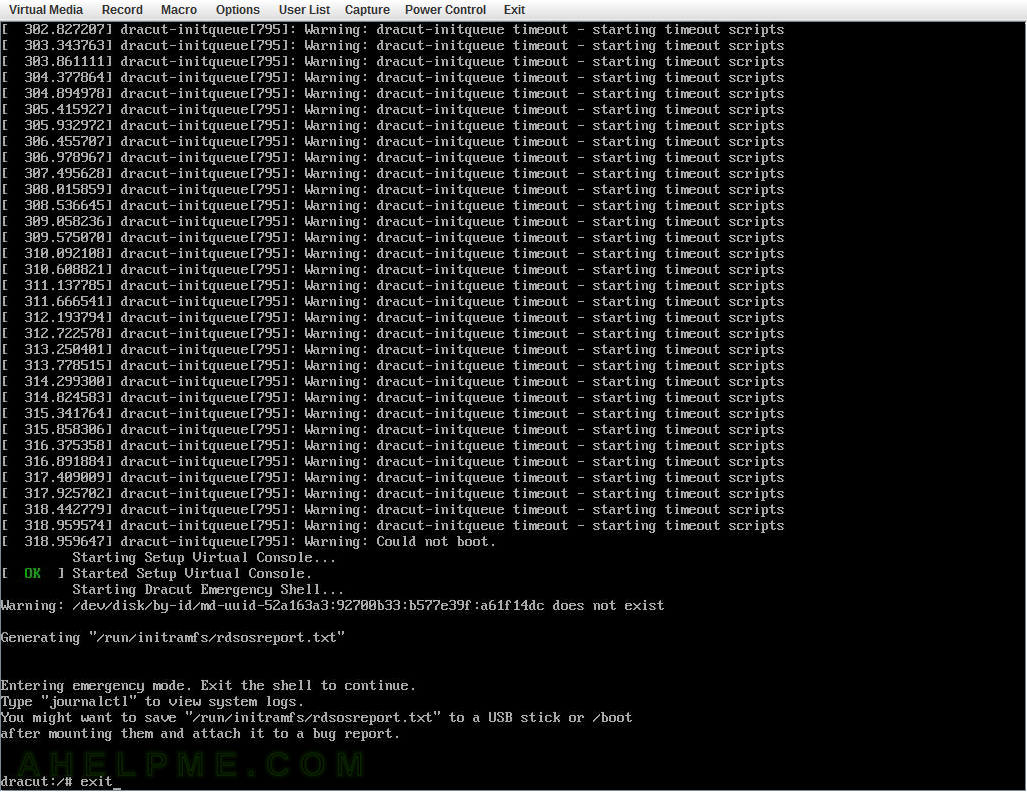
You may be able to continue a normal boot only by typing “exit” and hitting enter in the “Dracut” console.

Most of the time this Dracut console entering is caused because the system administrator of the server/machine added, replaced or deleted a RAID or similar device and forgot to update the configuration (grub2 probably). And in most of these cases, the raid is not critical for machine normal boot from the root partition, but it may be critical for the services lately. Booting in normal mode, even without some devices, is the main goal because under the normal mode it easier to repair the system.
Check out the two articles on the topic (especially the first one):

SCREENSHOT 1) Just type “exit” and hit enter.

It’s worth noting that if you executed some commands in the console and/or mounted devices to test they are with healthy file system or for whatever reason you did it, the boot process may not continue after typeing exit and probablly a reboot is required. The server will go once more in this mode and then just typing will work.

main menu
type exit

Keep on reading!

rsync daemon in CentOS 8

Apparently, the team behind the CentOS 8 decided to split the rsync functionality to two packages – one for the client-side and for the server-side, despite the binary rsync is only one and offers the client-size and server-side.
So there two packages in CentOS 8:

  1. rsync – provides the client-side and server-side as usual
  2. rsync-daemon – provides configuration example file and the systemd to start it as a service.

So if you wonder where is your rsync service after installing the rsync package under CentOS 8 you must install additional package “rsync-daemon”.

Of course, you may just create anywhere “rsyncd.conf” (the best place for the configuration file is in /etc, but could be placed anywhere with “–config=PATH/FILE” option) file and start the daemon as usual with “–daemon” option included to have the rsync server-side up and running.

rsync --daemon --config=/etc/rsyncd.conf

Just create yourself the configuration “/etc/rsyncd.conf” file.

Install the rsync program – the client and the daemon

dnf install rsync

Install the configuration and systemd files

dnf install rsync-daemon

rsync and rsync-daemon files

The files included in the two packages:

[root@srv ~]# dnf repoquery -l rsync-daemon
Last metadata expiration check: 0:33:02 ago on Wed 22 Jan 2020 02:57:06 PM UTC.
/etc/rsyncd.conf
/etc/sysconfig/rsyncd
/usr/lib/systemd/system/rsyncd.service
/usr/lib/systemd/system/rsyncd.socket
/usr/lib/systemd/system/rsyncd@.service
/usr/share/man/man5/rsyncd.conf.5.gz
[root@srv ~]# dnf repoquery -l rsync
Last metadata expiration check: 0:33:06 ago on Wed 22 Jan 2020 02:57:06 PM UTC.
/usr/bin/rsync
/usr/lib/.build-id
/usr/lib/.build-id/6e
/usr/lib/.build-id/6e/bdbf5032a966a6293cea003621ba766ab36ff1
/usr/share/doc/rsync
/usr/share/doc/rsync/NEWS
/usr/share/doc/rsync/OLDNEWS
/usr/share/doc/rsync/README
/usr/share/doc/rsync/support
/usr/share/doc/rsync/support/Makefile
/usr/share/doc/rsync/support/atomic-rsync
/usr/share/doc/rsync/support/cvs2includes
/usr/share/doc/rsync/support/deny-rsync
/usr/share/doc/rsync/support/file-attr-restore
/usr/share/doc/rsync/support/files-to-excludes
/usr/share/doc/rsync/support/git-set-file-times
/usr/share/doc/rsync/support/instant-rsyncd
/usr/share/doc/rsync/support/logfilter
/usr/share/doc/rsync/support/lsh
/usr/share/doc/rsync/support/lsh.sh
/usr/share/doc/rsync/support/mapfrom
/usr/share/doc/rsync/support/mapto
/usr/share/doc/rsync/support/mnt-excl
/usr/share/doc/rsync/support/munge-symlinks
/usr/share/doc/rsync/support/rrsync
/usr/share/doc/rsync/support/rsync-no-vanished
/usr/share/doc/rsync/support/rsync-slash-strip
/usr/share/doc/rsync/support/rsyncstats
/usr/share/doc/rsync/support/savetransfer.c
/usr/share/doc/rsync/tech_report.tex
/usr/share/licenses/rsync
/usr/share/licenses/rsync/COPYING
/usr/share/man/man1/rsync.1.gz

Technical details of a default CentOS 8.0.1950 minimal installation

This article is for those of you who do not want to install a whole new operating system only to discover some technical details about the default installation like disk layout, packages included, software versions, and so on. Here we are going to review in several sections what is like to have a default installation of CentOS 8.0.
Despite the kernel is 4.18 it detects successfully the new RYZEN/Threadripper AMD and the system is stable (we booted in UEFI mode).

Software

The CentOS 8.0 (8.0.1950) you can have

  • linux kernel – 4.18.0 (4.18.0-80.7.1.el8_0.x86_64)
  • Graphical User Interface
    • Xorg X server – 1.20.3
    • GNOME (the GUI) – 3.28.2
    • K Desktop Environment – NO, it’s depricated and not included in the release.
  • System
    • linux-firmware – version: 20190111, release: 92.gitd9fb2ee6.el8.
    • QT – 5.11.1
    • libc – 2.28
    • GNU GCC – 8.2.1
    • OpenSSL – 1.1.1
    • coreutils – 8.30
    • yum – Depricated and replaced with dnf
    • dnf – 4.0.9.2
    • cups – 2.2.6
    • rsyslog – 8.37.0
  • Servers
    • Apache – 2.4.37
    • Nginx – 1.14.1
    • MySQL server – 8.0.13
    • MariaDB server – 10.3.11
    • PostgreSQL – 10.6
  • Programming
    • PHP – 7.2.11
    • python – 2.7.15 and also includes 3.6.8
    • perl – 5.26.3
    • ruby – 2.5.3
    • OpenJDK – 11.0.4.11 and also includes 1.8.0.222.b10
    • Go – 1.11.5
    • Rust – 1.31.0
    • Subversion – 1.10.2
    • Git – 2.18.1

Note: Not all of the above software comes installed by default.
The installation procedure you can find here – How to do a network installation of CentOS 8 (8.0.1950) – minimal server installation Minimal install with “Standard” Addons selected.
Installed packages are 547 occupying 1.8G space:.

[root@srv ~]# dnf list installed|wc -l
547
[root@srv ~]# df -h /
Filesystem               Size  Used Avail Use% Mounted on
/dev/mapper/cl_srv-root   50G  1.8G   49G   4% /

Note: if you do not select “Standard Addon” the installation occupies less space – 1.6Gbytes and installs only 397 packages.
Keep on reading!