Review of freshly installed Fedora 38 Workstation (Gnome GUI)

After Install Fedora Workstation 38 (Gnome GUI) this tutorial is mainly to see what to expect from a freshly installed Fedora 38 Workstation – the look and feel of the GUI (Gnome – version 44.0).

  • Xorg X11 server – 1.20.14 and Xorg X11 server XWayland 22.1.9 is used by default
  • GNOME (the GUI) – 44.0
  • linux kernel – 6.2.9

The idea of this tutorial is just to see what to expect from https://docs.fedoraproject.org/en-US/releases/f38/the look and feel of the GUI, the default installed programs, and their look and how to do some basic steps with them. Here the reader finds more than 214 screenshots and not so much text the main idea is not to distract the user with much text and version information and 3 meaningless screenshots , which the reader cannot see anything for the user interface, but these days the user interface is the primary goal of a Desktop system. Only for comparison there are couple of old versions reviews, too – Review of freshly installed Fedora 37 Workstation (Gnome GUI), Review of freshly installed Fedora 36 Workstation (Gnome GUI) and more.
For more details about what software version could be installed check out the Software and technical details of Fedora Server 38 including cockpit screenshots. The same software could be installed in Fedora 38 Workstation to build a decent development desktop system.

For all installation and review articles, real workstations are used, not virtual environments!

SCREENSHOT 1) Fedora Linux (6.2.9-300.fc38.x86_64) 38 (Workstation Edition)
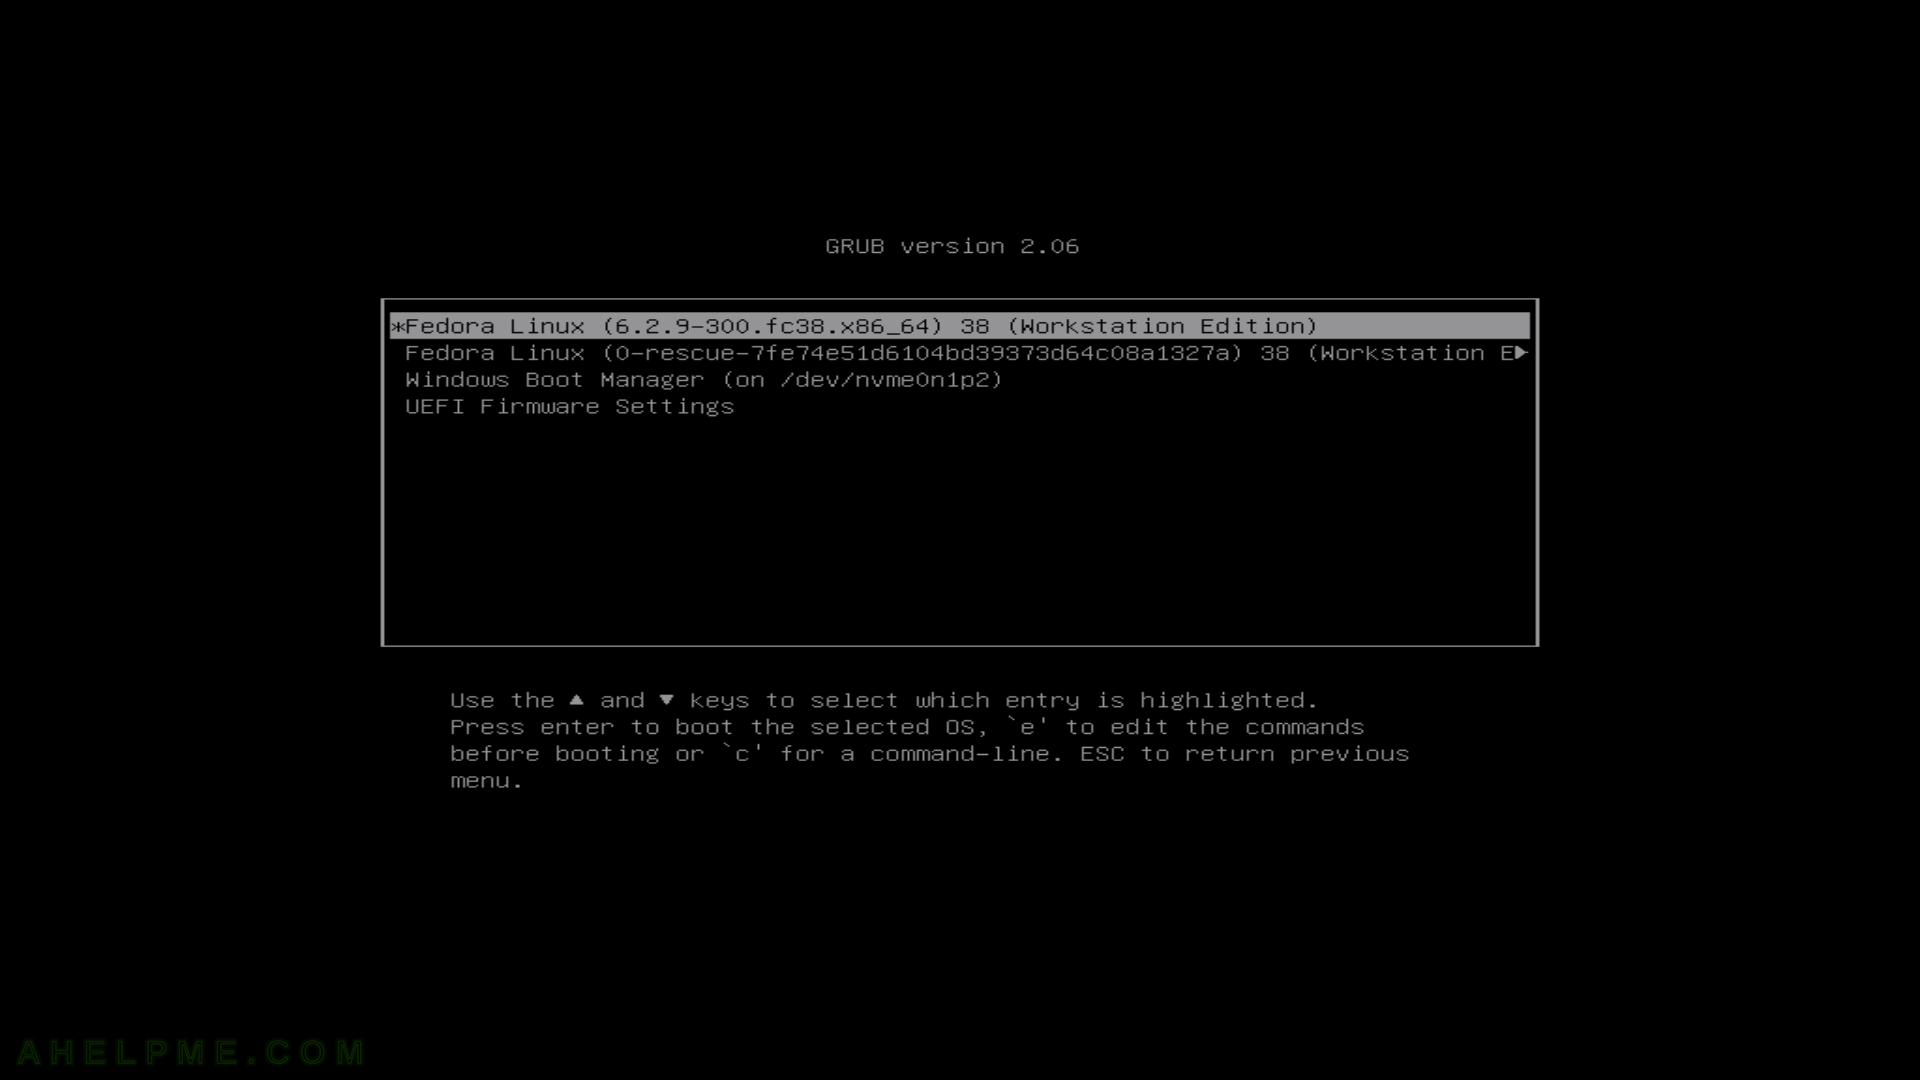
main menu
grub 2.06 entry boot

Keep on reading!

Install and create a GlusterFS 11 replica cluster under CentOS Stream 9

At present, the latest version of GlusterFS is 11 and the latest version of CentOS is CentOS Stream 9.

main menu
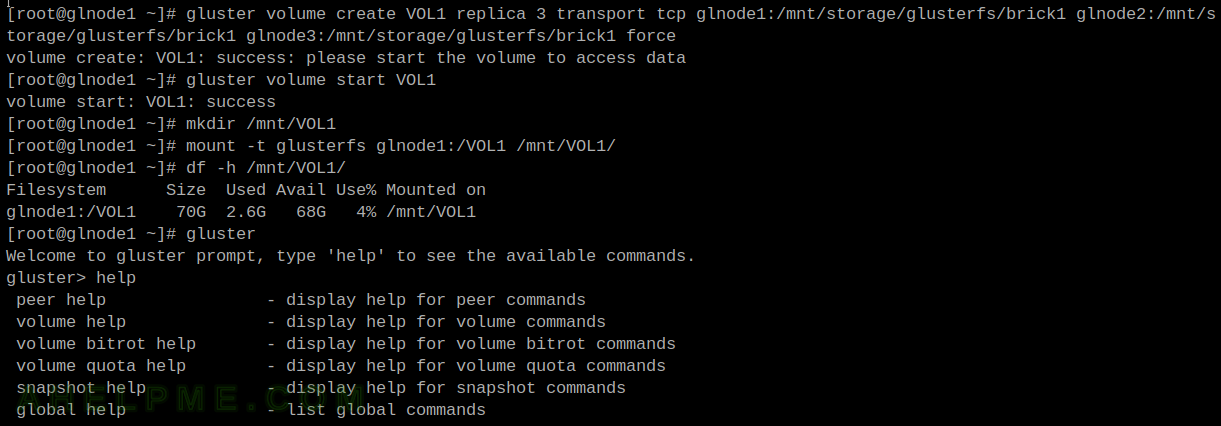
create force start and mount volume

This article will present how to build 3 file replicas node cluster using the latest version of GlusterFS and CentOS Stream 9. There are old versions of this topic here – Create and export a GlusterFS volume with NFS-Ganesha in CentOS 8 and glusterfs with localhost (127.0.0.1) nodes on different servers – glusterfs volume with 3 replicas.

Summary

Here is what the 3-nodes replicas cluster represents:

STEP 1) Install the additional repositories.

Three additional repositories should be installed – all of them are official from the CentOS community or Fedora official community, so there tend to be really stable and do not break the package integrity.
Keep on reading!

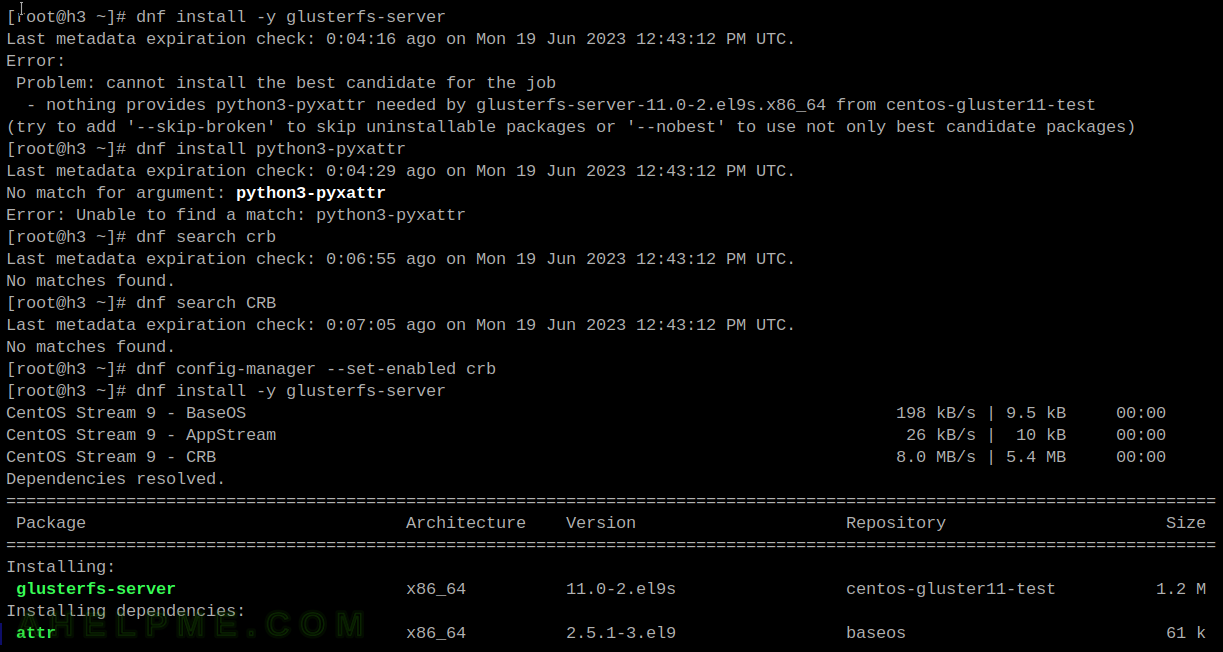
Missing the CentOS Stream 9 CRB repository – nothing provides python3-pyxattr needed by

CentOS Stream 9 CRB repository is the name of the repository, which replaces the old CentOS Stream 8 PowerTools repository.

main menu
enable CRB
The CRB is an official repository, which stands for CodeReady Linux Builder repository. It includes multiple important packages mainly for developer packages (those with “-devel” in the name). The CRB packages may be found here: https://mirror.stream.centos.org/9-stream/CRB/x86_64/os/Packages/.
When installing packages from community official or other repositories they may depend on packages in CRB repositories, but because it is not enabled by default, there will be a nasty error of broken dependencies like:

Error: 
 Problem: cannot install the best candidate for the job
  - nothing provides python3-pyxattr needed by glusterfs-server-11.0-2.el9s.x86_64 from centos-gluster11-test
(try to add '--skip-broken' to skip uninstallable packages or '--nobest' to use not only best candidate packages)

The package glusterfs-server-11.0-2.el9s.x86_64 needs the package python3-pyxattr, which cannot be found in all the enabled repositories on the system, so it appears the system is broken.

So the python3-pyxattr is part of the CRB repository so just enabling it will solve the problem:

[root@srv ~]# dnf config-manager --set-enabled crb
[root@srv ~]# dnf install -y glusterfs-server
CentOS Stream 9 - BaseOS                                                                 198 kB/s | 9.5 kB     00:00    
CentOS Stream 9 - AppStream                                                               26 kB/s |  10 kB     00:00    
CentOS Stream 9 - CRB                                                                    8.0 MB/s | 5.4 MB     00:00    
Dependencies resolved.
=========================================================================================================================
 Package                                Architecture    Version                     Repository                      Size
=========================================================================================================================
Installing:
 glusterfs-server                       x86_64          11.0-2.el9s                 centos-gluster11-test          1.2 M
Installing dependencies:
 attr                                   x86_64          2.5.1-3.el9                 baseos                          61 k
 device-mapper-event                    x86_64          9:1.02.195-1.el9            baseos                          33 k
 device-mapper-event-libs               x86_64          9:1.02.195-1.el9            baseos                          32 k
 device-mapper-persistent-data          x86_64          0.9.0-13.el9                baseos                         782 k
 glusterfs-cli                          x86_64          11.0-2.el9s                 centos-gluster11-test          185 k
 glusterfs-client-xlators               x86_64          11.0-2.el9s                 centos-gluster11-test          785 k
 glusterfs-fuse                         x86_64          11.0-2.el9s                 centos-gluster11-test          136 k
 glusterfs-selinux                      noarch          2.0.1-1.el9s                centos-gluster11                29 k
 libaio                                 x86_64          0.3.111-13.el9              baseos                          24 k
 libgfapi0                              x86_64          11.0-2.el9s                 centos-gluster11-test           95 k
 libgfchangelog0                        x86_64          11.0-2.el9s                 centos-gluster11-test           34 k
 lvm2                                   x86_64          9:2.03.21-1.el9             baseos                         1.5 M
 lvm2-libs                              x86_64          9:2.03.21-1.el9             baseos                         1.0 M
 python3-pyxattr                        x86_64          0.7.2-4.el9                 crb                             35 k
 rpcbind                                x86_64          1.2.6-5.el9                 baseos                          58 k

Transaction Summary
=========================================================================================================================
Install  16 Packages

Total download size: 6.0 M
.....
.....
  python3-pyxattr-0.7.2-4.el9.x86_64                         rpcbind-1.2.6-5.el9.x86_64                                 

Complete!

Listing packages of the CRB repository is simple enough.

[root@srv ~]# dnf repository-packages crb list
Last metadata expiration check: 1:26:16 ago on Mon 19 Jun 2023 12:50:59 PM UTC.
Installed Packages
python3-pyxattr.x86_64                       0.7.2-4.el9                        @crb
Available Packages
CUnit-devel.i686                             2.1.3-25.el9                       crb 
CUnit-devel.x86_64                           2.1.3-25.el9                       crb 
Judy-devel.i686                              1.0.5-28.el9                       crb 
Judy-devel.x86_64                            1.0.5-28.el9                       crb 
LibRaw-devel.i686                            0.20.2-6.el9                       crb 
LibRaw-devel.x86_64                          0.20.2-6.el9                       crb 
.....
.....

Apparently, CentOS Stream 9 installation should include EPEL and CRB repositories in addition to the base ones.
Almost half of the files are developments files (i.e. “-devel”) packages and others are additional libraries, mainly Python 3 and Perl modules, OpenJDK 17, 11, 1.8.0 slow debug and fast debug, and more.

Migrate from NFS Kernel Server to NFS-Ganesha server under CentOS Stream 9

This article is to show how to migrate from the NFS kernel server to the NFS-Ganesha server under CentOS Stream 9. The most important thing for migrating from one program to another program is how much downtime will be and what is expected to be done by the clients. In this case, what the clients are needed to do when NFS-Ganesha is used for the server?

main menu
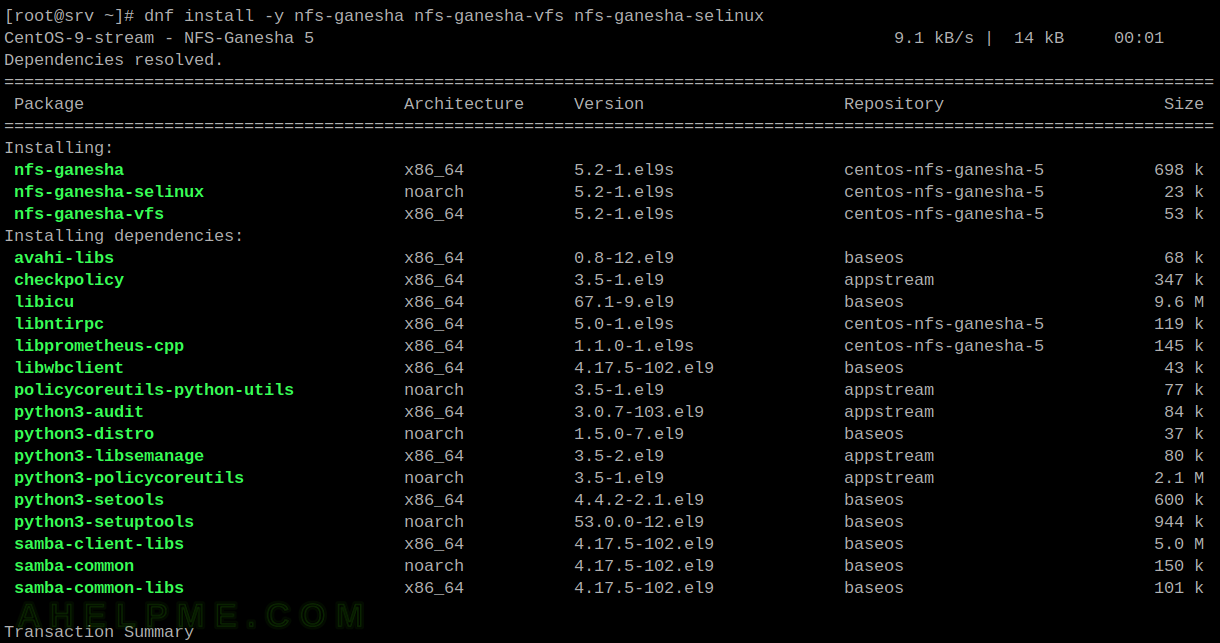
install nfs ganesha

Here are the main points when migrating from NFS Kernel Server to the NFS-Ganesha:

  • The nfs-tuils and nfs-ganesha packages and in general, the two software, are perfectly fine installed on the same system. There are no conflicts when NFS Kernel Server and the NFS-Ganesha server are installed at the same time on the same system.
  • The clients, do not need to do anything, except remount the NFS mounts.
  • It should be installed a new community repository by installing the centos-release-nfs-ganesha5 package. The Special Interest Groups (SIG) maintains the repository and the group is within the CentOS community

For installation of NFS-Ganesha and a detailed information check out the older article on the subject – Simple export of a ext4 directory with NFS Ganesha 3.5 server in CentOS 8 with SELinux enforcing, Simple export of a ext4 directory with NFS Ganesha 3.5 server in CentOS 8 without SELinux and Create and export a GlusterFS volume with NFS-Ganesha in CentOS 8

Prerequisite – NFS Kernel Configuration

NFS Kernel Server is installed with nfs-utils packages (and its dependencies) and it has the following simple configuration:

[root@srv ~]# cat /etc/exports
/mnt/storage           192.168.0.0/24(rw,sync,no_root_squash,no_subtree_check)

And here are the NFS services on the system:

[root@srv ~]# systemctl |grep nfs
  proc-fs-nfsd.mount                                         loaded active mounted   NFSD configuration filesystem
  var-lib-nfs-rpc_pipefs.mount                               loaded active mounted   RPC Pipe File System
  nfs-idmapd.service                                         loaded active running   NFSv4 ID-name mapping service
  nfs-mountd.service                                         loaded active running   NFS Mount Daemon
  nfs-server.service                                         loaded active exited    NFS server and services
  nfsdcld.service                                            loaded active running   NFSv4 Client Tracking Daemon
  nfs-client.target                                          loaded active active    NFS client services

The server’s firewall has been tuned for the NFS kernel server, so no need to edit anything in the firewall for the NFS-Ganesha server.
Keep on reading!

Firewalld and how to preserve the original source IP when forwarding to internal IP

Using firewalld and the forwarding options (IP or port forward) might work not as expected if the default setup is left on the system. Consider the simple example:

main menu
Internet <-> router <-> local network

The purpose is to forward a port to a server in the local network, which should be easy enough. Let the forwarding port be 80 and the server should receive the original source IP. To archive this task the system administrator should do the following on the router with firewalld service. Here is one of the simplest methods:

  • When the router’s external IP/interface and the router’s internal IP/interface are in the same firewalld zone. The zone is named “public” in the CentOS world.

The solution uses the masquerade rule added with a rich rule (–add-rich-rule), not the masquerade option of the zone (–add-masquerade).
The default configuration will assign the external interface and the internal interface, which may be a virtual one, in the same firewalld zone such as “public”. When this happens, activating the masquerade option will break the source IP and it will be replaced by the Netfilter with the internal IP address of the router and the internal server will see all incoming connections on the forwarded port as if they were coming from the internal router IP. All different IPs coming to this port will be replaced with the router’s internal IP and forwarded to the server’s internal.

The router’s external IP/interface and the router’s internal IP/interface are in the same firewalld zone.

This solution is demonstrated with a virtual interface – bridge br0, but it may be a network interface. By default, when the bridge is created, it will be added to the default zone, which is “public” in CentOS world. Use –get-active-zones to check the active zones and the assigned interfaces.

[root@srv ~]# firewall-cmd --get-active-zones
public
  interfaces: eth0 br0
[root@srv ~]# firewall-cmd --list-all
public (active)
  target: default
  icmp-block-inversion: no
  interfaces: br0 eth0
  sources: 
  services: cockpit dhcpv6-client http https ssh
  ports: 10022/tcp
  protocols: 
  forward: yes
  masquerade: no
  forward-ports: 
  source-ports: 
  icmp-blocks: 
  rich rules:

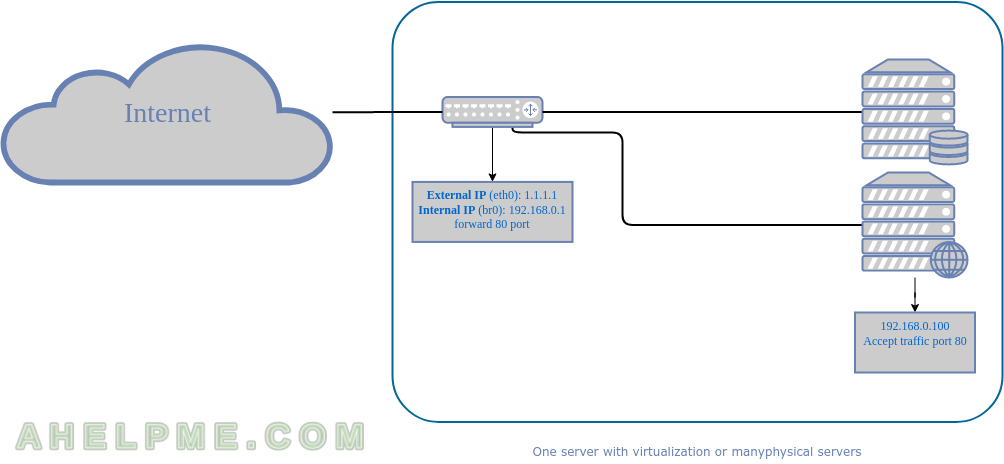
If the options forward and masquerade are activated (i.e. yes on the above output) and a forward rule to an internal local IP (some server IP connected to the bridge br0) is introduced to the firewall, the local server will receive all connection attempts to the forwarded port, but the source IP will be overwritten with the gateway IP of the internal (local network). For example, the bridge br0 has IP 192.168.0.1 and the eth0 has Internet IP 1.1.1.1. Forwarding port 1.1.1.1:80 to a server behind the bridge br0 with IP 192.168.0.100:
Keep on reading!

mdadm assembles AVAGO/LSI MegaRAID controller RAID 5 array

It is possible to read data with the software Linux raid using mdadm tool from a RAID 5 array created with the hardware raid controller AVAGO MegaRAID 9361-4i (LSI SAS3108).

main menu
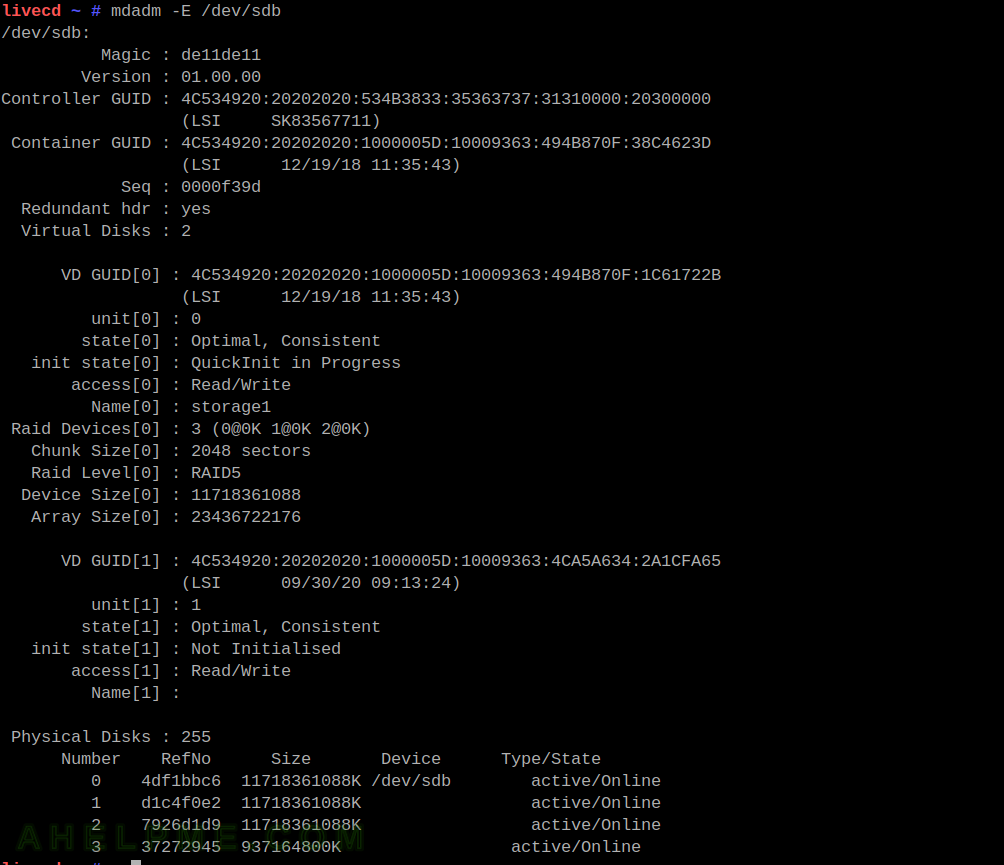
mdadm E sdb

Here, how a RAID 5 array with 3 hard drives and 1 SSD ( with CacheCade in write-through mode) is assembled by the mdadm and Linux software raid:

livecd ~ # cat /proc/mdstat 
Personalities : [raid0] [raid6] [raid5] [raid4] 
md125 : active raid0 sda[0]
      937164800 blocks super external:/md127/1 1024k chunks
      
md126 : active raid5 sdb[2] sdc[1] sdd[0]
      23436722176 blocks super external:/md127/0 level 5, 1024k chunk, algorithm 2 [3/3] [UUU]
      [==============>......]  resync = 72.0% (8438937704/11718361088) finish=336.8min speed=162234K/sec
      
md127 : inactive sdb[3](S) sda[2](S) sdd[1](S) sdc[0](S)
      2100568 blocks super external:ddf
       
unused devices: <none>

Note, it is essential that the CacheCade device is in write-through mode, which means the cache device is used only for reading and the data on the RAID array is consistent and written on it. The RAID 5 array was created here – AVAGO MegaRAID SAS-9361-4i with CacheCade – create a new virtual drive RAID5 with SSD caching. It seams possible for the data to be consistent if the CacheCade is write-back mode if there were few small writes and orderly shutdown prior to the removal of the AVAGO MegaRAID 9361-4i.
So, the above devices use proprietary LSI format, but here Linux software raid supports some of them:

  • md125 – the SSD device, which is a read cache only.
  • md126 – 3 hard drives in RAID 5 array.
  • md127 – logical device, which provides transparent interface to the

The important device is md126 and can be mounted under some live Linux CD/USB. Further, the md125 is a device, which has GPT partition table with 5 partitions:

livecd ~ # parted /dev/md126 --script print
Model: Linux Software RAID Array (md)
Disk /dev/md126: 24.0TB
Sector size (logical/physical): 512B/4096B
Partition Table: gpt
Disk Flags: 

Number  Start   End     Size    File system     Name                  Flags
 1      1049kB  211MB   210MB   fat16           EFI System Partition  boot, esp
 2      211MB   1285MB  1074MB  ext4                                  msftdata
 3      1285MB  23.9TB  23.9TB  ext4                                  msftdata
 4      23.9TB  24.0TB  53.7GB  ext4                                  msftdata
 5      24.0TB  24.0TB  16.8GB  linux-swap(v1)                        swap

Keep on reading!

Switch to a new master (primary) in MySQL InnoDB Cluster 8

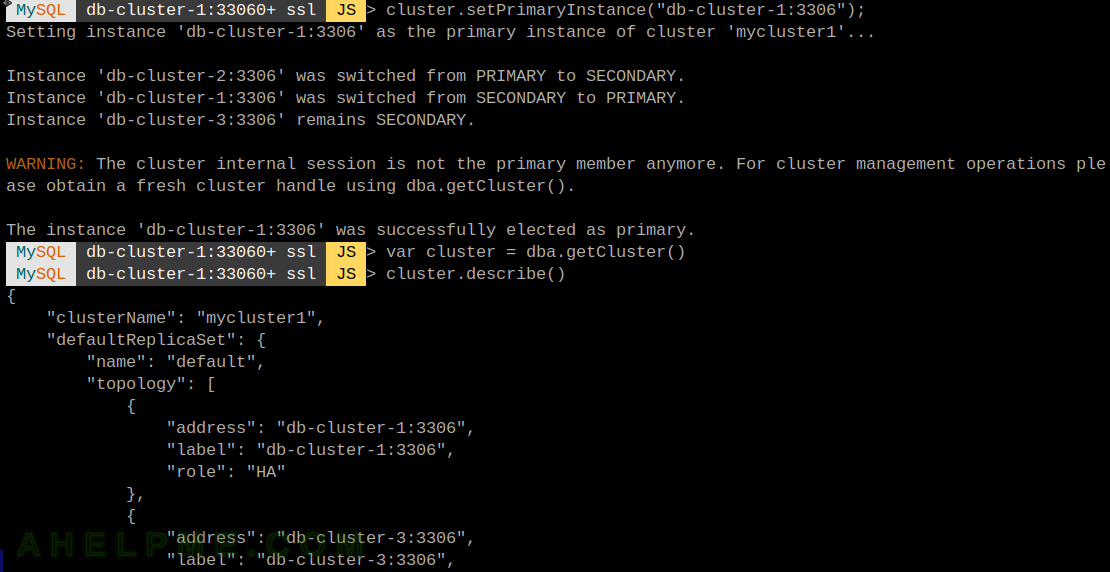
Switching to a new master (or new primary if to use the new naming) in a MySQL 8 InnoDB Cluster is simple with the MySQL Shell console and the function of the cluster variable – setPrimaryInstance.

main menu
MySQL Shell with setPrimaryInstance

Why would someone need to do it manually? One of the reasons may be because one of the nodes is on the same physical server and thus suppose a smaller latency.

First, get a cluster object of the cluster by connecting to the cluster API with MySQL Shell:

[root@db-cluster-1 ~]# mysqlsh
MySQL Shell 8.0.28

Copyright (c) 2016, 2022, Oracle and/or its affiliates.
Oracle is a registered trademark of Oracle Corporation and/or its affiliates.
Other names may be trademarks of their respective owners.

Type '\help' or '\?' for help; '\quit' to exit.
 MySQL  JS > \connect clusteradmin@db-cluster-1
Creating a session to 'clusteradmin@db-cluster-1'
Fetching schema names for autocompletion... Press ^C to stop.
Your MySQL connection id is 166928419 (X protocol)
Server version: 8.0.28 MySQL Community Server - GPL
No default schema selected; type \use <schema> to set one.
 MySQL  db-cluster-1:33060+ ssl  JS > var cluster = dba.getCluster()

Second, show the status of the cluster to get the cluster topology and the exact nodes’ names, which will use as an argument of the setPrimaryInstance. Still, in the MySQL Shell Console:

 MySQL  db-cluster-1:33060+ ssl  JS > cluster.status()
{
    "clusterName": "mycluster1", 
    "defaultReplicaSet": {
        "name": "default", 
        "primary": "db-cluster-2:3306", 
        "ssl": "REQUIRED", 
        "status": "OK", 
        "statusText": "Cluster is ONLINE and can tolerate up to ONE failure.", 
        "topology": {
            "db-cluster-1:3306": {
                "address": "db-cluster-1:3306", 
                "memberRole": "SECONDARY", 
                "mode": "R/O", 
                "readReplicas": {}, 
                "replicationLag": null, 
                "role": "HA", 
                "status": "ONLINE", 
                "version": "8.0.28"
            }, 
            "db-cluster-2:3306": {
                "address": "db-cluster-2:3306", 
                "memberRole": "PRIMARY", 
                "mode": "R/W", 
                "readReplicas": {}, 
                "replicationLag": null, 
                "role": "HA", 
                "status": "ONLINE", 
                "version": "8.0.28"
            }, 
            "db-cluster-3:3306": {
                "address": "db-cluster-3:3306", 
                "memberRole": "SECONDARY", 
                "mode": "R/O", 
                "readReplicas": {}, 
                "replicationLag": null, 
                "role": "HA", 
                "status": "ONLINE", 
                "version": "8.0.28"
            }
        }, 
        "topologyMode": "Single-Primary"
    }, 
    "groupInformationSourceMember": "db-cluster-2:3306"
}

Keep on reading!

Install Fedora Workstation 38 (Gnome GUI)

This article will show the simple steps of installing a modern Linux Distribution like Fedora 38 Workstation Edition with Gnome for the graphical user interface. First, it is offered the basic steps for installing the Operating system and then there are some screenshots of the installed system and its look and feel. Soon another article will show more screenshots of the installed and working Fedora 38 (Gnome and KDE plasma) – so the user may decide which of them to try first.
This is the most straightforward setup. One hard disk device in the system is installed, which is detected as sda and the entire disk will be used for the installation of Fedora Workstation 38. All disk information in sda disk device will be permanently deleted by the installation wizard!

The Fedora 38 Workstation comes with

  • Xorg X11 server – 1.20.14 and Xorg X11 server XWayland 22.1.9 is used by default
  • GNOME (the GUI) – 44.0
  • linux kernel – 6.2.9

Check out our article about what software is included in – Review of freshly installed Fedora 38 Workstation (Gnome GUI).

There are previous installations howto articles for the older Fedora 37Install Fedora Workstation 37 (Gnome GUI), Review of freshly installed Fedora 36 Workstation (Gnome GUI), Install Fedora Workstation 31 (Gnome GUI), Install Fedora Workstation 30 (Gnome GUI).

The following ISO is used for the installation process: https://download.fedoraproject.org/pub/fedora/linux/releases/38/Workstation/x86_64/iso/Fedora-Workstation-Live-x86_64-38-1.6.iso
It is a LIVE image so you can try it before installing. The easiest way is just to download the image and burn it to a DVD disk (or make a bootable USB flash drive) and then follow the installation below.
The simplest way to make a bootable USB drive is to just use the Linux command dd. First, download the ISO file above and then plug the USB drive into the computer and find out the device name, it should be something of /dev/sda or /dev/sdb or /dev/sdc (execute the dmesg command in the console and check the last lines for the USB drive detection and its device name like /dev/sd?). After knowing the USB device name issue the dd command to overwrite it with the ISO. Note, all data will be lost if you use the following command with the device name mentioned in the command line.

myuser@mydesktop ~ # dd if=/mnt/media/OS/Fedora/Fedora-Workstation-Live-x86_64-38-1.6.iso of=/dev/sdd bs=8M status=progress oflag=direct
2080374784 bytes (2.1 GB, 1.9 GiB) copied, 22 s, 94.4 MB/s2099451904 bytes (2.1 GB, 2.0 GiB) copied, 22.1921 s, 94.6 MB/s

250+1 records in
250+1 records out
2099451904 bytes (2.1 GB, 2.0 GiB) copied, 22.2063 s, 94.5 MB/s

The USB flash drive should have at least 4G space. Using dd command will overwrite the data on the USB drive without warning or confirmation!

The user can check what device name the just-plugged USB Drive has with dmesg console command:

myuser@mydesktop ~ # dmesg|tail -n 20
[1111445.079524] usb 3-2: New USB device strings: Mfr=1, Product=2, SerialNumber=3
[1111445.079526] usb 3-2: Product: IS888 USB3.0 to SATA bridge
[1111445.079528] usb 3-2: Manufacturer: Innostor Technology
[1111445.079529] usb 3-2: SerialNumber: 088810000000
[1111445.083169] usb-storage 3-2:1.0: USB Mass Storage device detected
[1111445.083301] scsi host6: usb-storage 3-2:1.0
[1111446.092244] scsi 6:0:0:0: Direct-Access     KINGSTON  SNV425S2128GB        PQ: 0 ANSI: 0
[1111446.093165] sd 6:0:0:0: Attached scsi generic sg2 type 0
[1111446.093586] sd 6:0:0:0: [sdd] 250069680 512-byte logical blocks: (128 GB/119 GiB)
[1111446.093883] sd 6:0:0:0: [sdd] Write Protect is off
[1111446.093886] sd 6:0:0:0: [sdd] Mode Sense: 03 00 00 00
[1111446.094489] sd 6:0:0:0: [sdd] No Caching mode page found
[1111446.094497] sd 6:0:0:0: [sdd] Assuming drive cache: write through
[1111446.100093] GPT:Primary header thinks Alt. header is not at the end of the disk.
[1111446.100102] GPT:1402999 != 250069679
[1111446.100104] GPT:Alternate GPT header not at the end of the disk.
[1111446.100105] GPT:1402999 != 250069679
[1111446.100106] GPT: Use GNU Parted to correct GPT errors.
[1111446.100148]  sdd: sdd1 sdd2 sdd3
[1111446.100623] sd 6:0:0:0: [sdd] Attached SCSI disk

The just-plugged USB drive is attached to the system with the device name /dev/sdd.

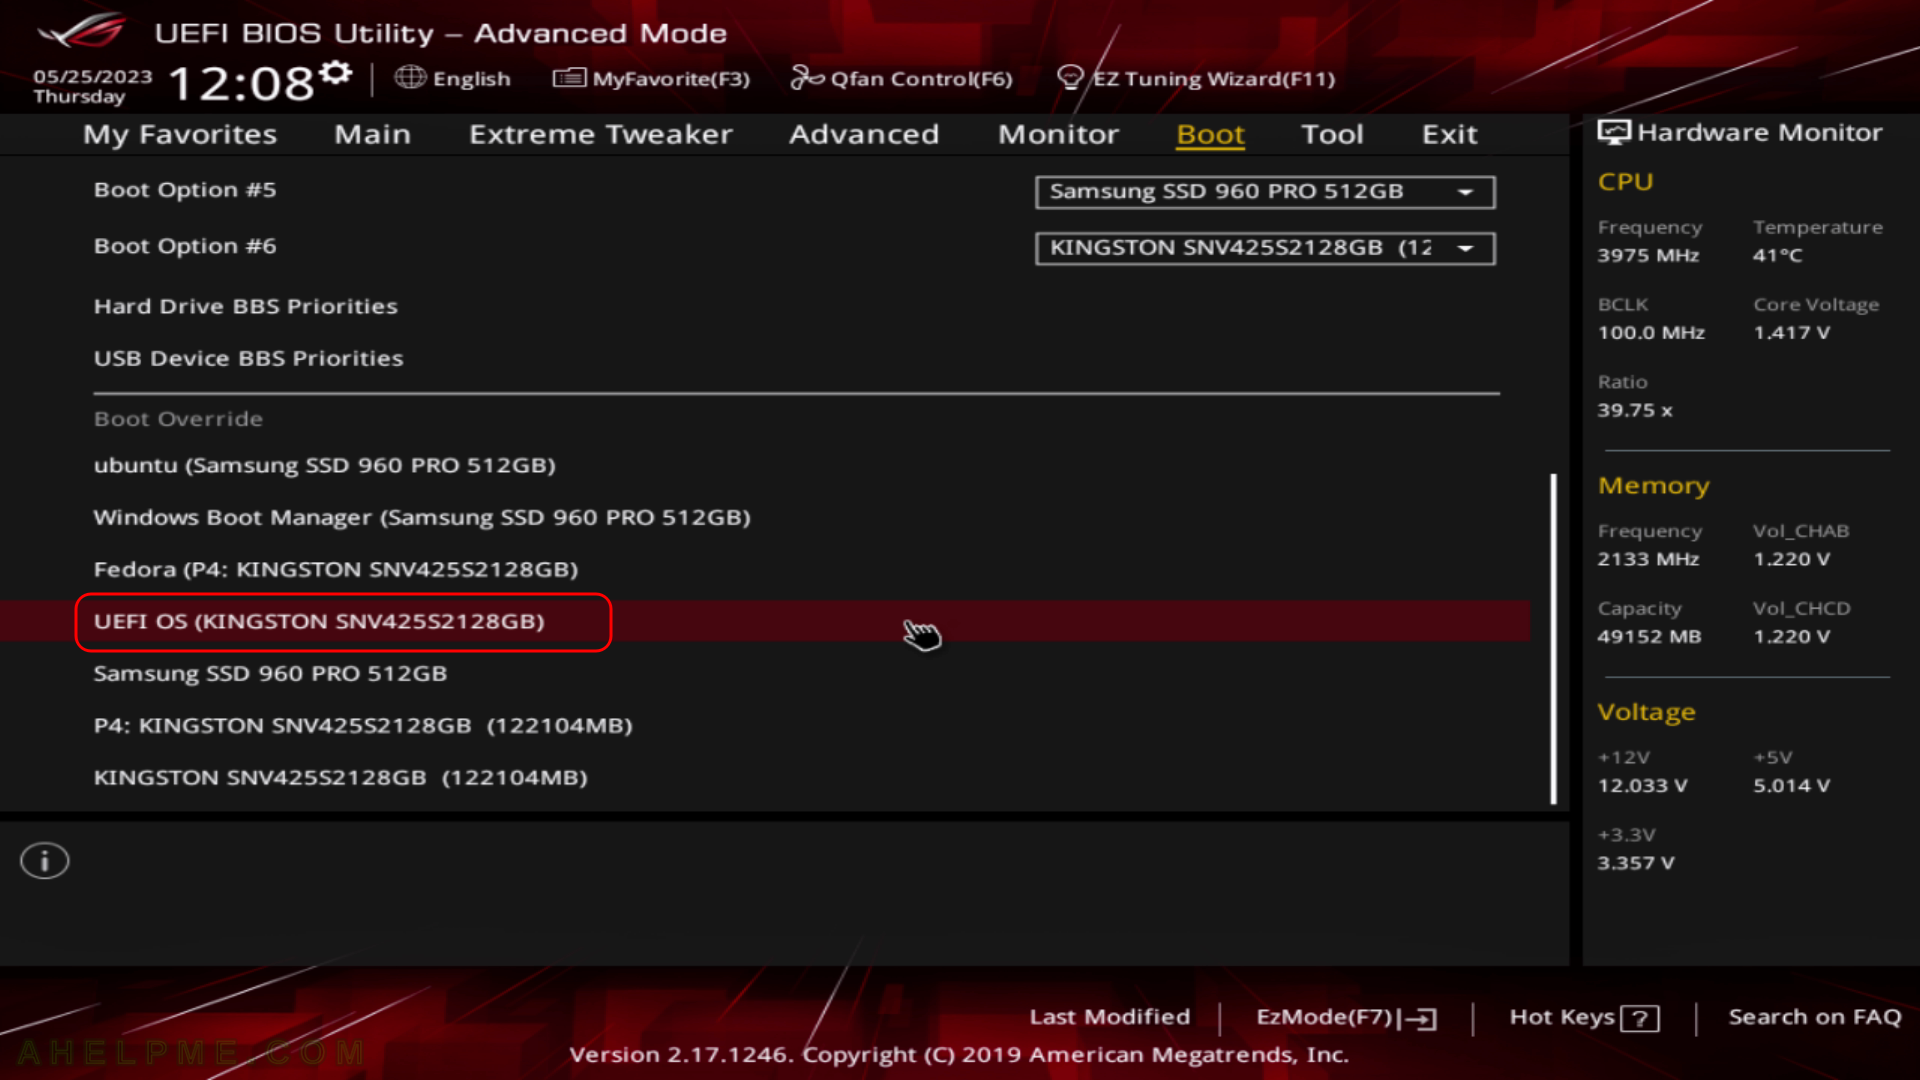
SCREENSHOT 1) Boot from the UEFI USB device.

It is the same as the CD/DVD removable drive. Choose the UEFI USB drive to boot the live installation.

main menu
UEFI BIOS USB device boot

Keep on reading!

Install CentOS Stream 9 booting VNC installer with kexec

Lately, dedicated servers come with Remote management consoles like IPMI KVM or iLO, or DRAC, but they are still slow to initiate the process of installing a system.

main menu
kexec execute

Consider a server (dedicated or not) should be installed in a remote colocation with the help of only the server’s network. The system administrator just receives an administrative shell access and nothing more and the server should be installed with the proper and secured software, in this case, the CentOS Stream 9. Using kexec the user can boot a new kernel from a different Linux Distribution and initiate automated network installation of the system and it is not needed any Remote management consoles. The only thing needed is the ability of the current system/kernel to be able to use kexec, which is pretty standard for 8 to 10 years old Linux systems. There is a good chance the colocations’ rescue CD/DVD/USB flash drives or the PXE rescue images support kexec, because they tend to upgrade their rescue systems, which the user may boot if he has problems.
Still, using kexec to initiate another kernel or Linux Distribution like CentOS Stream 9 with VNC installer, for example, it a powerful tool to safely replace a currently running system with only shell access.
This article has chosen to start the CentOS Stream 9 VNC installer just for demonstration purposes. Booting a downloaded kernel may be used for just anything from booting a system over the network, booting an installer, booting an unattended automation installation, and so on. There are a couple of simple things to check before booting the new kernel.
This article will show just one use case – reinstalling a system with CentOS Stream 9 over the network using the CentOS VNC Install. The purpose is to show how simple, fast, and easy is to install a modern Linux system only by having console access. No scripts are required if manual installation is performed.
To boot a CentOS Stream 9 VNC Installer the kexec command needs the following options.

The kexec commands need the following options:

  • Networkingdevice interface name, IP, netmask, gateway and DNS servers
  • Kernel options – these options will initiate scripts from the initramfs.
  • inst.vnc – a kernel option, which will start a VNC server with no password on the default port and network device. Using it with another inst.vncpassword=[PASSWORD] the VNC server will require the password – [PASSWORD]. The password should be a maximum of 8 characters because the VNC server will not start if it is with more!
  • inst.repo=[HTTP/HTTPS://repository] – a kernel option, which sets the CentOS HTTP/HTTPS repository.

The kexec command to boot the CentOS Stream 9 VNC Installer is:

kexec --initrd=./initrd.img -l ./vmlinuz --command-line="bootdev=eno1 ip=10.10.10.20::10.10.10.1:24:srv.example.com:eno1:none nameserver=8.8.8.8 inst.vnc inst.vncpassword=cha3hae4ahZaqueev1ee inst.repo=https://mirror.stream.centos.org/9-stream/BaseOS/x86_64/os/"

The kernel (i.e. vmlinuz) and the initramfs (i.e. initrd.img) should be downloaded in the current directory before executing the above command. The above line will order the kernel to load the new kernel, but to boot it another command must be executed:

kexec -e

Keep on reading!

Software and technical details of Fedora Server 38 including cockpit screenshots

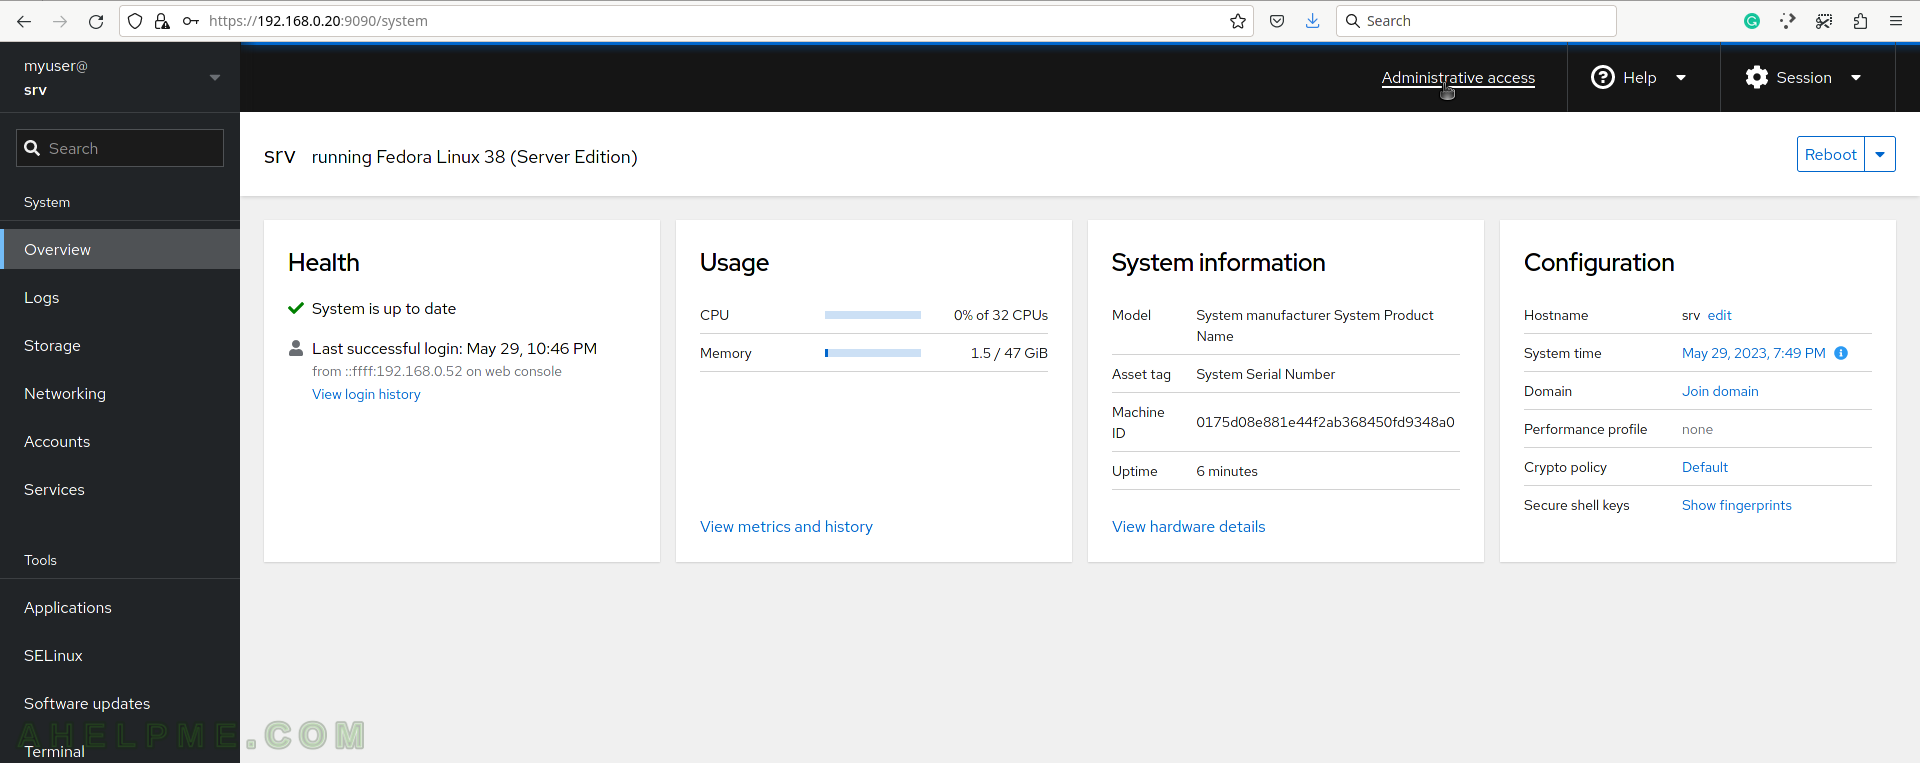
main menu
System Overview

This article is for those of you who do not want to install a whole new operating system only to discover some technical details about the default installation like disk layout, packages included, software versions, and so on. Here we are going to review in several sections what is like to have a default installation of Fedora 38 Server using a real not virtual machine!
The kernel is 6.2.15 it detects successfully the Threadripper 1950X AMD and the system is stable (we booted in UEFI mode).
The installation procedure uses default options for all installation setups – Minimal network installation of Fedora 38 Server

Software

With Fedora Server 38 you can have

  • linux kernel – 6.2.15 (6.2.15-300.fc38.x86_64)
  • System
    • linux-firmware – version: 20230515, release: 20230515-150.fc38.
    • libc – 2.37 (2.37-4.fc38)
    • GNU GCC – 13.1.1 (13.1.1-2.fc38)
    • OpenSSL – 3.0.8 (3.0.8-2.fc38) and 1.1.1q (1.1.1q-4.fc38)
    • coreutils – 9.1-12 (9.1-12.fc38)
    • yum – Depricated and replaced with dnf
    • dnf – 4.15.1 (4.15.1-1.fc38)
    • rsyslog – 8.2210.0 (8.2210.0-4.fc38)
    • NetworkManager – 1.42.6 (1.42.6-1.fc38)
  • Servers
    • Apache – 2.4.57 (2.4.57-1.fc38)
    • Nginx – 1.24.0 (1.24.0-1.fc38)
    • MySQL server – 8.0.33 (8.0.33-2.fc38)
    • MariaDB server – 10.5.19 (10.5.19-2.fc38)
    • PostgreSQL – 15.1 (15.1-2.fc38)
  • Programming
    • PHP – 8.2.6 (8.2.6-1.fc38)
    • python – The default is 3.11.3 (3.11.3-2.fc38) and many more available – 3.12.0 (3.12.0~a7-1.fc38), 3.10.11 (3.10.11-1.fc38), 3.9.16 (3.9.16-3.fc38), 3.8.16 (3.8.16-3.fc38), 3.7.16 (3.7.16-3.fc38), 3.6.15 (3.6.15-17.fc38) and also includes the older 2.7.18 (2.7.18-31.fc38)
    • perl – 5.36.1 (5.36.1-497.fc38)
    • ruby – 3.2.2 (3.2.2-180.fc38)
    • OpenJDK – the latest 20 – 20.0.1.0.9 (20.0.1.0.9-8.rolling.fc38) and also includes 17.0.7.0.7 (17.0.7.0.7-5.fc38), 11.0.19.0.7 (11.0.19.0.7-1.fc38) and 1.8.0.362.b09 (1.8.0.362.b09-2.fc38)
    • Go – 1.20.4 (1.20.4-1.fc38)
    • Rust – 1.69.0 (1.69.0-2.fc38)
    • llvm – the latest 16.0.4 (16.0.4-1.fc38), 15.0.7 (15.0.7-4.fc38), 14.0.5 (14.0.5-5.fc38), 13.0.1 (13.0.1-4.fc38), 12.0.1-8.fc38 (12.0.1-8.fc38), 11.1.0 (11.1.0-10.fc38), 8.0.1 (8.0.1-4.fc38) and 7.0.1 (7.0.1-7.fc38)
    • Subversion – 1.14.2 (1.14.2-13.fc38)
    • Git – 2.40.1 (2.40.1-1.fc38)

Note: Not all of the above software comes installed by default. The versions above are valid as of May 2023, these are the minimum versions you get with Fedora Server 38 now, and updating it after the initial date may update some of the above packages with newer versions.

Installed packages are 679 occupying 1.8G space:. Note, this is Fedora Server Install, not minimal install. The server install includes the web console – cockpit version 254.

[root@srv ~]# dnf list installed|wc -l
674
[root@srv ~]# df -h /
Filesystem               Size  Used Avail Use% Mounted on
/dev/mapper/fedora-root   15G  1.7G   14G  12% /

Keep on reading!