How To Install Linux, Apache, MySQL (MariaDB), PHP-FPM (LAMP) Stack on CentOS Stream 9

main menu
PHP Version 8.0.20

This article describes how to install a Web server with application back-end PHP and database back-end MySQL using MariaDB. In continuing the same topic, but with different software from the previous article – How To Install Linux, Nginx, MySQL (MariaDB), PHP-FPM (LEMP) Stack on CentOS Stream 9, where the Web server is Nginx with application back-end PHP-FPM, which is a sort of CGI (FastCGI). In this article, the Web server is Apache and the application is again PHP-FPM, because since the CentOS 8 the Apache mod_php is deprecated.
All the software installed throughout this article is from the CentOS Stream 9 official repositories including the EPEL repository. The machine is installed with a minimal installation of CentOS Stream 9 and there is a how-to here – Network installation of CentOS Stream 9 (20220606.0) – minimal server installation.
Here are the steps to perform:

  1. Install, configure and start the database MariaDB.
  2. Install, configure and start the PHP-FPM and PHP cli.
  3. Install, configure and start the Web server Apache 2.x.
  4. Configure the system – firewall and SELinux.
  5. Test the installation with a phpMyAdmin installation.
  6. Bonus – Apache HTTPS with SSL certificate – self-signed and letsencrypt.

STEP 1) Install, configure and start the database MariaDB.

First, install the MariaDB server by:

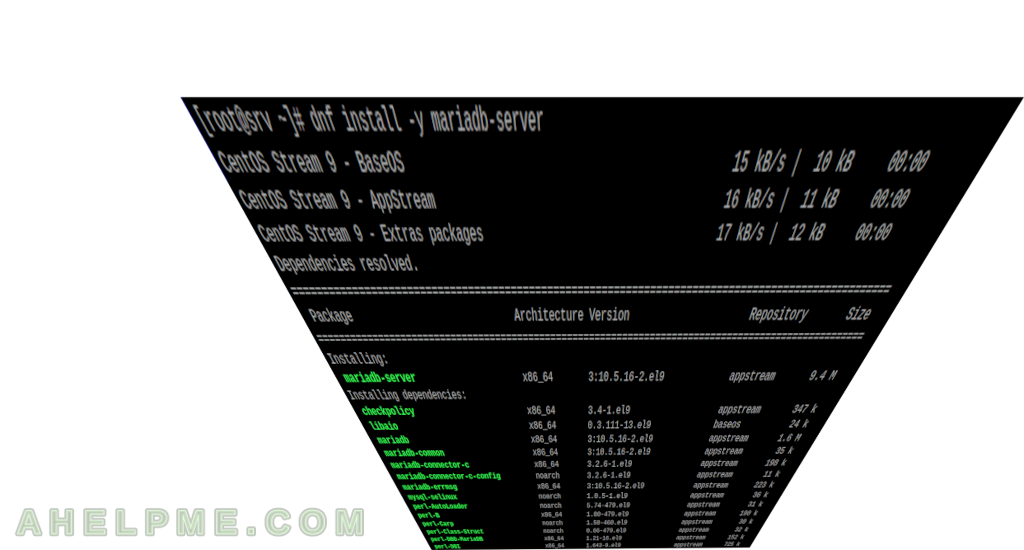
dnf install -y mariadb-server

To configure the MariaDB server, the main file is /etc/my.cnf, which just includes all files under the folder /etc/my.cnf.d/

[root@srv ~]# cat /etc/my.cnf
#
# This group is read both both by the client and the server
# use it for options that affect everything
#
[client-server]

#
# include all files from the config directory
#
!includedir /etc/my.cnf.d

[root@srv ~]# ls -altr /etc/my.cnf.d/
total 32
-rw-r--r--.  1 root root  295 Mar 25  2022 client.cnf
-rw-r--r--.  1 root root  120 May 18 07:55 spider.cnf
-rw-r--r--.  1 root root  232 May 18 07:55 mysql-clients.cnf
-rw-r--r--.  1 root root  763 May 18 07:55 enable_encryption.preset
-rw-r--r--.  1 root root 1458 Jun 13 13:24 mariadb-server.cnf
-rw-r--r--.  1 root root   42 Jun 13 13:29 auth_gssapi.cnf
drwxr-xr-x.  2 root root 4096 Oct  6 06:34 .
drwxr-xr-x. 81 root root 4096 Oct  6 06:34 ..

The most important file for the MariaDB server is /etc/my.cnf.d/mariadb-server.cnf, where all the server options are included. Under section “[mysqld]” add options to tune the MariaDB server. Supported options could be found here: https://mariadb.com/kb/en/mysqld-options/
Add the following options under “[mysqld]” in /etc/my.cnf.d/mariadb-server.cnf
Keep on reading!

How To Install Linux, Nginx, MySQL (MariaDB), PHP-FPM (LEMP) Stack on CentOS Stream 9

main menu
dnf mariadb

This article presents how to install a Web server with application back-end PHP and database back-end MySQL using MariaDB. All the software installed throughout this article is from the CentOS Stream 9 official repositories including the EPEL repository. The machine is installed with a minimal installation of CentOS Stream 9 and there is a how-to here – Network installation of CentOS Stream 9 (20220606.0) – minimal server installation.
Here are the steps to perform:

  1. Install, configure and start the database MariaDB.
  2. Install, configure and start the PHP-FPM and PHP cli.
  3. Install, configure and start the Web server Nginx.
  4. Configure the system – firewall and SELinux.
  5. Test the installation with a phpMyAdmin installation.
  6. Bonus – Nginx HTTPS with SSL certificate – self-signed and letsencrypt.

STEP 1) Install, configure and start the database MariaDB.

First, install the MariaDB server by:

dnf install -y mariadb-server

To configure the MariaDB server, the main file is /etc/my.cnf, which just includes all files under the folder /etc/my.cnf.d/

[root@srv ~]# cat /etc/my.cnf
#
# This group is read both both by the client and the server
# use it for options that affect everything
#
[client-server]

#
# include all files from the config directory
#
!includedir /etc/my.cnf.d

[root@srv ~]# ls -altr /etc/my.cnf.d/
total 32
-rw-r--r--.  1 root root  295 Mar 25  2022 client.cnf
-rw-r--r--.  1 root root  120 May 18 07:55 spider.cnf
-rw-r--r--.  1 root root  232 May 18 07:55 mysql-clients.cnf
-rw-r--r--.  1 root root  763 May 18 07:55 enable_encryption.preset
-rw-r--r--.  1 root root 1458 Jun 13 13:24 mariadb-server.cnf
-rw-r--r--.  1 root root   42 Jun 13 13:29 auth_gssapi.cnf
drwxr-xr-x.  2 root root 4096 Oct  6 06:34 .
drwxr-xr-x. 81 root root 4096 Oct  6 06:34 ..

The most important file for the MariaDB server is /etc/my.cnf.d/mariadb-server.cnf, where all the server options are included. Under section “[mysqld]” add options to tune the MariaDB server. Supported options could be found here: https://mariadb.com/kb/en/mysqld-options/
Add the following options under “[mysqld]” in /etc/my.cnf.d/mariadb-server.cnf
Keep on reading!
Run LXC Ubuntu 22.04 LTS container with bridged network under CentOS Stream 9

In continuation of the previous article Run LXC CentOS Stream 9 container with bridged network under CentOS Stream 9, this time the LXC container will be Ubuntu 22.04 LTS Jammy Jellyfish.
To receive a better understanding why to use LXC or a much detailed information of some steps in this article it is better to visit the previously mention article and the original Run LXC CentOS 8 container with bridged network under CentOS 8.

STEP 1) Install the needed software EPEL repository and the LXC and its dependencies

To install LXC software the EPEL CentOS Stream 9 repository must be installed. At present, the LXC included in CentOS Stream 9 EPEL repository is 4.0.

dnf install -y epel-release
dnf install -y lxc lxc-templates container-selinux
dnf install -y wget tar

lxc-templates uses template “download” to download different Linux distribution images from http://images.linuxcontainers.org/, which now redirects to http://uk.lxd.images.canonical.com/ (an Ubuntu lxd images mirror).
The container-selinux should be installed only if the host, i.e. the CentOS Stream 9 install, is with enabled SELinux. The packages offers additional SELinux rules or for the LXC and LXC tools like lxc-attach and more.

STEP 2) Create a Ubuntu 22.04 LTS with the help of LXC templates

[root@srv ~]# lxc-create --template download -n mycontainer -- --dist centos --release 9-Stream --arch amd64

In addition, there is a “–variant” option along with “--dist” and “--release” to specify which variant to install – default, cloud, desktop or other. There is a variant column in the table on the images’ page mentioned above.
Keep on reading!

Run LXC CentOS Stream 9 container with bridged network under CentOS Stream 9

In continue of the previous article with CentOS 8 – Run LXC CentOS 8 container with bridged network under CentOS 8, here is an updated version with CentOS Stream 9 running LXC container. In this case, the LXC container is CentOS Stream 9, too.
Under CentOS 8, the LXC software is from branch 3.x, but in CentOS Stream 9 the LXC is 4.x and there are some differences in the LXC configuration file.
It’s worth mentioning the differences between docker/podman containers and LXC from the previous article:

  • Multiprocesses.
  • Easy configuration modification. Even hot-plugin supported.
  • Unprivileged Linux containers.
  • Complex network setups. Multiple network interfaces connected to different networks, for example.
  • Live systemd, i.e. systemd or SysV init are booted as usual. Much of the software relies on systemd/udev features and in many cases, it is really hard to run software without a systemd or init process

Here are the steps to boot a CentOS Stream 9 container under CentOS Stream 9 host server:

STEP 1) Install EPEL repository.

EPEL CentOS Stream 9 repository now includes LXC 4.0 software.

dnf install -y epel-release

STEP 2) Install LXC software and start LXC service.

At present, the LXC software version is 4.0.12. The package lxc-templates includes template scripts to create a Linux distribution environment like CentOS, Ubuntu, Debian, Gentoo, ArchLinux, Oracle, Alpine, and many others and it also includes the configuration templates to start these Linux distributions. In fact, lxc-templates now includes a download script to download images from the Internet.

dnf install -y lxc lxc-templates container-selinux
dnf install -y wget tar

The wget and tar are required if LXC templates installation is going to be performed.
There is an additional package for container’s SELinux, which should be installed before starting the LXC service, because some of the SELinux rules may not apply in the system. If the SELinux is disabled the installation of container-selinux package might be skipped.

STEP 3) Create a CentOS Stream 9 container with the help of LXC templates and run it.

Use the lxc-templates to prepare a CentOS Stream 9 container environment. The currently available containers are listed here http://images.linuxcontainers.org/, which now redirects to http://uk.lxd.images.canonical.com/ (an Ubuntu lxd images mirror). Check out the URL and choose the right container. Here the CentOS Stream 9 amd64, i.e. release 9-Stream, is used.

[root@srv ~]# lxc-create --template download -n mycontainer -- --dist centos --release 9-Stream --arch amd64

In addition, there is a “–variant” option along with “--dist” and “--release” to specify which variant to install – default, cloud, desktop or other. There is a variant column in the table on the images’ page mentioned above.
Keep on reading!

Delete an Offline RAID6 virtual drive and create a new one with AVAGO storcli

Offline virtual device means it cannot be used because the missing or bad or failed disks are more than the fault tolerance it is offering. In this case, there is a RAID 6 on a AVAGO MegaRAID 3018 controller with 2 x RAID6 virtual drives with 6 disks each. One of the virtual drives misses 3 of the 6 disks in the group, so this virtual drive is in Offline state and it cannot be repaired. Three new disks are put to replace the failed disks. Here is what command to issue with the AVAGO command-line utility storcli under CentOS 7 to delete and then create a healthy new RAID 6 virtual drive:

  1. Delete the Offline virtual drive.
  2. Create a new RAID 6 virtual drive with 6 disks.
  3. Initialize the newly create virtual drive to make it consistent.

On each step, it is included additional show storcli commands to better preset what happens in reality and how the controller reflects the changes.
The initial state of the whole configuration is shown below:

[root@srv ~]# /opt/MegaRAID/storcli/storcli64 /c0 show
Generating detailed summary of the adapter, it may take a while to complete.

CLI Version = 007.0709.0000.0000 Aug 14, 2018
Operating system = Linux 3.10.0-957.1.3.el7.x86_64
Controller = 0
Status = Success
Description = None

Product Name = AVAGO 3108 MegaRAID
Serial Number = FW-AC5CMJEAARBWA
SAS Address =  500304802426b600
PCI Address = 00:01:00:00
System Time = 09/20/2022, 14:09:12
Mfg. Date = 00/00/00
Controller Time = 09/20/2022, 14:09:08
FW Package Build = 24.21.0-0028
BIOS Version = 6.36.00.2_4.19.08.00_0x06180202
FW Version = 4.680.00-8290
Driver Name = megaraid_sas
Driver Version = 07.705.02.00-rh1
Current Personality = RAID-Mode 
Vendor Id = 0x1000
Device Id = 0x5D
SubVendor Id = 0x15D9
SubDevice Id = 0x809
Host Interface = PCI-E
Device Interface = SAS-12G
Bus Number = 1
Device Number = 0
Function Number = 0
Drive Groups = 2

TOPOLOGY :
========

----------------------------------------------------------------------------
DG Arr Row EID:Slot DID Type  State BT      Size PDC  PI SED DS3  FSpace TR 
----------------------------------------------------------------------------
 0 -   -   -        -   RAID6 OfLn  N  43.654 TB dflt N  N   dflt N      N  
 0 0   -   -        -   RAID6 Dgrd  N  43.654 TB dflt N  N   dflt N      N  
 0 0   0   -        -   DRIVE Msng  -  10.913 TB -    -  -   -    -      N  
 0 0   1   8:1      13  DRIVE Onln  N  10.913 TB dflt N  N   dflt -      N  
 0 0   2   8:2      10  DRIVE Onln  N  10.913 TB dflt N  N   dflt -      N  
 0 0   3   -        -   DRIVE Msng  -  10.913 TB -    -  -   -    -      N  
 0 0   4   8:4      11  DRIVE Onln  N  10.913 TB dflt N  N   dflt -      N  
 0 0   5   -        -   DRIVE Msng  -  10.913 TB -    -  -   -    -      N  
 1 -   -   -        -   RAID6 Optl  N  43.654 TB dflt N  N   dflt N      N  
 1 0   -   -        -   RAID6 Optl  N  43.654 TB dflt N  N   dflt N      N  
 1 0   0   8:6      20  DRIVE Onln  N  10.913 TB dflt N  N   dflt -      N  
 1 0   1   8:7      19  DRIVE Onln  N  12.732 TB dflt N  N   dflt -      N  
 1 0   2   8:8      18  DRIVE Onln  N  10.913 TB dflt N  N   dflt -      N  
 1 0   3   8:9      15  DRIVE Onln  N  10.913 TB dflt N  N   dflt -      N  
 1 0   4   8:10     12  DRIVE Onln  N  10.913 TB dflt N  N   dflt -      N  
 1 0   5   8:11     14  DRIVE Onln  N  10.913 TB dflt N  N   dflt -      N  
----------------------------------------------------------------------------

DG=Disk Group Index|Arr=Array Index|Row=Row Index|EID=Enclosure Device ID
DID=Device ID|Type=Drive Type|Onln=Online|Rbld=Rebuild|Dgrd=Degraded
Pdgd=Partially degraded|Offln=Offline|BT=Background Task Active
PDC=PD Cache|PI=Protection Info|SED=Self Encrypting Drive|Frgn=Foreign
DS3=Dimmer Switch 3|dflt=Default|Msng=Missing|FSpace=Free Space Present
TR=Transport Ready

Virtual Drives = 2

VD LIST :
=======

------------------------------------------------------------------
DG/VD TYPE  State Access Consist Cache Cac sCC      Size Name     
------------------------------------------------------------------
0/0   RAID6 OfLn  RW     No      RAWBD -   ON  43.654 TB storage1 
1/1   RAID6 Optl  RW     Yes     RAWBD -   ON  43.654 TB storage2 
------------------------------------------------------------------

Cac=CacheCade|Rec=Recovery|OfLn=OffLine|Pdgd=Partially Degraded|Dgrd=Degraded
Optl=Optimal|RO=Read Only|RW=Read Write|HD=Hidden|TRANS=TransportReady|B=Blocked|
Consist=Consistent|R=Read Ahead Always|NR=No Read Ahead|WB=WriteBack|
AWB=Always WriteBack|WT=WriteThrough|C=Cached IO|D=Direct IO|sCC=Scheduled
Check Consistency

Physical Drives = 12

PD LIST :
=======

---------------------------------------------------------------------------------
EID:Slt DID State DG      Size Intf Med SED PI SeSz Model                Sp Type 
---------------------------------------------------------------------------------
8:0       9 UGood -  12.732 TB SATA HDD N   N  512B ST14000NM001G-2KJ103 D  -    
8:1      13 Onln  0  10.913 TB SATA HDD N   N  512B ST12000NM0007-2A1101 U  -    
8:2      10 Onln  0  10.913 TB SATA HDD N   N  512B ST12000NM0007-2A1101 U  -    
8:3      17 UGood -  12.732 TB SATA HDD N   N  512B ST14000NM001G-2KJ103 D  -    
8:4      11 Onln  0  10.913 TB SATA HDD N   N  512B ST12000NM001G-2MV103 U  -    
8:5      16 UGood -  12.732 TB SATA HDD N   N  512B ST14000NM001G-2KJ103 D  -    
8:6      20 Onln  1  10.913 TB SATA HDD N   N  512B ST12000NM0007-2A1101 U  -    
8:7      19 Onln  1  12.732 TB SATA HDD N   N  512B ST14000NM001G-2KJ103 U  -    
8:8      18 Onln  1  10.913 TB SATA HDD N   N  512B ST12000NM0007-2A1101 U  -    
8:9      15 Onln  1  10.913 TB SATA HDD N   N  512B ST12000NM0007-2A1101 U  -    
8:10     12 Onln  1  10.913 TB SATA HDD N   N  512B ST12000NM0007-2A1101 U  -    
8:11     14 Onln  1  10.913 TB SATA HDD N   N  512B ST12000NM0007-2A1101 U  -    
---------------------------------------------------------------------------------

EID-Enclosure Device ID|Slt-Slot No.|DID-Device ID|DG-DriveGroup
DHS-Dedicated Hot Spare|UGood-Unconfigured Good|GHS-Global Hotspare
UBad-Unconfigured Bad|Onln-Online|Offln-Offline|Intf-Interface
Med-Media Type|SED-Self Encryptive Drive|PI-Protection Info
SeSz-Sector Size|Sp-Spun|U-Up|D-Down/PowerSave|T-Transition|F-Foreign
UGUnsp-Unsupported|UGShld-UnConfigured shielded|HSPShld-Hotspare shielded
CFShld-Configured shielded|Cpybck-CopyBack|CBShld-Copyback Shielded


Cachevault_Info :
===============

------------------------------------
Model  State   Temp Mode MfgDate    
------------------------------------
CVPM02 Optimal 28C  -    2018/01/11 
------------------------------------

The show storcli command for the first virtual drive “/c0/v0” is also possible:

[root@srv ~]# /opt/MegaRAID/storcli/storcli64 /c0/v0 show all
CLI Version = 007.0709.0000.0000 Aug 14, 2018
Operating system = Linux 3.10.0-957.1.3.el7.x86_64
Controller = 0
Status = Success
Description = None


/c0/v0 :
======

------------------------------------------------------------------
DG/VD TYPE  State Access Consist Cache Cac sCC      Size Name     
------------------------------------------------------------------
0/0   RAID6 OfLn  RW     No      RAWBD -   ON  43.654 TB storage1 
------------------------------------------------------------------

Cac=CacheCade|Rec=Recovery|OfLn=OffLine|Pdgd=Partially Degraded|Dgrd=Degraded
Optl=Optimal|RO=Read Only|RW=Read Write|HD=Hidden|TRANS=TransportReady|B=Blocked|
Consist=Consistent|R=Read Ahead Always|NR=No Read Ahead|WB=WriteBack|
AWB=Always WriteBack|WT=WriteThrough|C=Cached IO|D=Direct IO|sCC=Scheduled
Check Consistency


PDs for VD 0 :
============

---------------------------------------------------------------------------------
EID:Slt DID State DG      Size Intf Med SED PI SeSz Model                Sp Type 
---------------------------------------------------------------------------------
8:1      13 Onln   0 10.913 TB SATA HDD N   N  512B ST12000NM0007-2A1101 U  -    
8:2      10 Onln   0 10.913 TB SATA HDD N   N  512B ST12000NM0007-2A1101 U  -    
8:4      11 Onln   0 10.913 TB SATA HDD N   N  512B ST12000NM001G-2MV103 U  -    
---------------------------------------------------------------------------------

EID-Enclosure Device ID|Slt-Slot No.|DID-Device ID|DG-DriveGroup
DHS-Dedicated Hot Spare|UGood-Unconfigured Good|GHS-Global Hotspare
UBad-Unconfigured Bad|Onln-Online|Offln-Offline|Intf-Interface
Med-Media Type|SED-Self Encryptive Drive|PI-Protection Info
SeSz-Sector Size|Sp-Spun|U-Up|D-Down/PowerSave|T-Transition|F-Foreign
UGUnsp-Unsupported|UGShld-UnConfigured shielded|HSPShld-Hotspare shielded
CFShld-Configured shielded|Cpybck-CopyBack|CBShld-Copyback Shielded


VD0 Properties :
==============
Strip Size = 1.0 MB
Number of Blocks = 93746888704
VD has Emulated PD = Yes
Span Depth = 1
Number of Drives Per Span = 6
Write Cache(initial setting) = WriteBack
Disk Cache Policy = Disk's Default
Encryption = None
Data Protection = Disabled
Active Operations = None
Exposed to OS = Yes
OS Drive Name = N/A
Creation Date = 19-12-2018
Creation Time = 06:11:08 AM
Emulation type = default
Cachebypass size = Cachebypass-64k
Cachebypass Mode = Cachebypass Intelligent
Is LD Ready for OS Requests = Yes
SCSI NAA Id = 600304802426b60023ac9d7c0a7a305b
SCSI Unmap = No

Keep on reading!

Surviving 3 disks failure of RAID 6 with AVAGO 3108 MegaRAID and foreign config

Whatever is the reason to end up with 3 broken hard disks in a RAID 6 setup it does not matter! What matters is to recover the data if possible and the most important thing in this situation is to find the LAST hard disk, which was marked as failed and removed from the array. Then the array gets a offline state immediately! So if the last broken hard disk might have a little light of life, probably it is easy to recover the data. The hardware controller is an additional Supermicro board – AOC-S3108L-H8iR.
What happened – third disk got failed status and a virtual device using RAID 6 setup is in offline state. In offline state the virtual device would not execute any READ or WRITE operations, because part of the data is missing and the virtual drive has no meaningfully user data.
To survive to backup the data:

  1. Power off the server. And it is better to remove the power cord, afterwards, and wait for at least a minute before plugging back the power cord back.
  2. Power on the server.
  3. When prompted for actions during initialization the AVAGO 3108 MegaRAID just continue the server loading without accepting any changes.
  4. Boot a recovery disk and using the AVAGO command-line (cli) tool dump the “events” in a file. A sample command might be:
    /opt/MegaRAID/storcli/storcli64 /c0 show events >show.event.log
    

    Assuming the Offline RAID 6 virtual drive is “/c0”. Other possible options are “/c1”, “/c2” and so on.

  5. Read from the end till start the AVAGO 3108 MegaRAID events dump and find which hard drive was marked as failed LAST, i.e. with the most latest date and time. And then there are events marking the the virtual device as Offline.
    seqNum: 0x00009a46
    Time: Mon Jun 27 01:49:54 2022
    
    Code: 0x00000072
    Class: 0
    Locale: 0x02
    Event Description: State change on PD 10(e0x08/s5) from ONLINE(18) to FAILED(11)
    Event Data:
    ===========
    Device ID: 16
    Enclosure Index: 8
    Slot Number: 5
    Previous state: 24
    New state: 17
    
    
    seqNum: 0x00009a47
    Time: Mon Jun 27 01:49:54 2022
    
    Code: 0x00000051
    Class: 0
    Locale: 0x01
    Event Description: State change on VD 00/0 from DEGRADED(2) to OFFLINE(0)
    Event Data:
    ===========
    Target Id: 0
    Previous state: 2
    New state: 0
    

    The first event of the list above logs the hard drive PD 10(e0x08/s5) gets FAILED status. And immediately after that the virtual drive VD 00/0 goes Offline, which means the last disk before the RAID 6 virtual drive stops working is the PD 10(e0x08/s5)The “/s5” from PD 10(e0x08/s5) points to the “Slot 5” hard drive.

  6. Reboot the server and when prompted the AVAGO 3108 MegaRAID BIOS Configuration Utility this time enter the utility.
  7. Make the found hard drive from the previous steps with ONLINE state. The hard drive might be in a foreign configuration or just in a bad state, so import the foreign configuration, make the drive a GOOD state and its state will immediately be ONLINE, which mean it is a part of an existing virtual drive. The virtual drive state will immediately be changed to DEGRADED (still two broken disks are out of the virtual drive). Follow the screenshots below to get the last broken disk back ONLINE and the virtual drive in an operable state – DEGRADED. If the drive is only in BAD/FAILED state, just skip the Foreign part and make the disk ONLINE (it may require first to make the disk “unconfigured-good”)
  8. Recover the data by simply copy it to another server or a healthy virtual drive. DO NOT TRY TO REMOVE data, i.e. do not use “rm”, the real state of this third broken disk is unknown and writing would probably kill it off. A good idea is to mount the filesystems on this virtual drive read-only and just rsync the data to a backup.

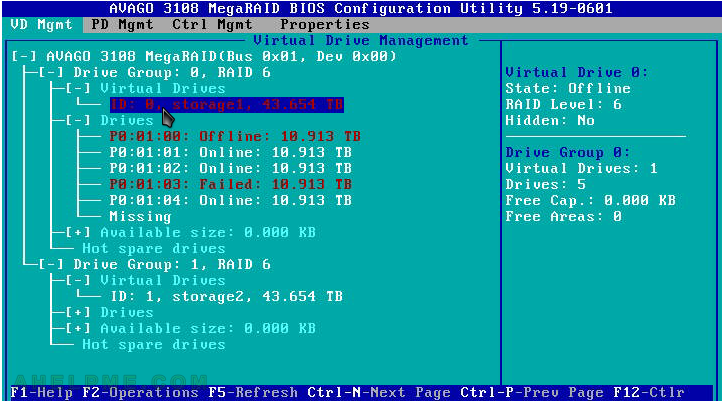
Here is the process of getting the third disk on “Slot 5” from a “Missing” and the “Virtual Drive 0Offline to the ONLINE state of the hard drive and a DEGRADED state of the “Virtual Drive 0“, i.e. operating.

SCREENSHOT 1) The Drive in Slot 5 is missing and the Virtual Drive 0 is in OFFLINE state

Slot 5 is the hard drive we need to recover, but it reports the hard drive is missing. Missing points out there is another configuration, so press “Ctrl+N” to change to the next page (i.e. menu), which is “PD Mgmt” – physical disk management.

main menu
slot 5 disk missing and VD offline

Keep on reading!

Delete Glusterfs volume when a peer is down – failed: Some of the peers are down

Deleting GlusterFS volumes may fail with an error, pointing out some of the peers are down, i.e. they are disconnected. Even all the volume’s peers of the volume the user is trying to delete are available, still the error appears and it is not possible to delete the volume.
That’s because GlusterFS by design stores the volume configuration spread to all peers – no matter they host a brick/arbiter of the volume or not. If a peer is a part of a GlusterFS setup, it is mandatory to be available and online in the peer status, to be able to delete a volume.
If the user still wants to delete the volume:

  1. * Force remove the brink, which was hosted on the detached peer. If any!
  2. Detach the disconnected peer from the peers
  3. Delete the volume

Here are real examples with and without a brick on the unavailable peer.
The initial volumes and peers configuration:

[root@srv1 ~]# gluster volume info
 
Volume Name: VOL1
Type: Replicate
Volume ID: 02ff2995-7307-4f3d-aa24-862edda7ce81
Status: Started
Snapshot Count: 0
Number of Bricks: 1 x (2 + 1) = 3
Transport-type: tcp
Bricks:
Brick1: ng1:/mnt/storage1/glusterfs/brick1
Brick2: ng3:/mnt/storage1/glusterfs/brick1
Brick3: ng1:/mnt/storage1/glusterfs/arbiter1 (arbiter)
Options Reconfigured:
features.scrub: Active
features.bitrot: on
cluster.self-heal-daemon: enable
storage.linux-io_uring: off
client.event-threads: 4
performance.cache-max-file-size: 50MB
performance.parallel-readdir: on
network.inode-lru-limit: 200000
performance.md-cache-timeout: 600
performance.cache-invalidation: on
performance.stat-prefetch: on
features.cache-invalidation-timeout: 600
features.cache-invalidation: on
performance.cache-size: 2048MB
performance.client-io-threads: on
nfs.disable: on
transport.address-family: inet
 
Volume Name: VOL2
Type: Replicate
Volume ID: fc2e82e4-2576-4bb1-b9bf-c6b2aff10ef0
Status: Started
Snapshot Count: 0
Number of Bricks: 1 x (2 + 1) = 3
Transport-type: tcp
Bricks:
Brick1: ng1:/mnt/storage1/glusterfs/brick2
Brick2: ng2:/mnt/storage1/glusterfs/brick2
Brick3: ng1:/mnt/storage1/glusterfs/arbiter2 (arbiter)
Options Reconfigured:
features.scrub: Active
features.bitrot: on
cluster.self-heal-daemon: enable
storage.linux-io_uring: off
performance.parallel-readdir: on
network.compression: off
transport.address-family: inet
nfs.disable: on
performance.client-io-threads: off
features.cache-invalidation: on

[root@srv ~]# gluster peer status
Number of Peers: 2

Hostname: ng1
Uuid: 7953514b-b52c-4a5c-be03-763c3e24eb4e
State: Peer in Cluster (Connected)

Hostname: ng3
Uuid: 3d273834-eca6-4997-871f-1a282ca90fb0
State: Peer in Cluster (Disconnected)

Delete a GlusterFS volume – all bricks and bricks’ peers are available, but another peer is not.

First, the error, when the disconnected peer is still in peer status list.

[root@srv ~]# gluster volume stop VOL2
Stopping volume will make its data inaccessible. Do you want to continue? (y/n) y
volume stop: VOL2: success
[root@srv ~]# gluster volume delete VOL2
Deleting volume will erase all information about the volume. Do you want to continue? (y/n) y
volume delete: VOL2: failed: Some of the peers are down

Keep on reading!

Recovery of MySQL 8 Cluster instance after server crash and corrupted data in log event

There is a MySQL 8 Cluster InnoDB of three servers and one of the server crashed with a bad RAM. The same setup is described here – Install and deploy MySQL 8 InnoDB Cluster with 3 nodes under CentOS 8 and MySQL Router for HA. The failed server got restarted without clean shutdown and after booting up the MySQL Cluster node tried to recover automatically, but the recover process failed and the node left the group of the three server:

2022-05-31T04:00:00.322469Z 24 [ERROR] [MY-011620] [Repl] Plugin group_replication reported: 'Fatal error during the incremental recovery process of Group Replication. The server will leave the group.'
2022-05-31T04:00:00.322489Z 24 [Warning] [MY-011645] [Repl] Plugin group_replication reported: 'Skipping leave operation: concurrent attempt to leave the group is on-going.'
2022-05-31T04:00:00.322500Z 24 [ERROR] [MY-011712] [Repl] Plugin group_replication reported: 'The server was automatically set into read only mode after an error was detected.'
2022-05-31T04:00:03.448475Z 0 [System] [MY-011504] [Repl] Plugin group_replication reported: 'Group membership changed: This member has left the group.'

The recovery process proposed here follows these steps

  1. Connect with mysqlsh (MySQL Shell) to a MySQL instance, which is currently a part of the cluster group. The member, which left the group is not part any more, though the MySQL Cluster status shows it is part of the cluster topology, but with error.
  2. Remove the bad instance from the MySQL Cluster with removeInstance
  3. Add the instance with addInstance and the recovery process will kick in. The type of the recovery process will be chosen by the setup if not specified. In this case, the setup chooses the Incremental state recovery over (full) clone mode.
  4. Initiate the cluster rescan operation to recovery the group replication and the MySQL Cluster.

mysql

Summery of the recovery process

  • The recovery process was successful.
  • The distributed recovery with Incremental state recovery has finished for 24 hours for 200Mbyte database, which is really strange and the speed was really bad. The instance uses ordinary disks, not SSDs and a 1Gbps network.
  • No need to change or manage the MySQL Router in any of the steps or the recovery stages. It handled the situation from the very beginning by removing the bad instance and then adding it again only after the recovery process had finished successfully.
  • MySQL Shell should be connected to an healthy instance currently a part of the Cluster.

In the console output logs all commands and important lines are highlighted.

STEP 1) Remove the bad instance from the cluster.

The status of the cluster with the bad instance.

[root@db-cluster-3 ~]# mysqlsh
MySQL Shell 8.0.28

Copyright (c) 2016, 2022, Oracle and/or its affiliates.
Oracle is a registered trademark of Oracle Corporation and/or its affiliates.
Other names may be trademarks of their respective owners.

Type '\help' or '\?' for help; '\quit' to exit.
 MySQL  JS > \connect clusteradmin@db-cluster-1
Creating a session to 'clusteradmin@db-cluster-1'
Fetching schema names for autocompletion... Press ^C to stop.
Closing old connection...
Your MySQL connection id is 39806649 (X protocol)
Server version: 8.0.28 MySQL Community Server - GPL
No default schema selected; type \use <schema> to set one.
 MySQL  db-cluster-1:33060+ ssl  JS > var cluster = dba.getCluster()
 MySQL  db-cluster-1:33060+ ssl  JS > cluster.status()
{
    "clusterName": "mycluster1", 
    "defaultReplicaSet": {
        "name": "default", 
        "primary": "db-cluster-1:3306", 
        "ssl": "REQUIRED", 
        "status": "OK_NO_TOLERANCE", 
        "statusText": "Cluster is NOT tolerant to any failures. 1 member is not active.", 
        "topology": {
            "db-cluster-1:3306": {
                "address": "db-cluster-1:3306", 
                "memberRole": "PRIMARY", 
                "mode": "R/W", 
                "readReplicas": {}, 
                "replicationLag": null, 
                "role": "HA", 
                "status": "ONLINE", 
                "version": "8.0.28"
            }, 
            "db-cluster-2:3306": {
                "address": "db-cluster-2:3306", 
                "memberRole": "SECONDARY", 
                "mode": "R/O", 
                "readReplicas": {}, 
                "replicationLag": null, 
                "role": "HA", 
                "status": "ONLINE", 
                "version": "8.0.28"
            }, 
            "db-cluster-3:3306": {
                "address": "db-cluster-3:3306", 
                "instanceErrors": [
                    "ERROR: group_replication has stopped with an error."
                ], 
                "memberRole": "SECONDARY", 
                "memberState": "ERROR", 
                "mode": "R/O", 
                "readReplicas": {}, 
                "role": "HA", 
                "status": "(MISSING)", 
                "version": "8.0.28"
            }
        }, 
        "topologyMode": "Single-Primary"
    }, 
    "groupInformationSourceMember": "db-cluster-1:3306"
}

Keep on reading!

lxc and interface lo does not exist in virtualized server

Virtualizing a real server with an LXC container is pretty easy – do a rsync and run it. Sometimes there are some glitches when starting the LXC container for the first time. Such errors like the following – no networking available at the start, but when attached to the started container it seems to have the network interfaces with no IPs. Even, though it is possible to set the IPs manually the init scripts do not work.

[root@srv ~]# lxc-start -F -n n7763.node-int.info
lxc-start: live300.mytv.bg: start.c: proc_pidfd_open: 1607 Function not implemented - Failed to send signal through pidfd
INIT: version 2.88 booting

   OpenRC 0.12.4 is starting up Gentoo Linux (x86_64) [LXC]

 * /proc is already mounted
 * Mounting /run ... * /run/openrc: creating directory
 * /run/lock: creating directory
 * /run/lock: correcting owner
 * Caching service dependencies ... [ ok ]
 * setting up tmpfiles.d entries for /dev ... [ ok ]
 * Creating user login records ... [ ok ]
 * Wiping /tmp directory ... [ ok ]
 * Bringing up network interface lo ...RTNETLINK answers: File exists
 [ ok ]
 * Updating /etc/mtab ... [ ok ]
 * Bringing up interface lo
 *   ERROR: interface lo does not exist
 *   Ensure that you have loaded the correct kernel module for your hardware
 * ERROR: net.lo failed to start
 * setting up tmpfiles.d entries ... [ ok ]
INIT: Entering runlevel: 3
 * Loading iptables state and starting firewall ... [ ok ]
 * Bringing up interface lo
 *   ERROR: interface lo does not exist
 *   Ensure that you have loaded the correct kernel module for your hardware
 * ERROR: net.lo failed to start
 * Bringing up interface eth0
 *   ERROR: interface eth0 does not exist
 *   Ensure that you have loaded the correct kernel module for your hardware
 * ERROR: net.eth0 failed to start

And it appeared that the old /dev was still in place, which messed up with virtualization and the init scripts.
The solution is simple just

  1. remove the existing /dev
  2. create a new empty one

And the LXC container of the real server will start with a network as usual.

So when virtualizing a real server into LXC container after doing RSYNC of the storage, it is mandatory to create an empty /dev, /proc, and /sys directories!

More on the LXC containers – Run LXC CentOS 8 container with bridged network under CentOS 8.

Install and use collectd-ping under CentOS 8 to monitor latency

Tracking the network latency of the servers’ network is not an easy job. Most monitoring software is capable to monitor the state of the server, but how to monitor the state of the connectivity and the network latency and even the Internet connectivity with some respectful addresses like 1.1.1.1 or 8.8.8.8? It should be easy to do it with ICMP and ping command but using the collectd daemon and one of its plugins offers collectd-ping from https://collectd.org/wiki/index.php/Plugin:Ping to save all the history in a time series back-end and using grafanahttps://grafana.com/ (or other graphs/histograms and etc software) to make graphs.
Using the collectd-ping plugin in conjunction with grafana may reach the similar effect as using the old and gold smokeping.
CentOS 7 included the collectd-ping plugin in its official repository, but in CentOS 8 the plugin is missing! Under Cent OS 8 the CentOS SIG OpsTools https://wiki.centos.org/SpecialInterestGroup/OpsTools includes the collectd-ping plugin in their repository. More on SIG and OpsTools may be obtained in the later page. In general, it is safe to use this repository it would not break user’s system.
Here is how to install and configure it. Real grafana examples are also included at the end.

The example here assumes there is a grafana server installed with influxdb backend.

STEP 1) Add OpsTools repository and install the collectd and collectd-ping.

The OpsTools repository is installed with centos-release-opstools package.
Here is what is going to install:

dnf install -y centos-release-opstools
dnf install -y collectd collectd-ping

Keep on reading!