
This article describes how to install a Web server with application back-end PHP and database back-end MySQL using MariaDB. In continuing the same topic, but with different software from the previous article – How To Install Linux, Nginx, MySQL (MariaDB), PHP-FPM (LEMP) Stack on CentOS Stream 9, where the Web server is Nginx with application back-end PHP-FPM, which is a sort of CGI (FastCGI). In this article, the Web server is Apache and the application is again PHP-FPM, because since the CentOS 8 the Apache mod_php is deprecated.
All the software installed throughout this article is from the CentOS Stream 9 official repositories including the EPEL repository. The machine is installed with a minimal installation of CentOS Stream 9 and there is a how-to here – Network installation of CentOS Stream 9 (20220606.0) – minimal server installation.
Here are the steps to perform:
- Install, configure and start the database MariaDB.
- Install, configure and start the PHP-FPM and PHP cli.
- Install, configure and start the Web server Apache 2.x.
- Configure the system – firewall and SELinux.
- Test the installation with a phpMyAdmin installation.
- Bonus – Apache HTTPS with SSL certificate – self-signed and letsencrypt.
STEP 1) Install, configure and start the database MariaDB.
First, install the MariaDB server by:
dnf install -y mariadb-server
To configure the MariaDB server, the main file is /etc/my.cnf, which just includes all files under the folder /etc/my.cnf.d/
[root@srv ~]# cat /etc/my.cnf
#
# This group is read both both by the client and the server
# use it for options that affect everything
#
[client-server]

#
# include all files from the config directory
#
!includedir /etc/my.cnf.d

[root@srv ~]# ls -altr /etc/my.cnf.d/
total 32
-rw-r--r--.  1 root root  295 Mar 25  2022 client.cnf
-rw-r--r--.  1 root root  120 May 18 07:55 spider.cnf
-rw-r--r--.  1 root root  232 May 18 07:55 mysql-clients.cnf
-rw-r--r--.  1 root root  763 May 18 07:55 enable_encryption.preset
-rw-r--r--.  1 root root 1458 Jun 13 13:24 mariadb-server.cnf
-rw-r--r--.  1 root root   42 Jun 13 13:29 auth_gssapi.cnf
drwxr-xr-x.  2 root root 4096 Oct  6 06:34 .
drwxr-xr-x. 81 root root 4096 Oct  6 06:34 ..
The most important file for the MariaDB server is /etc/my.cnf.d/mariadb-server.cnf, where all the server options are included. Under section “[mysqld]” add options to tune the MariaDB server. Supported options could be found here: https://mariadb.com/kb/en/mysqld-options/
Add the following options under “[mysqld]” in /etc/my.cnf.d/mariadb-server.cnf
# Generic
skip-external-locking
skip-character-set-client-handshake
skip-name-resolve

key_buffer_size                 = 1024M
sort_buffer_size                = 200K
net_buffer_length               = 64K
read_buffer_size                = 256K
read_rnd_buffer_size            = 512K
myisam_sort_buffer_size         = 256M
thread_cache_size               = 100
max_connections                 = 1000
max_heap_table_size             = 512M
open_files_limit                = 30000
max_allowed_packet              = 16M
myisam-recover-options  = BACKUP

sync_binlog=0
sql_mode="NO_ENGINE_SUBSTITUTION"

# InnoDB
innodb_buffer_pool_size = 4G
innodb_log_buffer_size = 24M
innodb_log_file_size = 128M
innodb_flush_method = O_DIRECT
innodb_file_per_table
innodb_flush_log_at_trx_commit = 0
innodb_lock_wait_timeout = 150
innodb_thread_concurrency = 0
The most important options is innodb_buffer_pool_size, which should be 70% of available RAM (for machines with low amount of RAM, those above the 32G the percentage should be higher) or the size of the database.
It’s worth noting that no additional configuration is required to start the MariaDB server, but it’s good to make some optimization even for a test/staging/dev environment.
Second, start the services and enable it to start on boot. Check if the services has started successfully:
[root@srv ~]# systemctl enable mariadb
Created symlink /etc/systemd/system/mysql.service → /usr/lib/systemd/system/mariadb.service.
Created symlink /etc/systemd/system/mysqld.service → /usr/lib/systemd/system/mariadb.service.
Created symlink /etc/systemd/system/multi-user.target.wants/mariadb.service → /usr/lib/systemd/system/mariadb.service.
[root@srv ~]# systemctl start mariadb
[root@srv ~]# systemctl status mariadb
● mariadb.service - MariaDB 10.5 database server
     Loaded: loaded (/usr/lib/systemd/system/mariadb.service; enabled; vendor preset: disabled)
     Active: active (running) since Fri 2022-10-07 10:23:35 UTC; 5s ago
       Docs: man:mariadbd(8)
             https://mariadb.com/kb/en/library/systemd/
    Process: 4322 ExecStartPre=/usr/libexec/mariadb-check-socket (code=exited, status=0/SUCCESS)
    Process: 4344 ExecStartPre=/usr/libexec/mariadb-prepare-db-dir mariadb.service (code=exited, sta>
    Process: 4446 ExecStartPost=/usr/libexec/mariadb-check-upgrade (code=exited, status=0/SUCCESS)
   Main PID: 4431 (mariadbd)
     Status: "Taking your SQL requests now..."
      Tasks: 14 (limit: 23072)
     Memory: 369.0M
        CPU: 800ms
     CGroup: /system.slice/mariadb.service
             └─4431 /usr/libexec/mariadbd --basedir=/usr

Oct 07 10:23:35 srv mariadb-prepare-db-dir[4383]: you need to be the system 'mysql' user to connect.
Oct 07 10:23:35 srv mariadb-prepare-db-dir[4383]: After connecting you can set the password, if you >
Oct 07 10:23:35 srv mariadb-prepare-db-dir[4383]: able to connect as any of these users with a passw>
Oct 07 10:23:35 srv mariadb-prepare-db-dir[4383]: See the MariaDB Knowledgebase at https://mariadb.c>
Oct 07 10:23:35 srv mariadb-prepare-db-dir[4383]: Please report any problems at https://mariadb.org/>
Oct 07 10:23:35 srv mariadb-prepare-db-dir[4383]: The latest information about MariaDB is available >
Oct 07 10:23:35 srv mariadb-prepare-db-dir[4383]: Consider joining MariaDB's strong and vibrant comm>
Oct 07 10:23:35 srv mariadb-prepare-db-dir[4383]: https://mariadb.org/get-involved/
Oct 07 10:23:35 srv mariadbd[4431]: 2022-10-07 10:23:35 0 [Note] /usr/libexec/mariadbd (mysqld 10.5.>
[root@srv ~]# pstree
systemd─┬─NetworkManager───2*[{NetworkManager}]
        ├─agetty
        ├─auditd───{auditd}
        ├─chronyd
        ├─crond
        ├─dbus-broker-lau───dbus-broker
        ├─firewalld───{firewalld}
        ├─irqbalance───{irqbalance}
        ├─mariadbd───13*[{mariadbd}]
        ├─mdadm
        ├─polkitd───5*[{polkitd}]
        ├─rsyslogd───2*[{rsyslogd}]
        ├─sshd───sshd───sshd───bash───pstree
        ├─systemd───(sd-pam)
        ├─systemd-journal
        ├─systemd-logind
        └─systemd-udevd
MariaDB server will accept connections through the Unix socket file: /var/lib/mysql/mysql.sock. If the user wants to accept network connections to the MariaDB server, the following options should be enabled (uncomment it or add it) in /etc/my.cnf.d/mariadb-server.cnf:
bind-address=0.0.0.0
It will accept connections on all network interfaces, if only on a specific one is desired, just add the IP instead of 0.0.0.0.
Secure the installation with the MariaDB tool: mysql_secure_installation. This build-in tool presents several questions, which are considered to make the current installation of MariaDB more secure. By default, the MariaDB root password (the user with all privileges) has no password, so this tool sets root password and more.
[root@srv ~]# mysql_secure_installation

NOTE: RUNNING ALL PARTS OF THIS SCRIPT IS RECOMMENDED FOR ALL MariaDB
      SERVERS IN PRODUCTION USE!  PLEASE READ EACH STEP CAREFULLY!

In order to log into MariaDB to secure it, we'll need the current
password for the root user. If you've just installed MariaDB, and
haven't set the root password yet, you should just press enter here.

Enter current password for root (enter for none):
OK, successfully used password, moving on...

Setting the root password or using the unix_socket ensures that nobody
can log into the MariaDB root user without the proper authorisation.

You already have your root account protected, so you can safely answer 'n'.

Switch to unix_socket authentication [Y/n] Y
Enabled successfully!
Reloading privilege tables..
 ... Success!


You already have your root account protected, so you can safely answer 'n'.

Change the root password? [Y/n] Y
New password:
Re-enter new password:
Password updated successfully!
Reloading privilege tables..
 ... Success!


By default, a MariaDB installation has an anonymous user, allowing anyone
to log into MariaDB without having to have a user account created for
them.  This is intended only for testing, and to make the installation
go a bit smoother.  You should remove them before moving into a
production environment.

Remove anonymous users? [Y/n] Y
 ... Success!

Normally, root should only be allowed to connect from 'localhost'.  This
ensures that someone cannot guess at the root password from the network.

Disallow root login remotely? [Y/n] Y
 ... Success!

By default, MariaDB comes with a database named 'test' that anyone can
access.  This is also intended only for testing, and should be removed
before moving into a production environment.

Remove test database and access to it? [Y/n] Y
 - Dropping test database...
 ... Success!
 - Removing privileges on test database...
 ... Success!

Reloading the privilege tables will ensure that all changes made so far
will take effect immediately.

Reload privilege tables now? [Y/n] Y
 ... Success!

Cleaning up...

All done!  If you've completed all of the above steps, your MariaDB
installation should now be secure.

Thanks for using MariaDB!
For user convenience, add the root password in /root/.my.cnf as follow and the system root user will enter the MariaDB console without entering a password.
root@srv ~]# cat /root/.my.cnf
[client]
password="iep9ooQueik0em#ohPa2"
[root@srv ~]# chmod 400 /root/.my.cnf
[root@srv ~]# mysql
Welcome to the MariaDB monitor.  Commands end with ; or \g.
Your MariaDB connection id is 13
Server version: 10.5.16-MariaDB MariaDB Server

Copyright (c) 2000, 2018, Oracle, MariaDB Corporation Ab and others.

Type 'help;' or '\h' for help. Type '\c' to clear the current input statement.

MariaDB [(none)]> ^DBye
root@srv ~]#
STEP 2) Install, configure and start the application part – PHP-FPM and PHP cli.
For around 20 years Apache used to run PHP processor with a module in its process, i.e. MOD_PHP, but it got deprecated and the mod_php module hasn’t been included in CentOS since CentOS 8/Stream 8. It’s not up to an CentOS Stream 8 developers decision, the problem is Apache starting from 2.4.27 stopped supporting the HTTP2 protocol with the Apache Prefork (the Apache module, which handles the HTTP requests), which module works with MOD_PHP.
FPM is FastCGI Process Manager, it starts a daemon, which runs a predefined number of PHP-FPM processes and it waits for Unix or TCP/IP connections to process them with PHP processor.
First, install PHP-FPM and PHP cli.
dnf install -y php-fpm php-cli php-pdo php-mbstring php-mysqlnd php-gd php-intl
There are two parts of PHP configuration:
- PHP configuration – the application, which processes the PHP files. The configuration is in /etc/php.ini and the custom modules configurations are in the directory /etc/php.d/
- PHP FPM configuration – the process, which controls the execution of the PHP daemon, which process the PHP files. The configuration is in /etc/php-fpm.conf and custom daemons’ configurations (there may be multiple instances of the daemon, each of which will start its own tree of processes) are under /etc/php-fpm.d/. By default, there is only one pool of PHP-FPM processes with configuration file /etc/php-fpm.d/www.conf
PHP configuration
The configuration is in file /etc/php.ini and in general, there are 3 important options:
.....
date.timezone = UTC
.....
memory_limit = 256M
.....
max_execution_time = 60
.....
The file is around 1660 lines with options and comments, but in most cases, the first limits to hit are the above ones. By default, date.timezone is not set and is commented, so comment it out and set a value, the time zone, which used by the date functions – http://php.net/date.timezone. The second memory_limit is how much memory is allowed for each process and the third max_execution_time is how much time is allowed a process to take before being killed by the PHP.
PHP FPM Configuration
/etc/php-fpm.conf – defines global configuration for all pools and includes the files for each pool in /etc/php-fpm.d/. So the first pool, which will start one PHP process tree is in /etc/php-fpm.d/www.conf
Here are the important options, which should be uncommented or modified as follows:
.....
user = apache
group = apache
.....
listen.backlog = 1024
.....
pm.max_requests = 20000
.....
Enure the user to be apache, because this Web server will be used. The backlog means how many connections to queue when there are connections to the process, which cannot be processed immediately.
Interesting options to manage the process counts of the PHP processes are: pm.max_children, pm.start_servers, pm.min_spare_servers, pm.max_spare_servers, pm.process_idle_timeout, pm.max_requests (always set a limit to how many requests a process can accept, memory leaks do exists, so restarting a PHP process is a good thing! Be careful, with low values on a busy server.)
The default configuration will accept connections only through the Unix socket file: /run/php-fpm/www.sock. To accept network connections modify the listen and listen.allowed_clients options:
.....
listen="10.10.10.10:9000"
.....
;listen.allowed_clients=
.....
The PHP-FPM will accept network connections from IP 10.10.10.10 on port 9000.
In the configuration file there are many comments, which the user should read, because they may help him to find interesting options like access logging, slow logging, error logging, status and ping pages and more.
Start and enable on boot the PHP-FPM service:
[root@srv ~]# systemctl enable php-fpm
Created symlink /etc/systemd/system/multi-user.target.wants/php-fpm.service → /usr/lib/systemd/system/php-fpm.service.
[root@srv ~]# systemctl start php-fpm
[root@srv ~]# systemctl status php-fpm
● php-fpm.service - The PHP FastCGI Process Manager
     Loaded: loaded (/usr/lib/systemd/system/php-fpm.service; enabled; vendor preset: disabled)
     Active: active (running) since Thu 2022-10-06 08:06:42 UTC; 3s ago
   Main PID: 4817 (php-fpm)
     Status: "Ready to handle connections"
      Tasks: 6 (limit: 23072)
     Memory: 10.4M
        CPU: 83ms
     CGroup: /system.slice/php-fpm.service
             ├─4817 "php-fpm: master process (/etc/php-fpm.conf)"
             ├─4818 "php-fpm: pool www"
             ├─4819 "php-fpm: pool www"
             ├─4820 "php-fpm: pool www"
             ├─4821 "php-fpm: pool www"
             └─4822 "php-fpm: pool www"

Oct 06 08:06:42 srv systemd[1]: Starting The PHP FastCGI Process Manager...
Oct 06 08:06:42 srv systemd[1]: Started The PHP FastCGI Process Manager.
There is a master PHP-FPM process, which ran 5 process to accept connections.
Fix the PHP session write permissions with:
[root@srv ~]# ls -altrZ /var/lib/php/
total 24
drwxrwx---.  2 root apache system_u:object_r:httpd_var_run_t:s0 4096 Aug  1 09:42 wsdlcache
drwxrwx---.  2 root apache system_u:object_r:httpd_var_run_t:s0 4096 Aug  1 09:42 session
drwxr-xr-x.  2 root root   system_u:object_r:httpd_var_lib_t:s0 4096 Aug  1 09:42 peclxml
drwxrwx---.  2 root apache system_u:object_r:httpd_var_lib_t:s0 4096 Aug  1 09:42 opcache
drwxr-xr-x. 26 root root   system_u:object_r:var_lib_t:s0       4096 Oct  9 17:25 ..
drwxr-xr-x.  6 root root   system_u:object_r:httpd_var_lib_t:s0 4096 Oct  9 17:25 ..
By default, the directories’ groups are apache and it should stay apache. A blank page may be displayed if the PHP-FPM could not write to these directories.
The SELinux permission are fine.
STEP 3) Install, configure and start the Web server Apache.
For more than 15 years, Apache server has been from branch 2.x and many reference it as an Apache2 despite its name is The Apache HTTP Server (“httpd“) and in CentOS world it is referred as “httpd“. The package name is httpd and in many cases, for naming is used httpd. Bear in mind, there many packages with httpd in their names, which means they are related to the Apache web server. Still “apache” is also used, for example, the user and group names are “apache:apache“.
First, install the Apache server.
dnf install -y httpd
The important folders are:
[root@srv ~]# ls -al /etc/httpd/
total 20
drwxr-xr-x.  5 root root 4096 Oct  9 17:33 .
drwxr-xr-x. 87 root root 4096 Oct  9 17:33 ..
drwxr-xr-x.  2 root root 4096 Oct  9 17:33 conf
drwxr-xr-x.  2 root root 4096 Oct  9 17:33 conf.d
drwxr-xr-x.  2 root root 4096 Oct  9 17:33 conf.modules.d
lrwxrwxrwx.  1 root root   19 Jul 22 11:42 logs -> ../../var/log/httpd
lrwxrwxrwx.  1 root root   29 Jul 22 11:42 modules -> ../../usr/lib64/httpd/modules
lrwxrwxrwx.  1 root root   10 Jul 22 11:42 run -> /run/httpd
lrwxrwxrwx.  1 root root   19 Jul 22 11:42 state -> ../../var/lib/httpd
[root@srv ~]# ls -al /etc/httpd/conf/
total 36
drwxr-xr-x. 2 root root  4096 Oct  9 17:33 .
drwxr-xr-x. 5 root root  4096 Oct  9 17:33 ..
-rw-r--r--. 1 root root 12005 Jul 22 11:41 httpd.conf
-rw-r--r--. 1 root root 13430 Jul 22 11:41 magic
[root@srv ~]# ls -al /etc/httpd/conf.d/
total 28
drwxr-xr-x. 2 root root 4096 Oct  9 17:33 .
drwxr-xr-x. 5 root root 4096 Oct  9 17:33 ..
-rw-r--r--. 1 root root 2916 Jul 22 11:42 autoindex.conf
-rw-r--r--. 1 root root 1577 Aug  1 09:42 php.conf
-rw-r--r--. 1 root root  400 Jul 22 11:43 README
-rw-r--r--. 1 root root 1252 Jul 22 11:41 userdir.conf
-rw-r--r--. 1 root root  653 Jul 22 11:41 welcome.conf
[root@srv ~]# ls -al /etc/httpd/conf.modules.d/
total 56
drwxr-xr-x. 2 root root 4096 Oct  9 17:33 .
drwxr-xr-x. 5 root root 4096 Oct  9 17:33 ..
-rw-r--r--. 1 root root 3325 Jul 22 11:41 00-base.conf
-rw-r--r--. 1 root root   47 Jul 22 11:41 00-brotli.conf
-rw-r--r--. 1 root root  139 Jul 22 11:41 00-dav.conf
-rw-r--r--. 1 root root   41 Jul 22 11:41 00-lua.conf
-rw-r--r--. 1 root root  948 Jul 22 11:41 00-mpm.conf
-rw-r--r--. 1 root root  787 Jul 22 11:41 00-optional.conf
-rw-r--r--. 1 root root 1073 Jul 22 11:41 00-proxy.conf
-rw-r--r--. 1 root root   88 Jul 22 11:41 00-systemd.conf
-rw-r--r--. 1 root root  367 Jul 22 11:41 01-cgi.conf
-rw-r--r--. 1 root root   45 Aug 10  2021 10-h2.conf
-rw-r--r--. 1 root root   57 Aug 10  2021 10-proxy_h2.conf
-rw-r--r--. 1 root root  496 Jul 22 11:42 README
See the bonus sections for HTTPS for mode details.
To include the SSL certificate support the mod_ssl Apache module must be installed:
dnf install -y httpd mod_ssl
The main configuration file is /etc/httpd/conf/httpd.conf. The directory /etc/httpd/conf/ hosts global configuration files, which are rarely modified by the user.
The /etc/httpd/conf.d contains additional configuration files with the extension .conf, which are used to fine tune the modules loaded from /etc/httpd/conf.modules.d/. The configuration files in /etc/httpd/conf.modules.d/ are used only to describe how to modules.
So /etc/httpd/conf.d is the place where configuration for different sites should be included in different .conf files.
The configuration for virtual host with domain example.mydomain.com (following the same logic as the article for the NGINX, mentioned above) will be in /etc/httpd/conf.d/example.mydomain.com.conf. The skeleton looks as follows:
<virtualhost *:80>

ServerName example.mydomain.com
ServerAlias www.example.mydomain.com
DocumentRoot /var/www/example.mydomain.com

<Directory "/var/www/example.mydomain.com">
    Options Indexes FollowSymLinks
    AllowOverride None
    Require all granted
</Directory>

#logs
ErrorLog /var/log/httpd/example.mydomain.com-error.log
CustomLog /var/log/httpd/example.mydomain.com-access.log combined

</virtualhost>
Note the Directory directive, which
Create the directory, change the owner to the preferred one or apache:apache, test the configuration and start the service.
[root@srv ~]# mkdir /var/www/example.mydomain.com
[root@srv ~]# chown -R apache:apache /var/www/example.mydomain.com
[root@srv ~]# httpd -t
AH00558: httpd: Could not reliably determine the server's fully qualified domain name, using fe80::a00:27ff:fe5d:c605%enp0s3. Set the 'ServerName' directive globally to suppress this message
Syntax OK
[root@srv ~]# systemctl start httpd
[root@srv ~]# systemctl status httpd
● httpd.service - The Apache HTTP Server
     Loaded: loaded (/usr/lib/systemd/system/httpd.service; enabled; vendor preset: disabled)
     Active: active (running) since Fri 2022-10-07 11:16:27 UTC; 5s ago
       Docs: man:httpd.service(8)
   Main PID: 5562 (httpd)
     Status: "Started, listening on: port 80"
      Tasks: 213 (limit: 23072)
     Memory: 29.0M
        CPU: 77ms
     CGroup: /system.slice/httpd.service
             ├─5562 /usr/sbin/httpd -DFOREGROUND
             ├─5563 /usr/sbin/httpd -DFOREGROUND
             ├─5564 /usr/sbin/httpd -DFOREGROUND
             ├─5565 /usr/sbin/httpd -DFOREGROUND
             └─5566 /usr/sbin/httpd -DFOREGROUND

Oct 07 11:16:27 srv systemd[1]: Starting The Apache HTTP Server...
Oct 07 11:16:27 srv httpd[5562]: AH00558: httpd: Could not reliably determine the server's fully qua>
Oct 07 11:16:27 srv httpd[5562]: Server configured, listening on: port 80
Oct 07 11:16:27 srv systemd[1]: Started The Apache HTTP Server.
[root@srv ~]# systemctl enable httpd
Created symlink /etc/systemd/system/multi-user.target.wants/httpd.service → /usr/lib/systemd/system/httpd.service.
The syntax is OK, despite a warning for one of the IPv6, just skip this warning!
The PHP Configuration file in Apache is loaded from /etc/httpd/conf.d/php.conf. This files instruct the Apache web server to handle all files with extenstion .php to the PHP-FPM using the Unix socket /run/php-fpm/www.sock or the default FastCGI port, i.e. 9000.
Note, this file could be removed and the content added to a file in the /etc/httpd/conf.d/example.mydomain.com.conf, so only example.mydomain.com would process PHP files.
STEP 4) Configure the system – firewall and SELinux
By default, CentOS Stream 9 uses firewalld service and firewall-cmd cli to control it. Allow HTTP trafffic to the server:
[root@srv ~]# firewall-cmd --list-all
public (active)
  target: default
  icmp-block-inversion: no
  interfaces: enp0s3
  sources:
  services: cockpit dhcpv6-client ssh
  ports:
  protocols:
  forward: yes
  masquerade: no
  forward-ports:
  source-ports:
  icmp-blocks:
  rich rules:
[root@srv ~]# firewall-cmd --permanent --add-service=http
success
[root@srv ~]# firewall-cmd --reload
success
[root@srv ~]# firewall-cmd --list-all
public (active)
  target: default
  icmp-block-inversion: no
  interfaces: enp0s3
  sources:
  services: cockpit dhcpv6-client http ssh
  ports:
  protocols:
  forward: yes
  masquerade: no
  forward-ports:
  source-ports:
  icmp-blocks:
  rich rules:
If the web root directories is under /var/www there is no need to tune the SELinux. If the user want to change to another location not under /var/www, the SELinux label httpd_sys_content_t must be added to the parent directory.
For example, if the web root directories are under /mnt/storage/www, the following commands should be issued:
[root@srv ~]# semanage fcontext -a -t httpd_sys_rw_content_t '/mnt/storage/www(/.*)?'
[root@srv ~]# restorecon -Rv /mnt/storage/www
Relabeled /mnt/storage/www from unconfined_u:object_r:mnt_t:s0 to unconfined_u:object_r:httpd_sys_rw_content_t:s0
Otherwise, the SELinux will block any web request to the /mnt/storage/www.
STEP 5) Test all the three components – Apache, PHP-FPM and MariaDB.
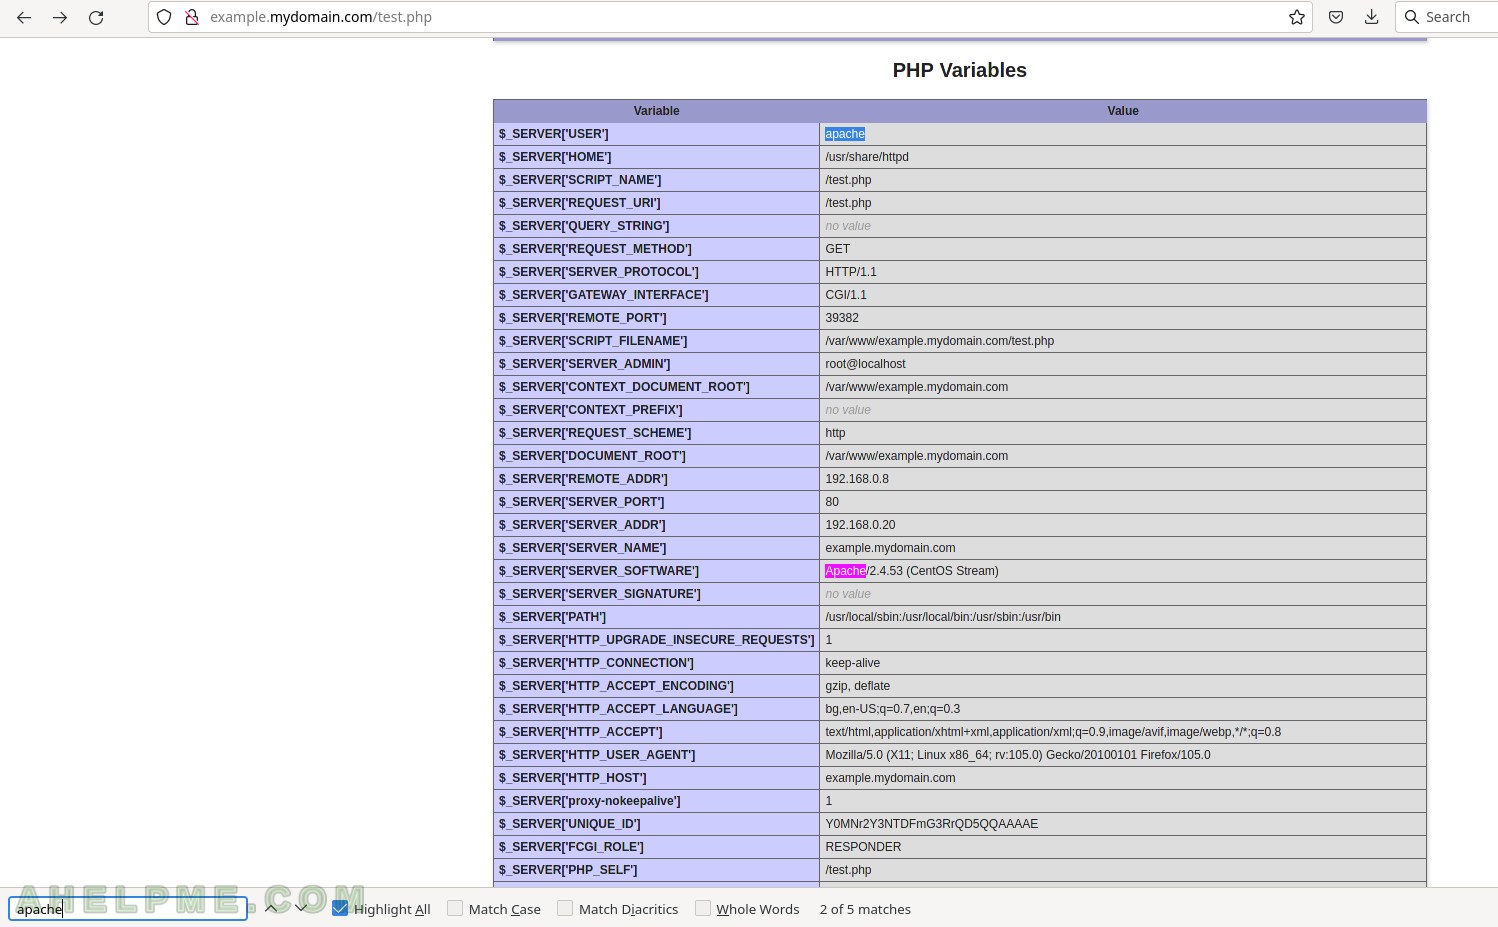
First test is Apache+PHP-FPM and the purpose is to show phpinfo() page. Create a file /var/www/example.mydomain.com/test.php with the content as shown below and then set the owner to “apache:apache”.
[root@srv ~]# cat /var/www/example.mydomain.com/test.php
<?php
phpinfo();
[root@srv ~]# chown -R apache:apache /var/www/example.mydomain.com
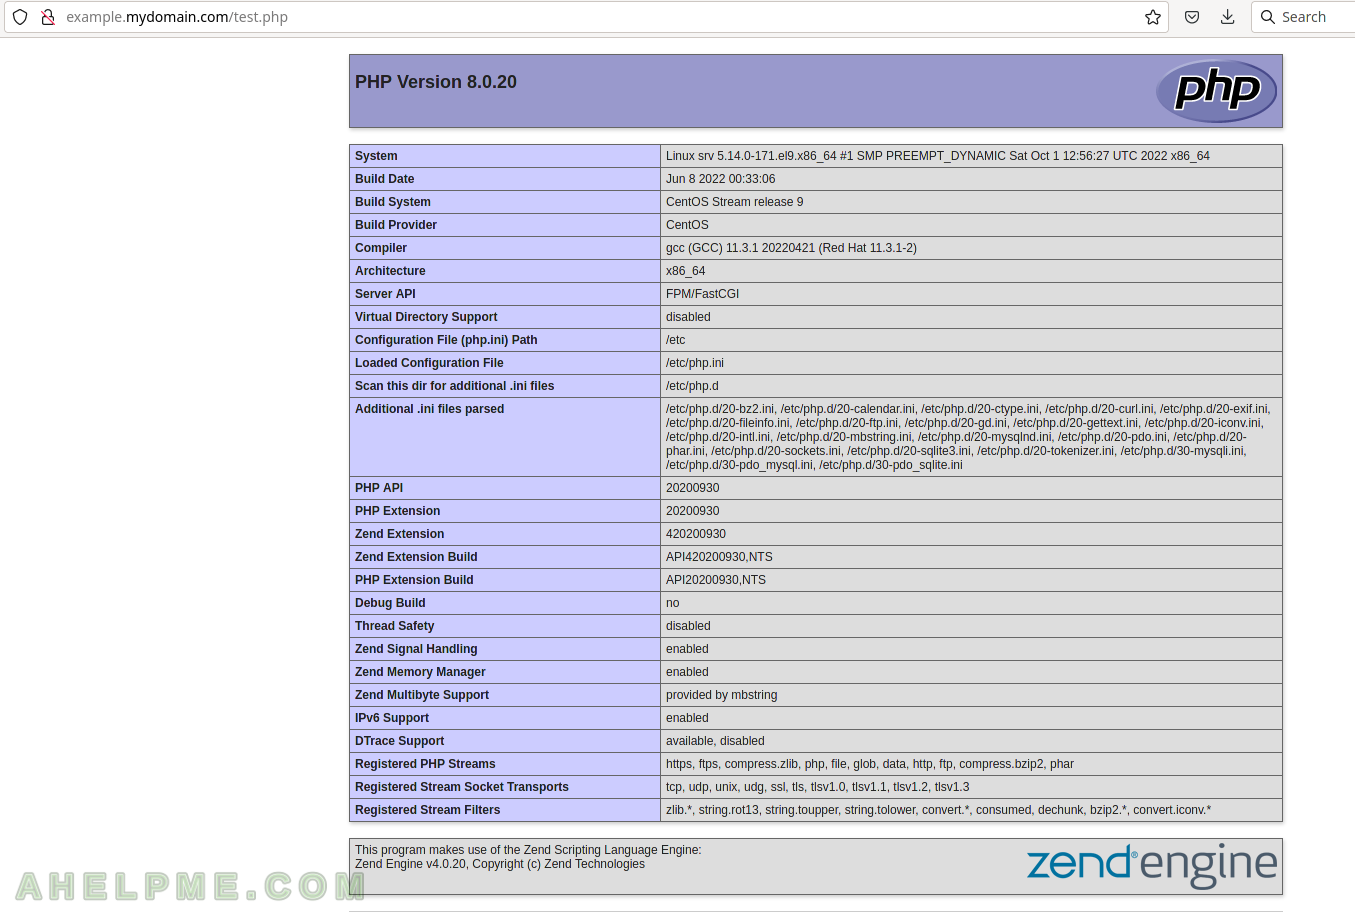
Apache environment with PHP-FPM:
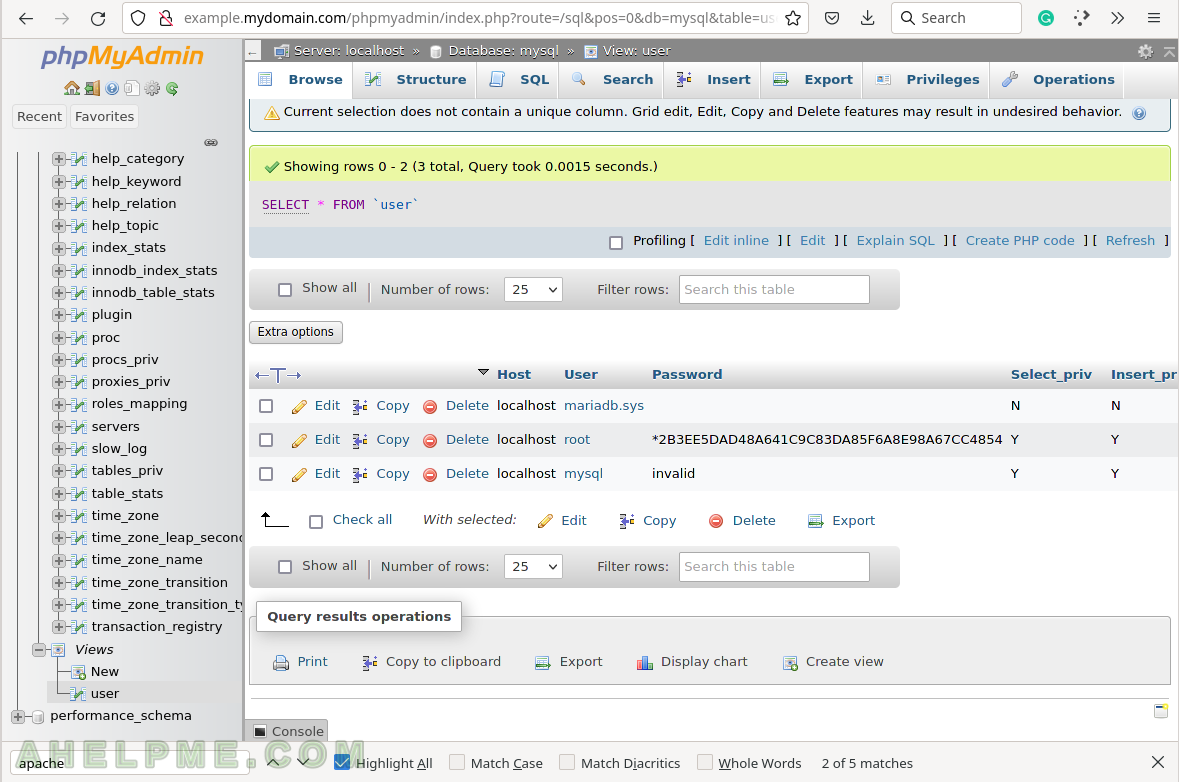
Second, test the Apache+PHP-FPM + MariaDB, i.e. the connectivity to the database from the application layer PHP-FPM.
Just download the phpMyAdmin package from https://files.phpmyadmin.net/phpMyAdmin/5.2.0/phpMyAdmin-5.2.0-all-languages.zip or the latest version. Unpack, add default config and load it in the browser:
[root@srv ~]# cd /var/www/example.mydomain.com
[root@srv example.mydomain.com]# wget https://files.phpmyadmin.net/phpMyAdmin/5.2.0/phpMyAdmin-5.2.0-all-languages.zip
--2022-10-09 19:07:03--  https://files.phpmyadmin.net/phpMyAdmin/5.2.0/phpMyAdmin-5.2.0-all-languages.zip
Resolving files.phpmyadmin.net (files.phpmyadmin.net)... 185.76.8.3, 2a02:6ea0:d900::3
Connecting to files.phpmyadmin.net (files.phpmyadmin.net)|185.76.8.3|:443... connected.
HTTP request sent, awaiting response... 200 OK
Length: 14112668 (13M) [application/zip]
Saving to: ‘phpMyAdmin-5.2.0-all-languages.zip’

phpMyAdmin-5.2.0-all-lang 100%[==================================>]  13.46M  4.04MB/s    in 3.3s

2022-10-09 19:07:07 (4.04 MB/s) - ‘phpMyAdmin-5.2.0-all-languages.zip’ saved [14112668/14112668]

[root@srv example.mydomain.com]# unzip phpMyAdmin-5.2.0-all-languages.zip
Archive:  phpMyAdmin-5.2.0-all-languages.zip
   creating: phpMyAdmin-5.2.0-all-languages/
.....
.....
  inflating: phpMyAdmin-5.2.0-all-languages/yarn.lock
[root@srv example.mydomain.com]# mv phpMyAdmin-5.2.0-all-languages phpmyadmin
[root@srv example.mydomain.com]# cd phpmyadmin
[root@srv example.mydomain.com]# cp config.sample.inc.php config.inc.php
Then open the browser and login with MariaDB root account and the password set in the (STEP 1). The phpMyAdmin should be located in http://example.mydomain.com/phpmyadmin/.
Bonus) Apache with SSL certificate – self-signed and letsencrypt.
Two types of certificate generations for the HTTPS server block will be presented in this section:
- Self-signed certificate. The browsers will report it is unsafe and the user should accept the certificate before viewing the site. It is convinient for development stage.
- Letsencrypt certificate – the software needed and how to generate. A free and valid certificate. More info – https://letsencrypt.org/
First, the Apache mod_ssl module must be installed to support HTTPS connections:
dnf install -y mod_ssl
An additional configuration files appears /etc/httpd/conf.d/ssl.conf, which tunes the mod_ssl module and includes the Listen directive for all IPs on 443 port. There is a default virtual host, which SSL certificate and the key files are missing, so generate one SSL certificate more for localhost or link or copy the one available.
Generate self-signed certificate
Generate the self-signed certificate and configure the firewall to accept HTTPS connections.
[root@srv ~]# mkdir /etc/ssl/apache
[root@srv ~]# openssl genrsa -out /etc/ssl/apache/example.mydomain.com.key 4096
[root@srv ~]# openssl req -new -key /etc/ssl/apache/example.mydomain.com.key -out /etc/ssl/apache/example.mydomain.com.csr -subj '/C=us/ST=newyork/L=newyork/O=mygroup/OU=servicing/CN=example.mydomain.com/emailAddress=admin@mydomain.com'
[root@srv ~]# openssl x509 -req -days 365 -in /etc/ssl/apache/example.mydomain.com.csr -signkey /etc/ssl/apache/example.mydomain.com.key -out /etc/ssl/apache/example.mydomain.com.crt
[root@srv ~]# chmod 400 /etc/ssl/apache/*
[root@srv ~]# ls -altr /etc/ssl/apache/
total 20
drwxr-xr-x. 3 root root 4096 Oct 10 00:02 ..
-r--------. 1 root root 3272 Oct 10 00:03 example.mydomain.com.key
-r--------. 1 root root 1765 Oct 10 00:03 example.mydomain.com.csr
drwxr-xr-x. 2 root root 4096 Oct 10 00:04 .
-r--------. 1 root root 2049 Oct 10 00:04 example.mydomain.com.crt
[root@srv ~]# ln -s /etc/ssl/apache/example.mydomain.com.key /etc/pki/tls/private/localhost.key
[root@srv ~]# ln -s /etc/ssl/apache/example.mydomain.com.crt /etc/pki/tls/certs/localhost.crt
The default virtual host and the certificate and key paths are declared in /etc/httpd/conf.d/ssl.conf.
Add the HTTPS service to the firewall with firewall-cmd command-line utility.
[root@srv ~]# firewall-cmd --permanent --add-service=https
success
[root@srv ~]# firewall-cmd --reload
success
Here is the Apache server block (in /etc/httpd/conf.d/example.mydomain.com.conf below the above HTTP server block) for the HTTPS connections:
<VirtualHost *:443>
ServerName example.mydomain.com
ServerAlias www.example.mydomain.com
DocumentRoot /var/www/example.mydomain.com

<Directory "/var/www/example.mydomain.com">
    Options Indexes FollowSymLinks
    AllowOverride None
    Require all granted
</Directory>

#ssl
SSLEngine on
SSLCertificateFile /etc/ssl/apache/example.mydomain.com.crt
SSLCertificateKeyFile /etc/ssl/apache/example.mydomain.com.key

#logs
ErrorLog /var/log/httpd/example.mydomain.com-ssl_error.log
#some SSL logging
#CustomLog /var/log/httpd/logs/example.mydomain.com-ssl "%t %h %{SSL_PROTOCOL}x %{SSL_CIPHER}x \"%r\" %b"
CustomLog /var/log/httpd/example.mydomain.com-ssl_access.log combined
</VirtualHost>
Test and restart the Apache web server.
[root@srv ~]# httpd -t
AH00558: httpd: Could not reliably determine the server's fully qualified domain name, using fe80::a00:27ff:fe5d:c605%enp0s3. Set the 'ServerName' directive globally to suppress this message
Syntax OK
[root@srv ~]# systemctl restart httpd
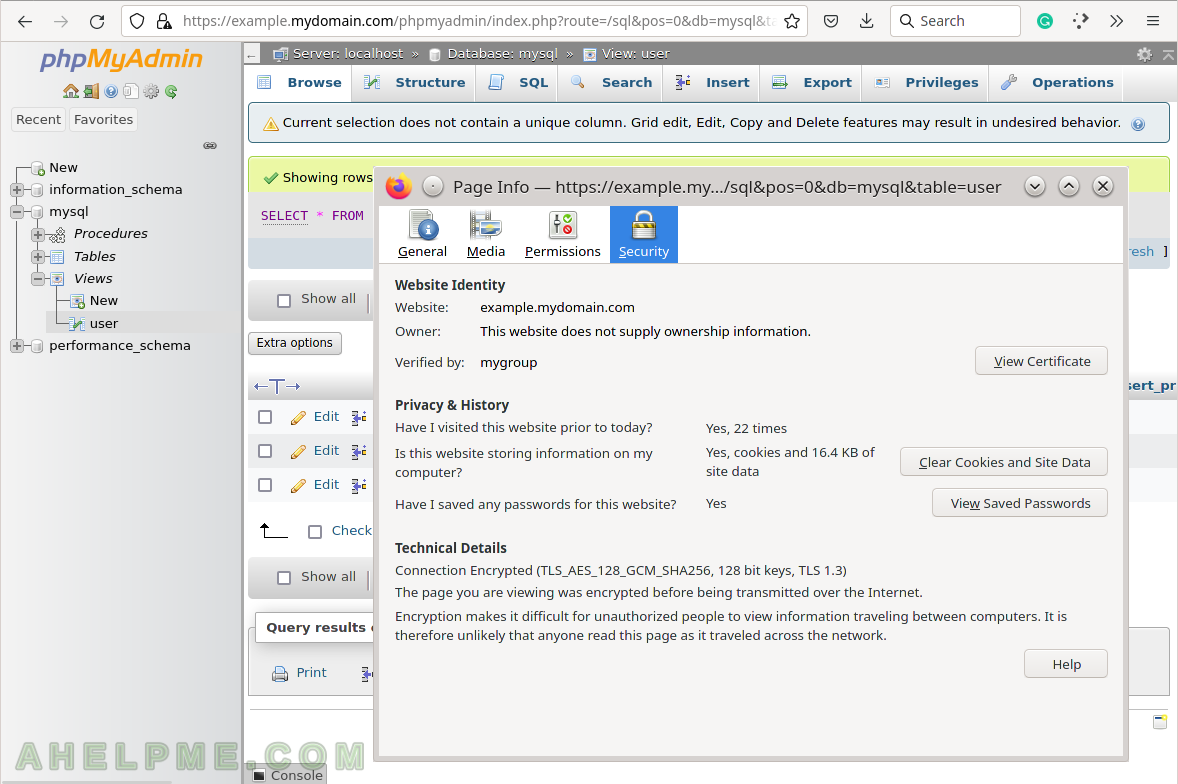
The phpMyAdmin should be located in https://example.mydomain.com/phpmyadmin/.
Letsencrypt certificate
Install the needed software. certbot is the command-line tool to generate, renewn and manage Let’s Encrypt SSL Certificates.
dnf install -y epel-release
dnf install -y certbot
The domain example.mydomain.com must have an accessible Internet IP, which the servers behind the letsencrypt organization would access using HTTP/HTTPS.
[root@srv ~]# certbot certonly --webroot -w /var/www/example.mydomain.com -d example.mydomain.com
Saving debug log to /var/log/letsencrypt/letsencrypt.log
Requesting a certificate for example.mydomain.com

Successfully received certificate.
Certificate is saved at: /etc/letsencrypt/live/example.mydomain.com/fullchain.pem
Key is saved at:         /etc/letsencrypt/live/example.mydomain.com/privkey.pem
This certificate expires on 2023-01-09.
These files will be updated when the certificate renews.

NEXT STEPS:
- The certificate will need to be renewed before it expires. Certbot can automatically renew the certificate in the background, but you may need to take steps to enable that functionality. See https://certbot.org/renewal-setup for instructions.

- - - - - - - - - - - - - - - - - - - - - - - - - - - - - - - - - - - - - - - -
If you like Certbot, please consider supporting our work by:
 * Donating to ISRG / Let's Encrypt:   https://letsencrypt.org/donate
 * Donating to EFF:                    https://eff.org/donate-le
- - - - - - - - - - - - - - - - - - - - - - - - - - - - - - - - - - - - - - - -
The Apache configuration in /etc/httpd/conf.d/example.mydomain.com.conf looks like:
<VirtualHost *:443>
ServerName example.mydomain.com
ServerAlias www.example.mydomain.com
DocumentRoot /var/www/example.mydomain.com

<Directory "/var/www/example.mydomain.com">
    Options Indexes FollowSymLinks
    AllowOverride None
    Require all granted
</Directory>

#ssl
SSLEngine on
SSLCertificateFile /etc/letsencrypt/live/example.mydomain.com/fullchain.pem
SSLCertificateKeyFile /etc/letsencrypt/live/example.mydomain.com/privkey.pem

#logs
ErrorLog /var/log/httpd/example.mydomain.com-ssl_error.log
#some SSL logging
#CustomLog /var/log/httpd/logs/example.mydomain.com-ssl "%t %h %{SSL_PROTOCOL}x %{SSL_CIPHER}x \"%r\" %b"
CustomLog /var/log/httpd/example.mydomain.com-ssl_access.log combined
</VirtualHost>
Essensially the same with the self-singed one, but with modified the path of SSLCertificateFile and SSLCertificateKeyFile.
Test and restart the Apache web server.
[root@srv ~]# httpd -t
AH00558: httpd: Could not reliably determine the server's fully qualified domain name, using fe80::a00:27ff:fe5d:c605%enp0s3. Set the 'ServerName' directive globally to suppress this message
Syntax OK
[root@srv ~]# systemctl restart httpd
The phpMyAdmin should be located in https://example.mydomain.com/phpmyadmin/, but this time the SSL certificate will be valid for example.mydomain.com and no errors or crititcal warnings will receive the users of the site.