Caching NFS files with cachefilesd

A great tool for caching a network filesystem like NFS mounts is cachefilesd! It is easy to use it and a good deal of stats can be retrieved from the tool. More on how it works here https://www.kernel.org/doc/Documentation/filesystems/caching/fscache.txt

Here are quick steps to cache an NFS mounts (it works with NFS-Ganesha servers, too):

  1. Install the daemon tool cachefilesd
  2. Check the configuration file /etc/cachefilesd.conf. In most cases, no need to edit the file! Just check the disk limits if they are good.
  3. Start the cachefilesd daemon.
  4. Mount the network directories with “fsc” option. Umount and mount them all if they’ve been already mounted. The fsc is mandatory option to enable file cacheing of a network mount.
  5. Check stats to see if the file cching is working properly.

The example below is under CentOS 8, but it is almost the same in most Linux distributions.

STEP 1) Install the daemon tool cachefilesd

This is straight forward, just install it with the package manager:

[root@srv ~]# dnf install cachefilesd
Last metadata expiration check: 2:33:44 ago on Tue 08 Dec 2020 07:18:01 AM UTC.
Dependencies resolved.
=============================================================================================================================================================================================
 Package                                        Architecture                              Version                                            Repository                                 Size
=============================================================================================================================================================================================
Installing:
 cachefilesd                                    x86_64                                    0.10.10-4.el8                                      BaseOS                                     43 k

Transaction Summary
=============================================================================================================================================================================================
Install  1 Package

Total download size: 43 k
Installed size: 71 k
Is this ok [y/N]: y
Downloading Packages:
cachefilesd-0.10.10-4.el8.x86_64.rpm                                                                                                                         3.1 MB/s |  43 kB     00:00    
---------------------------------------------------------------------------------------------------------------------------------------------------------------------------------------------
Total                                                                                                                                                        2.8 MB/s |  43 kB     00:00     
Running transaction check
Transaction check succeeded.
Running transaction test
Transaction test succeeded.
Running transaction
  Preparing        :                                                                                                                                                                     1/1 
  Installing       : cachefilesd-0.10.10-4.el8.x86_64                                                                                                                                    1/1 
  Running scriptlet: cachefilesd-0.10.10-4.el8.x86_64                                                                                                                                    1/1 
  Verifying        : cachefilesd-0.10.10-4.el8.x86_64                                                                                                                                    1/1 

Installed:
  cachefilesd-0.10.10-4.el8.x86_64                                                                                                                                                           

Complete!

STEP 2) Check the configuration file and tune for your system.

In most cases, the defaults in /etc/cachefilesd.conf are good to start with:

dir /var/cache/fscache
tag mycache
brun 10%
bcull 7%
bstop 3%
frun 10%
fcull 7%
fstop 3%

# Assuming you're using SELinux with the default security policy included in
# this package
secctx system_u:system_r:cachefiles_kernel_t:s0

The directory where the cache will reside and the lines with the percentages are for disk space limitation. “brun 10%” means cache can runs freely till the disk space drops below 10%. “bcull 7%” – culling the cache when the free space drops below “7%” and more in the man page (or https://linux.die.net/man/5/cachefilesd.conf).
So if one maintains disk free space below 10% the configuration file should be edited.

STEP 3) Start the cachefilesd daemon.

And enable on boot to start automatically.

[root@srv ~]# systemctl start cachefilesd
[root@srv ~]# systemctl enable cachefilesd
Created symlink /etc/systemd/system/multi-user.target.wants/cachefilesd.service → /usr/lib/systemd/system/cachefilesd.service.
[root@srv ~]# systemctl status cachefilesd
● cachefilesd.service - Local network file caching management daemon
   Loaded: loaded (/usr/lib/systemd/system/cachefilesd.service; enabled; vendor preset: disabled)
   Active: active (running) since Tue 2020-12-08 10:01:24 UTC; 11s ago
 Main PID: 29786 (cachefilesd)
    Tasks: 1 (limit: 408616)
   Memory: 2.5M
   CGroup: /system.slice/cachefilesd.service
           └─29786 /usr/sbin/cachefilesd -n -f /etc/cachefilesd.conf

Dec 08 10:01:24 srv systemd[1]: Starting Local network file caching management daemon...
Dec 08 10:01:24 srv systemd[1]: Started Local network file caching management daemon.
Dec 08 10:01:24 srv cachefilesd[29786]: About to bind cache
Dec 08 10:01:24 srv cachefilesd[29786]: Bound cache
Dec 08 10:01:24 srv cachefilesd[29786]: Daemon Started

The status command shows the daemon cachefilesd is running. But does it cache?

STEP 4) Mount the network filesystems with option fsc

To make cachefilesd cache a network mount the option fsc must be included in the mount options. Remount may not work correctly, so to be sure a full umount/mount should be executed. Here is an example /etc/fstab file:

192.168.0.1:/mnt/storage /mnt/storage  nfs defaults,hard,intr,noexec,nosuid,_netdev,fsc,vers=4 0 0

And then mount with simple command:

mount /mnt/storage

Check whether the mounts if the FS cache is used. FSC must be “yes”.

[root@srv ~]# cat /proc/fs/nfsfs/volumes
NV SERVER   PORT DEV          FSID                              FSC
v4 c0a80001  801 0:41         d4098a2af096148:ec7560388cbe5b83  yes

There is a proc file for cache statistics:

[root@srv ~]# cat /proc/fs/fscache/stats
FS-Cache statistics
Cookies: idx=49 dat=4385599 spc=0
Objects: alc=43666 nal=0 avl=43666 ded=36002
ChkAux : non=0 ok=12289 upd=0 obs=761
Pages  : mrk=24915179 unc=24492585
Acquire: n=4385648 nul=0 noc=0 ok=4385648 nbf=0 oom=0
Lookups: n=43666 neg=31372 pos=12294 crt=31372 tmo=0
Invals : n=1 run=1
Updates: n=0 nul=0 run=1
Relinqs: n=4377930 nul=0 wcr=0 rtr=0
AttrChg: n=0 ok=0 nbf=0 oom=0 run=0
Allocs : n=0 ok=0 wt=0 nbf=0 int=0
Allocs : ops=0 owt=0 abt=0
Retrvls: n=751549 ok=716860 wt=21436 nod=34689 nbf=0 int=0 oom=0
Retrvls: ops=751549 owt=9158 abt=0
Stores : n=550412 ok=550412 agn=0 nbf=0 oom=0
Stores : ops=33238 run=583650 pgs=550412 rxd=550412 olm=0
VmScan : nos=23963352 gon=0 bsy=0 can=0 wt=0
Ops    : pend=9160 run=784788 enq=26874960 can=0 rej=0
Ops    : ini=1301962 dfr=265 rel=1301962 gc=265
CacheOp: alo=0 luo=0 luc=0 gro=0
CacheOp: inv=0 upo=0 dro=0 pto=0 atc=0 syn=0
CacheOp: rap=0 ras=0 alp=0 als=0 wrp=0 ucp=0 dsp=0
CacheEv: nsp=761 stl=0 rtr=0 cul=0

And here is the cache directory filled with files. If there are no files, the FS cache is not used, probably the mount is not mounted with FSC! Umount and mount the mounts again.

[root@srv ~]# find /var/cache/fscache|head -n 20
/var/cache/fscache
/var/cache/fscache/graveyard
/var/cache/fscache/cache
/var/cache/fscache/cache/@4a
/var/cache/fscache/cache/@4a/I03nfs
/var/cache/fscache/cache/@4a/I03nfs/@84
/var/cache/fscache/cache/@4a/I03nfs/@84/Jc0010800840000cG0400
/var/cache/fscache/cache/@4a/I03nfs/@84/Jc0010800840000cG0400/@68
/var/cache/fscache/cache/@4a/I03nfs/@84/Jc0010800840000cG0400/@68/J1100000000000Q0goaWH946iIn7oUMELrd80000000040000g00Kb000wFe000jt000oG3000000040000g000000000
/var/cache/fscache/cache/@4a/I03nfs/@84/Jc0010800840000cG0400/@68/J1100000000000Q0goaWH946iIn7oUMELrd80000000040000g00Kb000wFe000jt000oG3000000040000g000000000/@8b
/var/cache/fscache/cache/@4a/I03nfs/@84/Jc0010800840000cG0400/@68/J1100000000000Q0goaWH946iIn7oUMELrd80000000040000g00Kb000wFe000jt000oG3000000040000g000000000/@8b/EA0g00sg0200n8000000ixBMHyy9gdcUm_O8ewl7XMW1n8cXgyl60
/var/cache/fscache/cache/@4a/I03nfs/@84/Jc0010800840000cG0400/@68/J1100000000000Q0goaWH946iIn7oUMELrd80000000040000g00Kb000wFe000jt000oG3000000040000g000000000/@8b/EA0g00sg0200n8000000ixBMHyy9gdcUm_O8ewl7XZG2n84qfxl60
/var/cache/fscache/cache/@4a/I03nfs/@84/Jc0010800840000cG0400/@68/J1100000000000Q0goaWH946iIn7oUMELrd80000000040000g00Kb000wFe000jt000oG3000000040000g000000000/@8b/EA0g00sg0200n8000000ixBMHyy9gdcUm_O8ewl7XQM2n8IQ4El60
/var/cache/fscache/cache/@4a/I03nfs/@84/Jc0010800840000cG0400/@68/J1100000000000Q0goaWH946iIn7oUMELrd80000000040000g00Kb000wFe000jt000oG3000000040000g000000000/@8b/EA0g00sg0200n8000000ixBMHyy9gdcUm_O8ewl7XZO2n8Ms7kl60
/var/cache/fscache/cache/@4a/I03nfs/@84/Jc0010800840000cG0400/@68/J1100000000000Q0goaWH946iIn7oUMELrd80000000040000g00Kb000wFe000jt000oG3000000040000g000000000/@8b/EA0g00sg0200n8000000ixBMHyy9gdcUm_O8ewl7XvQ2n88dKgl60
/var/cache/fscache/cache/@4a/I03nfs/@84/Jc0010800840000cG0400/@68/J1100000000000Q0goaWH946iIn7oUMELrd80000000040000g00Kb000wFe000jt000oG3000000040000g000000000/@8b/EA0g00sg0200n8000000ixBMHyy9gdcUm_O8ewl7XV40o8cREC6b0
/var/cache/fscache/cache/@4a/I03nfs/@84/Jc0010800840000cG0400/@68/J1100000000000Q0goaWH946iIn7oUMELrd80000000040000g00Kb000wFe000jt000oG3000000040000g000000000/@8b/EA0g00sg0200n8000000ixBMHyy9gdcUm_O8ewl7X3Y1n8MHO_l60
/var/cache/fscache/cache/@4a/I03nfs/@84/Jc0010800840000cG0400/@68/J1100000000000Q0goaWH946iIn7oUMELrd80000000040000g00Kb000wFe000jt000oG3000000040000g000000000/@8b/EA0g00sg0200n8000000ixBMHyy9gdcUm_O8ewl7Xhkwn80f23zb0
/var/cache/fscache/cache/@4a/I03nfs/@84/Jc0010800840000cG0400/@68/J1100000000000Q0goaWH946iIn7oUMELrd80000000040000g00Kb000wFe000jt000oG3000000040000g000000000/@8b/EA0g00sg0200n8000000ixBMHyy9gdcUm_O8ewl7XEQ2n8IuAll60
/var/cache/fscache/cache/@4a/I03nfs/@84/Jc0010800840000cG0400/@68/J1100000000000Q0goaWH946iIn7oUMELrd80000000040000g00Kb000wFe000jt000oG3000000040000g000000000/@8b/EA0g00sg0200n8000000ixBMHyy9gdcUm_O8ewl7XoO2n8A7Bll60
[root@srv ~]# du -d 1 -h /var/cache/fscache
4.0K    /var/cache/fscache/graveyard
3.8G    /var/cache/fscache/cache
3.8G    /var/cache/fscache

There are 3.8G in the cache.

Gentoo emerge virtualbox- Mesa / GLU: Mesa not found at, Mesa headers not found

Emerging the package app-emulation/virtualbox the following error occurs:

Checking for Mesa / GLU: 
  Mesa not found at -L/usr/X11R6/lib -L/usr/X11R6/lib64 -L/usr/local/lib -lXext -lX11 -lGL -I/usr/local/include or Mesa headers not found
  Check the file /var/tmp/portage/app-emulation/virtualbox-6.1.18/work/VirtualBox-6.1.18/configure.log for detailed error information.
Check /var/tmp/portage/app-emulation/virtualbox-6.1.18/work/VirtualBox-6.1.18/configure.log for details
 * ERROR: app-emulation/virtualbox-6.1.18::gentoo failed (configure phase):
 *   (no error message)
 * 
 * Call stack:
 *     ebuild.sh, line  125:  Called src_configure
 *   environment, line 5504:  Called doecho './configure' '--with-gcc=x86_64-pc-linux-gnu-gcc' '--with-g++=x86_64-pc-linux-gnu-g++' '--disable-dbus' '--disable-kmods' '--disable-alsa' '--disable-docs' '--disable-devmapper' '--disable-pulse' '--disable-python' '--enable-webservice' '--enable-vnc'
 *   environment, line 1538:  Called die
 * The specific snippet of code:
 *       "$@" || die

The configure script reports the mesa is missing, but the package media-libs/mesa is installed. Reinstalling does not fix the problem.
Farther investigation in the logs by checking the configure.log reveals the real problem:

srv ~ # tail -n 16 /var/tmp/portage/app-emulation/virtualbox-6.1.18/work/VirtualBox-6.1.18/configure.log
***** Checking Mesa / GLU *****
compiling the following source file:
#include <cstdio>
#include <X11/Xlib.h>
#include <GL/glx.h>
#include <GL/glu.h>
extern "C" int main(void)
{
  return 0;
}
using the following command line:
x86_64-pc-linux-gnu-g++  -fPIC -g -O -Wall -o /var/tmp/portage/app-emulation/virtualbox-6.1.18/work/VirtualBox-6.1.18/.tmp_out /var/tmp/portage/app-emulation/virtualbox-6.1.18/work/VirtualBox-6.1.18/.tmp_src.cc "-L/usr/X11R6/lib -L/usr/X11R6/lib64 -L/usr/local/lib -lXext -lX11 -lGL -I/usr/local/include"
/var/tmp/portage/app-emulation/virtualbox-6.1.18/work/VirtualBox-6.1.18/.tmp_src.cc:4:10: fatal error: GL/glu.h: No such file or directory
    4 | #include <GL/glu.h>
      |          ^~~~~~~~~~
compilation terminated.

The glu part of mesa is missing. In Gentoo, the glu (https://gitlab.freedesktop.org/mesa/glu) is not included in the media-libs/mesa and it is a separate package media-libs/glu.

The solution is to emerge media-libs/glu and then the app-emulation/virtualbox.

emerge -v media-libs/glu

Another Linux distribution may include glu in the main mesa package.

Here, the conclusion is to always check the configure.log, because it reports the exact error and not to trust the generic output of the configure script.

Stopping the glusterfs volume releases disk sleep process hangs

A quick tip for GlusterFS volume. There are multiple possible reasons for a Linux process to hang in “Disk Sleep” state, which even the KILL -9 cannot interrupt:

  • a bug in GlusterFS
  • just bad options turn on online
  • other device relying on a GlusterFS, which is unavailable.
[17294588.184470] INFO: task gdisk:12505 blocked for more than 120 seconds.
[17294588.184538] "echo 0 > /proc/sys/kernel/hung_task_timeout_secs" disables this message.
[17294588.184628] gdisk           D ffff8ce01fb9acc0     0 12505  26866 0x00000080
[17294588.184780] Call Trace:
[17294588.184844]  [<ffffffffbaed3d81>] ? __wake_up_common_lock+0x91/0xc0
[17294588.184910]  [<ffffffffbb585da9>] schedule+0x29/0x70
[17294588.184974]  [<ffffffffbb5838b1>] schedule_timeout+0x221/0x2d0
[17294588.185037]  [<ffffffffbaed3dc3>] ? __wake_up+0x13/0x20
[17294588.185102]  [<ffffffffc0a05d2e>] ? loop_make_request+0x12e/0x210 [loop]
[17294588.185169]  [<ffffffffbaf06d32>] ? ktime_get_ts64+0x52/0xf0
[17294588.185232]  [<ffffffffbb58549d>] io_schedule_timeout+0xad/0x130
[17294588.185304]  [<ffffffffbb5863dd>] wait_for_completion_io+0xfd/0x140
[17294588.185369]  [<ffffffffbaedb990>] ? wake_up_state+0x20/0x20
[17294588.185468]  [<ffffffffbb157e64>] blkdev_issue_flush+0xb4/0x110
[17294588.185533]  [<ffffffffbb08d335>] blkdev_fsync+0x35/0x50
[17294588.185598]  [<ffffffffbb082f57>] do_fsync+0x67/0xb0
[17294588.185671]  [<ffffffffbb083240>] SyS_fsync+0x10/0x20
[17294588.185734]  [<ffffffffbb592ed2>] system_call_fastpath+0x25/0x2a
[17294708.187598] INFO: task gdisk:12505 blocked for more than 120 seconds.
[17294708.187664] "echo 0 > /proc/sys/kernel/hung_task_timeout_secs" disables this message.
[17294708.187753] gdisk           D ffff8ce01fb9acc0     0 12505  26866 0x00000080
[17294708.187905] Call Trace:
[17294708.187968]  [<ffffffffbaed3d81>] ? __wake_up_common_lock+0x91/0xc0
[17294708.188033]  [<ffffffffbb585da9>] schedule+0x29/0x70
[17294708.188096]  [<ffffffffbb5838b1>] schedule_timeout+0x221/0x2d0
[17294708.188159]  [<ffffffffbaed3dc3>] ? __wake_up+0x13/0x20
[17294708.188223]  [<ffffffffc0a05d2e>] ? loop_make_request+0x12e/0x210 [loop]
[17294708.188289]  [<ffffffffbaf06d32>] ? ktime_get_ts64+0x52/0xf0
[17294708.188352]  [<ffffffffbb58549d>] io_schedule_timeout+0xad/0x130
[17294708.188416]  [<ffffffffbb5863dd>] wait_for_completion_io+0xfd/0x140
[17294708.188480]  [<ffffffffbaedb990>] ? wake_up_state+0x20/0x20
[17294708.188545]  [<ffffffffbb157e64>] blkdev_issue_flush+0xb4/0x110
[17294708.188624]  [<ffffffffbb08d335>] blkdev_fsync+0x35/0x50
[17294708.188690]  [<ffffffffbb082f57>] do_fsync+0x67/0xb0
[17294708.188754]  [<ffffffffbb083240>] SyS_fsync+0x10/0x20
[17294708.188828]  [<ffffffffbb592ed2>] system_call_fastpath+0x25/0x2a

The above example of dmesg log shows the gdisk process stuck in “Disk Sleep” state, because of a loop device from a file on an unavailable GlusterFS volume! Kill -9 won’t help, the process will remain in this bad state and even a restart would be difficult to perform!

[root@srv1 ~]# gluster volume stop VOL2 
Stopping volume will make its data inaccessible. Do you want to continue? (y/n) y
volume stop: VOL2: success
[root@srv1 ~]# gluster volume start VOL2 
volume start: VOL2: success

The solution is to stop the GlusterFS Volume and all the blocked processes on bad devices such as above would be released. The processes will carry on executing or will end their execution after issuing a stop command to the volume. No problem to start the GlusterFS volume immediately after the stop!
NOTE: executing STOP command would affect all servers using this volume. The volume becomes inaccessible for all!

Repairing damaged backup GPT with gdisk

Problem with network shared storage could lead to a damaged file system or even GPT tables, so the gdisk may help in this case.
Here it is a nasty the error:

[root@srv1 ~]# kpartx /dev/loop0
Alternate GPT is invalid, using primary GPT.
loop0p1 : 0 83881984 /dev/loop0 2048
[root@srv1 ~]# parted /dev/loop0
GNU Parted 3.1
Using /dev/loop0
Welcome to GNU Parted! Type 'help' to view a list of commands.
(parted) p                                                                
Error: The backup GPT table is corrupt, but the primary appears OK, so that will be used.
OK/Cancel? OK                                                             
Model: Loopback device (loopback)
Disk /dev/loop0: 42.9GB
Sector size (logical/physical): 512B/512B
Partition Table: gpt
Disk Flags: 

Number  Start   End     Size    File system  Name     Flags
 1      1049kB  42.9GB  42.9GB               primary

(parted)

So parted reports the backup GPT is damaged, but how to fix it? The solution is to use gdisk and use write “w” command in it. gdisk also shows the exact error with the GPT table with “v” option:

[root@srv1 ~]# gdisk 
GPT fdisk (gdisk) version 0.8.10

Type device filename, or press <Enter> to exit: /dev/loop0
Warning! Main and backup partition tables differ! Use the 'c' and 'e' options
on the recovery & transformation menu to examine the two tables.

Warning! One or more CRCs don't match. You should repair the disk!

Partition table scan:
  MBR: protective
  BSD: not present
  APM: not present
  GPT: damaged

****************************************************************************
Caution: Found protective or hybrid MBR and corrupt GPT. Using GPT, but disk
verification and recovery are STRONGLY recommended.
****************************************************************************

Command (? for help): p
Disk /dev/loop0: 83886080 sectors, 40.0 GiB
Logical sector size: 512 bytes
Disk identifier (GUID): 7EDF123B-FBC4-4C09-B636-922BD165F862
Partition table holds up to 128 entries
First usable sector is 34, last usable sector is 83886046
Partitions will be aligned on 2048-sector boundaries
Total free space is 4029 sectors (2.0 MiB)

Number  Start (sector)    End (sector)  Size       Code  Name
   1            2048        83884031   40.0 GiB    0700  primary

Command (? for help): v

Caution: The CRC for the backup partition table is invalid. This table may
be corrupt. This program will automatically create a new backup partition
table when you save your partitions.

Identified 1 problems!

Command (? for help): p
Disk /dev/loop0: 83886080 sectors, 40.0 GiB
Logical sector size: 512 bytes
Disk identifier (GUID): 7EDF123B-FBC4-4C09-B636-922BD165F862
Partition table holds up to 128 entries
First usable sector is 34, last usable sector is 83886046
Partitions will be aligned on 2048-sector boundaries
Total free space is 4029 sectors (2.0 MiB)

Number  Start (sector)    End (sector)  Size       Code  Name
   1            2048        83884031   40.0 GiB    0700  primary

Command (? for help): w

Final checks complete. About to write GPT data. THIS WILL OVERWRITE EXISTING
PARTITIONS!!

Do you want to proceed? (Y/N): Y
OK; writing new GUID partition table (GPT) to /dev/loop0.

Warning: The kernel is still using the old partition table.
The new table will be used at the next reboot.
The operation has completed successfully.

And the GPT backup in this loop device is fixed. Executing parted again reports no problems:

[root@srv1 ~]# parted /dev/loop0 print
Model: Loopback device (loopback)
Disk /dev/loop0: 42.9GB
Sector size (logical/physical): 512B/512B
Partition Table: gpt
Disk Flags: 

Number  Start   End     Size    File system  Name     Flags
 1      1049kB  42.9GB  42.9GB               primary

Verify also reports nor error. More options are available:

[root@srv1 ~]# gdisk /dev/loop0
GPT fdisk (gdisk) version 0.8.10

Partition table scan:
  MBR: protective
  BSD: not present
  APM: not present
  GPT: present

Found valid GPT with protective MBR; using GPT.

Command (? for help): h
b  back up GPT data to a file
c  change a partition's name
d  delete a partition
i  show detailed information on a partition
l  list known partition types
n  add a new partition
o  create a new empty GUID partition table (GPT)
p  print the partition table
q  quit without saving changes
r  recovery and transformation options (experts only)
s  sort partitions
t  change a partition's type code
v  verify disk
w  write table to disk and exit
x  extra functionality (experts only)
?  print this menu

Command (? for help): v

No problems found. 4029 free sectors (2.0 MiB) available in 2
segments, the largest of which is 2015 (1007.5 KiB) in size.

Command (? for help): q

Force losetup detach of local file after it became unavailable

Mounting a file as loop devices is simple enough operation! But what if the file just disappears because of the network storage got unreachable?

In our case the shared network storage had got unavailable and the ext4 file system of the loop device got read-only! Unfortunately after the reset of the shared network storage and mounting it in the same place, the loop device (/dev/loop0) still maintained the old file descriptor to the unavailable file. And the losetup could not detach the device, at all.

root@srv ~# losetup -d /dev/loop0
root@srv ~# losetup -l
NAME       SIZELIMIT OFFSET AUTOCLEAR RO BACK-FILE
/dev/loop0         0      0         0  0 /mnt/storage4/servers/test_raw_image.img
[root@lsrv1 ~]# kpartx -df /dev/loop0
read error, sector 0
read error, sector 1
read error, sector 29

The above command could not detach the device. Unfortunately, the losetup does not have the force detach, so the server ended with blocked loop0 device pointing to unavailable file. kpartx does not work, neither.

The solution is to use dmsetup!

root@srv ~# dmsetup remove /dev/mapper/loop0p1
root@srv ~# losetup -l
root@srv ~#

And there is no loop device any more. The wrong pointing loop device has been removed successfully! Now the user can use the loop0 for another device and in many cases, this helps to umount the filesystem!

MySQL slave upgrade: Slave failed to initialize relay log info structure from the repository

MySQL slave after upgrade from 5.6.x to 5.7.x may throw the following error:

mysql> START SLAVE;
ERROR 1872 (HY000): Slave failed to initialize relay log info structure from the repository

The best solution for this error is to:

  • Master server – mysqldump the database with –master-data=1 –single-transaction
  • On the slave server issue command “RESET SLAVE;”
  • On the slave server import the dump sql file and issue “CHANGE MASTER” command with the meta data written in the sql dump
  • On the slave server issue START SLAVE to start the replication.

Here is an a real world example:
First, mysqldump in the master with

root@master ~ # mysqldump --master-data=1 --single-transaction mydb > /root/mydb.sql
root@master ~ # grep "CHANGE MASTER" media.sql 
CHANGE MASTER TO MASTER_LOG_FILE='mysql-bin.023283', MASTER_LOG_POS=537774724;

And then copy the dump file to the slave server and import it and issue several specific slave commands:

root@slave ~ # mysql < /root/mydb.sql
root@slave ~ # mysql
Welcome to the MySQL monitor.  Commands end with ; or \g.
Your MySQL connection id is 23
Server version: 5.7.31-log Gentoo Linux mysql-5.7.31

Copyright (c) 2000, 2020, Oracle and/or its affiliates. All rights reserved.

Oracle is a registered trademark of Oracle Corporation and/or its
affiliates. Other names may be trademarks of their respective
owners.

Type 'help;' or '\h' for help. Type '\c' to clear the current input statement.

mysql> reset slave;
Query OK, 0 rows affected (0.01 sec)
mysql> CHANGE MASTER TO MASTER_LOG_FILE='mysql-bin.023283', MASTER_LOG_POS=537774724;
Query OK, 0 rows affected (0.00 sec)
mysql> START SLAVE;
Query OK, 0 rows affected (0.00 sec)

mysql> show slave status\G;
*************************** 1. row ***************************
               Slave_IO_State: Queueing master event to the relay log
                  Master_Host: 10.10.10.10
                  Master_User: ruser
                  Master_Port: 3306
                Connect_Retry: 60
              Master_Log_File: mysql-bin.023283
          Read_Master_Log_Pos: 641769286
               Relay_Log_File: slave-relay-bin.000002
                Relay_Log_Pos: 90874706
        Relay_Master_Log_File: mysql-bin.023283
             Slave_IO_Running: Yes
            Slave_SQL_Running: Yes
              Replicate_Do_DB: 
          Replicate_Ignore_DB: 
           Replicate_Do_Table: 
       Replicate_Ignore_Table: 
      Replicate_Wild_Do_Table: mydb.%
  Replicate_Wild_Ignore_Table: 
                   Last_Errno: 0
                   Last_Error: 
                 Skip_Counter: 0
          Exec_Master_Log_Pos: 628649113
              Relay_Log_Space: 103995088
              Until_Condition: None
               Until_Log_File: 
                Until_Log_Pos: 0
           Master_SSL_Allowed: No
           Master_SSL_CA_File: 
           Master_SSL_CA_Path: 
              Master_SSL_Cert: 
            Master_SSL_Cipher: 
               Master_SSL_Key: 
        Seconds_Behind_Master: 2395
Master_SSL_Verify_Server_Cert: No
                Last_IO_Errno: 0
                Last_IO_Error: 
               Last_SQL_Errno: 0
               Last_SQL_Error: 
  Replicate_Ignore_Server_Ids: 
             Master_Server_Id: 101
                  Master_UUID: cd1bcebb-cc27-11e8-90c9-801844f2c4d8
             Master_Info_File: /mnt/mysql/master.info
                    SQL_Delay: 0
          SQL_Remaining_Delay: NULL
      Slave_SQL_Running_State: Reading event from the relay log
           Master_Retry_Count: 86400
                  Master_Bind: 
      Last_IO_Error_Timestamp: 
     Last_SQL_Error_Timestamp: 
               Master_SSL_Crl: 
           Master_SSL_Crlpath: 
           Retrieved_Gtid_Set: 
            Executed_Gtid_Set: 
                Auto_Position: 0
         Replicate_Rewrite_DB: 
                 Channel_Name: 
           Master_TLS_Version: 
1 row in set (0.00 sec)

The replication is advancing. It is 2395 seconds behind the master.
Keep on reading!

libelf was not found in the pkg-config search path

Building from source under CentOS the user may stumble on some compilation errors and most of them are for missing -devel packages. Here is such example with not so easy to find the name of a missing library:

[/tmp/netdata-libbpf-El77Ld/libbpf-0.0.9_netdata-1/src]# env CFLAGS=-fPIC CXXFLAGS= LDFLAGS= BUILD_STATIC_ONLY=y OBJDIR=build DESTDIR=.. make install 
Package libelf was not found in the pkg-config search path.
Perhaps you should add the directory containing `libelf.pc'
to the PKG_CONFIG_PATH environment variable
No package 'libelf' found
mkdir -p build/staticobjs
cc -I. -I../include -I../include/uapi -DCOMPAT_NEED_REALLOCARRAY -fPIC -D_LARGEFILE64_SOURCE -D_FILE_OFFSET_BITS=64   -c bpf.c -o build/staticobjs/bpf.o
cc -I. -I../include -I../include/uapi -DCOMPAT_NEED_REALLOCARRAY -fPIC -D_LARGEFILE64_SOURCE -D_FILE_OFFSET_BITS=64   -c btf.c -o build/staticobjs/btf.o
btf.c:17:18: fatal error: gelf.h: No such file or directory
 #include <gelf.h>
                  ^
compilation terminated.
make: *** [build/staticobjs/btf.o] Error 1
 FAILED   

The missing development library file is with the name: elfutils-libelf-devel. Installing the package with yum or dnf will resolve the above error:

yum install -y elfutils-libelf-devel

Or for CentOS 8 and newer Fedora versions:

dnf install -y elfutils-libelf-devel

removing the default kernel in CentOS 8 – remove elrepo kernel

Removing the default kernel aka the loaded kernel in CentOS 8 maybe challenging because the package is protected and cannot be removed by the yum or dnf.
Here is the case: an elrepo kernel-ml loaded and the dnf prints it cannot remove the package, because it is protected:

[root@srv ~]# dnf remove kernel-ml kernel-ml-core kernel-ml-modules
Error: 
 Problem: The operation would result in removing the following protected packages: kernel-ml-core
(try to add '--skip-broken' to skip uninstallable packages or '--nobest' to use not only best candidate packages)
[root@srv ~]# uname -a
Linux srv.localhost 5.10.4-1.el8.elrepo.x86_64 #1 SMP Tue Dec 29 11:04:23 EST 2020 x86_64 x86_64 x86_64 GNU/Linux
[root@srv ~]# grubby --default-kernel
/boot/vmlinuz-5.10.4-1.el8.elrepo.x86_64

The system is booted up with the kernel we are trying to remove, which is impossible.

The solution is to set a new default kernel and load it. Then dnf will be able to remove the first kernel.

For CentOS 7, just use the yum instead of dnf command.
Using grubby is really easy and straightforward:

STEP 1) List all installed and available to boot kernels

[root@srv ~]# grubby --info=ALL |grep ^kernel
kernel="/boot/vmlinuz-5.10.4-1.el8.elrepo.x86_64"
kernel="/boot/vmlinuz-4.18.0-259.el8.x86_64"
kernel="/boot/vmlinuz-4.18.0-257.el8.x86_64"
kernel="/boot/vmlinuz-0-rescue-45e12f0814fd4947b99cbdcb88950361"

STEP 2) Select the kernel to load the next time

[root@srv ~]# grubby --set-default "/boot/vmlinuz-4.18.0-259.el8.x86_64"
The default is /boot/loader/entries/45e12f0814fd4947b99cbdcb88950361-4.18.0-259.el8.x86_64.conf with index 1 and kernel /boot/vmlinuz-4.18.0-259.el8.x86_64

Keep on reading!

Gentoo emerge GO lang failed – atomic_amd64x.go: too many errors

Upgrading GO lang under Gentoo maybe a little bit tricky. The upgrading go lang from 1.13.7 to 1.15.5 failed with strange error:

# runtime/internal/atomic
/usr/lib/go/src/runtime/internal/atomic/atomic_amd64x.go:18:6: Load redeclared in this block
        previous declaration at /usr/lib/go/src/runtime/internal/atomic/atomic_amd64.go:16:24
/usr/lib/go/src/runtime/internal/atomic/atomic_amd64x.go:24:6: Loadp redeclared in this block
        previous declaration at /usr/lib/go/src/runtime/internal/atomic/atomic_amd64.go:22:32
/usr/lib/go/src/runtime/internal/atomic/atomic_amd64x.go:30:6: Load64 redeclared in this block
        previous declaration at /usr/lib/go/src/runtime/internal/atomic/atomic_amd64.go:28:26
/usr/lib/go/src/runtime/internal/atomic/atomic_amd64x.go:36:6: LoadAcq redeclared in this block
        previous declaration at /usr/lib/go/src/runtime/internal/atomic/atomic_amd64.go:34:27
/usr/lib/go/src/runtime/internal/atomic/atomic_amd64x.go:41:6: Xadd redeclared in this block
        previous declaration at /usr/lib/go/src/runtime/internal/atomic/atomic_amd64.go:39:37
/usr/lib/go/src/runtime/internal/atomic/atomic_amd64x.go:44:6: Xadd64 redeclared in this block
        previous declaration at /usr/lib/go/src/runtime/internal/atomic/atomic_amd64.go:42:39
/usr/lib/go/src/runtime/internal/atomic/atomic_amd64x.go:47:6: Xadduintptr redeclared in this block
        previous declaration at /usr/lib/go/src/runtime/internal/atomic/atomic_amd64.go:45:47
/usr/lib/go/src/runtime/internal/atomic/atomic_amd64x.go:50:6: Xchg redeclared in this block
        previous declaration at /usr/lib/go/src/runtime/internal/atomic/atomic_amd64.go:48:36
/usr/lib/go/src/runtime/internal/atomic/atomic_amd64x.go:53:6: Xchg64 redeclared in this block
        previous declaration at /usr/lib/go/src/runtime/internal/atomic/atomic_amd64.go:51:38
/usr/lib/go/src/runtime/internal/atomic/atomic_amd64x.go:56:6: Xchguintptr redeclared in this block
        previous declaration at /usr/lib/go/src/runtime/internal/atomic/atomic_amd64.go:54:45
/usr/lib/go/src/runtime/internal/atomic/atomic_amd64x.go:56:6: too many errors

Googling a little bit and it appeared there might be a conflict with the old version in the same directory. Deleting the temporary build directory didn’t help…

Removing the GO lang package by unmerge command and then emerging the newest GO lang package is successful.

So the solution is to unmerge it and then immediately emerge the newest version with:

emerge -vC dev-lang/go
emerge -v dev-lang/go

The whole Gentoo output of the failed emerge command

Keep on reading!

Booting network installation from ipxe disk using IPMI KVM

There is a project for extended PXE Boot features https://ipxe.org/. This article is not for describing what this project may offer, but to show how to boot any Linux distribution (in fact, Windows 10, too) network installation wizard using the virtual CD/DVD of an IPMI KVM, DELL’s DRAC, HP iLO, IBM RSA/IMM and in general, KVM over IP.
Using the iPXE CD bootable disk mounted in the virtual CD/DVD of the server’s remote console (IPMI KVM and so on) will allow:

  • Booting from a CD/DVD with only a 1M size.
  • Extends the PXE features of the server’s network card.
  • Manual set IP address, i.e. not relying on DHCP server. In addition of the DHCP feature, but DHCP feature requires DHCP server, which is not always the case.
  • Load a Linux kernel and initramfs from a URL.
  • Boot a Linux live or installation CD/DVD from an URL. The server could load the instllation wizard from an official mirror in the Internet.
  • Manual install – boot from 1M CD and continue with multi gigabyte installation from an URL. For comparision the CentOS 8 network installation disk is more than 600M versus 1M iPXE CD disk. Booting directly from a 600M CentOS 8 network installation disk is unstable and really slow when the disk is mounted in user’s KVM. And not alwyas is possible to mount a disk next to the server location (or in the same co-location).
  • Automated install – simple unattended installation with kickstart files without the need of speacial features of the dedicated service provider.
  • No software installation or code writting needed.

This article uses the iPXE CD to boot and manually set an IP and then load the Linux kernel and initramfs of the CentOS 8 installation disk using an official URL mirror on the Internet. All types of server’s KVM, which supports CD/DVD virtual device, can be used.

Just 1 Mbytes of CD/DVD is required to boot an installation of a (connected to the Internet) server/machine.

Here are the steps and correct (all lines are tested) command lines to boot an installation wizard. The server is a SUPERMICRO server with IPMI KVM for remote management.
The iPXE ISO file is located here http://boot.ipxe.org/ipxe.iso

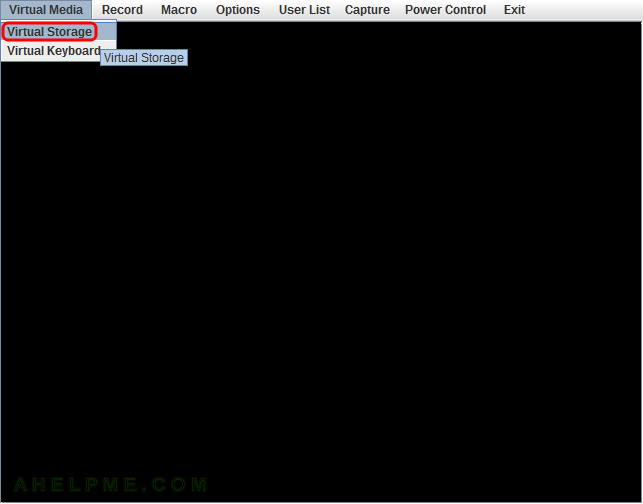
SCREENSHOT 1) Open the IPMI KVM and click on “Virtual Storage” menu to open the image mount dialog.

main menu
Virtual Storage menu

Keep on reading!