QEMU full virtualization – CPU emulations (enable/disable CPU flags/instruction sets) of QEMU 6.2.0

This article is an updated version of the old QEMU article about CPU flags available for version 2.0.0QEMU full virtualization – CPU emulations (enable/disable CPU flags/instruction sets) of QEMU 2.0.0.
The latest version of QEMU is 6.2.0 and it offers way more CPU flags and features! You can use QEMU with a nearly native full virtualization. Here are some important tips for the guest CPU to consider when using QEMU directly (without any virtualization manager like virt-manager, libvirt and so on).

TIP 1)Choose your host CPU emulation

You can see what options are available for host emulation with:

root@srv ~ # qemu-system-x86_64 -cpu help
Available CPUs:
x86 486                   (alias configured by machine type)                        
x86 486-v1                                                                          
x86 Broadwell             (alias configured by machine type)                        
x86 Broadwell-IBRS        (alias of Broadwell-v3)                                   
x86 Broadwell-noTSX       (alias of Broadwell-v2)                                   
x86 Broadwell-noTSX-IBRS  (alias of Broadwell-v4)                                   
x86 Broadwell-v1          Intel Core Processor (Broadwell)                          
x86 Broadwell-v2          Intel Core Processor (Broadwell, no TSX)                  
x86 Broadwell-v3          Intel Core Processor (Broadwell, IBRS)                    
x86 Broadwell-v4          Intel Core Processor (Broadwell, no TSX, IBRS)            
x86 Cascadelake-Server    (alias configured by machine type)                        
x86 Cascadelake-Server-noTSX  (alias of Cascadelake-Server-v3)                          
x86 Cascadelake-Server-v1  Intel Xeon Processor (Cascadelake)                        
x86 Cascadelake-Server-v2  Intel Xeon Processor (Cascadelake) [ARCH_CAPABILITIES]    
x86 Cascadelake-Server-v3  Intel Xeon Processor (Cascadelake) [ARCH_CAPABILITIES, no TSX]
x86 Cascadelake-Server-v4  Intel Xeon Processor (Cascadelake) [ARCH_CAPABILITIES, no TSX]
x86 Conroe                (alias configured by machine type)                        
x86 Conroe-v1             Intel Celeron_4x0 (Conroe/Merom Class Core 2)             
x86 Cooperlake            (alias configured by machine type)                        
x86 Cooperlake-v1         Intel Xeon Processor (Cooperlake)                         
x86 Denverton             (alias configured by machine type)                        
x86 Denverton-v1          Intel Atom Processor (Denverton)                          
x86 Denverton-v2          Intel Atom Processor (Denverton) [no MPX, no MONITOR]     
x86 Dhyana                (alias configured by machine type)                        
x86 Dhyana-v1             Hygon Dhyana Processor                                    
x86 EPYC                  (alias configured by machine type)                        
x86 EPYC-IBPB             (alias of EPYC-v2)                                        
x86 EPYC-Milan            (alias configured by machine type)                        
x86 EPYC-Milan-v1         AMD EPYC-Milan Processor                                  
x86 EPYC-Rome             (alias configured by machine type)                        
x86 EPYC-Rome-v1          AMD EPYC-Rome Processor                                   
x86 EPYC-Rome-v2          AMD EPYC-Rome Processor                                   
x86 EPYC-v1               AMD EPYC Processor                                        
x86 EPYC-v2               AMD EPYC Processor (with IBPB)                            
x86 EPYC-v3               AMD EPYC Processor                                        
x86 Haswell               (alias configured by machine type)                        
x86 Haswell-IBRS          (alias of Haswell-v3)                                     
x86 Haswell-noTSX         (alias of Haswell-v2)                                     
x86 Haswell-noTSX-IBRS    (alias of Haswell-v4)                                     
x86 Haswell-v1            Intel Core Processor (Haswell)                            
x86 Haswell-v2            Intel Core Processor (Haswell, no TSX)                    
x86 Haswell-v3            Intel Core Processor (Haswell, IBRS)                      
x86 Haswell-v4            Intel Core Processor (Haswell, no TSX, IBRS)              
x86 Icelake-Client        (alias configured by machine type)                        
x86 Icelake-Client-noTSX  (alias of Icelake-Client-v2)                              
x86 Icelake-Client-v1     Intel Core Processor (Icelake) [deprecated]               
x86 Icelake-Client-v2     Intel Core Processor (Icelake) [no TSX, deprecated]       
x86 Icelake-Server        (alias configured by machine type)                        
x86 Icelake-Server-noTSX  (alias of Icelake-Server-v2)                              
x86 Icelake-Server-v1     Intel Xeon Processor (Icelake)                            
x86 Icelake-Server-v2     Intel Xeon Processor (Icelake) [no TSX]                   
x86 Icelake-Server-v3     Intel Xeon Processor (Icelake)                            
x86 Icelake-Server-v4     Intel Xeon Processor (Icelake)                            
x86 IvyBridge             (alias configured by machine type)                        
x86 IvyBridge-IBRS        (alias of IvyBridge-v2)                                   
x86 IvyBridge-v1          Intel Xeon E3-12xx v2 (Ivy Bridge)                        
x86 IvyBridge-v2          Intel Xeon E3-12xx v2 (Ivy Bridge, IBRS)                  
x86 KnightsMill           (alias configured by machine type)                        
x86 KnightsMill-v1        Intel Xeon Phi Processor (Knights Mill)                   
x86 Nehalem               (alias configured by machine type)                        
x86 Nehalem-IBRS          (alias of Nehalem-v2)                                     
x86 Nehalem-v1            Intel Core i7 9xx (Nehalem Class Core i7)                 
x86 Nehalem-v2            Intel Core i7 9xx (Nehalem Core i7, IBRS update)          
x86 Opteron_G1            (alias configured by machine type)                        
x86 Opteron_G1-v1         AMD Opteron 240 (Gen 1 Class Opteron)                     
x86 Opteron_G2            (alias configured by machine type)                        
x86 Opteron_G2-v1         AMD Opteron 22xx (Gen 2 Class Opteron)                    
x86 Opteron_G3            (alias configured by machine type)                        
x86 Opteron_G3-v1         AMD Opteron 23xx (Gen 3 Class Opteron)                    
x86 Opteron_G4            (alias configured by machine type)                        
x86 Opteron_G4-v1         AMD Opteron 62xx class CPU                                
x86 Opteron_G5            (alias configured by machine type)                        
x86 Opteron_G5-v1         AMD Opteron 63xx class CPU                                
x86 Penryn                (alias configured by machine type)                        
x86 Penryn-v1             Intel Core 2 Duo P9xxx (Penryn Class Core 2)              
x86 SandyBridge           (alias configured by machine type)                        
x86 SandyBridge-IBRS      (alias of SandyBridge-v2)                                 
x86 SandyBridge-v1        Intel Xeon E312xx (Sandy Bridge)                          
x86 SandyBridge-v2        Intel Xeon E312xx (Sandy Bridge, IBRS update)             
x86 Skylake-Client        (alias configured by machine type)                        
x86 Skylake-Client-IBRS   (alias of Skylake-Client-v2)                              
x86 Skylake-Client-noTSX-IBRS  (alias of Skylake-Client-v3)                              
x86 Skylake-Client-v1     Intel Core Processor (Skylake)                            
x86 Skylake-Client-v2     Intel Core Processor (Skylake, IBRS)                      
x86 Skylake-Client-v3     Intel Core Processor (Skylake, IBRS, no TSX)              
x86 Skylake-Server        (alias configured by machine type)                        
x86 Skylake-Server-IBRS   (alias of Skylake-Server-v2)                              
x86 Skylake-Server-noTSX-IBRS  (alias of Skylake-Server-v3)                              
x86 Skylake-Server-v1     Intel Xeon Processor (Skylake)                            
x86 Skylake-Server-v2     Intel Xeon Processor (Skylake, IBRS)                      
x86 Skylake-Server-v3     Intel Xeon Processor (Skylake, IBRS, no TSX)              
x86 Skylake-Server-v4     Intel Xeon Processor (Skylake, IBRS, no TSX)              
x86 Snowridge             (alias configured by machine type)                        
x86 Snowridge-v1          Intel Atom Processor (SnowRidge)                          
x86 Snowridge-v2          Intel Atom Processor (Snowridge, no MPX)                  
x86 Westmere              (alias configured by machine type)                        
x86 Westmere-IBRS         (alias of Westmere-v2)                                    
x86 Westmere-v1           Westmere E56xx/L56xx/X56xx (Nehalem-C)                    
x86 Westmere-v2           Westmere E56xx/L56xx/X56xx (IBRS update)                  
x86 athlon                (alias configured by machine type)                        
x86 athlon-v1             QEMU Virtual CPU version 2.5+                             
x86 core2duo              (alias configured by machine type)                        
x86 core2duo-v1           Intel(R) Core(TM)2 Duo CPU     T7700  @ 2.40GHz           
x86 coreduo               (alias configured by machine type)                        
x86 coreduo-v1            Genuine Intel(R) CPU           T2600  @ 2.16GHz           
x86 kvm32                 (alias configured by machine type)                        
x86 kvm32-v1              Common 32-bit KVM processor                               
x86 kvm64                 (alias configured by machine type)                        
x86 kvm64-v1              Common KVM processor                                      
x86 n270                  (alias configured by machine type)                        
x86 n270-v1               Intel(R) Atom(TM) CPU N270   @ 1.60GHz                    
x86 pentium               (alias configured by machine type)                        
x86 pentium-v1                                                                      
x86 pentium2              (alias configured by machine type)                        
x86 pentium2-v1                                                                     
x86 pentium3              (alias configured by machine type)                        
x86 pentium3-v1                                                                     
x86 phenom                (alias configured by machine type)                        
x86 phenom-v1             AMD Phenom(tm) 9550 Quad-Core Processor                   
x86 qemu32                (alias configured by machine type)                        
x86 qemu32-v1             QEMU Virtual CPU version 2.5+                             
x86 qemu64                (alias configured by machine type)                        
x86 qemu64-v1             QEMU Virtual CPU version 2.5+                             
x86 base                  base CPU model type with no features enabled              
x86 host                  KVM processor with all supported host features            
x86 max                   Enables all features supported by the accelerator in the current host

Recognized CPUID flags:
  3dnow 3dnowext 3dnowprefetch abm ace2 ace2-en acpi adx aes amd-no-ssb
  amd-ssbd amd-stibp apic arat arch-capabilities avic avx avx2
  avx512-4fmaps avx512-4vnniw avx512-bf16 avx512-fp16 avx512-vp2intersect
  avx512-vpopcntdq avx512bitalg avx512bw avx512cd avx512dq avx512er avx512f
  avx512ifma avx512pf avx512vbmi avx512vbmi2 avx512vl avx512vnni bmi1 bmi2
  bus-lock-detect cid cldemote clflush clflushopt clwb clzero cmov
  cmp-legacy core-capability cr8legacy cx16 cx8 dca de decodeassists ds
  ds-cpl dtes64 erms est extapic f16c flushbyasid fma fma4 fpu fsgsbase
  fsrm full-width-write fxsr fxsr-opt gfni hle ht hypervisor ia64 ibpb ibrs
  ibrs-all ibs intel-pt intel-pt-lip invpcid invtsc kvm-asyncpf
  kvm-asyncpf-int kvm-hint-dedicated kvm-mmu kvm-msi-ext-dest-id
  kvm-nopiodelay kvm-poll-control kvm-pv-eoi kvm-pv-ipi kvm-pv-sched-yield
  kvm-pv-tlb-flush kvm-pv-unhalt kvm-steal-time kvmclock kvmclock
  kvmclock-stable-bit la57 lahf-lm lbrv lm lwp mca mce md-clear mds-no
  misalignsse mmx mmxext monitor movbe movdir64b movdiri mpx msr mtrr
  nodeid-msr npt nrip-save nx osvw pae pat pause-filter pbe pcid pclmulqdq
  pcommit pdcm pdpe1gb perfctr-core perfctr-nb pfthreshold pge phe phe-en
  pks pku pmm pmm-en pn pni popcnt pschange-mc-no pse pse36 rdctl-no rdpid
  rdrand rdseed rdtscp rsba rtm sep serialize sha-ni skinit
  skip-l1dfl-vmentry smap smep smx spec-ctrl split-lock-detect ss ssb-no
  ssbd sse sse2 sse4.1 sse4.2 sse4a ssse3 stibp svm svm-lock svme-addr-chk
  syscall taa-no tbm tce tm tm2 topoext tsc tsc-adjust tsc-deadline
  tsc-scale tsx-ctrl tsx-ldtrk umip v-vmsave-vmload vaes vgif virt-ssbd
  vmcb-clean vme vmx vmx-activity-hlt vmx-activity-shutdown
  vmx-activity-wait-sipi vmx-apicv-register vmx-apicv-vid vmx-apicv-x2apic
  vmx-apicv-xapic vmx-cr3-load-noexit vmx-cr3-store-noexit
  vmx-cr8-load-exit vmx-cr8-store-exit vmx-desc-exit vmx-encls-exit
  vmx-entry-ia32e-mode vmx-entry-load-bndcfgs vmx-entry-load-efer
  vmx-entry-load-pat vmx-entry-load-perf-global-ctrl vmx-entry-load-pkrs
  vmx-entry-load-rtit-ctl vmx-entry-noload-debugctl vmx-ept vmx-ept-1gb
  vmx-ept-2mb vmx-ept-advanced-exitinfo vmx-ept-execonly vmx-eptad
  vmx-eptp-switching vmx-exit-ack-intr vmx-exit-clear-bndcfgs
  vmx-exit-clear-rtit-ctl vmx-exit-load-efer vmx-exit-load-pat
  vmx-exit-load-perf-global-ctrl vmx-exit-load-pkrs
  vmx-exit-nosave-debugctl vmx-exit-save-efer vmx-exit-save-pat
  vmx-exit-save-preemption-timer vmx-flexpriority vmx-hlt-exit vmx-ins-outs
  vmx-intr-exit vmx-invept vmx-invept-all-context vmx-invept-single-context
  vmx-invept-single-context vmx-invept-single-context-noglobals
  vmx-invlpg-exit vmx-invpcid-exit vmx-invvpid vmx-invvpid-all-context
  vmx-invvpid-single-addr vmx-io-bitmap vmx-io-exit vmx-monitor-exit
  vmx-movdr-exit vmx-msr-bitmap vmx-mtf vmx-mwait-exit vmx-nmi-exit
  vmx-page-walk-4 vmx-page-walk-5 vmx-pause-exit vmx-ple vmx-pml
  vmx-posted-intr vmx-preemption-timer vmx-rdpmc-exit vmx-rdrand-exit
  vmx-rdseed-exit vmx-rdtsc-exit vmx-rdtscp-exit vmx-secondary-ctls
  vmx-shadow-vmcs vmx-store-lma vmx-true-ctls vmx-tsc-offset
  vmx-unrestricted-guest vmx-vintr-pending vmx-vmfunc
  vmx-vmwrite-vmexit-fields vmx-vnmi vmx-vnmi-pending vmx-vpid
  vmx-wbinvd-exit vmx-xsaves vmx-zero-len-inject vpclmulqdq waitpkg
  wbnoinvd wdt x2apic xcrypt xcrypt-en xgetbv1 xop xsave xsavec xsaveerptr
  xsaveopt xsaves xstore xstore-en xtpr

The number of supported flags grew enormously compared to the old versions of QEMU and in fact, they include almost all available CPU flags. The supported CPUs are also several times more than before! The above list of supported CPUs means the virtual guest machine could use one of them and the guest operating system will have all the flags the CPU supports. In fact, the guest virtual system will report to the OS it has the selected CPU from the list above.
Keep on reading!

Booting network installation from ipxe disk using IPMI KVM

There is a project for extended PXE Boot features https://ipxe.org/. This article is not for describing what this project may offer, but to show how to boot any Linux distribution (in fact, Windows 10, too) network installation wizard using the virtual CD/DVD of an IPMI KVM, DELL’s DRAC, HP iLO, IBM RSA/IMM and in general, KVM over IP.
Using the iPXE CD bootable disk mounted in the virtual CD/DVD of the server’s remote console (IPMI KVM and so on) will allow:

  • Booting from a CD/DVD with only a 1M size.
  • Extends the PXE features of the server’s network card.
  • Manual set IP address, i.e. not relying on DHCP server. In addition of the DHCP feature, but DHCP feature requires DHCP server, which is not always the case.
  • Load a Linux kernel and initramfs from a URL.
  • Boot a Linux live or installation CD/DVD from an URL. The server could load the instllation wizard from an official mirror in the Internet.
  • Manual install – boot from 1M CD and continue with multi gigabyte installation from an URL. For comparision the CentOS 8 network installation disk is more than 600M versus 1M iPXE CD disk. Booting directly from a 600M CentOS 8 network installation disk is unstable and really slow when the disk is mounted in user’s KVM. And not alwyas is possible to mount a disk next to the server location (or in the same co-location).
  • Automated install – simple unattended installation with kickstart files without the need of speacial features of the dedicated service provider.
  • No software installation or code writting needed.

This article uses the iPXE CD to boot and manually set an IP and then load the Linux kernel and initramfs of the CentOS 8 installation disk using an official URL mirror on the Internet. All types of server’s KVM, which supports CD/DVD virtual device, can be used.

Just 1 Mbytes of CD/DVD is required to boot an installation of a (connected to the Internet) server/machine.

Here are the steps and correct (all lines are tested) command lines to boot an installation wizard. The server is a SUPERMICRO server with IPMI KVM for remote management.
The iPXE ISO file is located here http://boot.ipxe.org/ipxe.iso

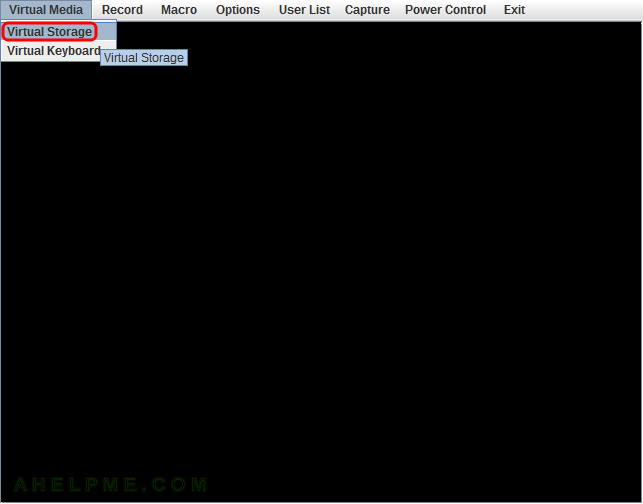
SCREENSHOT 1) Open the IPMI KVM and click on “Virtual Storage” menu to open the image mount dialog.

main menu
Virtual Storage menu

Keep on reading!

KDE Plasma windows force resize – iKVM virtual keyboard

If you happen to use KDE Plasma these days and you encounter view problems like you cannot see the whole viewpoint of a window (especially JAVA/GTK based programs?).

KDE Plasma Desktop offers the ability to force a window to expand to new dimensions.

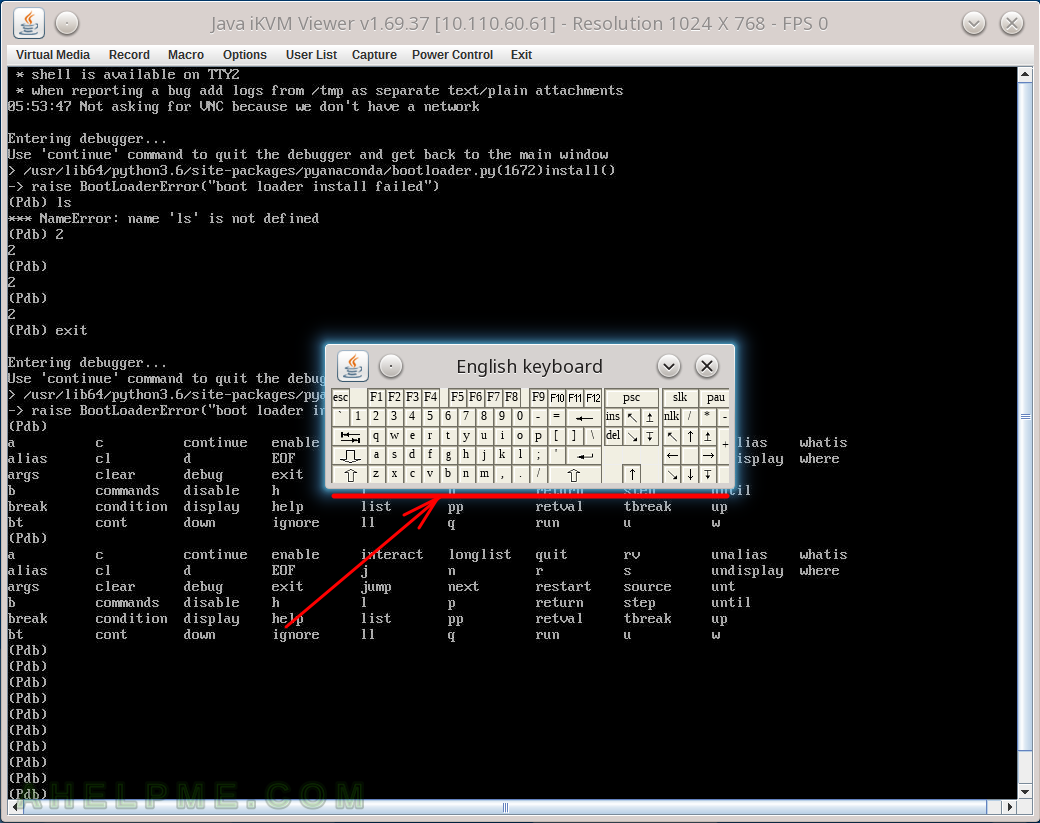
STEP 1) The Java-based iKVM program window has a handful virtual keyboard.

It could be used to “click on” specific key combinations, which otherwise could be caught by your system. But in sometimes the virtual keyboad window is trimmed and you lose some important keys like Ctrl, Alt, Space, arrow keys and more (the last line of buttons).

main menu
iKVM virtual keyboard trimmed keys

Keep on reading!

Howto do QEMU full virtualization with bridged networking

This howto rather continues the previous one “Howto do QEMU full virtualization with MacVTap networking” with the exception it will be showed how to use a classic setup of the networking – the use of bridge device. Because this setup requires a specific configuration for every Linux distro if we do not just add the bridge manually it is separated in this howto. For the clear and full howto, we would repeat the two first steps just to enable this howto to be independent of the original one mentioned above.
So use full virtualization under Linux you can use QEMU and no other library or manager like virt-manager. QEMU is simple enough and with a couple of parameters to it, you can start KVM virtual machines with near-native performance. To use KVM you must enable it in the BIOS of your server (or desktop machine).

Here are the main steps:

STEP 1) Enable KVM in the BIOS

  • For Intel machine you must find option Intel Virtualization Technology (or Intel VT-x) probably in BIOS menu of Chipset, Advanced CPU Configuration or other.
  • For AMD machine the virtualization cannot be disabled so it is enabled by default, but you can check for additional virtualization features to enable like Virtualization Extensions, Vanderpool and other.
  • Enable also additional features – Intel VT-d or AMD IOMMU, if they are available.

Reboot your machine and check if the KVM is supported:

srv@local ~$ cat /proc/cpuinfo |grep -E "vmx|svm"
flags           : fpu vme de pse tsc msr pae mce cx8 apic sep mtrr pge mca cmov pat pse36 clflush dts acpi mmx fxsr sse sse2 ss ht tm pbe syscall nx pdpe1gb rdtscp lm constant_tsc arch_perfmon pebs bts rep_good nopl xtopology nonstop_tsc cpuid aperfmperf pni pclmulqdq dtes64 monitor ds_cpl vmx est tm2 ssse3 sdbg fma cx16 xtpr pdcm pcid sse4_1 sse4_2 x2apic movbe popcnt aes xsave avx f16c rdrand lahf_lm abm 3dnowprefetch cpuid_fault epb invpcid_single pti intel_pt tpr_shadow vnmi flexpriority ept vpid fsgsbase tsc_adjust bmi1 avx2 smep bmi2 erms invpcid rdseed adx smap xsaveopt dtherm ida arat pln pts
...

STEP 2) Install QEMU

Under CentOS 7 you can just install couple of packets – that’s all you need:

yum install -y qemu qemu-common qemu-img qemu-kvm-common qemu-system-x86 qemu-user bridge-utils

Or under Ubuntu

apt-get install qemu-kvm bridge-utils

STEP 3) Prepare the network 1 – the bridge device

Under CentOS 7 add the following configuration file

/etc/sysconfig/network-scripts/ifcfg-br0

with the content of

DEVICE=br0
TYPE=Bridge
BOOTPROTO=none
ONBOOT=yes
IPADDR0=192.168.0.1
PREFIX0=24
#GATEWAY0=192.168.0.1
NETMASK=255.255.255.0
IPV6_FAILURE_FATAL=no
NM_CONTROLLED=no
ZONE=public

If you want to use a real IP set to your virtual machine, you should set a real IP here and uncomment the GATEWAY0 with the real gateway IP. If real IP is used then you should include the main Internet network interface to the bridge by adding at the end of the configuration file /etc/sysconfig/network-scripts/ifcfg-eth0 (if eth0 is your network interface):

...
BRIDGE=br0

And restart the network

srv@local ~$ systemctl restart network

Under Ubuntu add to the file

/etc/network/interfaces

the following:

# Bridge
auto br0
iface br0 inet static
  address 192.168.0.10
  netmask 255.255.255.0
#  gateway 192.168.0.1
  bridge_ports none
  bridge_stp off
  bridge_fd 0
  bridge_maxwait 0

If you want to use real IP set to your virtual machine, you should set a real IP here and uncomment the GATEWAY0 with the real gateway IP and replace the “none” in the option “bridge_ports” with the name of your main Internet network interface. For example:

  ...
  bridge_ports eth0
  ...

And restart the network

srv@local ~$ /etc/init.d/networking restart

Or we can add the bridge device manually:

srv@local ~$ brctl addbr br0
srv@local ~$ ip link set dev br0 up
srv@local ~$ ip addr add 192.168.0.1/24 dev br0

If we use real IP we have to add the main Internet network interface to the bridge, so when you set up the network in our virtual machine with a real IP it will work with no more additional configurations, but if we use a local IPs like our setup here and we want to have Internet in our virtual machine we must enable masquerade and linux routing. You can do it with:

srv@local ~$ echo 1 > /proc/sys/net/ipv4/ip_forward
#NAT with firewalld
srv@local ~$ firewall-cmd --add-masquerade --permanent
#NAT with iptables
srv@local ~$ iptables -t nat -A POSTROUTING -o br0 -j MASQUERADE

Use either firewalld or iptables setup, depends on your system configuration, just check if firewalld is running with:

srv@local ~$ firewall-cmd --list-all

If you receive an error, saying command not found or firewalld is not running, you should use the “NAT with iptables”
So the network is ready!

STEP 4) Prepare the network 2 – the tun/tap for the virtual machine

After we have added a bridge device tun/tap device, which will be used for the QEMU virtual machine must be added:

srv@local ~$ ip tuntap add tap0 mode tap
srv@local ~$ brctl addif br0 tap0

STEP 5) Create a QEMU hard drive

Create a 100G file

srv@local ~$ cd /mnt/storage1/disks/
srv@local ~$ qemu-img create -f qcow2 vm_harddisk.qcow2 100G
Formatting 'vm_harddisk.qcow2', fmt=qcow2 size=107374182400 encryption=off cluster_size=65536 lazy_refcounts=off 

or you can enable encryption (but on every start of your virtual machine you must set the key through the qemu console to start the virtual machine):

srv@local ~$ qemu-img create -f qcow2 vm_harddisk_e.bin -o encryption 100G
Formatting 'vm_harddisk_e.bin', fmt=qcow2 size=107374182400 encryption=on cluster_size=65536 lazy_refcounts=off

STEP 6) Boot up the QEMU KVM virtual server

srv@local ~$ qemu-system-x86_64 -enable-kvm -cpu host -smp 4 -runas qemu -daemonize -vnc 127.0.0.1:1 \
-drive file=/mnt/storage1/disks/vm_harddisk.qcow2,index=0,cache=none,aio=threads,if=virtio \
-boot d -net nic,model=virtio,macaddr=00:00:00:00:00:01 -net tap,ifname=tap0 \
-balloon virtio -m 2048 -monitor telnet:127.0.0.1:5801,server,nowait

The command above will :

  • “-enable-kvm” – enable the KVM – full virtualization with near native performance
  • “-cpu host” – will expose all supported host CPU features (only supported in KVM mode)
  • “-smp 4” – sets 4 processors to the virtual machine
  • “-daemonize” – start the command in daemon mode
  • “-runas qemu” – run under user, you can run thwo whole virtual machine from a user created especially for it, no need to run it with root, even it is recommended to run it under unprivileged user
  • “-vnc 192.168.1.10:1” – start a VNC server on this IP:PORT = 192.168.1.10:5901, the IP must present on the server or you can use 0.0.0.0:1 for 0.0.0.0:5901, but in every situation limit the access by a firewall
  • “-drive file=/mnt/storage1/disks/vm_harddisk.qcow2,index=0,cache=none,aio=threads,if=virtio” – set the main hard drive of the system
  • “-boot d” – boot from the first hard drive
  • “-net nic,model=virtio,macaddr=00:00:00:00:00:01 -net tap,ifname=tap0” – set the network interface using the tap device created by STEP 3) and STEP 4)
  • “-balloon virtio” – use balloon driver to be able to hot add or hot remove RAM (newer version this option is depricated and it can be skipped)
  • “-m 2048” – set virtual RAM size to megs
  • “-monitor telnet:127.0.0.1:5801,server,nowait” – set the management console for the this virtual server, you can connect with:
    srv@local ~$ telnet 127.0.0.1 5801
    Trying 127.0.0.1...
    Connected to 127.0.0.1.
    Escape character is '^]'.
    QEMU 2.0.0 monitor - type 'help' for more information
    (qemu) 
    <Press "CTRL+]">
    telnet> Connection closed.
    

    When quitting the management console you must NOT exit the console with quite/exit or CTRL+d, becuause it will terminate the virtual server, you must disconnect from the console with “CTRL+]” and then quit the telnet shell. With the console you can hot add/remove CPU, RAM, network cards, pci devices, harddrives, start/stop/shutdown/reset the virtual machine and a lot more.

Boot the virtual machine from the hard drive given by “-drive” with network “-net” (couple of options), the RAM uses baloon memory and could be adjusted on-the-fly and sets the vncserver to listen for connection on port IP:port = 192.168.1.1:5901 (probably you’ll want to change this with a the real IP of your server, but be careful to set up a firewall rule for 5901 – the vnc port) and a management console listening on IP:port 127.0.0.1:5801.

* Boot the virtual server from a virtual CD/DVD

Probably the first time booting you might need to boot from an installation disk, this could be done by the following command:

srv@local ~$ qemu-system-x86_64 -enable-kvm -cpu host -smp 4 -runas qemu -daemonize -vnc 127.0.0.1:1 -cdrom /mnt/storage1/disks/isos/CentOS-7-x86_64-NetInstall-1708.iso -boot c -drive file=/mnt/storage1/disks/vm_harddisk.qcow2,index=0,cache=none,aio=threads,if=virtio -net nic,model=virtio,macaddr=00:00:00:00:00:01 -net tap,ifname=tap0 -balloon virtio -m 2048 -monitor telnet:127.0.0.1:5805,server,nowait

The changes:

  1. “-boot c” – First boot device is now CD/DVD. “c” is for CD, “d” is for disk
  2. “-cdrom /mnt/storage1/disks/isos/CentOS-7-x86_64-NetInstall-1708.iso” – added the installation disk to the virtual machine

A newer QEMU version may need adding “script=no,downscript=no” to the tap0 interface!

srv@local ~$ qemu-system-x86_64 -enable-kvm -cpu host -smp 4 -runas qemu -daemonize -vnc 127.0.0.1:1 -cdrom /mnt/storage1/disks/isos/CentOS-7-x86_64-NetInstall-1708.iso -boot c -drive file=/mnt/storage1/disks/vm_harddisk.qcow2,index=0,cache=none,aio=threads,if=virtio -net nic,model=virtio,macaddr=00:00:00:00:00:01 -net tap,ifname=tap0,script=no,downscript=no -m 2048 -monitor telnet:127.0.0.1:5805,server,nowait

Howto do QEMU full virtualization with MacVTap networking

To use full virtualization under linux you can use QEMU and no other library or manager like virt-manager. QEMU is simple enough and with couple of parameters to it you can start KVM virtual machines with near native performance. To use KVM you must enable it in the BIOS of your server (or desktop machine).

Here a several simple step to start a KVM virtual server:

STEP 1) Enable KVM in the BIOS

  • For Intel machine you must find option Intel Virtualization Technology (or Intel VT-x) probably in BIOS menu of Chipset, Advanced CPU Configuration or other.
  • For AMD machine the virtualization cannot be disabled so it is enabled by default, but you can check for additional virtualization features to enable like Virtualization Extensions, Vanderpool and other.
  • Enable also additional features – Intel VT-d or AMD IOMMU, if they are available.

Reboot your machine and check if the KVM is supported:

srv@local ~$ cat /proc/cpuinfo |grep -E "vmx|svm"
flags           : fpu vme de pse tsc msr pae mce cx8 apic sep mtrr pge mca cmov pat pse36 clflush dts acpi mmx fxsr sse sse2 ss ht tm pbe syscall nx pdpe1gb rdtscp lm constant_tsc arch_perfmon pebs bts rep_good nopl xtopology nonstop_tsc cpuid aperfmperf pni pclmulqdq dtes64 monitor ds_cpl vmx est tm2 ssse3 sdbg fma cx16 xtpr pdcm pcid sse4_1 sse4_2 x2apic movbe popcnt aes xsave avx f16c rdrand lahf_lm abm 3dnowprefetch cpuid_fault epb invpcid_single pti intel_pt tpr_shadow vnmi flexpriority ept vpid fsgsbase tsc_adjust bmi1 avx2 smep bmi2 erms invpcid rdseed adx smap xsaveopt dtherm ida arat pln pts
...

STEP 2) Install QEMU

Under CentOS 7 you can just install couple of packets – that’s all you need:

yum install -y qemu qemu-common qemu-img qemu-kvm-common qemu-system-x86 qemu-user bridge-utils

Or under Ubuntu

apt-get install qemu-kvm bridge-utils

STEP 3) Prepare the network

srv@local ~$ ip link add link enp8s0f1 name macvtap0 type macvtap mode bridge
srv@local ~$ ip link set macvtap0 up

Here we create a macvtap0 device in bridge mode, these commands will create a tap device bridged to the network interface “enp8s0f1” (in our case, you must replace this device name with the device name you want to bridge your virtual machine network, probably the main interface of your server/desktop machine?). Only these two commands are needed, no other devices or network reload is needed.
The device will show in “ip addr”

7: macvtap0@enp8s0f1: <BROADCAST,MULTICAST,UP,LOWER_UP> mtu 1500 qdisc pfifo_fast state UNKNOWN qlen 500
    link/ether 2e:51:7e:bb:44:ee brd ff:ff:ff:ff:ff:ff
    inet6 fe80::2c51:7eff:febb:44ee/64 scope link 
       valid_lft forever preferred_lft forever

This setup could expose the MAC address of the macvtap device to the router port connected

STEP 4) Create a QEMU hard drive

Create a 100G file

srv@local ~$ cd /mnt/storage1/disks/
srv@local ~$ qemu-img create -f qcow2 vm_harddisk.qcow2 100G
Formatting 'vm_harddisk.qcow2', fmt=qcow2 size=107374182400 encryption=off cluster_size=65536 lazy_refcounts=off 

or you can enable encryption (but on every start of your virtual machine you must set the key through the qemu console to start the virtual machine):

srv@local ~$ qemu-img create -f qcow2 vm_harddisk_e.bin -o encryption 100G
Formatting 'vm_harddisk_e.bin', fmt=qcow2 size=107374182400 encryption=on cluster_size=65536 lazy_refcounts=off

STEP 5) Boot up the QEMU KVM virtual server

srv@local ~$ qemu-system-x86_64 -enable-kvm -cpu host -smp 4 -runas qemu -daemonize -vnc 127.0.0.1:1 \
-drive file=/mnt/storage1/disks/vm_harddisk.qcow2,index=0,cache=none,aio=threads,if=virtio \
-boot d -net nic,model=virtio,macaddr=$(cat /sys/class/net/macvtap0/address) \
-net tap,fd=3 3<>/dev/tap$(cat /sys/class/net/macvtap0/ifindex) \
-balloon virtio -m 2048 -monitor telnet:127.0.0.1:5801,server,nowait

The command above will :

  • “-enable-kvm” – enable the KVM – full virtualization with near native performance
  • “-cpu host” – will expose all supported host CPU features (only supported in KVM mode)
  • “-smp 4” – sets 4 processors to the virtual machine
  • “-daemonize” – start the command in daemon mode
  • “-runas qemu” – run under user, you can run thwo whole virtual machine from a user created especially for it, no need to run it with root, even it is recommended to run it under unprivileged user
  • “-vnc 192.168.1.10:1” – start a VNC server on this IP:PORT = 192.168.1.10:5901, the IP must present on the server or you can use 0.0.0.0:1 for 0.0.0.0:5901, but in every situation limit the access by a firewall
  • “-drive file=/mnt/storage1/disks/vm_harddisk.qcow2,index=0,cache=none,aio=threads,if=virtio” – set the main hard drive of the system
  • “-boot d” – boot from the first hard drive
  • “-net nic,model=virtio,macaddr=$(cat /sys/class/net/macvtap0/address) -net tap,fd=3 3<>/dev/tap$(cat /sys/class/net/macvtap0/ifindex)” – set the network interface using the tap device created by macvtap0 device (STEP 3)
  • “-balloon virtio” – use balloon driver to be able to hot add or hot remove RAM
  • “-m 2048” – set virtual RAM size to megs
  • “-monitor telnet:127.0.0.1:5801,server,nowait” – set the management console for the this virtual server, you can connect with:
    srv@local ~$ telnet 127.0.0.1 5801
    Trying 127.0.0.1...
    Connected to 127.0.0.1.
    Escape character is '^]'.
    QEMU 2.0.0 monitor - type 'help' for more information
    (qemu) 
    <Press "CTRL+]">
    telnet> Connection closed.
    

    When quitting the management console you must NOT exit the console with quite/exit or CTRL+d, becuause it will terminate the virtual server, you must disconnect from the console with “CTRL+]” and then quit the telnet shell. With the console you can hot add/remove CPU, RAM, network cards, pci devices, harddrives, start/stop/shutdown/reset the virtual machine and a lot more.

Boot the virtual machine from the hard drive given by “-drive” with network “-net” (couple of options), the RAM uses baloon memory and could be adjusted on-the-fly and sets the vncserver to listen for connection on port IP:port = 192.168.1.1:5901 (probably you’ll want to change this with a the real IP of your server, but be careful to set up a firewall rule for 5901 – the vnc port) and a management console listening on IP:port 127.0.0.1:5801.

* Boot the virtual server from a virtual CD/DVD

Probably the first time booting you might need to boot from an installation disk, this could be done by the following command:

srv@local ~$ qemu-system-x86_64 -enable-kvm -cpu host -smp 4 -runas qemu -daemonize -vnc 127.0.0.1:1 -cdrom /mnt/storage1/disks/isos/CentOS-7-x86_64-NetInstall-1708.iso -boot c -drive file=/mnt/storage1/disks/vm_harddisk.qcow2,index=0,cache=none,aio=threads,if=virtio -net nic,model=virtio,macaddr=$(cat /sys/class/net/macvtap0/address) -net tap,fd=3 3<>/dev/tap$(cat /sys/class/net/macvtap0/ifindex) -balloon virtio -m 2048 -monitor telnet:127.0.0.1:5801,server,nowait

The changes:

  1. “-boot c” – First boot device is now CD/DVD. “c” is for CD, “d” is for disk
  2. “-cdrom /mnt/storage1/disks/isos/CentOS-7-x86_64-NetInstall-1708.iso” – added the installation disk to the virtual machine