Dual 10Gbit network using PCI 2.0 (5GT/s) x4 – what is the maximum bandwidth?

Ever wondered what is the maximum bandwidth of a Dual 10Gbit LAN card, which can be reached using a dual 10Gbit ports card in a PCI Express 2.0 (Speed 5GT/s) and Width x4?
Here is the graph:
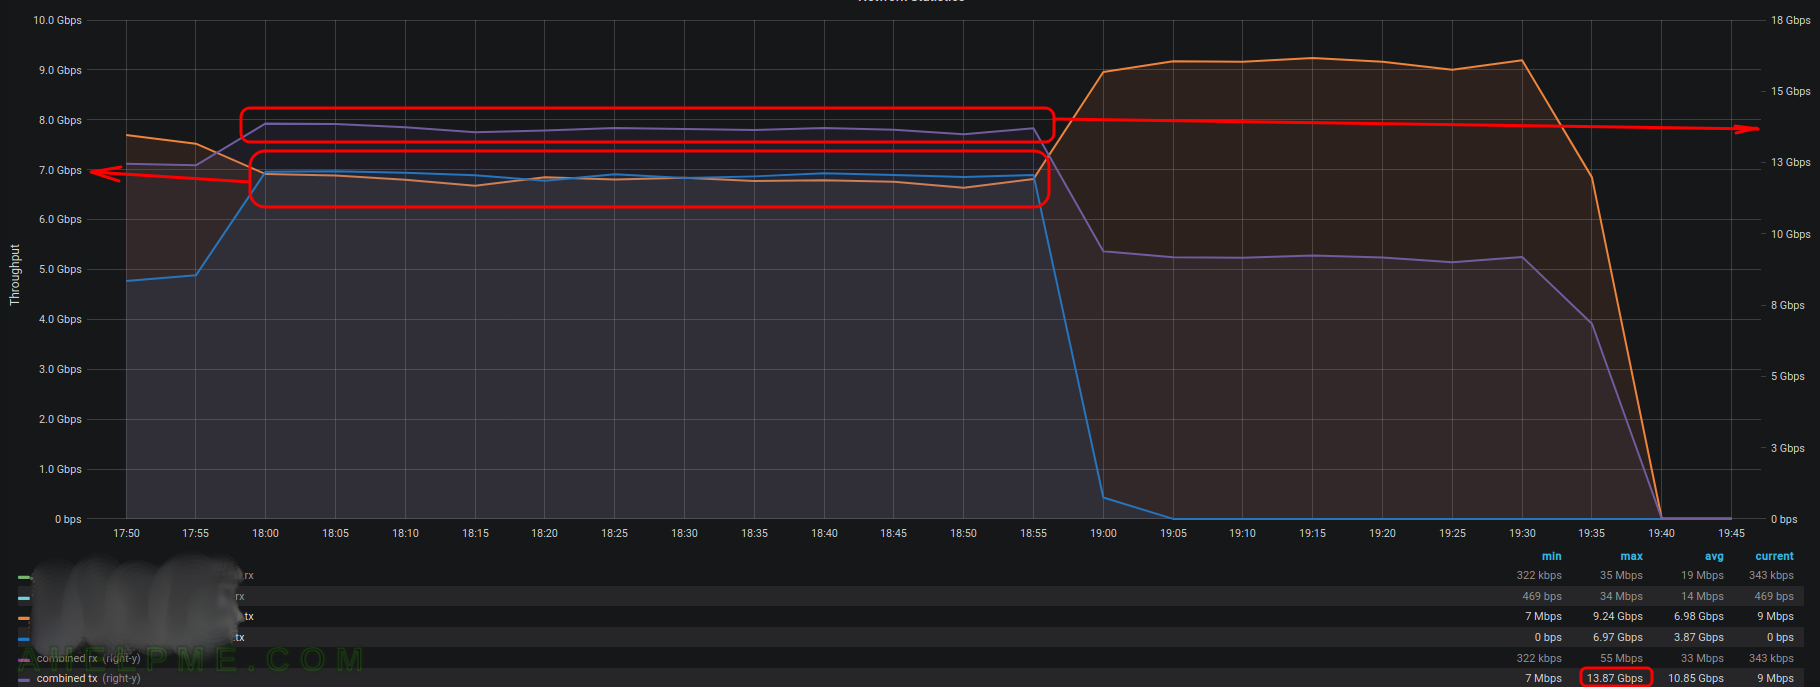
h3>SCREENSHOT 1) The bandwidth never exceeds 13.90Gbps (performed with only synthetic tests and mixed synthetic plus real http traffic).

main menu
Max graph bandwidth – below 14Gbps

As you can see the total of the two network ports is a little bit under 14Gbps. We are using intel dual-port controller:

Intel Corporation Ethernet Server Adapter X520-2

Even the dmesg reports the card is not in the right place:

[ 2.541813] ixgbe 0000:82:00.0: (Speed:5.0GT/s, Width: x4, Encoding Loss:20%)
[ 2.541832] ixgbe 0000:82:00.0: This is not sufficient for optimal performance of this card.
[ 2.541854] ixgbe 0000:82:00.0: For optimal performance, at least 20GT/s of bandwidth is required.
[ 2.541876] ixgbe 0000:82:00.0: A slot with more lanes and/or higher speed is suggested.
[ 2.541978] ixgbe 0000:82:00.0: MAC: 2, PHY: 19, SFP+: 5, PBA No: FFFFFF-0FF
[ 2.541996] ixgbe 0000:82:00.0: 00:16:31:fd:03:b8
[ 2.543027] ixgbe 0000:82:00.0: Intel(R) 10 Gigabit Network Connection
[ 2.694839] ixgbe 0000:82:00.1: Multiqueue Enabled: Rx Queue count = 48, Tx Queue count = 48 XDP Queue count = 0
[ 2.695531] ixgbe 0000:82:00.1: PCI Express bandwidth of 16GT/s available
[ 2.696087] ixgbe 0000:82:00.1: (Speed:5.0GT/s, Width: x4, Encoding Loss:20%)
[ 2.696631] ixgbe 0000:82:00.1: This is not sufficient for optimal performance of this card.
[ 2.697181] ixgbe 0000:82:00.1: For optimal performance, at least 20GT/s of bandwidth is required.
[ 2.697723] ixgbe 0000:82:00.1: A slot with more lanes and/or higher speed is suggested.
[ 2.698352] ixgbe 0000:82:00.1: MAC: 2, PHY: 19, SFP+: 6, PBA No: FFFFFF-0FF
[ 2.698890] ixgbe 0000:82:00.1: 00:16:31:fd:03:b9
[ 2.700436] ixgbe 0000:82:00.1: Intel(R) 10 Gigabit Network Connection

The controller is in the PCI Express slot – PCI 2.0 (Speed 5.0GT/s) Width x4, but the capability of the card is Speed 5GT/s, Width x8. This can be seen with “lspci -vvv” and the meanings with simple words:

  • LnkCap – it is the device capability. In fact, this is the hightest possible speed of the device put in the slot.
  • LnkSta – the actual speed of the PCI Express link.

If the device capacity (LnkCap) is higher than the actual speed (LnkSta) you could put the device in another slot with a higher capacity to take full advantage of the device.

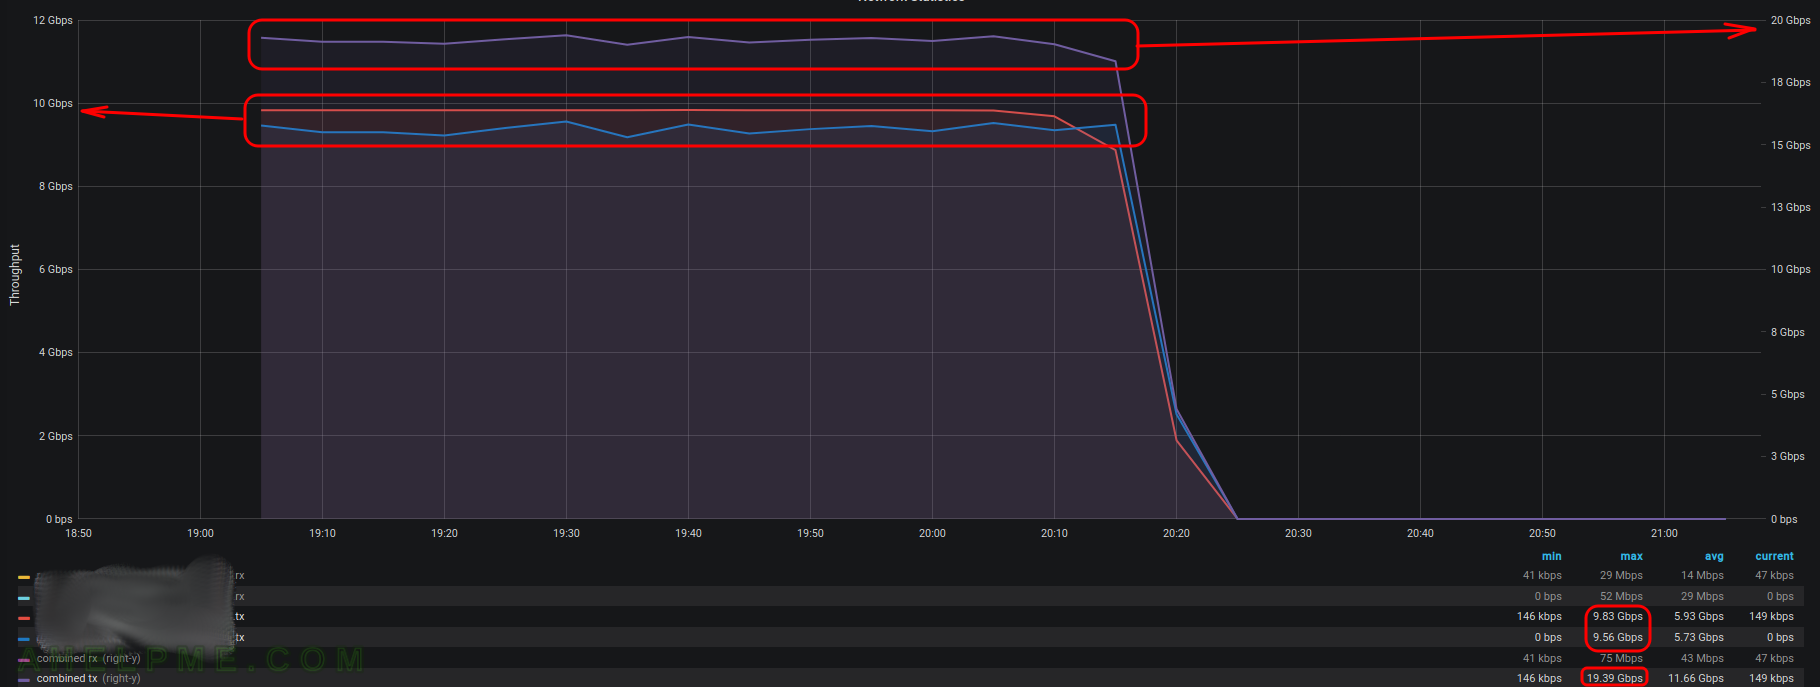
In our case, the maximum bandwidth of the two ports of the Dual 10G port Intel card was just below 14Gbps (13.85Gbps ~ 13.95Gbps). After we move the very same card in another slot with the capability of Speed 5GT/s Width x8, the card’s maximum bandwidth increased to 19.20Gbps ~ 19.40Gbps.

SCREENSHOT 2) After changing the slot of the network card, which supports PCI 2.0 (5GT/s) Width x8, the bandwidth tops arround 19.40Gbps in synthetic tests (performed with iperf3).

main menu
Max graph bandwidth – almost 20Gbps

Keep on reading!

syslog – UDP local to rsyslog and send remote with TCP and compression

This article is to show how to log Nginx’s access logs locally using UDP to the local rsyslog daemon, which will send the logs to a remote rsyslog server using TCP and compression. In general, logs could generate a lot of traffic and using UDP over distant locations could result in packet loss respectively logs’ lines loss. The idea here is to log messages locally using UDP (non-blocking way) to a local Syslog server, which will send the stream to a remote central Syslog server using TCP connections to be sure no packets are lost. In addition, we are going to enable local caching (if the remote server is temporary unreachable) and compression between the two Syslog servers.
Our goal is to use

  • UDP for our client program (Nginx in the case) for non-blocking log writes.
  • TCP between our local machine and the remote syslog server – to be sure not to lose messages on bad connectivity.
  • local caching for our client machine – not to lose messages if the remote syslog is temporary unreachable.
  • compression between the local machine and the remote syslog server.

The configuration and the commands are tested on CentOS 7, CentOS 8 and Ubuntu 18 LTS. Check out UDP remote logging here – nginx remote logging to UDP rsyslog server (CentOS 7).

STEP 1) Configure client’s local rsyslog to accept UDP log messages only if the messages’ tags are “nginx”

Couple of things should be enabled in the local client-size rsyslog daemon:

  • rsyslog to accept UDP messages. Uncomment or add the following under section “Modules” (probably the first section in the file?) in /etc/rsyslog.conf
    $ModLoad imudp
    $UDPServerRun 514
    

    or

    module(load="imudp")
    input(type="imudp" port="514")
    

    The first is the old syntax, which is still supported and the second is the new syntax. For simplicity, all of the following configuration will be using the new syntax, because the old one is depricated.

  • Add a rule to catch the tag containing “nginx” and execute action to forward the messages to the remote server
    if ($syslogtag == 'nginx:') then {
    action(type="omfwd" target="10.10.10.10" port="10514" protocol="tcp" compression.Mode="single" ZipLevel="9"
    queue.filename="forwarding" queue.spoolDirectory="/var/log" queue.size="1000000" queue.type="LinkedList" queue.maxFileSize="1g" queue.SaveOnShutdown="on"
    action.resumeRetryCount="-1")
    & stop
    }
    
  • The options are almost self-explanatory, the important ones are there is no retry limit count of reconnecting to the server, there is in-disk cache of maximum 1G if the remote server is unavailable and the compression per message is turned on. More on actionshttps://www.rsyslog.com/doc/v8-stable/configuration/actions.html, the forward modulehttps://www.rsyslog.com/doc/v8-stable/configuration/modules/omfwd.html and the queuehttps://www.rsyslog.com/doc/v8-stable/rainerscript/queue_parameters.html

And restart the rsyslog:

systemctl restart rsyslog

Keep on reading!

Remove disk (all partitions) from software RAID1 with mdadm and change layout of the disk

The following article is to show how to remove healthy partitions from software RAID1 devices to change the layout of the disk and then add them back to the array.
The mdadm is the tool to manipulate the software RAID devices under Linux and it is part of all Linux distributions (some don’t install it by default so it may need to be installed).

Software RAID layout

[root@srv ~]# cat /proc/mdstat 
Personalities : [raid1] 
md125 : active raid1 sda4[1] sdb3[0]
      1047552 blocks super 1.2 [2/2] [UU]
      bitmap: 0/1 pages [0KB], 65536KB chunk

md126 : active raid1 sdb2[0] sda3[1]
      32867328 blocks super 1.2 [2/2] [UU]
      
md127 : active raid1 sda2[1] sdb1[0]
      52427776 blocks super 1.2 [2/2] [UU]
      bitmap: 0/1 pages [0KB], 65536KB chunk

unused devices: <none>

STEP 1) Make the partitions faulty.

The partitions cannot be removed if they are not faulty.

[root@srv ~]# mdadm --fail /dev/md125 /dev/sdb3
mdadm: set /dev/sdb3 faulty in /dev/md125
[root@srv ~]# mdadm --fail /dev/md126 /dev/sdb2
mdadm: set /dev/sdb2 faulty in /dev/md126
[root@srv ~]# mdadm --fail /dev/md127 /dev/sdb1
mdadm: set /dev/sdb1 faulty in /dev/md127

Keep on reading!

bonding – write error – device or resource busy – operation not permitted

Recently, there was a little bit of confusion when following the article about activating network bonding without ifenslave – How to enable Linux bonding without ifenslave. At first, there were couple of errors:

livecd ~ # echo balance-alb > /sys/class/net/bond0/bonding/mode
-bash: echo: write error: Device or resource busy
livecd ~ # echo "+enp129s0f0" > /sys/class/net/bond0/bonding/slaves
-bash: echo: write error: Operation not permitted

Or similar error when changing the bonding mode:

livecd ~ # echo 4 > /sys/class/net/bond0/bonding/mode
-bash: echo: write error: Directory not empty
livecd ~ # echo 802.3ad > /sys/class/net/bond0/bonding/mode
-bash: echo: write error: Directory not empty

The server just booted in rescue live cd and there is no active network configuration:

SCREENSHOT 1) Apparently, the /sys/class/net/bond0/bonding/mode and /sys/class/net/bond0/bonding/slaves are in read only state.

No writes means no new configuration could be installed and the bonding cannot be configured (reconfigured).

main menu
device or resource busy – operation not permitted

Bonding mode could be changed only when the bonding device is in DOWN state.

Network interfaces could be added to the boding device only if they were in DOWN state, too.

In addition, changing bonding mode could only happen if there were no network interfaces added to the bonding interface.

Keep on reading!

Install aptly under Ubuntu 18 LTS with nginx serving the packages and the first steps

This article is how to install aptly software, which offers easy Debian repository management.
First, few words for aptly and what tasks are really simple to do:

  • Mirror an existing (remote) repository. Make a local copy of Debian or Ubuntu repostories for all your internal infrastructure.
  • Create your own repositories
  • Create snapshots of repositories and mirrors.
  • Merge repositories
  • Make diff between repositories (in fact snapshots of repositories, but you may make a mirror of an repository and then make a snapshot and then make a diff with some other snapshot to see the changes between the different repositories or the time the snapshots are made).
  • Remove or add individual packages from official mirrored repositories.
  • Use api calls to manage the repositories. HTTP REST API is still in development, but a big part of it works.

For more information you may visit the official documentation page – https://www.aptly.info/doc/overview/

We are going to install the aptly and despite it could be used to serve the repository files we will use the Nginx web server for this work. Nginx is a more fast and reliable web server with easy installation of SSL certificates for our repositories.
The aptly is included in official Ubuntu repositories in the component universe, but at present, it is 2 to 3 versions behind the stable one from the aptly site, so we are going to use their repository to install aptly. Still, if you do not want to use
Keep on reading!

How to compile xmr-stak (2.10) under CentOS 7 for CPU mining cryptocurrencies in September 2019

A time to refresh our old article on how to compile xmr-stak for CPU mining with the new version and this time a new GNU GCC version (version 8.3, the last article we used 7.x – How to compile xmr-stak (2.4.5) under CentOS 7 for CPU mining cryptocurrencies). Always use the latest available GNU GCC packages because the latest version of GNU GCC could add some optimizations to the binary compiled code and you may have a CPU miner with better performance!
Thanks to xmr-stak we can have one application capable of mining many different cryptocurrencies based on different algorithms. XMR-STAK is GPU and CPU miner and here we present only the CPU ability under CentOS 7 using our AMD Threadripper 1950X.
The software in this article:

  • CentOS 7 – CentOS Linux release 7.6.1810 (Core)
  • GNU GCC – gcc version 8.3.1 20190311 (Red Hat 8.3.1-3) (GCC)
  • XMR-STAK – 2.10.7

As said many times working with crypto-currency it is mandatory to do the things yourself – do not trust any binary made by someone on the Internet. It is easy to build your miner yourself with the code from the official repository!

So here are the steps to build the XMR-STAK for CPU mining:

STEP 1) Update your system and install the following dependencies

Always start with update command and then install the dependencies in order first install all the new repositories and then the dependency binaries.

sudo yum update -y
sudo yum install -y centos-release-scl epel-release
sudo yum install -y cmake3 devtoolset-8-gcc* hwloc-devel libmicrohttpd-devel openssl openssl-devel make git screen wget

We are going to use GNU GCC 8 to build the XMR-STAK. More on the subject of how to install GNU GCC 8 and what is “devtoolset” here – How to install GNU GCC 8 on CentOS 7.
Keep on reading!

root cannot delete, move or change a file – Operation not permitted or Permission denied – immutable attribute

If you are the root user and some file (files or directories) cannot be deleted, removed, renamed or changed you probably deal with the immutable attribute set on (by a colleague of yours – installation setups tend to not set such attributes).

Here is what it looks like to have such a file

root@srv.remote /etc/apache2/vhosts.d # mv example.com.conf /root/old/apache/
mv: cannot move `example.com.conf' to `/root/old/apache/example.com.conf': Operation not permitted
root@srv.remote /etc/apache2/vhosts.d # lsattr example.com.conf
----i--------e- example.com.conf
root@srv.remote /etc/apache2/vhosts.d # rm example.com.conf
rm: cannot remove `example.com.conf': Operation not permitted
root@srv.remote /etc/apache2/vhosts.d # echo "teeest" >> example.com.conf
-bash: example.com.conf: Permission denied

Here is how you can set the attribute off.

You need first to set off the file’s immutable attribute and then to do whatever you intended to do in the first place – delete, rename, change and so on. Y

chattr -i filename.txt

In continuation of our example above:

root@srv.remote /etc/apache2/vhosts.d # chattr -i example.com.conf
root@srv.remote /etc/apache2/vhosts.d # lsattr example.com.conf
-------------e- example.com.conf
root@srv.remote /etc/apache2/vhosts.d # mv example.com.conf /root/old/apache/
root@srv.remote /etc/apache2/vhosts.d #

As you can see no immutable attribute no problem to move the file!

And just not note you need to install a package with the name e2fsprogs (not always in the default installation) in your Linux distribution to have lsattr, chattr and more!

Really bad performance when going from Write-Back to Write-Through in a LSI controller

Ever wonder what is the impact of write-through of an LSI controller in a real-world streaming server? Have no wonder anymore!

you can get several (multiple?) times slower with the write-through mode than if your controller were using the write-back mode of the cache

And it could happen any moment because when charging the battery of the LSI controller and you have set “No Write Cache if Bad BBU” the write-through would kick in. Of course, you can make a schedule for the battery charging/discharging process, but in general, it will happen and it will hurt your IO performance a lot!

In simple words a write operation is successful only if the controller confirms the write operation on all disks, no matter the data has already been in the cache.

This mode puts pressure on the disks and Write-Through is a known destroyer of hard disks! You can read a lot of administrator’s feedback on the Internet about crashed disks using write-through mode (and sometimes several simultaneously on one machine losing all your data even it would have redundancy with some of the RAID setups like RAID1, RAID5, RAID6, RAID10 and so).

srv ~ # sudo megacli -ldinfo -lall -aall
                                     
Adapter 0 -- Virtual Drive Information:
Virtual Drive: 0 (Target Id: 0)
Name                :system
RAID Level          : Primary-1, Secondary-0, RAID Level Qualifier-0
Size                : 13.781 TB
Sector Size         : 512
Mirror Data         : 13.781 TB
State               : Optimal
Strip Size          : 128 KB
Number Of Drives per span:2
Span Depth          : 6
Default Cache Policy: WriteBack, ReadAdaptive, Direct, No Write Cache if Bad BBU
Current Cache Policy: WriteThrough, ReadAdaptive, Direct, No Write Cache if Bad BBU
Default Access Policy: Read/Write
Current Access Policy: Read/Write
Disk Cache Policy   : Disk's Default
Encryption Type     : None
Bad Blocks Exist: No
Is VD Cached: Yes
Cache Cade Type : Read Only

Exit Code: 0x00

As you can see our default cache policy is WriteBack and “No Write Cache if Bad BBU”, the BBU is not bad, but charging!
Keep on reading!

PHP 7.2 or PHP 7.3 with mcrypt – manual build

Newer PHP versions do not include PHP mcrypt library. The mcrypt module was part of PHP 5 till 7.1, in which it was deprecated and removed in 7.2. If you open the php.net documentation for mcrypt PHP functions you will see:

This function has been DEPRECATED as of PHP 7.1.0 and REMOVED as of PHP 7.2.0. Relying on this function is highly discouraged.

The mcrypt module is now in PHP PECL (repository for PHP Extensions) in https://pecl.php.net/package/mcrypt. As you can see in the description, this is a legacy module, which

Provides bindings for the unmaintained libmcrypt.

, so it is strongly recommended to replace it with OpenSSL (for example).
Still, if you need this legacy module – mcrypt and :

You may want to manually build the mcrypt module for your current installed PHP. Of course, the generic dependencies are:

  1. libmcrypt and its headers (if the Linux distribution) splits the binary and the headers
  2. GNU GCC
  3. PHP 7.2+
  4. download the latest mcrypt module source from https://pecl.php.net/package/mcrypt. For example, now it is https://pecl.php.net/get/mcrypt-1.0.2.tgz
mkdir /root/mcrypt-php-module-manual
cd /root/mcrypt-php-module-manual
wget https://pecl.php.net/get/mcrypt-1.0.2.tgz
tar xzf mcrypt-1.0.2.tgz
cd mcrypt-1.0.2
phpize
aclocal
libtoolize --force
autoheader
autoconf
./configure
make
make install

Do not use “make -j N” (“make -j 8”, for example), because it may fail to compile.
Keep on reading!