Make systemd to save logs on the disk

On some Linux distributions, systemd log files are not saved on your disk, but only temporary in the memory and when you reboot all logs are discarded. So the systemd logs are not persistent, which could lead to missing important information if you want to check them when you are booted in a rescue disk or even if you just reboot your server. for exmaple,

if some important service failed to boot and your server is unreachable and you boot in rescue CD you do not have logs to check why the service failed and the (error) output of the process of starting the services!

Here is how you can enable the systemd logs to be persistent i.e. save them on the disk. This is tested on CentOS 7, which by default saves the systemd logs on memory!

STEP 1) Prepare the systemd log directory

mkdir -p /var/log/journal/
systemd-tmpfiles --create --prefix /var/log/journal/

STEP 2) Edit systemd configuration and reload the daemon

And ensure your configuration uses “Storage=persistent” in /etc/systemd/journald.conf

grep Storage /etc/systemd/journald.conf
Storage=persistent
systemctl restart systemd-journald

The last line with systemctl restart could be replace with

killall -USR1 systemd-journald

if you do not want to lose all your current logs in memory!

Bonus – systemd logs from multiple reboots

Here we have logs from 5 reboots. Here you can also see what are the right owner (systemd-journal) and Selinux labels of the “/var/log/journal/”

[root@srv ~]# ls -altrZ /var/log/journal/
drwxr-sr-x+ root systemd-journal system_u:object_r:var_log_t:s0   dbd91181db6b4c9f900d9b3a1651a8d5
drwxr-sr-x+ root systemd-journal system_u:object_r:var_log_t:s0   .
drwxr-xr-x. root root            system_u:object_r:var_log_t:s0   ..
[root@srv ~]# journalctl --disk-usage
Archived and active journals take up 112.0M on disk.
[root@srv ~]# journalctl --list-boots
-4 ec4146b78ac944b8a8d4116f259e09ee Thu 2019-06-06 23:39:14 UTC—Thu 2019-06-06 23:39:37 UTC
-3 ae3d39db626c4592aa84cc68072fbb32 Thu 2019-06-06 23:41:03 UTC—Thu 2019-06-06 23:42:13 UTC
-2 68c1ca07c05b4d59adcc9888c50f4065 Thu 2019-06-06 23:42:57 UTC—Fri 2019-06-07 00:13:27 UTC
-1 f7e8da6aaa8740faa05c4985c92023fd Fri 2019-06-07 00:14:08 UTC—Fri 2019-06-07 00:16:33 UTC
 0 45c00dc29e1a48298d9f87f5421468b4 Fri 2019-06-07 00:17:13 UTC—Mon 2019-06-10 01:39:17 UTC
[root@srv ~]# journalctl --boot=-2
-- Logs begin at Thu 2019-06-06 23:39:14 UTC, end at Mon 2019-06-10 01:39:17 UTC. --
Jun 06 23:42:57 srv systemd-journal[133]: Runtime journal is using 8.0M (max allowed 1.5G, trying to leave 2.3G free of 15.6G available → current limit 1.5G).
Jun 06 23:42:57 srv kernel: microcode: microcode updated early to revision 0x710, date = 2013-06-17
Jun 06 23:42:57 srv kernel: Initializing cgroup subsys cpuset
Jun 06 23:42:57 srv kernel: Initializing cgroup subsys cpu
Jun 06 23:42:57 srv kernel: Initializing cgroup subsys cpuacct
Jun 06 23:42:57 srv kernel: Linux version 3.10.0-514.10.2.el7.x86_64 (builder@kbuilder.dev.centos.org) (gcc version 4.8.5 20150623 (Red Hat 4.8.5-11) (GCC) ) #1 S
Jun 06 23:42:57 srv kernel: Command line: BOOT_IMAGE=/boot/vmlinuz-3.10.0-514.10.2.el7.x86_64 root=UUID=c9bec791-c77d-4189-b18a-9ddc728ee782 ro crashkernel=auto r
Jun 06 23:42:57 srv kernel: e820: BIOS-provided physical RAM map:
....
....
[root@srv ~]# journalctl --boot=-2 -u auditd
-- Logs begin at Thu 2019-06-06 23:39:14 UTC, end at Mon 2019-06-10 01:50:18 UTC. --
Jun 06 23:43:05 srv systemd[1]: Starting Security Auditing Service...
Jun 06 23:43:05 srv auditd[694]: Started dispatcher: /sbin/audispd pid: 698
Jun 06 23:43:05 srv audispd[698]: priority_boost_parser called with: 4
Jun 06 23:43:05 srv audispd[698]: max_restarts_parser called with: 10
Jun 06 23:43:05 srv audispd[698]: audispd initialized with q_depth=150 and 1 active plugins
Jun 06 23:43:05 srv augenrules[695]: /sbin/augenrules: No change
Jun 06 23:43:05 srv auditd[694]: Init complete, auditd 2.6.5 listening for events (startup state enable)
Jun 06 23:43:05 srv augenrules[695]: No rules
Jun 06 23:43:05 srv augenrules[695]: enabled 1
Jun 06 23:43:05 srv augenrules[695]: failure 1
Jun 06 23:43:05 srv augenrules[695]: pid 694
Jun 06 23:43:05 srv augenrules[695]: rate_limit 0
Jun 06 23:43:05 srv augenrules[695]: backlog_limit 320
Jun 06 23:43:05 srv augenrules[695]: lost 0
Jun 06 23:43:05 srv augenrules[695]: backlog 1
Jun 06 23:43:05 srv systemd[1]: Started Security Auditing Service.
Jun 06 23:56:48 srv auditd[694]: The audit daemon is exiting.
Jun 06 23:56:49 srv systemd[1]: Starting Security Auditing Service...
Jun 06 23:56:49 srv auditd[24744]: Started dispatcher: /sbin/audispd pid: 24746
Jun 06 23:56:49 srv audispd[24746]: audispd initialized with q_depth=250 and 1 active plugins
Jun 06 23:56:49 srv auditd[24744]: Init complete, auditd 2.8.4 listening for events (startup state enable)
Jun 06 23:56:49 srv augenrules[24750]: /sbin/augenrules: No change
Jun 06 23:56:49 srv augenrules[24750]: No rules
Jun 06 23:56:49 srv augenrules[24750]: enabled 1
Jun 06 23:56:49 srv augenrules[24750]: failure 1
Jun 06 23:56:49 srv augenrules[24750]: pid 24744
Jun 06 23:56:49 srv augenrules[24750]: rate_limit 0
Jun 06 23:56:49 srv augenrules[24750]: backlog_limit 320
Jun 06 23:56:49 srv augenrules[24750]: lost 0
Jun 06 23:56:49 srv augenrules[24750]: backlog 1
Jun 06 23:56:49 srv systemd[1]: Started Security Auditing Service.
Jun 07 00:13:26 srv systemd[1]: Stopping Security Auditing Service...
Jun 07 00:13:26 srv systemd[1]: Stopped Security Auditing Service.

Now you have logs of your booting process!

The systemd log files are accessible even if you’ve booted from a rescue CD and you chroot in your system!

Be careful with the disk free space when using disk storage for your systemd logs – Clear or delete systemd logs.

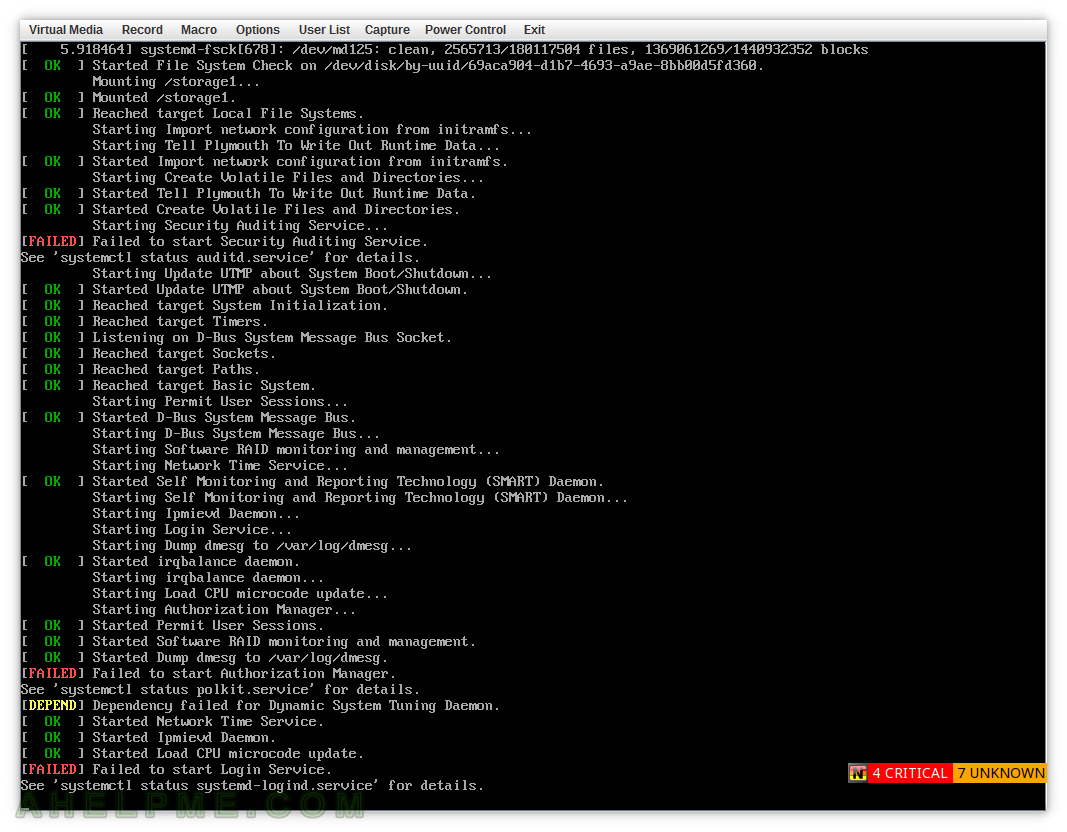
Failed to start Security Audit Service, Authorization Manager and Login Service

A power outrage caused one of our servers to shut down unexpectedly and after it had been powered up the server did not show up. The server was unreachable and apparently, the network did not bring up the interfaces.
Loading the IPMI KVM Console and rebooting the server there were three errors on the screen during the boot up of the CentOS 7:

[FAILED] Failed to start Security Audit Service.
See 'systemctl status auditd.service' for details.
....
....
[FAILED] Failed to start Authorization Manager.
See 'systemctl status polkit.service' for details.
....
....
[FAILED] Failed to start Login Service.
See 'systemctl status systemd-logind.service' for details.

And after the above last line, the system stopped loading.
The disks are clean, but there was no login service, so you cannot log in to the server through the keyboard and the monitor! There was no network as mentioned above, which meant no logging at all in the server. You might not know, but if auditd service is enabled you probably use Selinux!

STEP 1) Failed to start the three important services – Security Audit Service, Authorization Manager and Login Service.

So we ended up with unability to log in our server.

main menu

Not sure what exactly caused this problem (seems strange a perfectly working Selinux enabled CentOS 7 server to have miss-labeled files in the root only because of an unexpected shutdown), but to be able to fix the issue and bring back your server to life

you need a rescue CD/USB/DVD/PXE Server to boot from and mount the disks and relabel your root file system.

STEP 1) Boot from a rescue CD/USB/DVD/PXE Server.

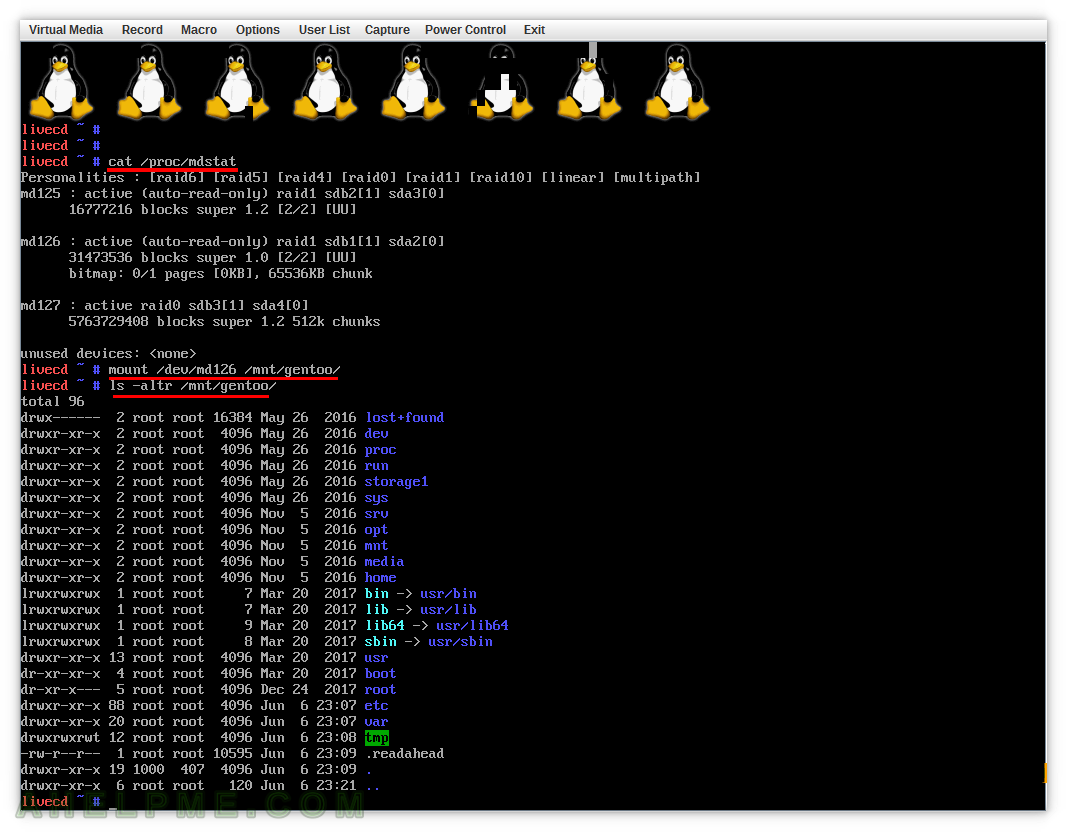
In our case, we used the IPMI KVM Console and mounted a Gentoo ISO disk and then booted from it to have a bash shell in our system. Our root resides on software RAID 1, so cat the /proc/mdstat and mount your root file system somewhere (/mnt/gentoo is there by default…)

STEP 2) Booted in our rescue Gentoo CD and mount your root file system.

main menu
Rescue Gentoo CD

STEP 2) create a file “.autorelabel” in the mounting point of your root file system.

So in our case, we mounted our CentOS 7 root file system in /mnt/gentoo and you must create a file with patch “/mnt/gentoo/.autorelabel”. umount and reboot. And a few minutes later your server will be back from the dead. A quick and handful advice – edit your /etc/fstab to mount only the root file system by commenting out all other big storage mounts – of course, if it is possible. We have big storage with millions of files in /mnt/storage-01 and we put the “#” to comment out the line with it – we do not want to wait for relabeling this file system, because the problem apparently is in our root file system! If it is possible (it is highly recommended) to relabel only the root file system in such situations to be able to regain shell control over your server fast.

Bonus – booted in rescue but no logs

OK, we booted to the rescue and tried to see what was the error (with journalctl in chrooted /mnt/gentoo), which did not allow auditd, polkit and systemd-logind to fail to start, but it appeared by default the systemd logs are not persistent on the disk in CentOS 7, so when you reboot in rescue you do not have systemd logs from the last boot! As a piece of additional advice here you may consider enabling persistent systemd logs!

simple time synchronization of a server (laptop, desktop) using built-in systemd-timesyncd service

Here we offer you a relatively new way of keeping your server’s time (or your computer and laptop) synchronized with a reliable time service on the Internet.

systemd has a built-in feature – a small daemon (systemd-timesyncd) to periodically to contact NTP servers and keep the server’s clock synchronized with them!

Of course, you must use systemd in your Linux distribution. This article is for those Linux systems using systemd, not for upstart (sysvinit, openrc, upstart, runit and so on). Most of the modern Linux distributions use the systemd like Fedora, Ubuntu, CentOS, RedHat, Gentoo, SuSe and many more.

Once there were not many options to keep your server’s clock synced with NTP servers. Now we have simpler programs (some of which by the way could act as clients only!!!) – chrony, openntpd, systemd-timesyncd and more.
This time synchronization service is not going to open server port 123, it does not have the server capabilities of an NTP server. So you won’t need any firewall rules (like for ntpd). It is a simple client service to sync your time and keep it synchronized all the time with accuracy not more than 100ms.

Do not expect complex clock discipline like training or compensating. It just sets the time according to a selected time server from the configuration file in “/etc/systemd/timesyncd.conf”. The polling interval is automatically adjusted in minimal and maximal values from the configuration file and the daemon decides which is the actual interval based on the near-term drift it thinks. Possible back running clock if it needs to set in the past. The quality of the clock source could not be checked, so

in any case, you may not expect more than 100ms accuracy.

Of course, this service is actively developed and it has already many changes from the base client once it was!

Here is how you can enable it. Here are the steps:
Keep on reading!

Unpack centos 7 initramfs file with and without dracut skipcpio

In CentOS 7 the initramfs consists of two concatenated gzipped cpio files. If you want to check what files and probably configuration files are included you can unpack it, but you should use

the dracut tool skipcpio

/usr/lib/dracut/skipcpio <initramfs-file> | zcat | cpio -id --no-absolute-filenames

The following is the output of a CentOS 7

[root@srv ~]# mkdir initramfs-unpacked
[root@srv ~]# cd initramfs-unpacked/
[root@srv initramfs-unpacked]# /usr/lib/dracut/skipcpio /boot/initramfs-3.10.0-957.10.1.el7.x86_64.img | zcat | cpio -id --no-absolute-filenames
164026 blocks
[root@srv initramfs-unpacked]# ls -al
общо 52
drwxr-xr-x. 12 root root 4096  1 Apr 11,48 .
dr-xr-x---.  5 root root 4096  1 Apr 11,48 ..
lrwxrwxrwx.  1 root root    7  1 Apr 11,48 bin -> usr/bin
drwxr-xr-x.  2 root root 4096  1 Apr 11,48 dev
drwxr-xr-x.  9 root root 4096  1 Apr 11,48 etc
lrwxrwxrwx.  1 root root   23  1 Apr 11,48 init -> usr/lib/systemd/systemd
lrwxrwxrwx.  1 root root    7  1 Apr 11,48 lib -> usr/lib
lrwxrwxrwx.  1 root root    9  1 Apr 11,48 lib64 -> usr/lib64
drwxr-xr-x.  2 root root 4096  1 Apr 11,48 proc
drwxr-xr-x.  2 root root 4096  1 Apr 11,48 root
drwxr-xr-x.  2 root root 4096  1 Apr 11,48 run
lrwxrwxrwx.  1 root root    8  1 Apr 11,48 sbin -> usr/sbin
-rwxr-xr-x.  1 root root 3117  1 Apr 11,48 shutdown
drwxr-xr-x.  2 root root 4096  1 Apr 11,48 sys
drwxr-xr-x.  2 root root 4096  1 Apr 11,48 sysroot
drwxr-xr-x.  2 root root 4096  1 Apr 11,48 tmp
drwxr-xr-x.  7 root root 4096  1 Apr 11,48 usr
drwxr-xr-x.  3 root root 4096  1 Apr 11,48 var
[root@srv initramfs-unpacked]# ls -al /boot/
общо 114812
dr-xr-xr-x.  6 root root     4096 30 Mar  2,36 .
dr-xr-xr-x. 19 root root     4096 30 Mar  2,37 ..
-rw-r--r--.  1 root root   151923 18 Mar 15,10 config-3.10.0-957.10.1.el7.x86_64
drwxr-xr-x.  3 root root     4096 28 Jan 20,52 efi
drwxr-xr-x.  2 root root     4096 30 Mar  2,29 grub
drwx------.  5 root root     4096 29 Mar 13,50 grub2
-rw-------.  1 root root 44256471 28 Jan 20,57 initramfs-0-rescue-05cb8c7b39fe0f70e3ce97e5beab809d.img
-rw-------.  1 root root 44821343 29 Mar 13,50 initramfs-3.10.0-957.10.1.el7.x86_64.img
-rw-------.  1 root root 10982937 30 Mar  2,36 initramfs-3.10.0-957.10.1.el7.x86_64kdump.img
drwx------.  2 root root    16384 29 Mar 13,46 lost+found
-rw-r--r--.  1 root root   314087 18 Mar 15,10 symvers-3.10.0-957.10.1.el7.x86_64.gz
-rw-------.  1 root root  3544363 18 Mar 15,10 System.map-3.10.0-957.10.1.el7.x86_64
-rwxr-xr-x.  1 root root  6639808 28 Jan 20,57 vmlinuz-0-rescue-05cb8c7b39fe0f70e3ce97e5beab809d
-rwxr-xr-x.  1 root root  6643904 18 Mar 15,10 vmlinuz-3.10.0-957.10.1.el7.x86_64
-rw-r--r--.  1 root root      171 18 Mar 15,10 .vmlinuz-3.10.0-957.10.1.el7.x86_64.hmac

You can see the init is handled by systemd!

Not using dracut skipcpio

early_cpio – dracut set this file at the beginning of the CentOS 7 initramfs. It contains the CPU microcode.
You can check it with “file” command and if it shows: “ASCII cpio archive (SVR4 with no CRC)” there is a microcode prepended to the initramfs file.

And here without the dracut skipcpio tool with an example:

  1. cpio the original initramfs and write down the number of blocks reported
  2. use dd to skip the first blocks from the above step
  3. Uncompress (and unpack) the file created by dd – this is the real initramfs file.

Here is how you can do it:

[root@srv ~]# file /boot/initramfs-3.10.0-957.10.1.el7.x86_64.img
/boot/initramfs-3.10.0-957.10.1.el7.x86_64.img: ASCII cpio archive (SVR4 with no CRC)
[root@srv ~]# mkdir initramfs-unpacked-3
[root@srv ~]# cd initramfs-unpacked-3
[root@srv initramfs-unpacked-3]# cat /boot/initramfs-3.10.0-957.10.1.el7.x86_64.img | cpio -idmv
.
early_cpio
kernel
kernel/x86
kernel/x86/microcode
kernel/x86/microcode/AuthenticAMD.bin
kernel/x86/microcode/GenuineIntel.bin
3412 blocks
[root@srv initramfs-unpacked-3]# dd if=/boot/initramfs-3.10.0-957.10.1.el7.x86_64.img of=initramfs-tmp.img bs=512 skip=3412
84129+1 records in
84129+1 records out
43074399 bytes (43 MB) copied, 0.191311 s, 225 MB/s
[root@srv initramfs-unpacked-3]# ls
early_cpio  initramfs-tmp.img  kernel
[root@srv initramfs-unpacked-3]# file initramfs-tmp.img 
initramfs-tmp.img: gzip compressed data, from Unix, last modified: Fri Mar 29 13:49:41 2019, max compression
[root@srv initramfs-unpacked-3]# zcat ./initramfs-tmp.img | cpio -idm
164026 blocks
[root@srv initramfs-unpacked-3]# ls -al
total 42128
drwxr-xr-x. 13 root root     4096 Apr  1 12:38 .
dr-xr-x---. 10 root root     4096 Apr  1 12:38 ..
lrwxrwxrwx.  1 root root        7 Apr  1 12:38 bin -> usr/bin
drwxr-xr-x.  2 root root     4096 Apr  1 12:38 dev
-rw-r--r--.  1 root root        2 Mar 29 13:49 early_cpio
drwxr-xr-x.  9 root root     4096 Apr  1 12:38 etc
lrwxrwxrwx.  1 root root       23 Apr  1 12:38 init -> usr/lib/systemd/systemd
-rw-r--r--.  1 root root 43074399 Apr  1 12:35 initramfs-tmp.img
drwxr-xr-x.  3 root root     4096 Mar 29 13:49 kernel
lrwxrwxrwx.  1 root root        7 Apr  1 12:38 lib -> usr/lib
lrwxrwxrwx.  1 root root        9 Apr  1 12:38 lib64 -> usr/lib64
drwxr-xr-x.  2 root root     4096 Mar 29 13:49 proc
drwxr-xr-x.  2 root root     4096 Mar 29 13:49 root
drwxr-xr-x.  2 root root     4096 Mar 29 13:49 run
lrwxrwxrwx.  1 root root        8 Apr  1 12:38 sbin -> usr/sbin
-rwxr-xr-x.  1 root root     3117 Nov  2 17:40 shutdown
drwxr-xr-x.  2 root root     4096 Mar 29 13:49 sys
drwxr-xr-x.  2 root root     4096 Mar 29 13:49 sysroot
drwxr-xr-x.  2 root root     4096 Mar 29 13:49 tmp
drwxr-xr-x.  7 root root     4096 Apr  1 12:38 usr
drwxr-xr-x.  3 root root     4096 Apr  1 12:38 var

SSD cache device to a hard disk drive using LVM

This article is to show how simple is to use an SSD cache device to a hard disk drive. We also included statistics and graphs for several days of usage in one of our streaming servers.
Our setup:

  • 1 SSD disk Samsung 480G. It will be used for writeback cache device!
  • 1 Hard disk drive 1T

We included several graphs of this setup from one of our static media servers serving HLS video streaming.

The effectiveness of the cache is around 2-4 times at least!

Keep on reading!

Centos 7 Server hangs up on boot after deleting a software raid (mdadm device)

We have a CentOS 7 server with a simple two hard drives setup in RAID1 of total 4 devices for boot, root, swap and storage. The storage device (/dev/md5) was removed and recreated with RAID0 for better performance, because the server was promoted as only cache server. Then the server was restarted and it never went up.
On IPMI KVM it just started loading the kernel and hanged up after several seconds without any additional information:

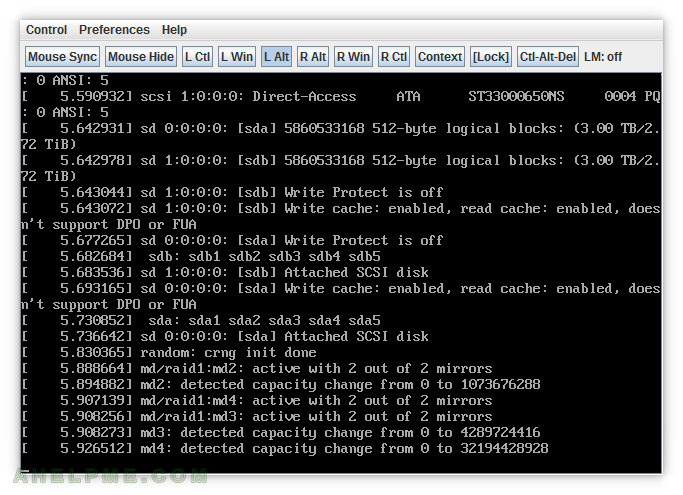
The kernel loads the mdadm devices and do not continue and the device md5 is missing.

main menu
CentOS 7 kernel loading the mdadm RAID devices

To boot successfully you must remove the missing device

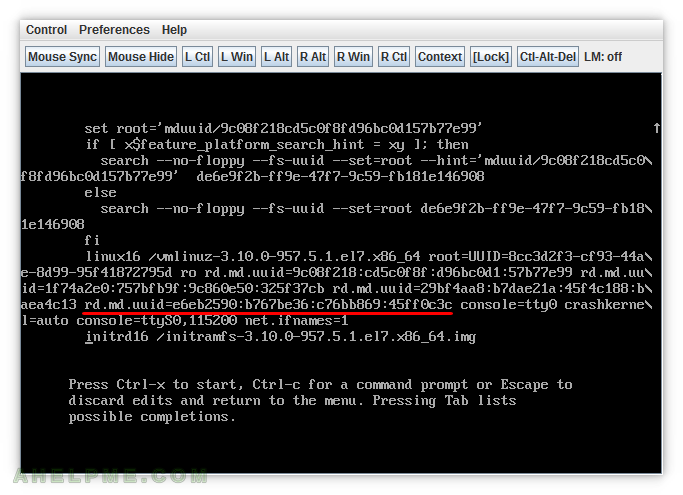
On the Grub 2 menu press “e” and you’ll get this screen. Here you can edit all lines if you need. You must remove the last rd.md.uuid in our case or the one you deleted. Remove it and press Ctrl+x to load the kernel.

main menu
Grub 2 edit

There are two options you can do:

  • OPTION 1) Remove rd.md.uuid option of your old mdadm device
  • OPTION 2) Replace the ID in rd.md.uuid= with the new ID of the mdadm device.

Each of these two options could be used to solve the booting problem. Edit /etc/default/grub and replace or remove rd.md.uuid and generate the grub.conf.
You can find old mdadm ID in /etc/mdadm.conf (if you have not replace it there).

[root@srv ~]# cat /etc/mdadm.conf 
ARRAY /dev/md2 level=raid1 num-devices=2 metadata=0.90 UUID=9c08f218:cd5c0f8f:d96bc0d1:57b77e99
ARRAY /dev/md3 level=raid1 num-devices=2 metadata=1.2 name=2035110:swap UUID=1f74a2e0:757bfb9f:9c860e50:325f37cb
ARRAY /dev/md4 level=raid1 num-devices=2 metadata=1.2 name=2035110:root UUID=29bf4aa8:b7dae21a:45f4c188:baea4c13
ARRAY /dev/md5 level=raid1 num-devices=2 metadata=1.2 name=2035110:storage1 UUID=e6eb2590:b767be36:c76bb869:45ff0c3c
[root@srv ~]# mdadm --detail --scan
ARRAY /dev/md2 metadata=0.90 UUID=9c08f218:cd5c0f8f:d96bc0d1:57b77e99
ARRAY /dev/md3 metadata=1.2 name=2035110:swap UUID=1f74a2e0:757bfb9f:9c860e50:325f37cb
ARRAY /dev/md4 metadata=1.2 name=2035110:root UUID=29bf4aa8:b7dae21a:45f4c188:baea4c13
ARRAY /dev/md/5 metadata=1.2 name=s2035110:5 UUID=901074eb:16ba7c5b:0af69934:e9444102
[root@srv ~]# mdadm --detail --scan > /etc/mdadm.conf 

Here is our old /etc/default/grub:

[root@srv ~]# cat /etc/default/grub 
GRUB_TIMEOUT=1
GRUB_DISTRIBUTOR="$(sed 's, release .*$,,g' /etc/system-release)"
GRUB_DEFAULT=saved
GRUB_DISABLE_SUBMENU=true
GRUB_TERMINAL="serial console"
GRUB_SERIAL_COMMAND="serial --speed=115200"
GRUB_CMDLINE_LINUX="rd.md.uuid=9c08f218:cd5c0f8f:d96bc0d1:57b77e99 rd.md.uuid=1f74a2e0:757bfb9f:9c860e50:325f37cb rd.md.uuid=29bf4aa8:b7dae21a:45f4c188:baea4c13 rd.md.uuid=e6eb2590:b767be36:c76bb869:45ff0c3c console=tty0 crashkernel=auto console=ttyS0,115200 net.ifnames=1"
GRUB_DISABLE_RECOVERY="true"

Here we edit our /boot/grub2/grub.cfg, replace the old uuid and generate grub.cfg (legacy BIOS):

[root@srv ~]# cat /etc/default/grub 
GRUB_TIMEOUT=1
GRUB_DISTRIBUTOR="$(sed 's, release .*$,,g' /etc/system-release)"
GRUB_DEFAULT=saved
GRUB_DISABLE_SUBMENU=true
GRUB_TERMINAL="serial console"
GRUB_SERIAL_COMMAND="serial --speed=115200"
GRUB_CMDLINE_LINUX="rd.md.uuid=9c08f218:cd5c0f8f:d96bc0d1:57b77e99 rd.md.uuid=1f74a2e0:757bfb9f:9c860e50:325f37cb rd.md.uuid=29bf4aa8:b7dae21a:45f4c188:baea4c13 rd.md.uuid=901074eb:16ba7c5b:0af69934:e9444102 console=tty0 crashkernel=auto console=ttyS0,115200 net.ifnames=1"
[root@srv ~]# grub2-mkconfig -o /boot/grub2/grub.cfg 
Generating grub configuration file ...
Found linux image: /boot/vmlinuz-3.10.0-957.5.1.el7.x86_64
Found initrd image: /boot/initramfs-3.10.0-957.5.1.el7.x86_64.img
Found linux image: /boot/vmlinuz-0-rescue-05cb8c7b39fe0f70e3ce97e5beab809d
Found initrd image: /boot/initramfs-0-rescue-05cb8c7b39fe0f70e3ce97e5beab809d.img
done
[root@srv ~]# reboot

Use this for UEFI BIOS boot:
First check if /boot and /boot/efi are mounted and if not you must mount them with:

mount /boot
mount /boot/efi

Generate the grub.cfg

grub2-mkconfig -o /boot/efi/EFI/centos/grub.cfg

Bonus

In fact when the original device was removed and added a new one we formatted it as usual. But it was not possible to mount it, you just execute mount

/dev/md5 /mnt/stor1

no error, but no mount could be found, the device was not mounted and when you execute

umount /mnt/stor1

The OS told the “/mnt/stor1” was not mounted. Several more tries were made unsuccessfully to mount the “/dev/md5”, then the restart was performed and the server never went up.
Suppose the systemd just did not allow to mount the device because of the boot parameters rd.md.uuid!

LSI MegaRAID 2108 freezes with abort command and all processes hang up in disk sleep

It happened to one of our old LSI MegaRAID 2108 controllers (AOC-USAS2LP-H8iR (smc2108) with 36 disk, 32x2T and 4x8T) to freeze and most of the processes hang up with Disk sleep. The server was up, the network was working, but no login could be successful. A hard reset was executed with the IPMI KVM. The server started up, the MegaRAID controller booted with a warning that it was shutdown unexpectedly so there could be possible loss of data and to accept it by pressing any key or “C” to boot in the WebBIOS of the controller.

To summarize it up: the LSI controller hangs up when is in the following modes:

  1. Background Initialization
  2. Check Consistency

Aborting and disabling the modes above let out controller to work till replacement. If you experience any kind of strange disk hangs or freezes you can try our solution here! Check below to see how to do it yourself.

Keep on reading!

systemd service freezes in activating (start-post) status – mysqld or other services

We’ve experienced this with the MySQL server under CentOS 7, but you can have this state with other services!
After updating our MySQL we tried to start it up, but the service got this strange state after “systemctl start” returned:

[root@mysql2 ~]# systemctl start mysqld
Job for mysqld.service failed because a timeout was exceeded. See "systemctl status mysqld.service" and "journalctl -xe" for details.

The timeout is big it’s something like 5 to 10 minutes and so it is typical (do not do it!) to type “ctrl+c” and you end up without this message and a strange state of the mysql:

[root@mysql2 ~]# systemctl status mysqld
● mysqld.service - MySQL Community Server
   Loaded: loaded (/usr/lib/systemd/system/mysqld.service; enabled; vendor preset: disabled)
   Active: activating (start-post) since Fri 2018-11-09 09:00:55 UTC; 6min ago
  Process: 8333 ExecStart=/usr/bin/mysqld_safe --basedir=/usr (code=exited, status=0/SUCCESS)
  Process: 8321 ExecStartPre=/usr/bin/mysql-systemd-start pre (code=exited, status=0/SUCCESS)
 Main PID: 8333 (code=exited, status=0/SUCCESS);         : 8334 (mysql-systemd-s)
   CGroup: /user.slice/user-0.slice/session-2395.scope/system.slice/mysqld.service
           └─control
             ├─ 8334 /bin/bash /usr/bin/mysql-systemd-start post
             └─10152 sleep 1

Nov 09 09:00:55 mysql2.mytv.bg systemd[1]: Starting MySQL Community Server...
Nov 09 09:00:56 mysql2.mytv.bg mysqld_safe[8333]: 181109 09:00:56 mysqld_safe Logging to '/var/log/mysqld.log'.
Nov 09 09:00:56 mysql2.mytv.bg mysqld_safe[8333]: 181109 09:00:56 mysqld_safe Starting mysqld daemon with databases from /var/lib/mysql

Meanwhile with “pstree”:

[root@mysql2 ~]# pstree
systemd─┬─agetty
        ├─crond
        ├─dbus-daemon
        ├─mysql-systemd-s───sleep
        ├─rsyslogd───2*[{rsyslogd}]
        ├─sshd─┬─sshd───bash───systemctl─┬─systemctl
        │      │                         └─systemd-tty-ask
        │      └─sshd───bash───pstree
        ├─systemd-journal
        └─systemd-logind

So as you can see no mysqld process! Apparently systemctl had tried to start MySQL server process and it failed.
So the first thing to do was to check the MySQL logs. In our case it was a obsolete option in my.cnf:

2018-11-09 09:10:57 11384 [ERROR] /usr/sbin/mysqld: unknown variable 'default-character-set=utf8'
2018-11-09 09:10:57 11384 [ERROR] Aborting

The interesting part is that

the service got “Active: activating (start-post)” and when you fix the problem you cannot “systemctl start mysqld” it just start to wait for the current timeout.

In fact this state means “I’m trying to start the service…” and it is in an endless loop to start the service and if you the service has a big start timeout like 5-10 minutes you must wait for the next iteration of the loop to start the service successfully (if you fixed the problem!). And if you want not to wait you must execute first stop to the service and then start – you’ll not wait for any timeout and you can check immediately if the service was started successfully:

[root@mysql2 ~]# systemctl status mysqld
● mysqld.service - MySQL Community Server
   Loaded: loaded (/usr/lib/systemd/system/mysqld.service; enabled; vendor preset: disabled)
   Active: activating (start-post) since Fri 2018-11-09 09:20:56 UTC; 2min 50s ago
  Process: 13208 ExecStart=/usr/bin/mysqld_safe --basedir=/usr (code=exited, status=0/SUCCESS)
  Process: 13196 ExecStartPre=/usr/bin/mysql-systemd-start pre (code=exited, status=0/SUCCESS)
 Main PID: 13208 (code=exited, status=0/SUCCESS);         : 13209 (mysql-systemd-s)
   CGroup: /user.slice/user-0.slice/session-2395.scope/system.slice/mysqld.service
           └─control
             ├─13209 /bin/bash /usr/bin/mysql-systemd-start post
             └─14357 sleep 1

Nov 09 09:20:56 mysql2.mytv.bg systemd[1]: Starting MySQL Community Server...
Nov 09 09:20:56 mysql2.mytv.bg mysqld_safe[13208]: 181109 09:20:56 mysqld_safe Logging to '/var/log/mysqld.log'.
Nov 09 09:20:56 mysql2.mytv.bg mysqld_safe[13208]: 181109 09:20:56 mysqld_safe Starting mysqld daemon with databases from /var/lib/mysql
[root@mysql2 ~]# systemctl start mysqld
Job for mysqld.service failed because a timeout was exceeded. See "systemctl status mysqld.service" and "journalctl -xe" for details.
[root@mysql2 ~]# systemctl status mysqld
● mysqld.service - MySQL Community Server
   Loaded: loaded (/usr/lib/systemd/system/mysqld.service; enabled; vendor preset: disabled)
   Active: active (running) since Fri 2018-11-09 09:30:59 UTC; 2s ago
  Process: 15656 ExecStartPost=/usr/bin/mysql-systemd-start post (code=exited, status=0/SUCCESS)
  Process: 15643 ExecStartPre=/usr/bin/mysql-systemd-start pre (code=exited, status=0/SUCCESS)
 Main PID: 15655 (mysqld_safe)
   CGroup: /user.slice/user-0.slice/session-2395.scope/system.slice/mysqld.service
           ├─15655 /bin/sh /usr/bin/mysqld_safe --basedir=/usr
           └─16243 /usr/sbin/mysqld --basedir=/usr --datadir=/var/lib/mysql --plugin-dir=/usr/lib64/mysql/plugin --log-error=/var/log/mysqld.log --open-files-limit=10000...

Nov 09 09:30:56 mysql2.mytv.bg systemd[1]: Starting MySQL Community Server...
Nov 09 09:30:57 mysql2.mytv.bg mysqld_safe[15655]: 181109 09:30:57 mysqld_safe Logging to '/var/log/mysqld.log'.
Nov 09 09:30:57 mysql2.mytv.bg mysqld_safe[15655]: 181109 09:30:57 mysqld_safe Starting mysqld daemon with databases from /var/lib/mysql
Nov 09 09:30:59 mysql2.mytv.bg systemd[1]: Started MySQL Community Server.

As you can see we even received error again that the service cannot be started and immediately after that the service status is in normal “active (running)” state! And we waited for around 10 minutes! You can see the times in the logs above.
So to summarize it up:

If you have a service in “activating (start-post)” the service cannot be started because of an error, check and fix the problem and then issue “stop and start”:

[root@mysql2 ~]# systemctl start mysqld
Job for mysqld.service failed because a timeout was exceeded. See "systemctl status mysqld.service" and "journalctl -xe" for details.
[root@mysql2 ~]# systemctl status mysqld
● mysqld.service - MySQL Community Server
   Loaded: loaded (/usr/lib/systemd/system/mysqld.service; enabled; vendor preset: disabled)
   Active: activating (start-post) since Fri 2018-11-09 10:05:20 UTC; 2min 17s ago
  Process: 23601 ExecStart=/usr/bin/mysqld_safe --basedir=/usr (code=exited, status=0/SUCCESS)
  Process: 23589 ExecStartPre=/usr/bin/mysql-systemd-start pre (code=exited, status=0/SUCCESS)
 Main PID: 23601 (code=exited, status=0/SUCCESS);         : 23602 (mysql-systemd-s)
   CGroup: /user.slice/user-0.slice/session-2395.scope/system.slice/mysqld.service
           └─control
             ├─23602 /bin/bash /usr/bin/mysql-systemd-start post
             └─24646 sleep 1

Nov 09 10:05:20 mysql2.mytv.bg systemd[1]: Starting MySQL Community Server...
Nov 09 10:05:21 mysql2.mytv.bg mysqld_safe[23601]: 181109 10:05:21 mysqld_safe Logging to '/var/log/mysqld.log'.
Nov 09 10:05:21 mysql2.mytv.bg mysqld_safe[23601]: 181109 10:05:21 mysqld_safe Starting mysqld daemon with databases from /var/lib/mysql
[root@mysql2 ~]# systemctl stop mysqld
[root@mysql2 ~]# systemctl status mysqld
● mysqld.service - MySQL Community Server
   Loaded: loaded (/usr/lib/systemd/system/mysqld.service; enabled; vendor preset: disabled)
   Active: inactive (dead) since Fri 2018-11-09 10:07:52 UTC; 4s ago
  Process: 23602 ExecStartPost=/usr/bin/mysql-systemd-start post (code=killed, signal=TERM)
  Process: 23601 ExecStart=/usr/bin/mysqld_safe --basedir=/usr (code=exited, status=0/SUCCESS)
  Process: 23589 ExecStartPre=/usr/bin/mysql-systemd-start pre (code=exited, status=0/SUCCESS)
 Main PID: 23601 (code=exited, status=0/SUCCESS)

Nov 09 10:05:20 mysql2.mytv.bg systemd[1]: Starting MySQL Community Server...
Nov 09 10:05:21 mysql2.mytv.bg mysqld_safe[23601]: 181109 10:05:21 mysqld_safe Logging to '/var/log/mysqld.log'.
Nov 09 10:05:21 mysql2.mytv.bg mysqld_safe[23601]: 181109 10:05:21 mysqld_safe Starting mysqld daemon with databases from /var/lib/mysql
Nov 09 10:07:52 mysql2.mytv.bg systemd[1]: Stopped MySQL Community Server.
[root@mysql2 ~]# systemctl start mysqld
[root@mysql2 ~]# systemctl status mysqld
● mysqld.service - MySQL Community Server
   Loaded: loaded (/usr/lib/systemd/system/mysqld.service; enabled; vendor preset: disabled)
   Active: active (running) since Fri 2018-11-09 10:08:06 UTC; 3s ago
  Process: 24711 ExecStartPost=/usr/bin/mysql-systemd-start post (code=exited, status=0/SUCCESS)
  Process: 24698 ExecStartPre=/usr/bin/mysql-systemd-start pre (code=exited, status=0/SUCCESS)
 Main PID: 24710 (mysqld_safe)
   CGroup: /user.slice/user-0.slice/session-2395.scope/system.slice/mysqld.service
           ├─24710 /bin/sh /usr/bin/mysqld_safe --basedir=/usr
           └─25298 /usr/sbin/mysqld --basedir=/usr --datadir=/var/lib/mysql --plugin-dir=/usr/lib64/mysql/plugin --log-error=/var/log/mysqld.log --open-files-limit=10000...

Nov 09 10:08:04 mysql2.mytv.bg systemd[1]: Starting MySQL Community Server...
Nov 09 10:08:04 mysql2.mytv.bg mysqld_safe[24710]: 181109 10:08:04 mysqld_safe Logging to '/var/log/mysqld.log'.
Nov 09 10:08:04 mysql2.mytv.bg mysqld_safe[24710]: 181109 10:08:04 mysqld_safe Starting mysqld daemon with databases from /var/lib/mysql
Nov 09 10:08:06 mysql2.mytv.bg systemd[1]: Started MySQL Community Server.