Debug Ubuntu preseed failure – select and install software

Preparing the preseed for unattended installation sometimes could be challenging. This article presents the right way to analyze an installation failure in one of the main steps – “select and install software”.
There is a ubuntu installation preseed file for our Bionic unattended installation, which uses the “pkgsel” to install first packages in the new system:

d-i pkgsel/include string openssh-server wget vim git python gpg ntp
d-i pkgsel/upgrade select full-upgrade
d-i pkgsel/update-policy select unattended-upgrades

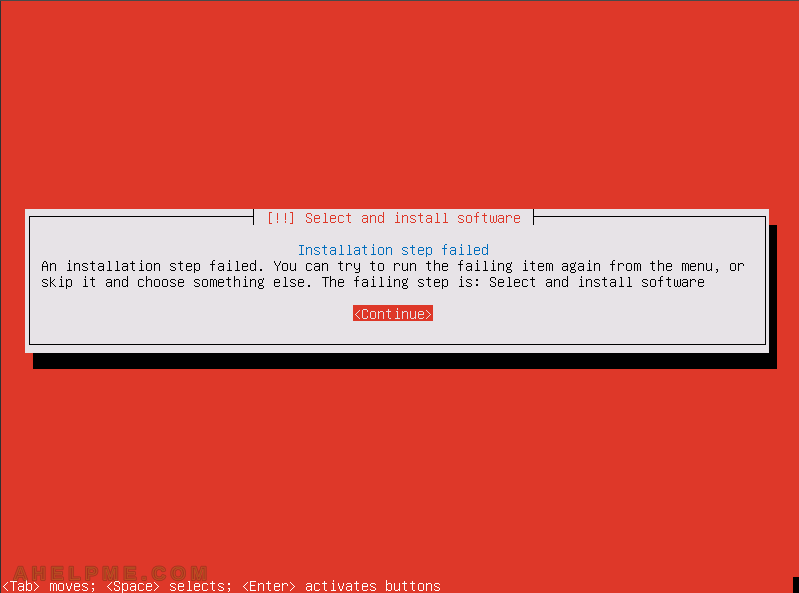
When an installation step in the preseed of a unattended installation fails the setup stops with a “Continue” confirmation.
main menu
“select and install software” – step failed

Here is what you can do to check what exactly fails in step “select and install software”:

  1. Start a shell in the current installation boot. Press “Ctrl+Alt+F2” to start the shell. You may use “Ctrl+Alt+F3” and “Ctrl+Alt+F4” for two more consoles and “Ctrl+Alt+F1” to return to the installation wizard.
  2. Check the /var/log/syslog, in which file the debconf writes the logging information.
  3. Find the lines where the step “select and install software” starts and look for errors after that. In this file, you can see all the step titles during, which the setup passes and they are named the same way the windows’ titles during the installation wizard.

Here is the real world output

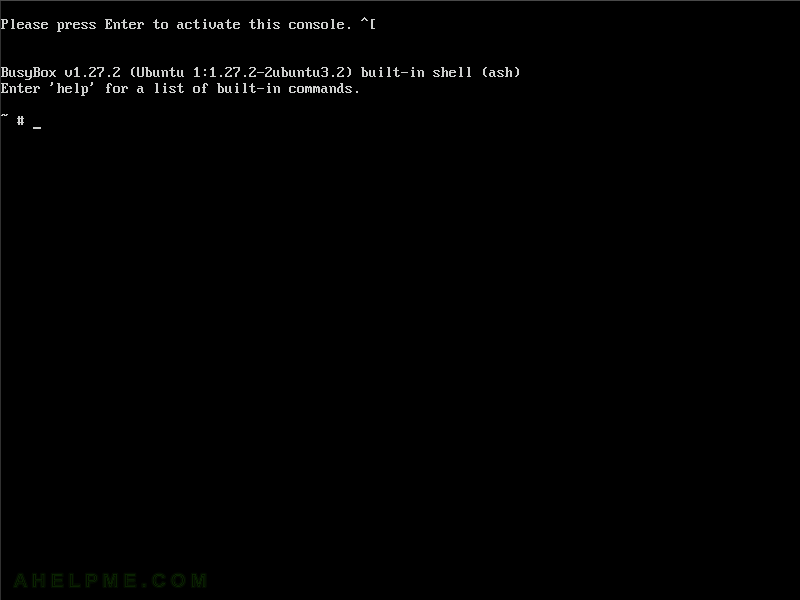
Presing the “CTRL+ALT+F2” to start the BusyBox built-in shell, which is ash not bash!

Be careful there are some difference between ash and bash.
main menu
Installation wizard – BusyBox built-in shell (ash)

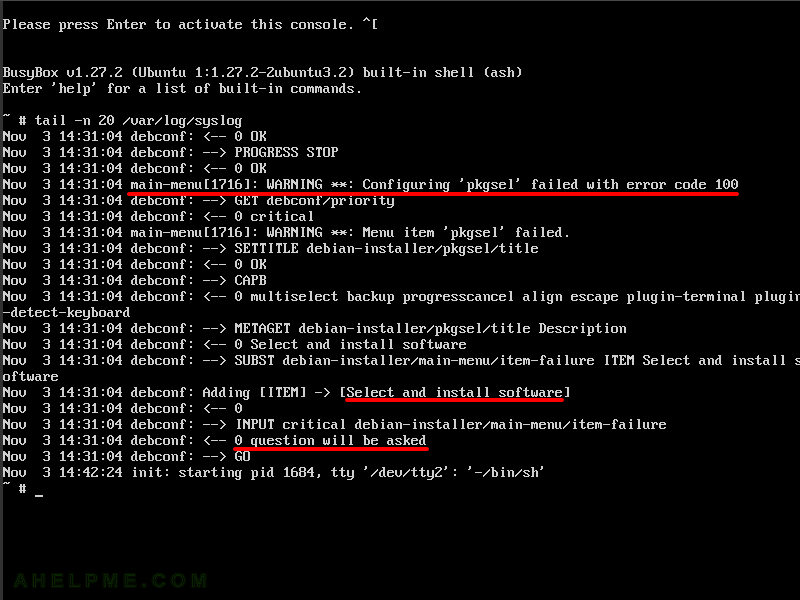
Last 20 lines shows the problem – pkgsel failed to install packages in step “select and install software”.

The installation wizard stops.
main menu
debconf logging using syslog – pkgsel

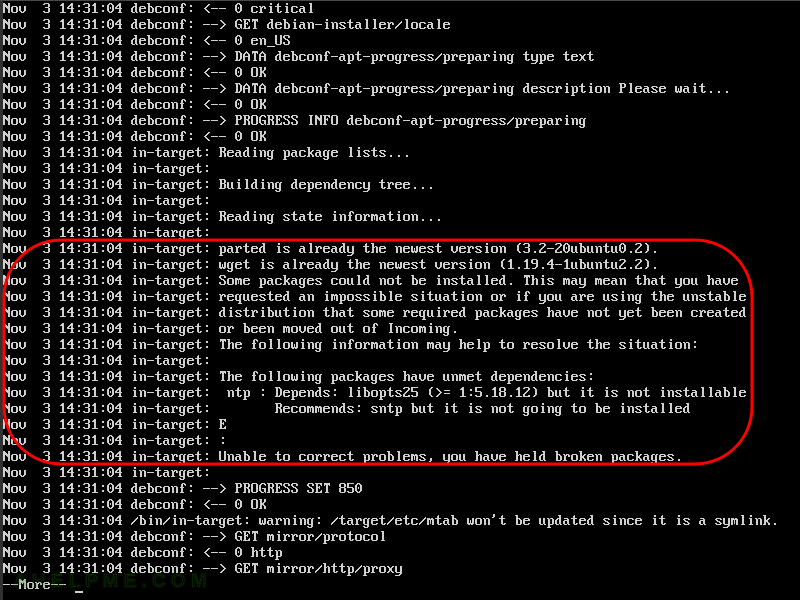
The problem is in the package “ntp”, the setup cannot install the “ntp” package because of unmet dependencies.

Because it is not so important to install ntp at this stage we added the package to the script executed in “preseed/late_command” and removed the package from the pkgsel line in the preseed file. In general, our problem was because we set local repositories for the bionic packages, but the setup cannot update list of available packages when the you set Bionic mirror to be unofficial local repository.
main menu
Package because of unmet dependencies

Save iptables rules over reboots on Ubuntu 16 and Ubuntu 18 – persistent iptables rules

Moving towards the firewalld software and especially the systemd some good old init scripts got missing! For example, one of those good scripts is the init script for iptables firewall, which allows saving iptables rules and during boot, it loads them again. With the init iptables script we have persistence of the iptables rules. Meanwhile, we can always call the init script with “save” argument to update the currently saved rules. Many different Linux distributions have this init script – “/etc/init.d/iptables”, but in systemd world, it has been removed and replaced with nothing (probably, because you are encouraged to use firewalld, which is not a bad thing!).

There are two packages “iptables-persistent” and “netfilter-persistent”, which work together to have iptables persistence over reboots. The rules are saved and restored automatically during system startup.

First, install “iptables-persistent” and “netfilter-persistent” with

sudo apt install netfilter-persistent iptables-persistent

During the iptables–persistent installation the setup asks the user to save the current iptables rules. Hit “Yes” if you want to save the current iptables rules, which will be automatically loaded the next time the system starts up.

main menu
Configuring iptables-persistent setup

So it is safe to install it on a live system – the current iptables rules won’t be deleted.
Second, ensure the boot script to restore the iptables rules is enabled

sudo systemctl enable netfilter-persistent

Additional information

Saving the current state of the iptables rules:

myuser@myubuntupc:~$ sudo /usr/sbin/netfilter-persistent save
run-parts: executing /usr/share/netfilter-persistent/plugins.d/15-ip4tables save
run-parts: executing /usr/share/netfilter-persistent/plugins.d/25-ip6tables save

Restore the original state of the iptables rules:

sudo systemctl restart netfilter-persistent

And all commands you can do – start, stop, restart, reload, flush, save. You can use the script directly (it is not mandatory to use systemctl to restart, i.e. restore rules and etc.)

myuser@myubuntupc:~$ sudo /usr/sbin/netfilter-persistent
Usage: /usr/sbin/netfilter-persistent (start|stop|restart|reload|flush|save)

The script netfilter-persistent executes 2 other scripts as plugins:

/usr/share/netfilter-persistent/plugins.d/15-ip4tables
/usr/share/netfilter-persistent/plugins.d/25-ip6tables

The iptables rules are saved respectively in files

/etc/iptables/rules.v4
/etc/iptables/rules.v6

And you can always edit them manually or save/restore with iptables-save and iptables-restore redirecting the output to the above files.

It’s normal the state of the “active (exited)”. The service is “enabled” as you can see (by default the setup automatically enables the service on Ubuntu, but always check it to be sure, it’s the firewall!).

myuser@myubuntupc:~$ sudo systemctl status netfilter-persistent
● netfilter-persistent.service - netfilter persistent configuration
   Loaded: loaded (/lib/systemd/system/netfilter-persistent.service; enabled; vendor preset: enabled)
   Active: active (exited) since Thu 2019-01-17 20:44:08 EST; 14min ago
 Main PID: 666 (code=exited, status=0/SUCCESS)
   CGroup: /system.slice/netfilter-persistent.service

Jan 17 20:44:08 myubuntupc systemd[1]: Starting netfilter persistent configuration...
Jan 17 20:44:08 myubuntupc netfilter-persistent[666]: run-parts: executing /usr/share/netfilter-persistent/plugins.d/15-ip4tables start
Jan 17 20:44:08 myubuntupc netfilter-persistent[666]: run-parts: executing /usr/share/netfilter-persistent/plugins.d/25-ip6tables start
Jan 17 20:44:08 myubuntupc systemd[1]: Started netfilter persistent configuration.

Ubuntu with PHP 7.2 and mcrypt module

As mentioned in our previous article PHP 7.2 or PHP 7.3 with mcrypt – manual build the PHP versions 7.2 and 7.3 do not include PHP mcrypt module. The mcrypt module was part of PHP 5 till 7.1, in which it was deprecated and removed in 7.2.
In this article we show how to build mcrypt module for Ubuntu based on our previous article showed above. Because of the great popularity of Ubuntu and it has no PHP mcrypt package in Ubuntu package system unlike other Linux distributions (like Gentoo, which created a package) we decided to make this article.

For our purpose we use Ubuntu 18.04.2 LTS and here is what the steps to have the mcrypt PHP module:

STEP 1) Update and install mcrypt library and header development packet

sudo apt update -y
sudo apt install -y libmcrypt-dev

STEP 2) Install the GNU GCC build utility and the PHP dev packet

This is the compiler to build the module.

sudo apt install -y build-essential
sudo apt install -y php7.2-dev

STEP 3) Download the PHP mcrypt module and build it.

cd
mkdir mcrypt-php-module-manual
cd mcrypt-php-module-manual
wget https://pecl.php.net/get/mcrypt-1.0.2.tgz
tar xzf mcrypt-1.0.2.tgz
cd mcrypt-1.0.2
phpize
aclocal
libtoolize --force
autoheader
autoconf
./configure
make
sudo make install

STEP 4) Load the module in the PHP configuration (we use PHP-FPM and PHP-CLI) and block future PHP versions to be installed when apt update is used.

Because we compile the PHP mcrypt module for the specific currently installed PHP we do not want to upgrade our PHP when there is an update and the mcrypt module to fail to load. Each change of the PHP version (upgrade) would require a recompile against the current PHP version. To see more for holding and unholding Ubuntu packages – apt-mark – upgrade with the exception of certain packages Of course, if there is an update for PHP you must install it just recompile the mcrypt package, too!

echo "extension=mcrypt.so" > 20-mcrypt.ini
sudo cp 20-mcrypt.ini /etc/php/7.2/cli/conf.d/20-mcrypt.ini
sudo cp 20-mcrypt.ini /etc/php/7.2/fpm/conf.d/20-mcrypt.ini
sudo apt-mark hold php-cli php7.2-cli php-fpm php7.2-fpm

Keep on reading!

Ubuntu apt – InRelease is not valid yet (invalid for another 151d 18h 5min 59s)

Invalid time could cause your server (or probably your virtual server or docker instance) to be unable to use Ubuntu’s packaging system apt. It is a typical thing if your virtual or docker instance does not use automatic time synchronization.

It is really important even small installation and virtualized environments to have automatic time synchronization or the service they provide could become error prone with time!

The “apt” just reports the repositories are not valid yet:

myuser@my-server-pc:~$ sudo su
root@my-server-pc:/home/myuser# apt update
Hit:1 http://archive.ubuntu.com/ubuntu bionic InRelease
Get:2 http://archive.ubuntu.com/ubuntu bionic-updates InRelease [88.7 kB]
Get:3 http://archive.ubuntu.com/ubuntu bionic-backports InRelease [74.6 kB]
Get:4 http://archive.ubuntu.com/ubuntu bionic-security InRelease [88.7 kB]
Reading package lists... Done                                 
E: Release file for http://archive.ubuntu.com/ubuntu/dists/bionic-updates/InRelease is not valid yet (invalid for another 151d 18h 5min 59s). Updates for this repository will not be applied.
E: Release file for http://archive.ubuntu.com/ubuntu/dists/bionic-backports/InRelease is not valid yet (invalid for another 151d 17h 16min 26s). Updates for this repository will not be applied.
E: Release file for http://archive.ubuntu.com/ubuntu/dists/bionic-security/InRelease is not valid yet (invalid for another 151d 17h 15min 3s). Updates for this repository will not be applied.
root@my-server-pc:/home/myuser# date
Thu Jan 17 15:11:56 UTC 2019

The clock shows 17 January 2019, but now is 18 June 2019! This is a Ubuntu virtual server with the minimal installation.

The solution is to synchronize your clock manually or use a service (the better way)!

Keep on reading!

pycurl.h: fatal error: openssl/ssl.h: No such file or directory

If you encounter this error trying to install a pip module or compile a program under the console you surely miss OpenSSL development packages!
pip also may build a packages in your system and it could depend on generic library headers like in this case OpenSSL, which the installer (pip) won’t bring them and it will output an error as you can see

myuser@srv # sudo pip install pycurl pygeoip psutil
Collecting pycurl
  Using cached https://files.pythonhosted.org/packages/e8/e4/0dbb8735407189f00b33d84122b9be52c790c7c3b25286826f4e1bdb7bde/pycurl-7.43.0.2.tar.gz
Requirement already satisfied (use --upgrade to upgrade): pygeoip in /usr/local/lib/python2.7/dist-packages
Requirement already satisfied (use --upgrade to upgrade): psutil in /usr/lib/python2.7/dist-packages
Building wheels for collected packages: pycurl
  Running setup.py bdist_wheel for pycurl ... error
  Complete output from command /usr/bin/python -u -c "import setuptools, tokenize;__file__='/tmp/pip-build-AbCshS/pycurl/setup.py';exec(compile(getattr(tokenize, 'open', open)(__file__).read().replace('\r\n', '\n'), __file__, 'exec'))" bdist_wheel -d /tmp/tmpqVNq1upip-wheel- --python-tag cp27:
  Using curl-config (libcurl 7.47.0)
  running bdist_wheel
  running build
  running build_py
  creating build
  creating build/lib.linux-x86_64-2.7
  creating build/lib.linux-x86_64-2.7/curl
  copying python/curl/__init__.py -> build/lib.linux-x86_64-2.7/curl
  running build_ext
  building 'pycurl' extension
  creating build/temp.linux-x86_64-2.7
  creating build/temp.linux-x86_64-2.7/src
  x86_64-linux-gnu-gcc -pthread -DNDEBUG -g -fwrapv -O2 -Wall -Wstrict-prototypes -fno-strict-aliasing -Wdate-time -D_FORTIFY_SOURCE=2 -g -fstack-protector-strong -Wformat -Werror=format-security -fPIC -DPYCURL_VERSION="7.43.0.2" -DHAVE_CURL_SSL=1 -DHAVE_CURL_OPENSSL=1 -DHAVE_CURL_SSL=1 -I/usr/include/python2.7 -c src/docstrings.c -o build/temp.linux-x86_64-2.7/src/docstrings.o
  In file included from src/docstrings.c:4:0:
  src/pycurl.h:164:28: fatal error: openssl/ssl.h: No such file or directory
  compilation terminated.
  error: command 'x86_64-linux-gnu-gcc' failed with exit status 1
  
  ----------------------------------------
  Failed building wheel for pycurl
  Running setup.py clean for pycurl
Failed to build pycurl
Installing collected packages: pycurl
  Running setup.py install for pycurl ... error
    Complete output from command /usr/bin/python -u -c "import setuptools, tokenize;__file__='/tmp/pip-build-AbCshS/pycurl/setup.py';exec(compile(getattr(tokenize, 'open', open)(__file__).read().replace('\r\n', '\n'), __file__, 'exec'))" install --record /tmp/pip-oea_jq-record/install-record.txt --single-version-externally-managed --compile:
    Using curl-config (libcurl 7.47.0)
    running install
    running build
    running build_py
    creating build
    creating build/lib.linux-x86_64-2.7
    creating build/lib.linux-x86_64-2.7/curl
    copying python/curl/__init__.py -> build/lib.linux-x86_64-2.7/curl
    running build_ext
    building 'pycurl' extension
    creating build/temp.linux-x86_64-2.7
    creating build/temp.linux-x86_64-2.7/src
    x86_64-linux-gnu-gcc -pthread -DNDEBUG -g -fwrapv -O2 -Wall -Wstrict-prototypes -fno-strict-aliasing -Wdate-time -D_FORTIFY_SOURCE=2 -g -fstack-protector-strong -Wformat -Werror=format-security -fPIC -DPYCURL_VERSION="7.43.0.2" -DHAVE_CURL_SSL=1 -DHAVE_CURL_OPENSSL=1 -DHAVE_CURL_SSL=1 -I/usr/include/python2.7 -c src/docstrings.c -o build/temp.linux-x86_64-2.7/src/docstrings.o
    In file included from src/docstrings.c:4:0:
    src/pycurl.h:164:28: fatal error: openssl/ssl.h: No such file or directory
    compilation terminated.
    error: command 'x86_64-linux-gnu-gcc' failed with exit status 1
    
    ----------------------------------------
Command "/usr/bin/python -u -c "import setuptools, tokenize;__file__='/tmp/pip-build-AbCshS/pycurl/setup.py';exec(compile(getattr(tokenize, 'open', open)(__file__).read().replace('\r\n', '\n'), __file__, 'exec'))" install --record /tmp/pip-oea_jq-record/install-record.txt --single-version-externally-managed --compile" failed with error code 1 in /tmp/pip-build-AbCshS/pycurl/
You are using pip version 8.1.1, however version 18.1 is available.
You should consider upgrading via the 'pip install --upgrade pip' command

Keep on reading!

Ubuntu AttributeError: ‘module’ object has no attribute ‘SSL_ST_INIT’

If you install libraries with

pip

command you might find yourself in the following situation:

root@srv:~# pip
Traceback (most recent call last):
  File "/usr/bin/pip", line 9, in <module>
    from pip import main
  File "/usr/lib/python2.7/dist-packages/pip/__init__.py", line 13, in <module>
    from pip.exceptions import InstallationError, CommandError, PipError
  File "/usr/lib/python2.7/dist-packages/pip/exceptions.py", line 6, in <module>
    from pip._vendor.six import iteritems
  File "/usr/lib/python2.7/dist-packages/pip/_vendor/__init__.py", line 64, in <module>
    vendored("cachecontrol")
  File "/usr/lib/python2.7/dist-packages/pip/_vendor/__init__.py", line 36, in vendored
    __import__(modulename, globals(), locals(), level=0)
  File "/usr/share/python-wheels/CacheControl-0.11.5-py2.py3-none-any.whl/cachecontrol/__init__.py", line 9, in <module>
  File "/usr/share/python-wheels/CacheControl-0.11.5-py2.py3-none-any.whl/cachecontrol/wrapper.py", line 1, in <module>
  File "/usr/share/python-wheels/CacheControl-0.11.5-py2.py3-none-any.whl/cachecontrol/adapter.py", line 3, in <module>
  File "/usr/share/python-wheels/requests-2.9.1-py2.py3-none-any.whl/requests/__init__.py", line 53, in <module>
  File "/usr/share/python-wheels/urllib3-1.13.1-py2.py3-none-any.whl/urllib3/contrib/pyopenssl.py", line 54, in <module>
  File "/usr/local/lib/python2.7/dist-packages/OpenSSL/__init__.py", line 8, in <module>
    from OpenSSL import rand, crypto, SSL
  File "/usr/local/lib/python2.7/dist-packages/OpenSSL/SSL.py", line 124, in <module>
    SSL_ST_INIT = _lib.SSL_ST_INIT
AttributeError: 'module' object has no attribute 'SSL_ST_INIT'

Keep on reading!

New Redis server (4.0.9) in Ubuntu 16.04 LTS

One of our critical service was under Ubuntu 16.04 LTS (and is scheduled for update, but this a another story!) and how it always happens other parts of our systems use new versions of Ubuntu. But the latest version in Ubuntu 16.04 is 3.0.6 https://packages.ubuntu.com/xenial-updates/redis-server.
Here you can find all the redis server versions available in the supported Ubuntu distributions: https://packages.ubuntu.com/search?keywords=redis-server&searchon=names
Keep on reading!

apt-mark – upgrade with the exception of certain packages

If you are in a situation when you want to upgrade your system, but do not want to upgrade a certain software in it you can just instruct apt not to upgrade these packages with:

apt-mark hold <package name(s)>

Here is how you can block updating 4 packages – ca-certificates, firefox, ghostscript, linux-firmware. First we update and upgrade and you can see there is no packages to keep back, and then we use apt-mark to “hold” package “linux-firmware” and ca-certificates, firefox, ghostscript at once. Initiating apt upgrade again will give you “The following packages have been kept back:” and it will include all packages, which will not be upgraded (it will include dependencies, which require some of the blocked packages).
Keep on reading!

Rebuild the official Ubuntu kernel – Ubuntu 16.04 LTS

There are multiple reasons to rebuild the official kernel of a Linux distro but this is not the purpose of this article

just cannot miss the chance to write that all the kernels are built therefore optimized for the very first 64bit Intel/AMD processor! But come on who wants the most important piece of software to be optimized not for his new and expensive processor but for one released 15 years ago???

. Here we are going to show you how to recompile the latest official Ubuntu kernel of Ubuntu 16.04 LTS – the one, which comes with the apt packages system, because this kernel comes with the latest and greatest patches of the Ubuntu team. You should not confuse this howto with the one, which compile a vanilla kernel or the mainline kernel from http://kernel.ubuntu.com/~kernel-ppa/mainline/. So if you want a new kernel or the latest from kernel.org this is the right tutorial for Ubuntu – Build your own kernel under Ubuntu using mainline (latest) kernel. The official latest kernel in the Ubuntu repository is not always the latest one from kernel.org, but you can be sure it is probably most secure one, because there are additional modifications, configurations and tests by the team. Here you can see what versions of the kernel are the officials in Ubuntu: https://wiki.ubuntu.com/Kernel/Support

Keep on reading!

List all kernels available to install under Ubuntu

Here is the fast command to see which Linux kernels are available to install from the Ubuntu package management system:

apt update
apt list linux-*image-*

Always update to download the latest metadata files for the available packages and the list with a pattern. In our case we want the Ubuntu kernels and they start with “linux-“, before it was easy linux-image-*, but now there are two types of kernels:

  1. Signed Linux kernel with name starting “linux-signed-image-” (and alias is “linux-image-“) – “Signed with the Ubuntu EFI key”, which means you should have UEFI BIOS and unsigned (with two words – “more security”)
  2. Good old kernel format (so no signing) with name starting “linux-image-unsigned-” – to be sure you pull the unsigned version

And you can use:

apt search linux-*image-*

to see the kernels available and their descriptions.
Keep on reading!