Having many Supermicro servers we used multiple times Virtual Media to install, diagnose and rescue Supermicro server. It is really simple to open the Console Redirection – java web start and just mount the ISO file from Virtual Media -> ISO File, but this way if your server is not local to your network and it is located in a colocation as it should be the connection is slow and in many cases bogus! Because it uses UDP it happened many times to remount or just to lose the connection and the media to disappear in the middle of the booting/loading process from the installation media, for example. And probably you have noticed there is additional option in the web interface of mounting ISO file from a windows share. Of course, in linux world it might be samba share as in our case and the share could be easily configured on a server in your colocation.
And we noticed was several times we have no problems using it, but some time the share could not be even saved and respectively could not be mounted. No error reported, just the edit boxes resets to blank and apparently everything was the same as the previous box, which it worked as a charm!
Here are the steps to enable one of your CentOS 7 servers to share a resource and to use it in your Supermicro IPMI KVM. The server is selinux enabled and the policy is Enforcing.
STEP 1) Install samba server in CentOS 7
[root@srv0 ~]# yum -y install samba samba-client samba-common policycoreutils-python
Loaded plugins: fastestmirror
Determining fastest mirrors
epel/x86_64/metalink                                                                                                                           |  30 kB  00:00:00
 * base: mirrors.neterra.net
 * epel: mirrors.neterra.net
 * extras: mirrors.neterra.net
 * updates: mirrors.neterra.net
base                                                                                                                                           | 3.6 kB  00:00:00
epel                                                                                                                                           | 3.2 kB  00:00:00
extras                                                                                                                                         | 3.4 kB  00:00:00
updates                                                                                                                                        | 3.4 kB  00:00:00
(1/7): base/7/x86_64/group_gz                                                                                                                  | 166 kB  00:00:00
(2/7): epel/x86_64/group_gz                                                                                                                    |  88 kB  00:00:00
(3/7): base/7/x86_64/primary_db                                                                                                                | 5.9 MB  00:00:00
(4/7): extras/7/x86_64/primary_db                                                                                                              | 147 kB  00:00:00
(5/7): updates/7/x86_64/primary_db                                                                                                             | 2.0 MB  00:00:00
(6/7): epel/x86_64/updateinfo                                                                                                                  | 932 kB  00:00:00
(7/7): epel/x86_64/primary                                                                                                                     | 3.5 MB  00:00:00
epel                                                                                                                                                      12584/12584
Package samba-client-4.7.1-6.el7.x86_64 already installed and latest version
Package samba-common-4.7.1-6.el7.noarch already installed and latest version
Resolving Dependencies
--> Running transaction check
---> Package samba.x86_64 0:4.7.1-6.el7 will be installed
--> Processing Dependency: samba-libs = 4.7.1-6.el7 for package: samba-4.7.1-6.el7.x86_64
--> Processing Dependency: samba-common-tools = 4.7.1-6.el7 for package: samba-4.7.1-6.el7.x86_64
--> Processing Dependency: libxattr-tdb-samba4.so(SAMBA_4.7.1)(64bit) for package: samba-4.7.1-6.el7.x86_64
--> Processing Dependency: libaio.so.1(LIBAIO_0.4)(64bit) for package: samba-4.7.1-6.el7.x86_64
--> Processing Dependency: libaio.so.1(LIBAIO_0.1)(64bit) for package: samba-4.7.1-6.el7.x86_64
--> Processing Dependency: libxattr-tdb-samba4.so()(64bit) for package: samba-4.7.1-6.el7.x86_64
--> Processing Dependency: libaio.so.1()(64bit) for package: samba-4.7.1-6.el7.x86_64
--> Running transaction check
---> Package libaio.x86_64 0:0.3.109-13.el7 will be installed
---> Package samba-common-tools.x86_64 0:4.7.1-6.el7 will be installed
---> Package samba-libs.x86_64 0:4.7.1-6.el7 will be installed
--> Processing Dependency: libpytalloc-util.so.2(PYTALLOC_UTIL_2.1.9)(64bit) for package: samba-libs-4.7.1-6.el7.x86_64
--> Processing Dependency: libpytalloc-util.so.2(PYTALLOC_UTIL_2.1.6)(64bit) for package: samba-libs-4.7.1-6.el7.x86_64
--> Processing Dependency: libpytalloc-util.so.2(PYTALLOC_UTIL_2.0.6)(64bit) for package: samba-libs-4.7.1-6.el7.x86_64
--> Processing Dependency: libpytalloc-util.so.2()(64bit) for package: samba-libs-4.7.1-6.el7.x86_64
--> Running transaction check
---> Package pytalloc.x86_64 0:2.1.10-1.el7 will be installed
--> Finished Dependency Resolution

Dependencies Resolved

======================================================================================================================================================================
 Package                                        Arch                               Version                                     Repository                        Size
======================================================================================================================================================================
Installing:
 samba                                          x86_64                             4.7.1-6.el7                                 base                             661 k
Installing for dependencies:
 libaio                                         x86_64                             0.3.109-13.el7                              base                              24 k
 pytalloc                                       x86_64                             2.1.10-1.el7                                base                              17 k
 samba-common-tools                             x86_64                             4.7.1-6.el7                                 base                             463 k
 samba-libs                                     x86_64                             4.7.1-6.el7                                 base                             275 k

Transaction Summary
======================================================================================================================================================================
Install  1 Package (+4 Dependent packages)

Total download size: 1.4 M
Installed size: 3.8 M
Downloading packages:
(1/5): libaio-0.3.109-13.el7.x86_64.rpm                                                                                                        |  24 kB  00:00:00
(2/5): pytalloc-2.1.10-1.el7.x86_64.rpm                                                                                                        |  17 kB  00:00:00
(3/5): samba-4.7.1-6.el7.x86_64.rpm                                                                                                            | 661 kB  00:00:00
(4/5): samba-common-tools-4.7.1-6.el7.x86_64.rpm                                                                                               | 463 kB  00:00:00
(5/5): samba-libs-4.7.1-6.el7.x86_64.rpm                                                                                                       | 275 kB  00:00:00
----------------------------------------------------------------------------------------------------------------------------------------------------------------------
Total                                                                                                                                 4.5 MB/s | 1.4 MB  00:00:00
Running transaction check
Running transaction test
Transaction test succeeded
Running transaction
  Installing : pytalloc-2.1.10-1.el7.x86_64                                                                                                                       1/5
  Installing : samba-libs-4.7.1-6.el7.x86_64                                                                                                                      2/5
  Installing : samba-common-tools-4.7.1-6.el7.x86_64                                                                                                              3/5
  Installing : libaio-0.3.109-13.el7.x86_64                                                                                                                       4/5
  Installing : samba-4.7.1-6.el7.x86_64                                                                                                                           5/5
  Verifying  : libaio-0.3.109-13.el7.x86_64                                                                                                                       1/5
  Verifying  : samba-libs-4.7.1-6.el7.x86_64                                                                                                                      2/5
  Verifying  : samba-common-tools-4.7.1-6.el7.x86_64                                                                                                              3/5
  Verifying  : samba-4.7.1-6.el7.x86_64                                                                                                                           4/5
  Verifying  : pytalloc-2.1.10-1.el7.x86_64                                                                                                                       5/5

Installed:
  samba.x86_64 0:4.7.1-6.el7

Dependency Installed:
  libaio.x86_64 0:0.3.109-13.el7        pytalloc.x86_64 0:2.1.10-1.el7        samba-common-tools.x86_64 0:4.7.1-6.el7        samba-libs.x86_64 0:4.7.1-6.el7

Complete!
[root@srv0 ~]#
STEP 2) Configure samba server CentOS 7 for the purpose of using it in IPMI Virtual share.
We are going to use a share without login credentials, because our KVM IP are always local ones and accessed via a vpn network and in addition only the network of the IPMI IPs could access the share (the samba server has a firewall configured).
Set the configuration file of the samba server – one directory storing the files shared with no login credentials (no username/password means anonymous login).
The configuration file is:
/etc/samba/smb.conf
[global]
workgroup = WINSHARE
server string = Samba Server %v
netbios name = centossrv
security = user
map to guest = bad user
dns proxy = no
#============================ Share Definitions ==============================
[share]
path = /mnt/storage1/samba
browsable =yes
writable = no
guest ok = yes
read only = yes
As you can see we use “/mnt/storage1/samba” for our directory where the ISO files will be located. Change this path if you want to put your ISO files somewhere else.
Set the right permissions for the directory and selinux (if you server is not selinux enabled, you could skip the selinux part) and run the samba daemon:
[root@srv0 ~]# mkdir /mnt/storage1/samba
[root@srv0 ~]# chown -R nobody:nobody /mnt/storage1/samba/
[root@srv0 ~]# semanage fcontext -a -t samba_share_t '/mnt/storage1/samba(/.*)?'
[root@srv0 ~]# restorecon -Rv /mnt/storage1/samba/
restorecon reset /mnt/storage1/samba context unconfined_u:object_r:unlabeled_t:s0->unconfined_u:object_r:samba_share_t:s0
[root@srv0 ~]# cd /mnt/storage1/samba/
[root@srv0 samba]# wget http://mirror.leaseweb.com/centos/7.5.1804/isos/x86_64/CentOS-7-x86_64-Minimal-1804.iso
--2018-06-01 14:15:42--  http://mirror.leaseweb.com/centos/7.5.1804/isos/x86_64/CentOS-7-x86_64-Minimal-1804.iso
Resolving mirror.leaseweb.com (mirror.leaseweb.com)... 37.58.58.140, 2a00:c98:2030:a034::21
Connecting to mirror.leaseweb.com (mirror.leaseweb.com)|37.58.58.140|:80... connected.
HTTP request sent, awaiting response... 200 OK
Length: 950009856 (906M) [application/octet-stream]
Saving to: ‘CentOS-7-x86_64-Minimal-1804.iso’

100%[============================================================================================================================>] 950,009,856 40.1MB/s   in 33s

2018-06-01 14:16:15 (27.3 MB/s) - ‘CentOS-7-x86_64-Minimal-1804.iso’ saved [950009856/950009856]

[root@srv0 samba]# chown nobody:nobody CentOS-7-x86_64-Minimal-1804.iso
[root@srv0 samba]# systemctl start smb
[root@srv0 samba]# systemctl status smb
● smb.service - Samba SMB Daemon
   Loaded: loaded (/usr/lib/systemd/system/smb.service; disabled; vendor preset: disabled)
   Active: active (running) since Fri 2018-06-01 14:17:57 UTC; 20s ago
 Main PID: 31961 (smbd)
   Status: "smbd: ready to serve connections..."
    Tasks: 4
   Memory: 19.0M
   CGroup: /system.slice/smb.service
           ├─31961 /usr/sbin/smbd --foreground --no-process-group
           ├─31964 /usr/sbin/smbd --foreground --no-process-group
           ├─31965 /usr/sbin/smbd --foreground --no-process-group
           └─31966 /usr/sbin/smbd --foreground --no-process-group

Jun 01 14:17:56 srv0@local systemd[1]: Starting Samba SMB Daemon...
Jun 01 14:17:57 srv0@local smbd[31961]: [2018/06/01 14:17:57.761913,  0] ../lib/util/become_daemon.c:124(daemon_ready)
Jun 01 14:17:57 srv0@local smbd[31961]:   STATUS=daemon 'smbd' finished starting up and ready to serve connections
Jun 01 14:17:57 srv0@local systemd[1]: Started Samba SMB Daemon.
Configure the firewall to allow only connections from the IPMI KVM IP networks (or a single IP if you need to expose it in the Internet). You can work with build in zone “trusted”, but here we prefer more generic approach, which could be used not only for local IP networks but for real IPs:
[root@srv0 samba]# firewall-cmd --new-zone=smbshare --permanent
success
[root@srv0 samba]# firewall-cmd --zone=smbshare --add-source=192.168.7.0/24 --permanent
success
[root@srv0 samba]# firewall-cmd --zone=smbshare --add-service=samba --permanent
success
[root@srv0 samba]# firewall-cmd --zone=smbshare --add-service=samba-client --permanent
success
[root@srv00 samba]# firewall-cmd --reload
success
[root@srv00 samba]# firewall-cmd --zone=smbshare --list-all
smbshare (active)
  target: default
  icmp-block-inversion: no
  interfaces:
  sources: 192.168.7.0/24
  services: samba samba-client
  ports:
  protocols:
  masquerade: no
  forward-ports:
  source-ports:
  icmp-blocks:
  rich rules:

[root@srv00 samba]#
STEP 3) Mount a disk in IPMI Virutal Media and boot from it
You could check our additional tutorial for it here –
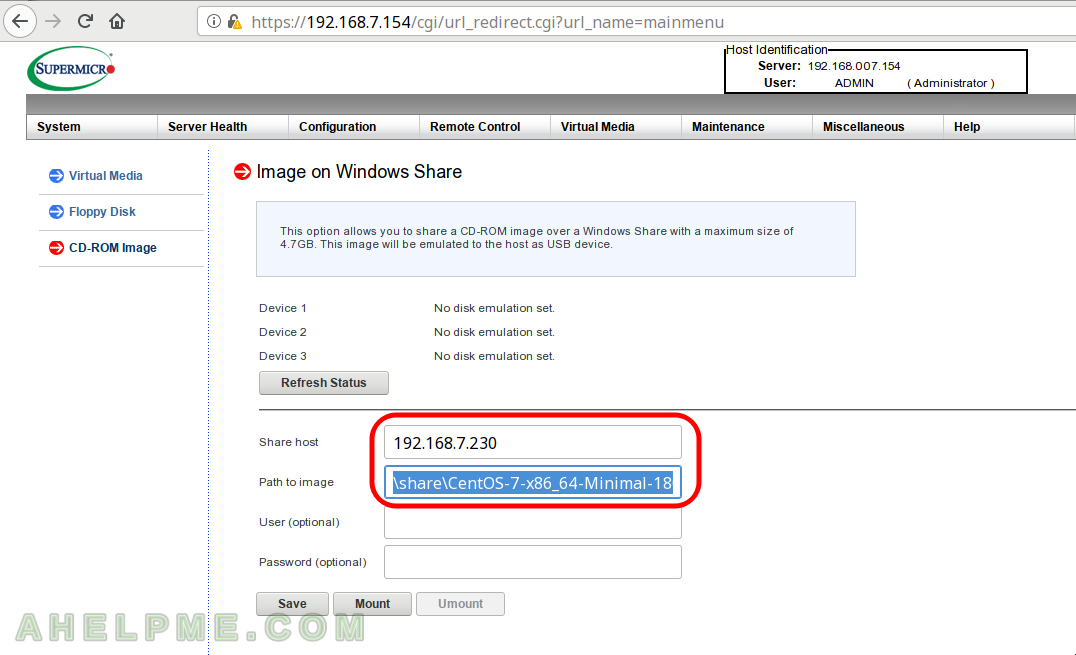
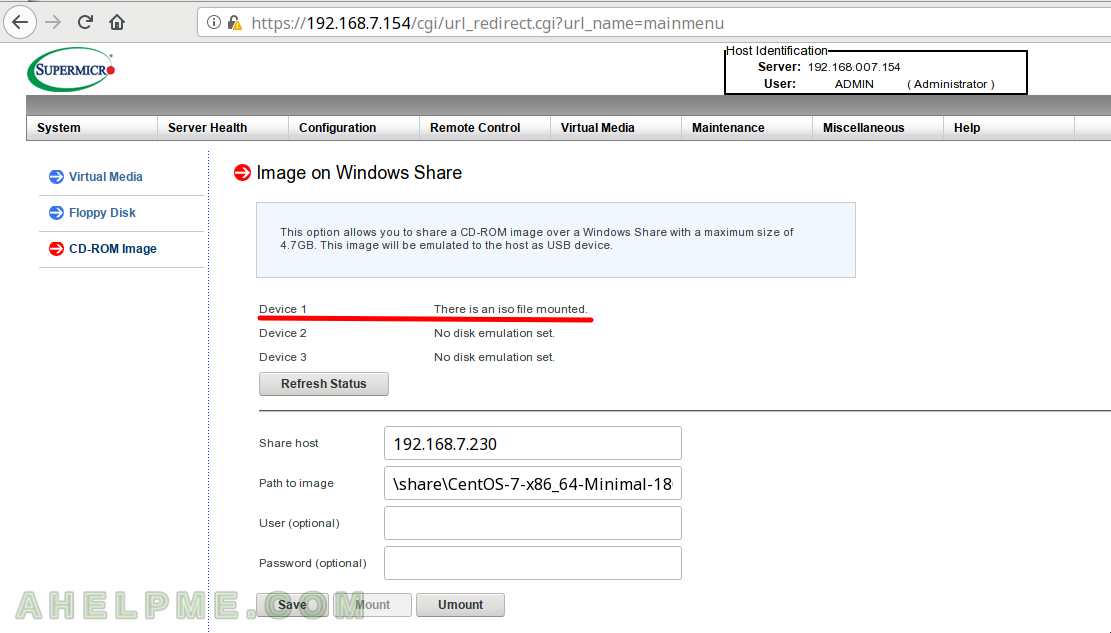
STEP 3.1) Fill “Share host” and “Path image” only, because we configured our samba share without a password
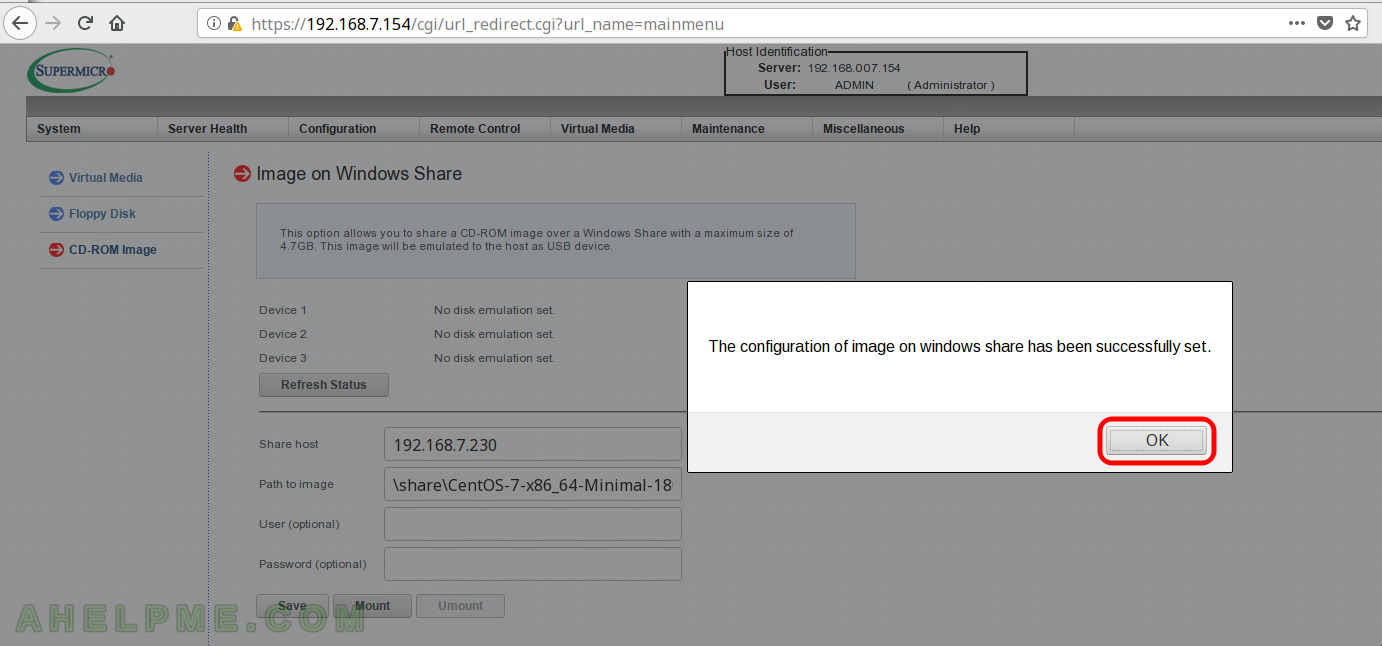
STEP 3.2) Upon a successful configuration saving you’ll get a confirmation dialog.
If no confirmation is shown you would not be able to mount the share, check out our Troubleshooting below!
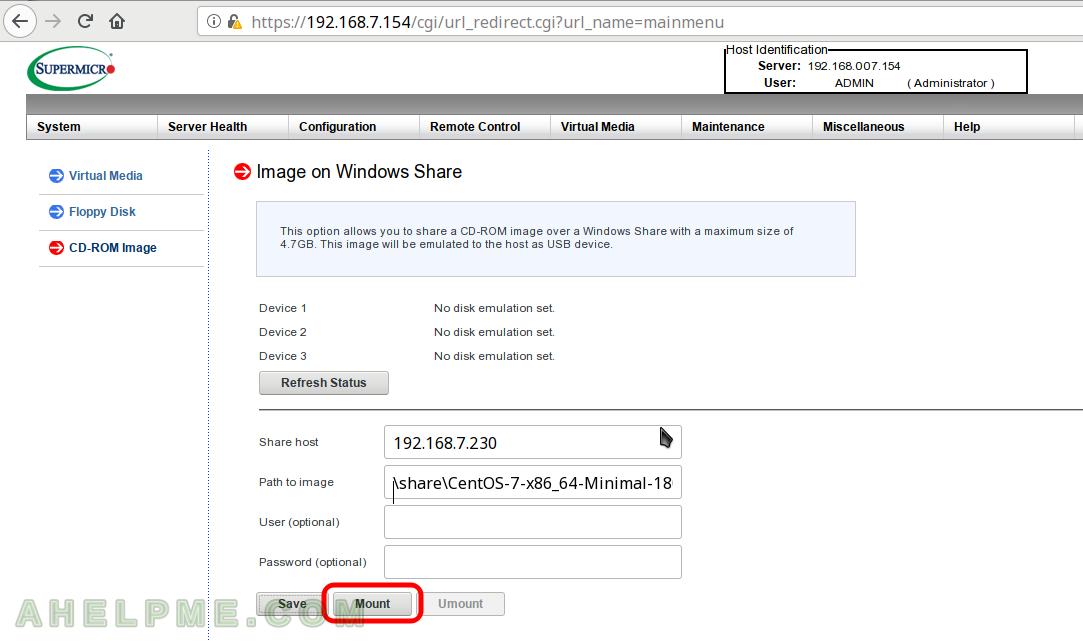
STEP 3.3) After saving the configuration click on “Mount” to load your ISO file in the virtual CD-ROM.
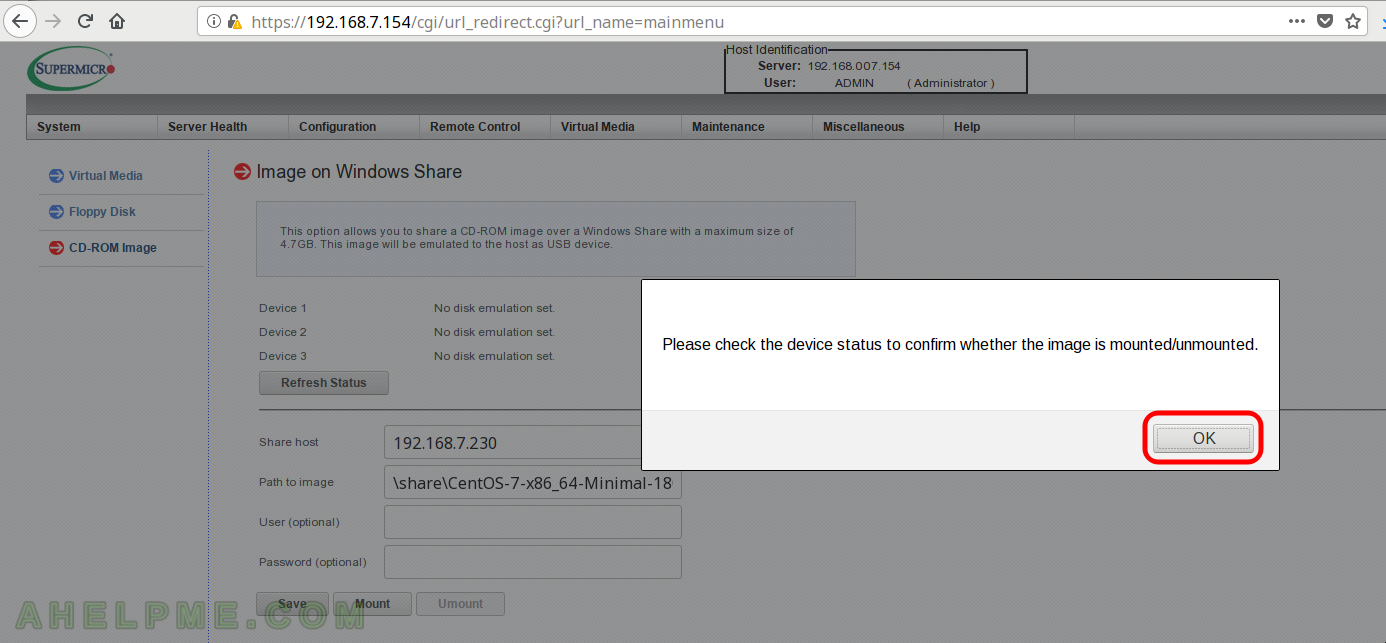
STEP 3.4) This dialog is always shown no matter there is such share or not: “Please check the device status to confirm whether the image is mounted/unmounted.”
STEP 3.5) If the Supermicro IPMI accessed successfully the share resource it would mount it (load the ISO file as s CD in the virtual CD-ROM).
If not the three Device 1,2,3 will show the same: “No disk emulation set.”, which means the samba share is not accessible, check the permissions for the file and the firewall first (and the logs files, too).
* Troubleshooting
– if you click on button “Save” and just nothing happen – no dialog for successful saving and no dialog at all, probably there is a Javascript error, try to open the web interface from a different browser with clean history or click ctrl+F5 when loading the Virtual Media page! More in Cannot save and mount a Supermicro IPMI Virtual media mount – javascript error?
Hi,
This tip is very useful and helped me a lot. Only an additional information, the semanage tool wasn’t installed in the server, so I ran the command “yum provides /usr/sbin/semanage” and checked it’s provide by core python utilities, so I ran “yum -y install policycoreutils-python”, and I could continue the steps with sucess.
Thank you very much for share.
Hi,
yes you need policycoreutils-python for semanage and I added it to the tutorial above.
Thank you for the note.
Hi,
Try to do it on centos8 and it didnt work for me.
Can you please let me know if there are more special step?
Hi, Try to do it on centos8 and it didnt work for me. Can you please let me know if there are more special step?
Thanks for this. I am having a little trouble. My share is available -I accessed the ISO from a Chromebook.
As you state – browser can be an issue. Firefox from my Linux laptop failed. Chromium was good. There were no javascript errors from Firefox.
The Supermicro IPMI still seems to use SMB protocol version 1 which is disabled by most modern samba servers. Try adding “server min protocol = NT1” to the “[global]” section of your /etc/samba/smb.conf. That fixed it for us.
Thanks Torsten, great hint!
I had this same issue with FREENAS, had to turn on SMB1 protocol for it to work.
Amazing tip! I had to enable the older protocol when sharing from Ubuntu 20.04. I was so frustrated it wasn’t working before trying this! Thank you!
You rock it @Torsten. Your tip helped me.
Years later, your post is still saving folk like me! Thanks
Thank you from me as well!
I would like to mention that you have to allow your SAMBA server in IP Access list too. It took me a while to realise that.
THANK YOU! I could not find the right set of options which would work with Supermicro.
Hi,
Try to do it on centos8 and it didnt work for me.
Can you please let me know if there are more special step?