Technical details of a default CentOS 6.10 minimal installation

This article is for those of you who do not want to install a whole new operating system only to discover some technical details about the default installation like, disk layout, packages included, software versions and so on. Here we are going to review in several sections what is like to have a default installation of CentOS 6.10.
Despite the old kernel, as you can see branch 2.6.x (2.6.32) it detects successfully the new RYZEN/Threadripper AMD and the system is stable (though we could not boot in UEFI mode!).

Software

The CentOS 6.10 you can have

  • Xorg X server – 1.17.4
  • GNOME (the GUI) – 2.28.2
  • K Desktop Environment – Workspace 4.3.4
  • linux kernel – 2.6.32 (2.6.32-754.el6)
  • linux-firmware – no version, multiple packages for the drivers
  • QT – 4.6.2
  • libc – 2.12
  • gnu gcc – 4.4.7
  • coreutils – 8.4
  • yum – 3.2.29
  • cups – 1.4.2
  • MySQL server – 5.1.73
  • PHP – 5.3.3
  • python – 2.6.6
  • perl – 5.10.1
  • ruby – 1.8.7.374
  • OpenJDK – 1.8.0.191.b12 and also includes 1.6.0.41 and 1.7.0.191

Note: Not all of the above software comes installed by default.
Installed packages are 268 occupying 717M space:

[root@srv ~]# yum list installed|wc -l
268
[root@srv ~]# df -h /
Filesystem            Size  Used Avail Use% Mounted on
/dev/mapper/vg_srv-lv_root
                       50G  717M   46G   2% /

Keep on reading!

How to compile xmr-stak (2.5) under CentOS 6 for CPU mining cryptocurrencies in November 2018

In continuing our crypto series with xmr-stak we update the old article How to compile xmr-stak (2.4.5) under CentOS 7 for CPU mining cryptocurrencies with the new version 2.5 and tested the build procedure with the old CentOS 6.

In crypto mining it is important to have latest version of the mining software, because crypto world is super dynamic with thousands crypto currency and tens of algos, which ever month might be changed and updated!

Thanks to xmr-stak we can have one application capable of mining many different cryptocurrencies based on different algorithms. XMR-STAK is GPU and CPU miner, here we present only the CPU ability. Here are the steps you should do to install (in fact install dependencies and compile the miner) and to begin CPU mining:

STEP 1) Update your system and install the following dependencies

Because xmr-stak need a newer version of GNU GCC than the CentOS ships with you must install GNU GCC 5.1 at least. Because the latest versions have better optimizations for the processors we use here GNU GCC 7 from Software Collection repository – more information for this repository here: How to install new gcc and development tools under CentOS 7

[root@srv ~]# yum update -y
[root@srv ~]# yum install -y centos-release-scl epel-release
[root@srv ~]# yum install -y cmake3 devtoolset-7-gcc* hwloc-devel libmicrohttpd-devel openssl openssl-devel make git screen

STEP 2) Compile the mining program xmr-stak

[root@srv ~]# scl enable devtoolset-7 bash
[root@srv ~]# git clone https://github.com/fireice-uk/xmr-stak.git
Initialized empty Git repository in /root/xmr-stak/.git/
remote: Enumerating objects: 1, done.
remote: Counting objects: 100% (1/1), done.
remote: Total 6002 (delta 0), reused 1 (delta 0), pack-reused 6001
Receiving objects: 100% (6002/6002), 1.86 MiB | 1.02 MiB/s, done.
Resolving deltas: 100% (4283/4283), done.
[root@srv ~]# mkdir xmr-stak/build
[root@srv ~]# cd xmr-stak/build
[root@srv build]# export CFLAGS="-O2 -march=native -msse3 -fomit-frame-pointer -pipe"
[root@srv build]# export CHOST="x86_64-pc-linux-gnu"
[root@srv build]# export CXXFLAGS="${CFLAGS}"
[root@srv build]# export LDFLAGS="-Wl,-O1"
[root@srv build]# cmake3 .. -DCUDA_ENABLE=OFF -DOpenCL_ENABLE=OFF
-- The C compiler identification is GNU 7.3.1
-- The CXX compiler identification is GNU 7.3.1
-- Check for working C compiler: /opt/rh/devtoolset-7/root/usr/bin/cc
-- Check for working C compiler: /opt/rh/devtoolset-7/root/usr/bin/cc -- works
-- Detecting C compiler ABI info
-- Detecting C compiler ABI info - done
-- Detecting C compile features
-- Detecting C compile features - done
-- Check for working CXX compiler: /opt/rh/devtoolset-7/root/usr/bin/c++
-- Check for working CXX compiler: /opt/rh/devtoolset-7/root/usr/bin/c++ -- works
-- Detecting CXX compiler ABI info
-- Detecting CXX compiler ABI info - done
-- Detecting CXX compile features
-- Detecting CXX compile features - done
-- Looking for pthread.h
-- Looking for pthread.h - found
-- Looking for pthread_create
-- Looking for pthread_create - not found
-- Looking for pthread_create in pthreads
-- Looking for pthread_create in pthreads - not found
-- Looking for pthread_create in pthread
-- Looking for pthread_create in pthread - found
-- Found Threads: TRUE  
-- Found OpenSSL: /usr/lib64/libssl.so;/usr/lib64/libcrypto.so (found version "1.0.1e") 
-- The ASM compiler identification is GNU
-- Found assembler: /opt/rh/devtoolset-7/root/usr/bin/cc
-- Configuring done
-- Generating done
-- Build files have been written to: /root/xmr-stak/build
[root@srv build]# make -j 8
Scanning dependencies of target xmr-stak-asm
[  3%] Building ASM object CMakeFiles/xmr-stak-asm.dir/xmrstak/backend/cpu/crypto/asm/cryptonight_v8_main_loop.S.o
[  6%] Linking C static library bin/libxmr-stak-asm.a
[  6%] Built target xmr-stak-asm
Scanning dependencies of target xmr-stak-c
[ 10%] Building C object CMakeFiles/xmr-stak-c.dir/xmrstak/backend/cpu/crypto/c_blake256.c.o
[ 13%] Building C object CMakeFiles/xmr-stak-c.dir/xmrstak/backend/cpu/crypto/c_jh.c.o
[ 20%] Building C object CMakeFiles/xmr-stak-c.dir/xmrstak/backend/cpu/crypto/c_keccak.c.o
[ 20%] Building C object CMakeFiles/xmr-stak-c.dir/xmrstak/backend/cpu/crypto/c_groestl.c.o
[ 24%] Building C object CMakeFiles/xmr-stak-c.dir/xmrstak/backend/cpu/crypto/c_skein.c.o
[ 27%] Linking C static library bin/libxmr-stak-c.a
[ 27%] Built target xmr-stak-c
Scanning dependencies of target xmr-stak-backend
[ 34%] Building CXX object CMakeFiles/xmr-stak-backend.dir/xmrstak/jconf.cpp.o
[ 34%] Building CXX object CMakeFiles/xmr-stak-backend.dir/xmrstak/backend/cpu/cpuType.cpp.o
[ 37%] Building CXX object CMakeFiles/xmr-stak-backend.dir/xmrstak/backend/cpu/jconf.cpp.o
[ 44%] Building CXX object CMakeFiles/xmr-stak-backend.dir/xmrstak/version.cpp.o
[ 44%] Building CXX object CMakeFiles/xmr-stak-backend.dir/xmrstak/backend/cpu/hwlocMemory.cpp.o
[ 55%] Building CXX object CMakeFiles/xmr-stak-backend.dir/xmrstak/backend/cpu/minethd.cpp.o
[ 55%] Building CXX object CMakeFiles/xmr-stak-backend.dir/xmrstak/backend/backendConnector.cpp.o
[ 55%] Building CXX object CMakeFiles/xmr-stak-backend.dir/xmrstak/backend/globalStates.cpp.o
[ 58%] Building CXX object CMakeFiles/xmr-stak-backend.dir/xmrstak/backend/cpu/crypto/cryptonight_common.cpp.o
[ 62%] Building CXX object CMakeFiles/xmr-stak-backend.dir/xmrstak/http/httpd.cpp.o
[ 65%] Building CXX object CMakeFiles/xmr-stak-backend.dir/xmrstak/http/webdesign.cpp.o
[ 68%] Building CXX object CMakeFiles/xmr-stak-backend.dir/xmrstak/misc/console.cpp.o
[ 72%] Building CXX object CMakeFiles/xmr-stak-backend.dir/xmrstak/misc/executor.cpp.o
[ 75%] Building CXX object CMakeFiles/xmr-stak-backend.dir/xmrstak/misc/telemetry.cpp.o
[ 79%] Building CXX object CMakeFiles/xmr-stak-backend.dir/xmrstak/misc/uac.cpp.o
[ 82%] Building CXX object CMakeFiles/xmr-stak-backend.dir/xmrstak/misc/utility.cpp.o
[ 86%] Building CXX object CMakeFiles/xmr-stak-backend.dir/xmrstak/net/jpsock.cpp.o
[ 89%] Building CXX object CMakeFiles/xmr-stak-backend.dir/xmrstak/net/socket.cpp.o
[ 93%] Linking CXX static library bin/libxmr-stak-backend.a
[ 93%] Built target xmr-stak-backend
Scanning dependencies of target xmr-stak
[ 96%] Building CXX object CMakeFiles/xmr-stak.dir/xmrstak/cli/cli-miner.cpp.o
[100%] Linking CXX executable bin/xmr-stak
[100%] Built target xmr-stak

Execute the program to see if everything is OK. With the help output you can see how many algorithms are supported as of version 2.5 of xmr-stak:

[root@srv build]# cd bin
[root@srv bin]# ./xmr-stak --help
Usage: xmr-stak [OPTION]...
 
  -h, --help                 show this help
  -v, --version              show version number
  -V, --version-long         show long version number
  -c, --config FILE          common miner configuration file
  -C, --poolconf FILE        pool configuration file
  --benchmark BLOCKVERSION   ONLY do a benchmark and exit
  --benchwait WAIT_SEC             ... benchmark wait time
  --benchwork WORK_SEC             ... benchmark work time
  --noCPU                    disable the CPU miner backend
  --cpu FILE                 CPU backend miner config file
  -i --httpd HTTP_PORT       HTTP interface port
 
The following options can be used for automatic start without a guided config,
If config exists then this pool will be top priority.
  -o, --url URL              pool url and port, e.g. pool.usxmrpool.com:3333
  -O, --tls-url URL          TLS pool url and port, e.g. pool.usxmrpool.com:10443
  -u, --user USERNAME        pool user name or wallet address
  -r, --rigid RIGID          rig identifier for pool-side statistics (needs pool support)
  -p, --pass PASSWD          pool password, in the most cases x or empty ""
  --use-nicehash             the pool should run in nicehash mode
  --currency NAME            currency to mine

Supported coin options: 
        - aeon7
        - bbscoin
        - bittube
        - cryptonight
        - cryptonight_bittube2
        - cryptonight_masari
        - cryptonight_haven
        - cryptonight_heavy
        - cryptonight_lite
        - cryptonight_lite_v7
        - cryptonight_lite_v7_xor
        - cryptonight_v7
        - cryptonight_v8
        - cryptonight_v7_stellite
        - graft
        - haven
        - intense
        - masari
        - monero
        - qrl
        - ryo
        - stellite
        - turtlecoin

Version: xmr-stak 2.5.2 752fd1e
Brought to by fireice_uk and psychocrypt under GPLv3.

systemd service freezes in activating (start-post) status – mysqld or other services

We’ve experienced this with the MySQL server under CentOS 7, but you can have this state with other services!
After updating our MySQL we tried to start it up, but the service got this strange state after “systemctl start” returned:

[root@mysql2 ~]# systemctl start mysqld
Job for mysqld.service failed because a timeout was exceeded. See "systemctl status mysqld.service" and "journalctl -xe" for details.

The timeout is big it’s something like 5 to 10 minutes and so it is typical (do not do it!) to type “ctrl+c” and you end up without this message and a strange state of the mysql:

[root@mysql2 ~]# systemctl status mysqld
● mysqld.service - MySQL Community Server
   Loaded: loaded (/usr/lib/systemd/system/mysqld.service; enabled; vendor preset: disabled)
   Active: activating (start-post) since Fri 2018-11-09 09:00:55 UTC; 6min ago
  Process: 8333 ExecStart=/usr/bin/mysqld_safe --basedir=/usr (code=exited, status=0/SUCCESS)
  Process: 8321 ExecStartPre=/usr/bin/mysql-systemd-start pre (code=exited, status=0/SUCCESS)
 Main PID: 8333 (code=exited, status=0/SUCCESS);         : 8334 (mysql-systemd-s)
   CGroup: /user.slice/user-0.slice/session-2395.scope/system.slice/mysqld.service
           └─control
             ├─ 8334 /bin/bash /usr/bin/mysql-systemd-start post
             └─10152 sleep 1

Nov 09 09:00:55 mysql2.mytv.bg systemd[1]: Starting MySQL Community Server...
Nov 09 09:00:56 mysql2.mytv.bg mysqld_safe[8333]: 181109 09:00:56 mysqld_safe Logging to '/var/log/mysqld.log'.
Nov 09 09:00:56 mysql2.mytv.bg mysqld_safe[8333]: 181109 09:00:56 mysqld_safe Starting mysqld daemon with databases from /var/lib/mysql

Meanwhile with “pstree”:

[root@mysql2 ~]# pstree
systemd─┬─agetty
        ├─crond
        ├─dbus-daemon
        ├─mysql-systemd-s───sleep
        ├─rsyslogd───2*[{rsyslogd}]
        ├─sshd─┬─sshd───bash───systemctl─┬─systemctl
        │      │                         └─systemd-tty-ask
        │      └─sshd───bash───pstree
        ├─systemd-journal
        └─systemd-logind

So as you can see no mysqld process! Apparently systemctl had tried to start MySQL server process and it failed.
So the first thing to do was to check the MySQL logs. In our case it was a obsolete option in my.cnf:

2018-11-09 09:10:57 11384 [ERROR] /usr/sbin/mysqld: unknown variable 'default-character-set=utf8'
2018-11-09 09:10:57 11384 [ERROR] Aborting

The interesting part is that

the service got “Active: activating (start-post)” and when you fix the problem you cannot “systemctl start mysqld” it just start to wait for the current timeout.

In fact this state means “I’m trying to start the service…” and it is in an endless loop to start the service and if you the service has a big start timeout like 5-10 minutes you must wait for the next iteration of the loop to start the service successfully (if you fixed the problem!). And if you want not to wait you must execute first stop to the service and then start – you’ll not wait for any timeout and you can check immediately if the service was started successfully:

[root@mysql2 ~]# systemctl status mysqld
● mysqld.service - MySQL Community Server
   Loaded: loaded (/usr/lib/systemd/system/mysqld.service; enabled; vendor preset: disabled)
   Active: activating (start-post) since Fri 2018-11-09 09:20:56 UTC; 2min 50s ago
  Process: 13208 ExecStart=/usr/bin/mysqld_safe --basedir=/usr (code=exited, status=0/SUCCESS)
  Process: 13196 ExecStartPre=/usr/bin/mysql-systemd-start pre (code=exited, status=0/SUCCESS)
 Main PID: 13208 (code=exited, status=0/SUCCESS);         : 13209 (mysql-systemd-s)
   CGroup: /user.slice/user-0.slice/session-2395.scope/system.slice/mysqld.service
           └─control
             ├─13209 /bin/bash /usr/bin/mysql-systemd-start post
             └─14357 sleep 1

Nov 09 09:20:56 mysql2.mytv.bg systemd[1]: Starting MySQL Community Server...
Nov 09 09:20:56 mysql2.mytv.bg mysqld_safe[13208]: 181109 09:20:56 mysqld_safe Logging to '/var/log/mysqld.log'.
Nov 09 09:20:56 mysql2.mytv.bg mysqld_safe[13208]: 181109 09:20:56 mysqld_safe Starting mysqld daemon with databases from /var/lib/mysql
[root@mysql2 ~]# systemctl start mysqld
Job for mysqld.service failed because a timeout was exceeded. See "systemctl status mysqld.service" and "journalctl -xe" for details.
[root@mysql2 ~]# systemctl status mysqld
● mysqld.service - MySQL Community Server
   Loaded: loaded (/usr/lib/systemd/system/mysqld.service; enabled; vendor preset: disabled)
   Active: active (running) since Fri 2018-11-09 09:30:59 UTC; 2s ago
  Process: 15656 ExecStartPost=/usr/bin/mysql-systemd-start post (code=exited, status=0/SUCCESS)
  Process: 15643 ExecStartPre=/usr/bin/mysql-systemd-start pre (code=exited, status=0/SUCCESS)
 Main PID: 15655 (mysqld_safe)
   CGroup: /user.slice/user-0.slice/session-2395.scope/system.slice/mysqld.service
           ├─15655 /bin/sh /usr/bin/mysqld_safe --basedir=/usr
           └─16243 /usr/sbin/mysqld --basedir=/usr --datadir=/var/lib/mysql --plugin-dir=/usr/lib64/mysql/plugin --log-error=/var/log/mysqld.log --open-files-limit=10000...

Nov 09 09:30:56 mysql2.mytv.bg systemd[1]: Starting MySQL Community Server...
Nov 09 09:30:57 mysql2.mytv.bg mysqld_safe[15655]: 181109 09:30:57 mysqld_safe Logging to '/var/log/mysqld.log'.
Nov 09 09:30:57 mysql2.mytv.bg mysqld_safe[15655]: 181109 09:30:57 mysqld_safe Starting mysqld daemon with databases from /var/lib/mysql
Nov 09 09:30:59 mysql2.mytv.bg systemd[1]: Started MySQL Community Server.

As you can see we even received error again that the service cannot be started and immediately after that the service status is in normal “active (running)” state! And we waited for around 10 minutes! You can see the times in the logs above.
So to summarize it up:

If you have a service in “activating (start-post)” the service cannot be started because of an error, check and fix the problem and then issue “stop and start”:

[root@mysql2 ~]# systemctl start mysqld
Job for mysqld.service failed because a timeout was exceeded. See "systemctl status mysqld.service" and "journalctl -xe" for details.
[root@mysql2 ~]# systemctl status mysqld
● mysqld.service - MySQL Community Server
   Loaded: loaded (/usr/lib/systemd/system/mysqld.service; enabled; vendor preset: disabled)
   Active: activating (start-post) since Fri 2018-11-09 10:05:20 UTC; 2min 17s ago
  Process: 23601 ExecStart=/usr/bin/mysqld_safe --basedir=/usr (code=exited, status=0/SUCCESS)
  Process: 23589 ExecStartPre=/usr/bin/mysql-systemd-start pre (code=exited, status=0/SUCCESS)
 Main PID: 23601 (code=exited, status=0/SUCCESS);         : 23602 (mysql-systemd-s)
   CGroup: /user.slice/user-0.slice/session-2395.scope/system.slice/mysqld.service
           └─control
             ├─23602 /bin/bash /usr/bin/mysql-systemd-start post
             └─24646 sleep 1

Nov 09 10:05:20 mysql2.mytv.bg systemd[1]: Starting MySQL Community Server...
Nov 09 10:05:21 mysql2.mytv.bg mysqld_safe[23601]: 181109 10:05:21 mysqld_safe Logging to '/var/log/mysqld.log'.
Nov 09 10:05:21 mysql2.mytv.bg mysqld_safe[23601]: 181109 10:05:21 mysqld_safe Starting mysqld daemon with databases from /var/lib/mysql
[root@mysql2 ~]# systemctl stop mysqld
[root@mysql2 ~]# systemctl status mysqld
● mysqld.service - MySQL Community Server
   Loaded: loaded (/usr/lib/systemd/system/mysqld.service; enabled; vendor preset: disabled)
   Active: inactive (dead) since Fri 2018-11-09 10:07:52 UTC; 4s ago
  Process: 23602 ExecStartPost=/usr/bin/mysql-systemd-start post (code=killed, signal=TERM)
  Process: 23601 ExecStart=/usr/bin/mysqld_safe --basedir=/usr (code=exited, status=0/SUCCESS)
  Process: 23589 ExecStartPre=/usr/bin/mysql-systemd-start pre (code=exited, status=0/SUCCESS)
 Main PID: 23601 (code=exited, status=0/SUCCESS)

Nov 09 10:05:20 mysql2.mytv.bg systemd[1]: Starting MySQL Community Server...
Nov 09 10:05:21 mysql2.mytv.bg mysqld_safe[23601]: 181109 10:05:21 mysqld_safe Logging to '/var/log/mysqld.log'.
Nov 09 10:05:21 mysql2.mytv.bg mysqld_safe[23601]: 181109 10:05:21 mysqld_safe Starting mysqld daemon with databases from /var/lib/mysql
Nov 09 10:07:52 mysql2.mytv.bg systemd[1]: Stopped MySQL Community Server.
[root@mysql2 ~]# systemctl start mysqld
[root@mysql2 ~]# systemctl status mysqld
● mysqld.service - MySQL Community Server
   Loaded: loaded (/usr/lib/systemd/system/mysqld.service; enabled; vendor preset: disabled)
   Active: active (running) since Fri 2018-11-09 10:08:06 UTC; 3s ago
  Process: 24711 ExecStartPost=/usr/bin/mysql-systemd-start post (code=exited, status=0/SUCCESS)
  Process: 24698 ExecStartPre=/usr/bin/mysql-systemd-start pre (code=exited, status=0/SUCCESS)
 Main PID: 24710 (mysqld_safe)
   CGroup: /user.slice/user-0.slice/session-2395.scope/system.slice/mysqld.service
           ├─24710 /bin/sh /usr/bin/mysqld_safe --basedir=/usr
           └─25298 /usr/sbin/mysqld --basedir=/usr --datadir=/var/lib/mysql --plugin-dir=/usr/lib64/mysql/plugin --log-error=/var/log/mysqld.log --open-files-limit=10000...

Nov 09 10:08:04 mysql2.mytv.bg systemd[1]: Starting MySQL Community Server...
Nov 09 10:08:04 mysql2.mytv.bg mysqld_safe[24710]: 181109 10:08:04 mysqld_safe Logging to '/var/log/mysqld.log'.
Nov 09 10:08:04 mysql2.mytv.bg mysqld_safe[24710]: 181109 10:08:04 mysqld_safe Starting mysqld daemon with databases from /var/lib/mysql
Nov 09 10:08:06 mysql2.mytv.bg systemd[1]: Started MySQL Community Server.

Technical details of a default Fedora 29 Workstation installation

This article is for those of you who do not want to install a how new operating system only to discover some technical details about the default installation like, disk layout, packages included, software versions and so on. Here we are going to review in several sections what is like to have a default installation of Fedora Workstation 29.

Software

The Fedora 29 Workstation you can have

  • Xorg X server – 1.20.1
  • GNOME (the GUI) – 3.30.1
  • linux kernel – 4.18.16
  • linux-firmware – 20180913 (87.git44d4fca9.fc29)
  • QT – 5.11.1
  • libc – 2.28
  • gnu gcc – 8.2.1 / installed by default
  • coreutils – 8.30
  • dnf – 4.0.4
  • cups – 2.2.8
  • MySQL server – 8.0.12
  • PHP – 7.2.11
  • Go Lang – 1.11
  • python2.7 – 2.7.15
  • python3 (default) – 3.7.0 / installed by default
  • perl – 5.28.0 / installed by default
  • ruby – 2.5.1
  • OpenJDK – “11-ea” 2018-09-25 / installed by default

Note: Not all of the above software comes installed by default.
Installed packages are 1613 occupying 5.9G space:

[root@localhost ~]# dnf list installed|wc -l
1613
[root@localhost ~]# df -h /
Filesystem               Size  Used Avail Use% Mounted on
/dev/mapper/fedora-root   49G  5.9G   41G  13% /

Keep on reading!

Review of freshly installed Fedora 29 Workstation (Gnome GUI)

After the tutorial of Install Fedora Workstation 29 (Gnome GUI) this tutorial is mainly to see what to expect from a freshly installed Fedora 27 Workstation – the look and feel of the GUI (Gnome – version 3.30).

  • Xorg X server – 1.20.1
  • GNOME (the GUI) – 3.30.1
  • linux kernel – 4.18.16

The idea of this tutorial is just to see what to expect from Fedora 29 Workstation (Gnome)the look and feel of the GUI, the default installed programs and their look and how to do some basic steps with them. Here you’ll find more than 110 screenshots and not so many text we do not want to turn this review of many text and version information and 3 meaningless screenshot, which you cannot see anything for the user interface, which these days is the primary goal of a Desktop system. You can expect more of this kind reviews in the future…
You can find similar article for Fedora Workstation 27 – Review of freshly installed Fedora 27 Workstation (Gnome GUI).
And for all installation and review tutorials we use real workstations not virtual environments!

SCREENSHOT 1)

main menu
Keep on reading!

Install Fedora Workstation 29 (Gnome GUI)

This tutorial will show you the simple steps of installing a modern Linux Distribution like Fedora 29 Workstation with Gnome for the user graphical interface. First we present the basic steps for installing the Operating system in addition to your present operating systems (here we have two: Windows 10 and Ubuntu 16) and then you can see some screenshots of the installed system and the look and feel of it. We have another tutorials showing more screenshots of the installed and working Fedora 29 (Gnome and KDE plasma) – so you can decide which of them to try first – coming soon.

The Fedora 29 Workstation comes with

  • Xorg X server – 1.20.1
  • GNOME (the GUI) – 3.30.1
  • linux kernel – 4.18.16

Check out our article about what software is included in Fedora 29 Workstation

The installation process is very similar to the old Fedora Workstation 27 and Fedora Workstation 28, in fact the main difference is the creation of an user, which the setup is not responsible anymore, the creation of an user is done by the first boot after installation. Our system was pretty new – Asus X399 with AMD Ryzen Threadripper 1950X and NVIDIA 1080 Ti and the setup loaded successfully and there were no problems till the end.

We used the following ISO for the installation process:

https://download.fedoraproject.org/pub/fedora/linux/releases/29/Workstation/x86_64/iso/Fedora-Workstation-Live-x86_64-29-1.2.iso

It is a LIVE image so you can try it before installing. The easiest way is just to download the image and burn it to a DVD disk and then follow the installation below:

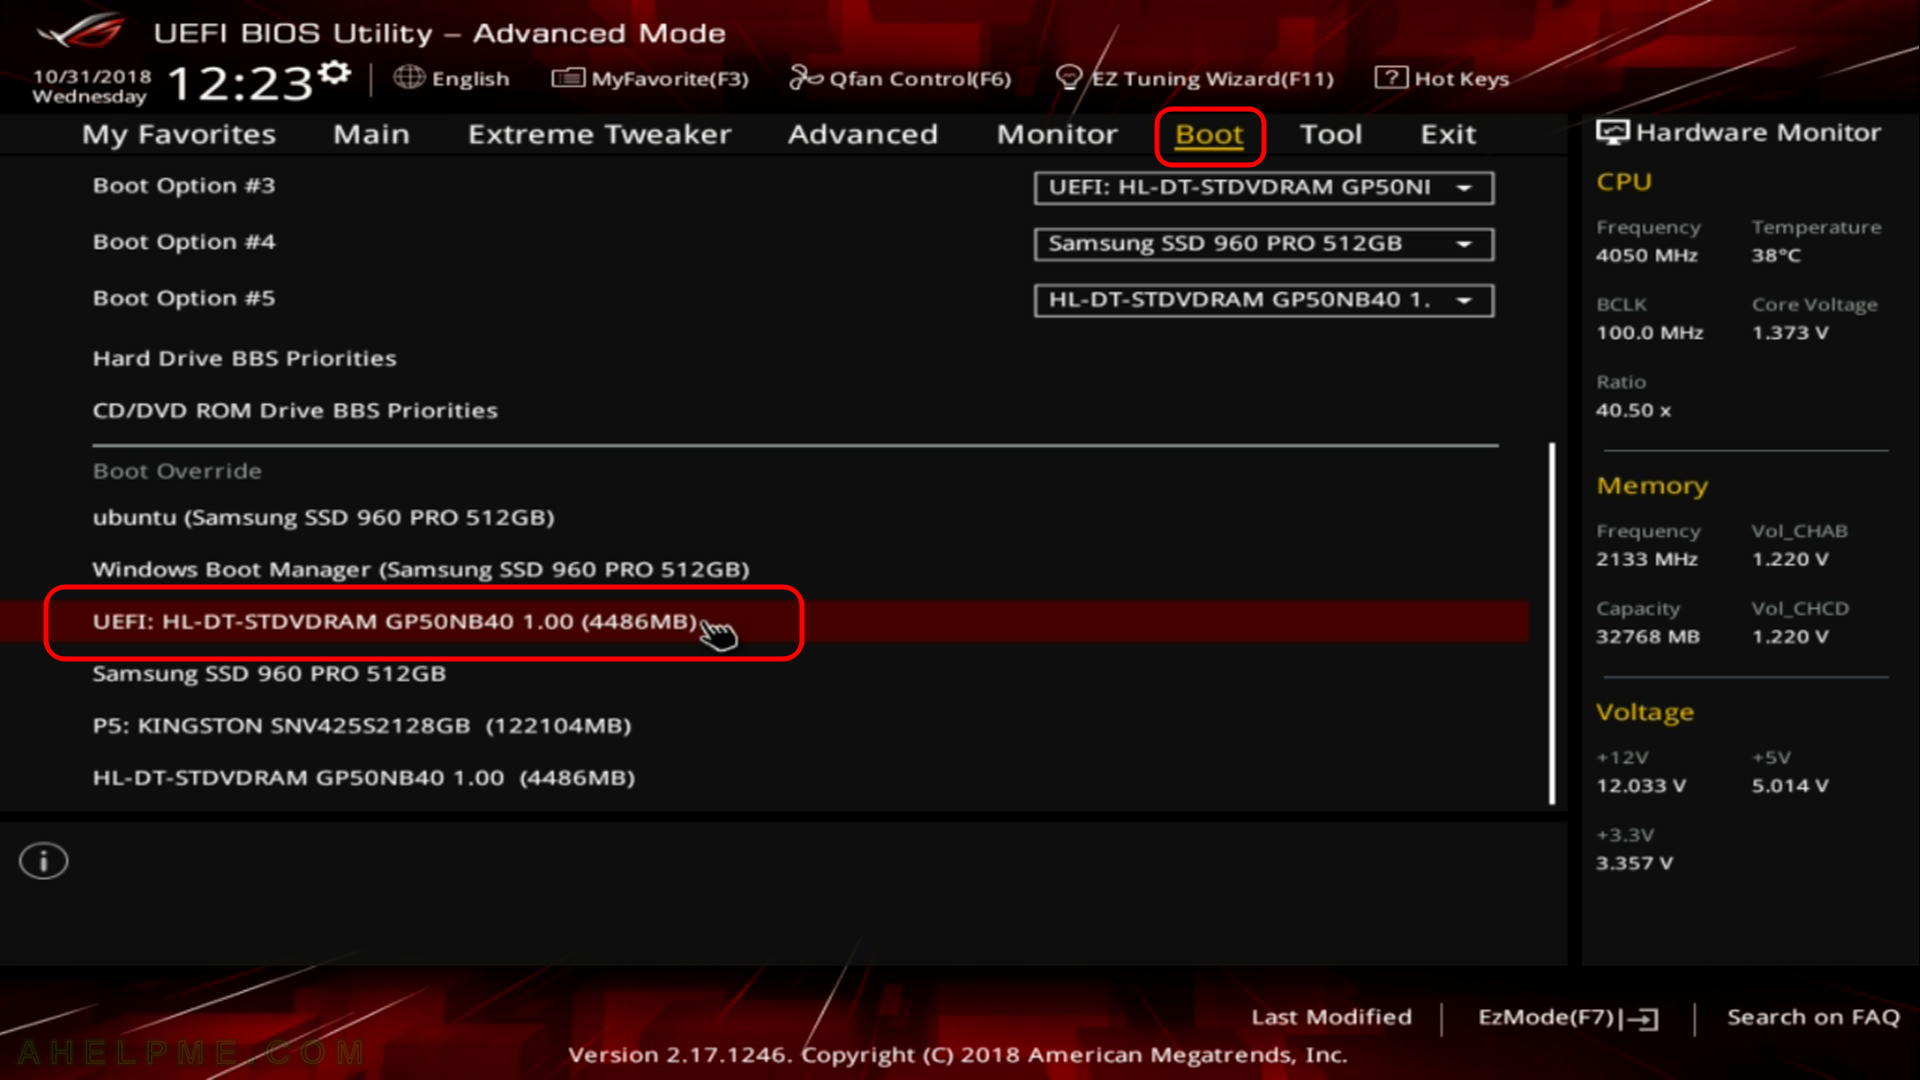
STEP 1) Here is our “UEFI BIOS->Boot->Boot Override” and in most modern motherboard you can choose to override the default boot devices.

Choose the “UEFI: HL-DT-STDVDRAM…” to boot and install Fedora Workstation 29 with UEFI support. You should do this, because most of the new hardware like video cards would not work properly without beeing in UEFI mode.

main menu
Boot from DVD/USB Installation

Keep on reading!

Start GUI program on the remote machine using your local display through ssh

This article is probably not only for absolute beginners, so many Linux guys do not know they can just execute a GUI program on their remote machine but the output of the graphics to be drawn in the local display, it’s like your local display is connected to the remote computer through the network. And you do not need any special software like VNC Client/Server, TeamViewer – all you need is the OpenSSH package you probably have when managing a remote machine. And it is absolutely secure because all the communication is performed within ssh.
Suppose you have a machine, which has some GUI capabilities (you know if we speak for servers, not all servers need the GUI, but in some cases we need it) and you want to execute a graphical program on the remote.
Here is how you can login to be sure you can execute the program remotely:

ssh -o ForwardX11=yes -o ForwardAgent=yes -o ForwardX11Trusted=yes [USER]@[IP]

And you can also execute a remote command with the ssh:

ssh -o ForwardX11=yes -o ForwardAgent=yes -o ForwardX11Trusted=yes myuser@192.168.0.245 'virtualbox'

This command will execute virtualbox on your remote machine with login myuser@192.168.0.245 and the output the display on your local machine.

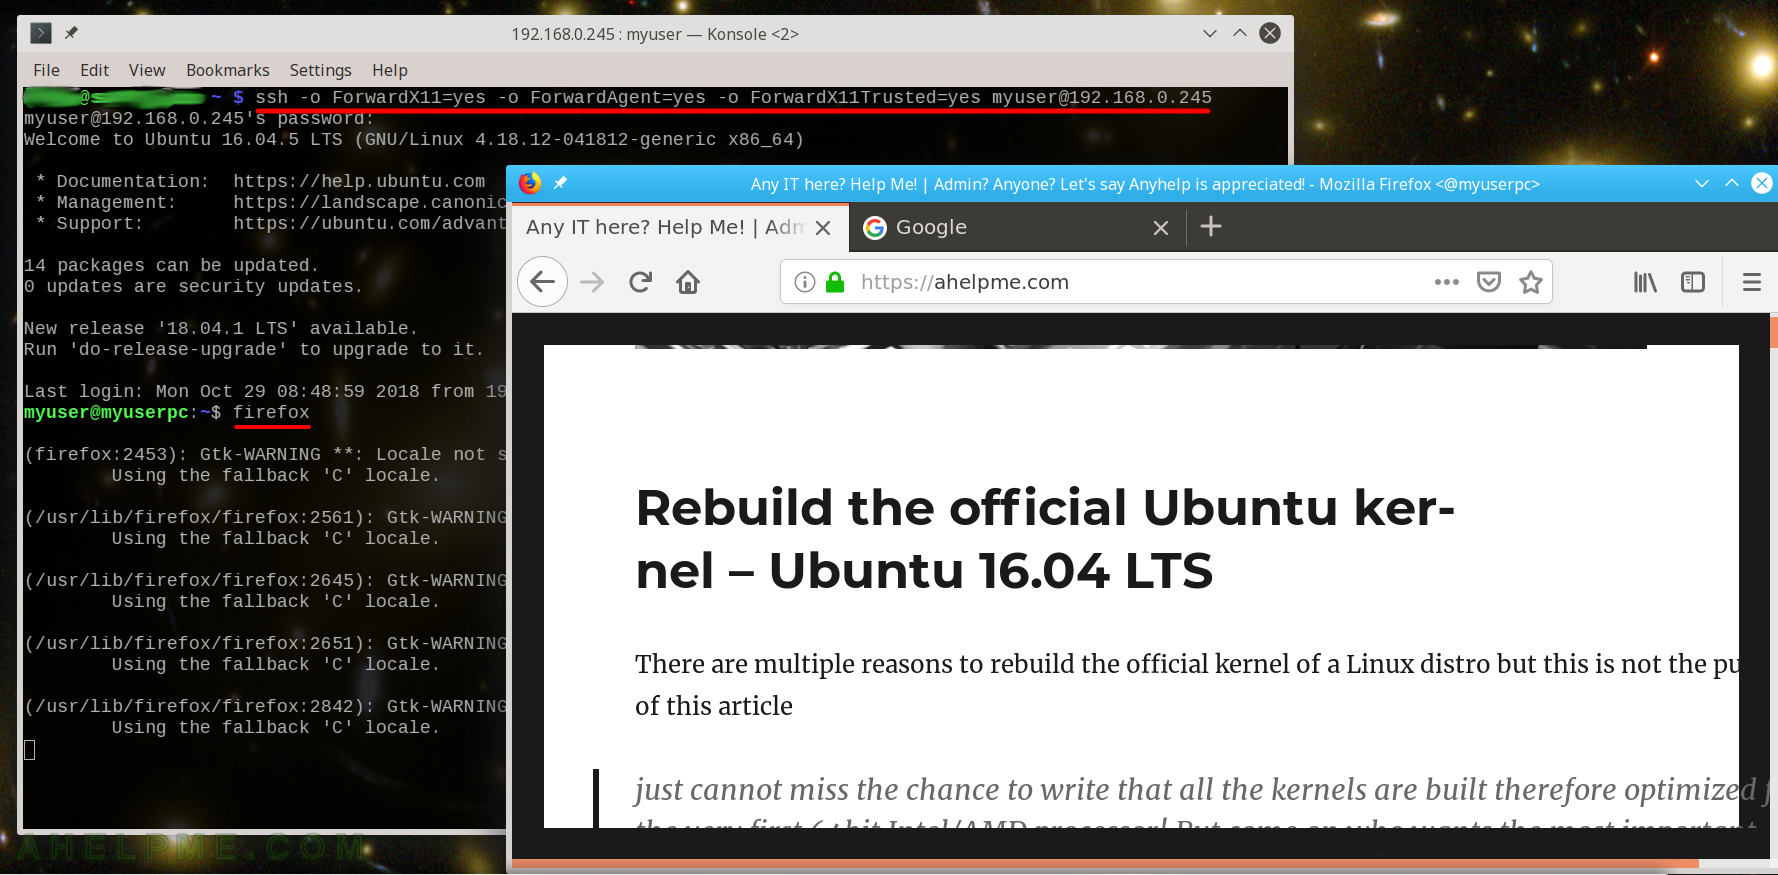
Here are some examples. Gentoo Desktop using KDE with konsole get to the remote machine on our local network 198.160.245:

SCREENSHOT 1) Login in your remote machine and there type firefox. The firefox will be executed on the remote machine, but the graphics will be output on your local display.

main menu
Remote execute Firefox through ssh

Keep on reading!

Rebuild the official Ubuntu kernel – Ubuntu 16.04 LTS

There are multiple reasons to rebuild the official kernel of a Linux distro but this is not the purpose of this article

just cannot miss the chance to write that all the kernels are built therefore optimized for the very first 64bit Intel/AMD processor! But come on who wants the most important piece of software to be optimized not for his new and expensive processor but for one released 15 years ago???

. Here we are going to show you how to recompile the latest official Ubuntu kernel of Ubuntu 16.04 LTS – the one, which comes with the apt packages system, because this kernel comes with the latest and greatest patches of the Ubuntu team. You should not confuse this howto with the one, which compile a vanilla kernel or the mainline kernel from http://kernel.ubuntu.com/~kernel-ppa/mainline/. So if you want a new kernel or the latest from kernel.org this is the right tutorial for Ubuntu – Build your own kernel under Ubuntu using mainline (latest) kernel. The official latest kernel in the Ubuntu repository is not always the latest one from kernel.org, but you can be sure it is probably most secure one, because there are additional modifications, configurations and tests by the team. Here you can see what versions of the kernel are the officials in Ubuntu: https://wiki.ubuntu.com/Kernel/Support

Keep on reading!

List all kernels available to install under Ubuntu

Here is the fast command to see which Linux kernels are available to install from the Ubuntu package management system:

apt update
apt list linux-*image-*

Always update to download the latest metadata files for the available packages and the list with a pattern. In our case we want the Ubuntu kernels and they start with “linux-“, before it was easy linux-image-*, but now there are two types of kernels:

  1. Signed Linux kernel with name starting “linux-signed-image-” (and alias is “linux-image-“) – “Signed with the Ubuntu EFI key”, which means you should have UEFI BIOS and unsigned (with two words – “more security”)
  2. Good old kernel format (so no signing) with name starting “linux-image-unsigned-” – to be sure you pull the unsigned version

And you can use:

apt search linux-*image-*

to see the kernels available and their descriptions.
Keep on reading!

PHP module compilation error – libtool: Version mismatch error

If you happen to get this error trying to build your own a PHP module (probably, because you need a newer version than the included one in the disto you use and because it is fairly easy):

libtool: Version mismatch error.  This is libtool 2.4.6, but the
libtool: definition of this LT_INIT comes from an older release.
libtool: You should recreate aclocal.m4 with macros from libtool 2.4.6
libtool: and run autoconf again.
make: *** [Makefile:181: geoip.lo] Error 63

Here is what you can do to recreate the configuration files for the build process:

phpize
aclocal
libtoolize --force
autoheader
autoconf
./configure
make

This sequence of commands (probably without the phpize, because it is PHP specific) could save you in similar situations with similar error in other source code not related to PHP.
Keep on reading!