gentoo emerge resume – Invalid resume list and clean the list

Under Gentoo and emerge it will eventually end up using “–resume” paired with “–skipfirst” emerge command, which should resume last list of packages to build without the first one. Each execution of emerge command should reset the list but apparently it might not be the case (in fact two lists are kept – resume and resume_backup, read below).
The command just reads a list of packages and emerges them – it’s fast and it does not go through the whole process of dependancy check! But sometimes the list could be old or get corrupted or it just throws errors for “Invalid resume list“:

dekstop ~ # emerge --resume --skipfirst

These are the packages that would be merged, in order:

Calculating dependencies... done!
 * Invalid resume list:
 * 
 *   ('ebuild', '/', 'kde-frameworks/kpty-5.66.0', 'merge')
 *   ('ebuild', '/', 'kde-plasma/libkscreen-5.17.5', 'merge')
 *   ('ebuild', '/', 'kde-apps/kmbox-19.12.1', 'merge')
 *   ('ebuild', '/', 'kde-frameworks/kdesignerplugin-5.66.0', 'merge')
 *   ('ebuild', '/', 'kde-plasma/kwayland-integration-5.17.5', 'merge')
 *   ('ebuild', '/', 'kde-plasma/xembed-sni-proxy-5.17.5', 'merge')
 *   ('ebuild', '/', 'net-libs/accounts-qml-0.7-r1', 'merge')
 *   ('ebuild', '/', 'kde-apps/akonadi-notes-19.12.1', 'merge')
....
....
 * One or more packages are either masked or have missing dependencies:
 * 
 *   dev-lang/python:3.4[xml(+)] pulled in by:
 *     (dev-python/setuptools-40.6.2:0/0::gentoo, installed)
 * 
 *   dev-lang/python:3.5[xml(+)] pulled in by:
 *     (dev-python/setuptools-40.6.2:0/0::gentoo, installed)
 * 
 *   dev-lang/python:3.4 pulled in by:
 *     (dev-python/certifi-2018.8.24:0/0::gentoo, installed)
 * 
 *   dev-lang/python:3.5 pulled in by:
 *     (dev-python/certifi-2018.8.24:0/0::gentoo, installed)
 * 
 *   dev-libs/openssl:0/0= pulled in by:
 *     (dev-lang/python-2.7.17-r1:2.7/2.7::gentoo, installed)
 * 
 *   dev-lang/python:3.5 pulled in by:
 *     (dev-util/glib-utils-2.56.2:0/0::gentoo, installed)
 * 
 *   dev-lang/python:3.4 pulled in by:
 *     (sys-apps/file-5.35:0/0::gentoo, installed)
 * 
 *   dev-lang/python:3.5 pulled in by:
 *     (sys-apps/file-5.35:0/0::gentoo, installed)
 * 
 *   >=dev-libs/icu-58.1:0/60.2= pulled in by:
 *     (dev-lang/spidermonkey-52.9.1_pre1:52/52::gentoo, installed)
....
....
 *   dev-lang/python:3.4 pulled in by:
 *     (virtual/python-enum34-1:0/0::gentoo, installed)
 * 
 *   dev-lang/python:3.5 pulled in by:
 *     (virtual/python-enum34-1:0/0::gentoo, installed)
 * 
 *   dev-libs/openssl:0/0= pulled in by:
 *     (dev-lang/python-3.7.6:3.7/3.7m::gentoo, installed)
 * 
 * The resume list contains packages that are either masked or have
 * unsatisfied dependencies. Please restart/continue the operation
 * manually, or use --skipfirst to skip the first package in the list and
 * any other packages that may be masked or have missing dependencies.

Not all packages are included above, but it is clear that the list includes packages not only from the last emerge command. The list includes multiple old packages and dependencies about python:3.4, python:3.5, openssl:0/0.
The list is located in the binary file: /var/cache/edb/mtimedb and to clean the list you should execute:

desktop ~ # emaint --fix cleanresume
Emaint: fix cleanresume    100% [============================================>]

It is safe to the directory, too:

rm -Rf /var/cache/edb/

emaint is part of the sys-apps/portage package, so the program should always be available in the system.

*Bonus 1 – old packages

There is one more problem in the above example! In fact, you may clear the resume list with emaint or remove the whole directory “/var/cache/edb”, but still to receive such errors let’s say resuming log lists like KDE, gnome, qt packages (packages with many dependencies).

This problem persists not only with “–resume”, but also with “–keep-going” option!

When using “–keep-going” option you’ll get the same errors after the line “One or more packages are either masked or have missing dependencies”. So it is not an option, which may replace the “–resume” option.

Even all dependencies were resolved when the emerge list was generated when resuming a list of packages may throw errors for packages, which pull old packages because they had not been rebuilt against the updated of some of their dependencies. For example, simple enough from the above emerge resume command:
Some packages of our KDE resume list depends on the “dev-python/setuptools”, which has not been rebuilt against the new python (or after a removed old version python 3.4 and 3.5 or even another [old] package depends on the old python 3.5 and dev-python/setuptools, which has not been rebuilt after the python 3.4/3.5 removal!) and now this is a problem to resume the emerge list.

The solution is to take all those packages (after the line “One or more packages are either masked or have missing dependencies”) and rebuild or remove them.

Keep on reading!

meson.build – ERROR: Dependency “x11” not found, tried pkgconfig and cmake

Another day and another major update exposed an error of missing the “x11” library. Apparently, the pkg-config got corrupted for X11 library. Most of the time the error is self-explanatory, but sometimes it is too generic like:

Run-time dependency x11 found: NO (tried pkgconfig and cmake)

meson.build:412:2: ERROR: Dependency "x11" not found, tried pkgconfig and cmake

The name “x11” is a part of multiple libraries:

srv ~ # pkg-config --list-all |grep x11

gdkglext-1.0                               GdkGLExt - OpenGL Extension to GDK (x11 target)
gdk-2.0                                    GDK - GTK+ Drawing Kit (x11 target)
gtk+-2.0                                   GTK+ - GTK+ Graphical UI Library (x11 target)
gdkglext-x11-1.0                           GdkGLExt - OpenGL Extension to GDK (x11 target)
x11-xcb                                    X11 XCB - X Library XCB interface
gdk-x11-3.0                                GDK - GTK+ Drawing Kit
gdk-x11-2.0                                GDK - GTK+ Drawing Kit (x11 target)
gtkglext-1.0                               GtkGLExt - OpenGL Extension to GTK+ (x11 target)
x11                                        X11 - X Library
xkbcommon-x11                              xkbcommon-x11 - XKB API common to servers and clients - X11 support
scim-x11utils                              scim-x11utils - X11 Utilities for Smart Common Input Method platform
clutter-x11-1.0                            Clutter - Clutter Core Library
gtk+-x11-3.0                               GTK+ - GTK+ Graphical UI Library
libva-x11                                  libva-x11 - Userspace Video Acceleration (VA) x11 interface
gtkglext-x11-1.0                           GtkGLExt - OpenGL Extension to GTK+ (x11 target)
gtk+-x11-2.0                               GTK+ - GTK+ Graphical UI Library (x11 target)

The above example is of working x11 library pkg-config. In our broken system the 10th line was missing.
Keep on reading!

simple squid proxy with http authorization

Squid (caching) proxy has been used on the Internet for ages. The first release of Squid was back in the mid-90s!
Here is how you may use Squid as a proxy HTTP server with user and password authorization (it is easy to enable the caching, but we do not include such configuration). Our system is CentOS 7, but the configuration part is platform-independent, so just install it in your Linux distribution and use our configuration lines.

STEP 1) Install Squid

The instalation under CentOS 7

yum install squid

STEP 2) Squid configuration to use it as web caching proxy.

The configuration file is located in “/etc/squid/squid.conf” and you should add at the begging the following lines:

#MY ADITIONAL CONFIG
visible_hostname srvname
auth_param basic program /usr/lib64/squid/basic_ncsa_auth /etc/squid/pass.squid
acl ncsa_users proxy_auth REQUIRED
http_access allow ncsa_users
auth_param basic program /usr/lib64/squid/basic_ncsa_auth /etc/squid/pass.squid

Keep on reading!

rsync daemon in CentOS 8

Apparently, the team behind the CentOS 8 decided to split the rsync functionality to two packages – one for the client-side and for the server-side, despite the binary rsync is only one and offers the client-size and server-side.
So there two packages in CentOS 8:

  1. rsync – provides the client-side and server-side as usual
  2. rsync-daemon – provides configuration example file and the systemd to start it as a service.

So if you wonder where is your rsync service after installing the rsync package under CentOS 8 you must install additional package “rsync-daemon”.

Of course, you may just create anywhere “rsyncd.conf” (the best place for the configuration file is in /etc, but could be placed anywhere with “–config=PATH/FILE” option) file and start the daemon as usual with “–daemon” option included to have the rsync server-side up and running.

rsync --daemon --config=/etc/rsyncd.conf

Just create yourself the configuration “/etc/rsyncd.conf” file.

Install the rsync program – the client and the daemon

dnf install rsync

Install the configuration and systemd files

dnf install rsync-daemon

rsync and rsync-daemon files

The files included in the two packages:

[root@srv ~]# dnf repoquery -l rsync-daemon
Last metadata expiration check: 0:33:02 ago on Wed 22 Jan 2020 02:57:06 PM UTC.
/etc/rsyncd.conf
/etc/sysconfig/rsyncd
/usr/lib/systemd/system/rsyncd.service
/usr/lib/systemd/system/rsyncd.socket
/usr/lib/systemd/system/rsyncd@.service
/usr/share/man/man5/rsyncd.conf.5.gz
[root@srv ~]# dnf repoquery -l rsync
Last metadata expiration check: 0:33:06 ago on Wed 22 Jan 2020 02:57:06 PM UTC.
/usr/bin/rsync
/usr/lib/.build-id
/usr/lib/.build-id/6e
/usr/lib/.build-id/6e/bdbf5032a966a6293cea003621ba766ab36ff1
/usr/share/doc/rsync
/usr/share/doc/rsync/NEWS
/usr/share/doc/rsync/OLDNEWS
/usr/share/doc/rsync/README
/usr/share/doc/rsync/support
/usr/share/doc/rsync/support/Makefile
/usr/share/doc/rsync/support/atomic-rsync
/usr/share/doc/rsync/support/cvs2includes
/usr/share/doc/rsync/support/deny-rsync
/usr/share/doc/rsync/support/file-attr-restore
/usr/share/doc/rsync/support/files-to-excludes
/usr/share/doc/rsync/support/git-set-file-times
/usr/share/doc/rsync/support/instant-rsyncd
/usr/share/doc/rsync/support/logfilter
/usr/share/doc/rsync/support/lsh
/usr/share/doc/rsync/support/lsh.sh
/usr/share/doc/rsync/support/mapfrom
/usr/share/doc/rsync/support/mapto
/usr/share/doc/rsync/support/mnt-excl
/usr/share/doc/rsync/support/munge-symlinks
/usr/share/doc/rsync/support/rrsync
/usr/share/doc/rsync/support/rsync-no-vanished
/usr/share/doc/rsync/support/rsync-slash-strip
/usr/share/doc/rsync/support/rsyncstats
/usr/share/doc/rsync/support/savetransfer.c
/usr/share/doc/rsync/tech_report.tex
/usr/share/licenses/rsync
/usr/share/licenses/rsync/COPYING
/usr/share/man/man1/rsync.1.gz

libselinux – undefined reference to pcre_version

Emerging the “sys-libs/libselinux-2.9-r1” failed with this link errors of undefined references

/usr/lib/gcc/x86_64-pc-linux-gnu/8.3.0/../../../../x86_64-pc-linux-gnu/bin/ld: regex.lo: in function `regex_version':
regex.c:(.text+0x30): undefined reference to `pcre_version'
/usr/lib/gcc/x86_64-pc-linux-gnu/8.3.0/../../../../x86_64-pc-linux-gnu/bin/ld: regex.lo: in function `regex_writef':
regex.c:(.text+0x95): undefined reference to `pcre_fullinfo'
/usr/lib/gcc/x86_64-pc-linux-gnu/8.3.0/../../../../x86_64-pc-linux-gnu/bin/ld: regex.c:(.text+0xf6): undefined reference to `pcre_fullinfo'
/usr/lib/gcc/x86_64-pc-linux-gnu/8.3.0/../../../../x86_64-pc-linux-gnu/bin/ld: regex.lo: in function `regex_data_free':
regex.c:(.text+0x1eb): undefined reference to `pcre_free'
/usr/lib/gcc/x86_64-pc-linux-gnu/8.3.0/../../../../x86_64-pc-linux-gnu/bin/ld: regex.c:(.text+0x200): undefined reference to `pcre_free_study'
/usr/lib/gcc/x86_64-pc-linux-gnu/8.3.0/../../../../x86_64-pc-linux-gnu/bin/ld: regex.lo: in function `regex_prepare_data':
regex.c:(.text+0x26d): undefined reference to `pcre_compile'
/usr/lib/gcc/x86_64-pc-linux-gnu/8.3.0/../../../../x86_64-pc-linux-gnu/bin/ld: regex.c:(.text+0x28f): undefined reference to `pcre_study'
/usr/lib/gcc/x86_64-pc-linux-gnu/8.3.0/../../../../x86_64-pc-linux-gnu/bin/ld: regex.lo: in function `regex_load_mmap':
regex.c:(.text+0x385): undefined reference to `pcre_fullinfo'
/usr/lib/gcc/x86_64-pc-linux-gnu/8.3.0/../../../../x86_64-pc-linux-gnu/bin/ld: regex.c:(.text+0x3ed): undefined reference to `pcre_fullinfo'
/usr/lib/gcc/x86_64-pc-linux-gnu/8.3.0/../../../../x86_64-pc-linux-gnu/bin/ld: regex.lo: in function `regex_match':
regex.c:(.text+0x494): undefined reference to `pcre_exec'
/usr/lib/gcc/x86_64-pc-linux-gnu/8.3.0/../../../../x86_64-pc-linux-gnu/bin/ld: regex.lo: in function `regex_cmp':
regex.c:(.text+0x502): undefined reference to `pcre_fullinfo'
/usr/lib/gcc/x86_64-pc-linux-gnu/8.3.0/../../../../x86_64-pc-linux-gnu/bin/ld: regex.c:(.text+0x51a): undefined reference to `pcre_fullinfo'
collect2: error: ld returned 1 exit status
make[1]: *** [Makefile:148: libselinux.so.1] Error 1
make[1]: *** Waiting for unfinished jobs....
make[1]: Leaving directory '/var/tmp/portage/sys-libs/libselinux-2.9-r1/work/libselinux-2.9-abi_x86_32.x86/src'
make: *** [Makefile:44: all] Error 1
 * ERROR: sys-libs/libselinux-2.9-r1::gentoo failed (compile phase):
 *   emake failed
 *
 * If you need support, post the output of `emerge --info '=sys-libs/libselinux-2.9-r1::gentoo'`,
 * the complete build log and the output of `emerge -pqv '=sys-libs/libselinux-2.9-r1::gentoo'`.
 * The complete build log is located at '/var/tmp/portage/sys-libs/libselinux-2.9-r1/temp/build.log'.
 * The ebuild environment file is located at '/var/tmp/portage/sys-libs/libselinux-2.9-r1/temp/environment'.
 * Working directory: '/var/tmp/portage/sys-libs/libselinux-2.9-r1/work/libselinux-2.9-abi_x86_32.x86'
 * S: '/var/tmp/portage/sys-libs/libselinux-2.9-r1/work/libselinux-2.9'

>>> Failed to emerge sys-libs/libselinux-2.9-r1, Log file:

>>>  '/var/tmp/portage/sys-libs/libselinux-2.9-r1/temp/build.log'

 * Messages for package sys-libs/libselinux-2.9-r1:

 * ERROR: sys-libs/libselinux-2.9-r1::gentoo failed (compile phase):
 *   emake failed
 *
 * If you need support, post the output of `emerge --info '=sys-libs/libselinux-2.9-r1::gentoo'`,
 * the complete build log and the output of `emerge -pqv '=sys-libs/libselinux-2.9-r1::gentoo'`.
 * The complete build log is located at '/var/tmp/portage/sys-libs/libselinux-2.9-r1/temp/build.log'.
 * The ebuild environment file is located at '/var/tmp/portage/sys-libs/libselinux-2.9-r1/temp/environment'.
 * Working directory: '/var/tmp/portage/sys-libs/libselinux-2.9-r1/work/libselinux-2.9-abi_x86_32.x86'
 * S: '/var/tmp/portage/sys-libs/libselinux-2.9-r1/work/libselinux-2.9'

The solution was to rebuild the dev-libs/libpcre and dev-libs/libpcre2 libraries.

emerge -va dev-libs/libpcre dev-libs/libpcre2

These are the packages that would be merged, in order:

Calculating dependencies... done!
[ebuild     U  ] dev-libs/libpcre-8.43:3::gentoo [8.42:3::gentoo] USE="bzip2 cxx jit pcre16 readline recursion-limit (split-usr%*) (static-libs) (unicode) zlib -libedit -pcre32" ABI_X86="32 (64) (-x32)" 1540 KiB
[ebuild     U  ] dev-libs/libpcre2-10.34::gentoo [10.32::gentoo] USE="bzip2 jit pcre16 pcre32* readline recursion-limit (split-usr%*) unicode zlib -libedit -static-libs" ABI_X86="32 (64) (-x32)" 1676 KiB

Total: 2 packages (2 upgrades), Size of downloads: 3216 KiB

if you encounter the error above even you are not using Gentoo probably the problem is your libpcre/libpcre2 library and try to rebuild it or include the proper path to the library and its headers.

Mirror the official Ubuntu repositories using aptly

This article is to show mainly how to work with aptly by mirroring an official Ubuntu mirror. If you want to know how to install and a brief description of what is aptly you may want to read our previous article – Install aptly under Ubuntu 18 LTS with Nginx serving the packages and the first steps

What we are going to do – this is what you need to have a mirror of an external application repository:

  1. Install aptly in Ubuntu 18 LTS
  2. Create a mirror in aptly
  3. Create a snapshot of the mirror created before
  4. Publish the snapshot to be used in other servers.

and at the last step there is an example how to use the mirror in your local machines.

STEP 1) Install aptly in Ubuntu 18.04 LTS.

As mentioned already you may follow our article on the subject – Install aptly under Ubuntu 18 LTS with Nginx serving the packages and the first steps. The following steps are based on this installation!
The aptly home directory is in “/srv/aptly”. We use the “aptly” user and change to it to manipulate the aptly installation.

STEP 2) Create a mirror in aptly.

Prepare the keys (aptly needs to have the Ubuntu keys in its trustedkeys keyring):

aptly@srv:~$ gpg --no-default-keyring --keyring /usr/share/keyrings/ubuntu-archive-keyring.gpg --export | gpg --no-default-keyring --keyring trustedkeys.gpg --import
gpg: key 3B4FE6ACC0B21F32: 3 signatures not checked due to missing keys
gpg: key 3B4FE6ACC0B21F32: public key "Ubuntu Archive Automatic Signing Key (2012) <ftpmaster@ubuntu.com>" imported
gpg: key D94AA3F0EFE21092: 3 signatures not checked due to missing keys
gpg: key D94AA3F0EFE21092: public key "Ubuntu CD Image Automatic Signing Key (2012) <cdimage@ubuntu.com>" imported
gpg: key 871920D1991BC93C: 1 signature not checked due to a missing key
gpg: key 871920D1991BC93C: public key "Ubuntu Archive Automatic Signing Key (2018) <ftpmaster@ubuntu.com>" imported
gpg: Total number processed: 3
gpg:               imported: 3
gpg: public key of ultimately trusted key 212A3D20E4D3351D not found
gpg: marginals needed: 3  completes needed: 1  trust model: pgp
gpg: depth: 0  valid:   1  signed:   0  trust: 0-, 0q, 0n, 0m, 0f, 1u

Probably you would like to have “main” and “universe” for the three bionic, bionic updates and bionic security.
First, main and universe for bionic repository. main is ~16G and universe is ~136, these numbers will vary in future when more packages are added.
Two commands are need for the aptly mirror:

  1. create – create the mirror.
  2. update – download the repository contents locally.

Keep on reading!

nginx and proxy_cache not growing cache despite max_size is bigger – shared memory zone to blame

One of our big Nginx cache servers has recently been upgraded to have 70T storage, which is pretty good storage for a proxy. And in a hurry to configure the big storage we changed only the “max_size” option of proxy_cache_path directive! After a week in production, the proxy reached 23T and it just stopped growing with no apparent reason! Space and Nginx max_size were OK 75T total space and 70T for the proxy cache, but no Nginx had not added more space after reaching 23T occupied space for two days, which was impossible because all files were kept for 5 years and 200G per day were generated. No errors in the logs and we even use “virtual host traffic status module” – Live status information like used space and more for nginx proxy cache, but still no clue why it did not grow above this threshold of 23T! And it began to remove cached objects!

proxy_cache_path /mnt/cache levels=1:2 keys_zone=STATIC:900m inactive=42600h max_size=70000g;

It appeared we exhausted the shared memory zone limit for the zone! And Nginx cache just stopped growing.

According to the Nginx manual “One megabyte (of shared memory zone), a zone can store about 8 thousand keys“. Apparently, after 23T of files, we have passed 7 200 000 keys and exhausted the limit we configured in the proxy_cache_path line!

The solution is really simple just increase the limit for the shared memory zone for the zone.

proxy_cache_path /mnt/cache levels=1:2 keys_zone=STATIC:4000m inactive=42600h max_size=70000g;

In the past, with small cache (15T) it was enough to have 900Mbytes for the cache’s shared memory. Now we set it to 4000 Mbytes to be able to store approximately 32 000 000 keys. We have 23T and 900M of shared memory for keys (for our setup, your setup may differ a lot!!!) and setting it to 4000M, which is more than 4 times bigger than before it will probably be enough for the rest free storage to be used at full extent.
Be careful this operation will trigger the “Nginx cache loader” to load the cache index and may produce IO during this operation!

Nginx shared memory zone size

Nginx workers use shared mappings – mmap, which is different from the SYSV and POSIX shared memory (so you cannot use ipcs tool to check for shared memory). You should check how many memory currently the process is using. Here is how you can get the size of the shared memory zone occupied by the Nginx processes and as you can see each Nginx worker is around 900M of column “RSS” (Resident Set Size):

[root@srv ~]# ps -o rss,pid,comm,user,cmd -C nginx
  RSS   PID COMMAND         USER     CMD
904888 3979 nginx           nginx    nginx: worker process
905116 3980 nginx           nginx    nginx: worker process
904828 3981 nginx           nginx    nginx: worker process
905176 3982 nginx           nginx    nginx: worker process
905196 3983 nginx           nginx    nginx: worker process
905008 3984 nginx           nginx    nginx: worker process
904908 3985 nginx           nginx    nginx: worker process
905372 3986 nginx           nginx    nginx: worker process
905088 3987 nginx           nginx    nginx: worker process
902688 3988 nginx           nginx    nginx: worker process
904932 3989 nginx           nginx    nginx: worker process
905032 3990 nginx           nginx    nginx: worker process
26452  3991 nginx           nginx    nginx: cache manager process
33928  8148 nginx           root     nginx: master process /usr/sbin/nginx -c /etc/nginx/nginx.conf

For a single Nginx process:

[root@srv ~]# cat /proc/3981/status |grep RssShmem
RssShmem:         894240 kB

You can check the occupied inodes of your file system with df to get approximately how many files you have:

[root@srv ~]# df -i
Filesystem         Inodes   IUsed      IFree IUse% Mounted on
devtmpfs         16452656     715   16451941   1% /dev
tmpfs            16455999       1   16455998   1% /dev/shm
tmpfs            16455999    1153   16454846   1% /run
tmpfs            16455999      17   16455982   1% /sys/fs/cgroup
/dev/md1          2076704   39687    2037017   2% /
/dev/md3       1214685184 6897020 1207788164   1% /mnt/cache
tmpfs            16455999       5   16455994   1% /run/user/0

inodes around 6 897 020 and not growing for days. This number is very close to the maximum keys, which 900M key shared memory zone may store!

Two days after changing the key shared memory zone limit to 4000Mbytes:

proxy_cache_path /mnt/cache levels=1:2 keys_zone=STATIC:4000m inactive=42600h max_size=70000g;

The Nginx workers passed 900Mbytes RSS (Resident Set Size) and it reached 1Gbyte. The occupied cached sized grew with 1T and continued to grow.

[root@srv ~]# ps -o rss,pid,comm,user,cmd -C nginx
  RSS   PID COMMAND         USER     CMD
52256  8148 nginx           root     nginx: master process /usr/sbin/nginx -c /etc/nginx/nginx.conf
1005624 16899 nginx         nginx    nginx: worker process
1005948 16900 nginx         nginx    nginx: worker process
1005936 16901 nginx         nginx    nginx: worker process
1005912 16902 nginx         nginx    nginx: worker process
1005832 16903 nginx         nginx    nginx: worker process
1005836 16904 nginx         nginx    nginx: worker process
1005868 16905 nginx         nginx    nginx: worker process
1005932 16906 nginx         nginx    nginx: worker process
1005796 16907 nginx         nginx    nginx: worker process
1005980 16908 nginx         nginx    nginx: worker process
1005848 16909 nginx         nginx    nginx: worker process
1005888 16910 nginx         nginx    nginx: worker process
26328 16911 nginx           nginx    nginx: cache manager process

The occupied inodes also increased to 7 484 291, which means the cache added around 700 000 new files.

[root@srv ~]# df -i
Filesystem         Inodes   IUsed      IFree IUse% Mounted on
devtmpfs         16452656     715   16451941    1% /dev
tmpfs            16455999       1   16455998    1% /dev/shm
tmpfs            16455999    1153   16454846    1% /run
tmpfs            16455999      17   16455982    1% /sys/fs/cgroup
/dev/md1          2076704   39690    2037014    2% /
/dev/md3       1214685184 7484582 1207200602    1% /mnt/cache
tmpfs            16455999       5   16455994    1% /run/user/0

KDE Plasma windows force resize – iKVM virtual keyboard

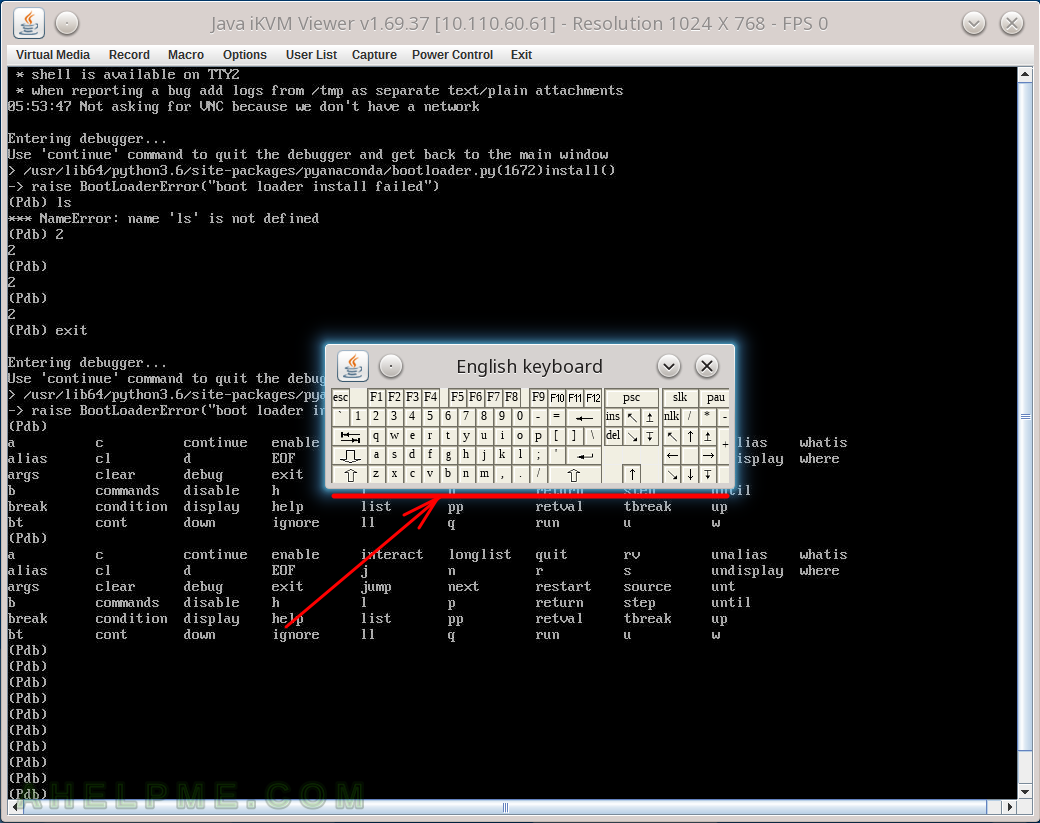
If you happen to use KDE Plasma these days and you encounter view problems like you cannot see the whole viewpoint of a window (especially JAVA/GTK based programs?).

KDE Plasma Desktop offers the ability to force a window to expand to new dimensions.

STEP 1) The Java-based iKVM program window has a handful virtual keyboard.

It could be used to “click on” specific key combinations, which otherwise could be caught by your system. But in sometimes the virtual keyboad window is trimmed and you lose some important keys like Ctrl, Alt, Space, arrow keys and more (the last line of buttons).

main menu
iKVM virtual keyboard trimmed keys

Keep on reading!

Review of freshly installed Fedora 31 KDE Plasma Desktop (KDE GUI)

After the tutorial of Install Fedora 31 KDE Plasma Desktop this tutorial is mainly to see what to expect from a freshly installed Fedora 31 KDE Plasma Desktop – the look and feel of the new KDE GUI (version 5.13.5 of KDE Plasma).
Here you can find how to Install Fedora 31 KDE Plasma Desktop (KDE GUI). Here it worth mentioning the included versions of KDE software for Fedora 31:
The Fedora 29 KDE Plasma Desktop comes with

  • KDE Plasma version: 5.16.5
  • KDE Frameworks version: 5.61.0
  • QT version: 5.12.5

The idea of this tutorial is just to see what to expect from Fedora 31 KDE Plasma – the look and feel of the GUI, the default installed programs and their look and how to do some basic steps with them, it is included also screenshots of the KDE settings program. Here you’ll find more than 200 screenshots and not so many texts we do not want to turn this review of many texts and version information and 3 meaningless screenshots, which you could not see anything for the user interface because these days it is the primary goal of a Desktop system. You can expect more of this kind of review in the future.
It may be interesting to compare with the Fedora 29 review – Review of freshly installed Fedora 29 KDE Plasma Desktop (KDE GUI)

SCREENSHOT 1) Fedora (5.3.7-301.fc31.x86_64) 31 (Thirty One)

main menu
grub entry boot

Keep on reading!

Remove disk (all partitions) from software RAID1 with mdadm and change layout of the disk

The following article is to show how to remove healthy partitions from software RAID1 devices to change the layout of the disk and then add them back to the array.
The mdadm is the tool to manipulate the software RAID devices under Linux and it is part of all Linux distributions (some don’t install it by default so it may need to be installed).

Software RAID layout

[root@srv ~]# cat /proc/mdstat 
Personalities : [raid1] 
md125 : active raid1 sda4[1] sdb3[0]
      1047552 blocks super 1.2 [2/2] [UU]
      bitmap: 0/1 pages [0KB], 65536KB chunk

md126 : active raid1 sdb2[0] sda3[1]
      32867328 blocks super 1.2 [2/2] [UU]
      
md127 : active raid1 sda2[1] sdb1[0]
      52427776 blocks super 1.2 [2/2] [UU]
      bitmap: 0/1 pages [0KB], 65536KB chunk

unused devices: <none>

STEP 1) Make the partitions faulty.

The partitions cannot be removed if they are not faulty.

[root@srv ~]# mdadm --fail /dev/md125 /dev/sdb3
mdadm: set /dev/sdb3 faulty in /dev/md125
[root@srv ~]# mdadm --fail /dev/md126 /dev/sdb2
mdadm: set /dev/sdb2 faulty in /dev/md126
[root@srv ~]# mdadm --fail /dev/md127 /dev/sdb1
mdadm: set /dev/sdb1 faulty in /dev/md127

Keep on reading!