Copying partition table from one disk to another with older sfdisk under CentOS 7

Older version of sfdisk may still be used for msdos partition tables.
To copy the partition table from one disk to another using sfdisk a temporary file should be used to store the data for the partition table.

Here is an example of how to copy the msdos partition table from disk sda to disk sdb! Two simple commands

  1. Dump the source (sda) partition table to a temporary file.
  2. Redirect the standard input of the sfdisk utility with the above temporary file.

A copying partition table is really useful when recovering from a drive failure in a Linux software raid. Sometimes it is difficult or just easier to create the exact layout as the source mirror disk!

mdadm --add /dev/md1 /dev/sdb2
mdadm: /dev/sdb2 not large enough to join array

Errors such as the above are easily resolved with just two commands. The new versions of disk programs align the partitions, which may be a problem for a software RAID to join in a partition.

STEP 1) Dump the source partition table.

The source partition table is from /dev/sda:

[root@srv ~]# sfdisk -d /dev/sda > part_table_sda
sfdisk: Warning: extended partition does not start at a cylinder boundary.
DOS and Linux will interpret the contents differently.

There is a warning about not aligned partition, which may cause problems when creating from scratch, so copying the partition table is the best option in such cases.

Here is what the temporary file part_table_sda with the partition table information contains:

[root@srv ~]# cat part_table_sda 
# partition table of /dev/sda
unit: sectors

/dev/sda1 : start=     2048, size= 67045376, Id=fd, bootable
/dev/sda2 : start= 67110912, size=  1048576, Id=fd
/dev/sda3 : start= 68159488, size= 62883840, Id=fd
/dev/sda4 : start=131043328, size=845729792, Id= f
/dev/sda5 : start=131076096, size=845434880, Id=fd

Keep on reading!

rsync server under CentOS 8 with SELinux enabled

Here is a quick and useful tip on how to run a rsync daemon under CentOS 8 with SELinux in Enforcing mode.
There are three basic steps:

  1. rsync daemon installation and configuration.
  2. firewall configuration.
  3. SELinux configuration.

STEP 1) rsync daemon installation and configuration.

Under CentOS 8 rsync daemon files are in a separate rpm package rsync-daemon (more on the subject rsync daemon in CentOS 8):

[root@srv ~]# dnf install -y rsync-daemon
Last metadata expiration check: 2:45:48 ago on Thu Apr  7 07:40:42 2022.
Dependencies resolved.
==============================================================================================================
 Package                     Architecture          Version                        Repository             Size
==============================================================================================================
Installing:
 rsync-daemon                noarch                3.1.3-14.el8                   baseos                 43 k

Transaction Summary
==============================================================================================================
Install  1 Package

Total download size: 43 k
Installed size: 17 k
Downloading Packages:
rsync-daemon-3.1.3-14.el8.noarch.rpm                                           98 kB/s |  43 kB     00:00    
--------------------------------------------------------------------------------------------------------------
Total                                                                          81 kB/s |  43 kB     00:00     
Running transaction check
Transaction check succeeded.
Running transaction test
Transaction test succeeded.
Running transaction
  Preparing        :                                                                                      1/1 
  Installing       : rsync-daemon-3.1.3-14.el8.noarch                                                     1/1 
  Running scriptlet: rsync-daemon-3.1.3-14.el8.noarch                                                     1/1 
  Verifying        : rsync-daemon-3.1.3-14.el8.noarch                                                     1/1 

Installed:
  rsync-daemon-3.1.3-14.el8.noarch                                                                            

Complete!

Keep on reading!

Starting up standalone ClickHouse server with basic configuration in docker

ClickHouse is a powerful column-oriented database written in C, which generates analytical and statistical reports in real-time using SQL statements!

It supports on-the-fly compression of the data, cluster setup of replicas and shards instances over thousands of servers, and multi-master cluster modes.

The ClickHouse is an ideal instrument for weblogs and easy real-time generating reports of the weblogs! Or for storing the data of user behaviour and interactions with web sites or applications.
The easiest way to run a CLickHouse instance is within a docker/podman container. The docker hub hosts official containers image maintained by the ClickHouse developers.
And this article will show how to run a ClickHouse standalone server, how to manage the ClickHouse configuration features, and what obstacles the user may encounter.

Here are some key points:

  • Main server configuration file is config.xml (in /etc/clickhouse-server/config.xml) – all server’s settings like listening port, ports, logger, remote access, cluster setup (shards and replicas), system settings (time zone, umask, and more), monitoring, query logs, dictionaries, compressions and so on. Check out the server settings: https://clickhouse.com/docs/en/operations/server-configuration-parameters/settings/
  • The main user configuration file is users.xml (in /etc/clickhouse-server/users.xml), which specifies profiles, users, passwords, ACL, quotas, and so on. It also supports SQL-driven user configuration, check out the available settings and users’ options – https://clickhouse.com/docs/en/operations/settings/settings-users/
  • By default, there is a root user with administrative privileges without password, which could only connect to the server from the localhost.
  • Do not edit the main configuration file(s). Some options may get deprecated and removed and the modified configuration file to become incompatible with the new releases.
  • Every configuration setting could be overriden with configuration files in config.d/. A good practice is to have a configuration file per each setting, which overrides the default one in config.xml. For example:
    root@srv ~ # ls -al /etc/clickhouse-server/config.d/
    total 48
    drwxr-xr-x 2 root root 4096 Nov 22 04:40 .
    drwxr-xr-x 4 root root 4096 Nov 22 04:13 ..
    -rw-r--r-- 1 root root  343 Sep 16  2021 00-path.xml
    -rw-r--r-- 1 root root   58 Nov 22 04:40 01-listen.xml
    -rw-r--r-- 1 root root  145 Feb  3  2020 02-log_to_console.xml
    

    There are three configurations files, which override the default paths (00-path.xml), change the default listen setting (01-listen.xml), and log to console (02-log_to_console.xml). Here is what to expect in 00-path.xml

    <yandex>
        <path replace="replace">/mnt/storage/ClickHouse/var/</path>
        <tmp_path replace="replace">/mnt/storage/ClickHouse/tmp/</tmp_path>
        <user_files_path replace="replace">/mnt/storage/ClickHouse/var/user_files/</user_files_path>
        <format_schema_path replace="replace">/mnt/storage/ClickHouse/format_schemas/</format_schema_path>
    </yandex>
    

    So the default settings in config.xml path, tmp_path, user_files_path and format_schema_path will be replaced with the above values.
    To open the ClickHouse for the outer world, i.e. listen to 0.0.0.0 just include a configuration file like 01-listen.xml.

    <yandex>
        <listen_host>0.0.0.0</listen_host>
    </yandex>
    
  • When all additional (including user) configuration files are processed and the result is written in preprocessed_configs/ directory in var directory, for example /var/lib/clickhouse/preprocessed_configs/
  • The configuration directories are reloaded each 3600 seconds (by default, it could be changed) by the ClickHouse server and on a change in the configuration files new processed ones are generated and in most cases the changes are loaded on-the-fly. Still, there are settings, which require manual restart of the main process. Check out the manual for more details.
  • By default, the logger is in the trace log level, which may generate an enormous amount of logging data. So just change the settings to something more production meaningful like warning level (in config.d/04-part_log.xml).
    <yandex>
        <logger>
            <level>warning</level>
        </logger>
    </yandex>
    
  • ClickHouse default ports:
    • 8123 is the HTTP client port (8443 is the HTTPS). The client can connect with curl or wget or other command-line HTTP(S) clients to manage and insert data in databases and tables.
    • 9000 is the native TCP/IP client port (9440 is the TLS enabled port for this service) to manage and insert data in databases and tables.
    • 9004 is the MySQL protocol port. ClickHouse supports MySQL wire protocol and it can be enabled by the
      <yandex>
          <mysql_port>9004</mysql_port>
      </yandex>
      
    • 9009 is the port, which ClickHouse uses to exchange data between ClickHouse servers when using cluster setup and replicas/shards.
  • There is a flag directory, in which files with special names may instruct ClickHouse to process commands. For example, creating a blank file with the name: /var/lib/clickhouse/flags/force_restore_data will instruct the ClickHouse to begin a restore procedure for the server.
  • A good practice is to make backup of the whole configuration directory despite the main configuration file(s) are not changed and in original state.
  • The SQL commands, which are supported by CickHouse server: https://clickhouse.com/docs/en/sql-reference/ and https://clickhouse.com/docs/en/sql-reference/statements/
  • The basic and fundamental table type is MergeTree, which is designed for inserting a very large amount of data into a table – https://clickhouse.com/docs/en/engines/table-engines/mergetree-family/mergetree/
  • Bear in mind, ClickHouse supports SQL syntax and some of the SQL statements, but UPDATE and DELETE statements are not supported, just INSERTs! The main idea behind the ClickHouse is not to change the data, but to add only!
  • Batch INSERTs are the preferred way of inserting data! In fact, there is a recommendation of 1 INSERT per a second in the ClickHouse manual

Keep on reading!

QEMU full virtualization – CPU emulations (enable/disable CPU flags/instruction sets) of QEMU 6.2.0

This article is an updated version of the old QEMU article about CPU flags available for version 2.0.0QEMU full virtualization – CPU emulations (enable/disable CPU flags/instruction sets) of QEMU 2.0.0.
The latest version of QEMU is 6.2.0 and it offers way more CPU flags and features! You can use QEMU with a nearly native full virtualization. Here are some important tips for the guest CPU to consider when using QEMU directly (without any virtualization manager like virt-manager, libvirt and so on).

TIP 1)Choose your host CPU emulation

You can see what options are available for host emulation with:

root@srv ~ # qemu-system-x86_64 -cpu help
Available CPUs:
x86 486                   (alias configured by machine type)                        
x86 486-v1                                                                          
x86 Broadwell             (alias configured by machine type)                        
x86 Broadwell-IBRS        (alias of Broadwell-v3)                                   
x86 Broadwell-noTSX       (alias of Broadwell-v2)                                   
x86 Broadwell-noTSX-IBRS  (alias of Broadwell-v4)                                   
x86 Broadwell-v1          Intel Core Processor (Broadwell)                          
x86 Broadwell-v2          Intel Core Processor (Broadwell, no TSX)                  
x86 Broadwell-v3          Intel Core Processor (Broadwell, IBRS)                    
x86 Broadwell-v4          Intel Core Processor (Broadwell, no TSX, IBRS)            
x86 Cascadelake-Server    (alias configured by machine type)                        
x86 Cascadelake-Server-noTSX  (alias of Cascadelake-Server-v3)                          
x86 Cascadelake-Server-v1  Intel Xeon Processor (Cascadelake)                        
x86 Cascadelake-Server-v2  Intel Xeon Processor (Cascadelake) [ARCH_CAPABILITIES]    
x86 Cascadelake-Server-v3  Intel Xeon Processor (Cascadelake) [ARCH_CAPABILITIES, no TSX]
x86 Cascadelake-Server-v4  Intel Xeon Processor (Cascadelake) [ARCH_CAPABILITIES, no TSX]
x86 Conroe                (alias configured by machine type)                        
x86 Conroe-v1             Intel Celeron_4x0 (Conroe/Merom Class Core 2)             
x86 Cooperlake            (alias configured by machine type)                        
x86 Cooperlake-v1         Intel Xeon Processor (Cooperlake)                         
x86 Denverton             (alias configured by machine type)                        
x86 Denverton-v1          Intel Atom Processor (Denverton)                          
x86 Denverton-v2          Intel Atom Processor (Denverton) [no MPX, no MONITOR]     
x86 Dhyana                (alias configured by machine type)                        
x86 Dhyana-v1             Hygon Dhyana Processor                                    
x86 EPYC                  (alias configured by machine type)                        
x86 EPYC-IBPB             (alias of EPYC-v2)                                        
x86 EPYC-Milan            (alias configured by machine type)                        
x86 EPYC-Milan-v1         AMD EPYC-Milan Processor                                  
x86 EPYC-Rome             (alias configured by machine type)                        
x86 EPYC-Rome-v1          AMD EPYC-Rome Processor                                   
x86 EPYC-Rome-v2          AMD EPYC-Rome Processor                                   
x86 EPYC-v1               AMD EPYC Processor                                        
x86 EPYC-v2               AMD EPYC Processor (with IBPB)                            
x86 EPYC-v3               AMD EPYC Processor                                        
x86 Haswell               (alias configured by machine type)                        
x86 Haswell-IBRS          (alias of Haswell-v3)                                     
x86 Haswell-noTSX         (alias of Haswell-v2)                                     
x86 Haswell-noTSX-IBRS    (alias of Haswell-v4)                                     
x86 Haswell-v1            Intel Core Processor (Haswell)                            
x86 Haswell-v2            Intel Core Processor (Haswell, no TSX)                    
x86 Haswell-v3            Intel Core Processor (Haswell, IBRS)                      
x86 Haswell-v4            Intel Core Processor (Haswell, no TSX, IBRS)              
x86 Icelake-Client        (alias configured by machine type)                        
x86 Icelake-Client-noTSX  (alias of Icelake-Client-v2)                              
x86 Icelake-Client-v1     Intel Core Processor (Icelake) [deprecated]               
x86 Icelake-Client-v2     Intel Core Processor (Icelake) [no TSX, deprecated]       
x86 Icelake-Server        (alias configured by machine type)                        
x86 Icelake-Server-noTSX  (alias of Icelake-Server-v2)                              
x86 Icelake-Server-v1     Intel Xeon Processor (Icelake)                            
x86 Icelake-Server-v2     Intel Xeon Processor (Icelake) [no TSX]                   
x86 Icelake-Server-v3     Intel Xeon Processor (Icelake)                            
x86 Icelake-Server-v4     Intel Xeon Processor (Icelake)                            
x86 IvyBridge             (alias configured by machine type)                        
x86 IvyBridge-IBRS        (alias of IvyBridge-v2)                                   
x86 IvyBridge-v1          Intel Xeon E3-12xx v2 (Ivy Bridge)                        
x86 IvyBridge-v2          Intel Xeon E3-12xx v2 (Ivy Bridge, IBRS)                  
x86 KnightsMill           (alias configured by machine type)                        
x86 KnightsMill-v1        Intel Xeon Phi Processor (Knights Mill)                   
x86 Nehalem               (alias configured by machine type)                        
x86 Nehalem-IBRS          (alias of Nehalem-v2)                                     
x86 Nehalem-v1            Intel Core i7 9xx (Nehalem Class Core i7)                 
x86 Nehalem-v2            Intel Core i7 9xx (Nehalem Core i7, IBRS update)          
x86 Opteron_G1            (alias configured by machine type)                        
x86 Opteron_G1-v1         AMD Opteron 240 (Gen 1 Class Opteron)                     
x86 Opteron_G2            (alias configured by machine type)                        
x86 Opteron_G2-v1         AMD Opteron 22xx (Gen 2 Class Opteron)                    
x86 Opteron_G3            (alias configured by machine type)                        
x86 Opteron_G3-v1         AMD Opteron 23xx (Gen 3 Class Opteron)                    
x86 Opteron_G4            (alias configured by machine type)                        
x86 Opteron_G4-v1         AMD Opteron 62xx class CPU                                
x86 Opteron_G5            (alias configured by machine type)                        
x86 Opteron_G5-v1         AMD Opteron 63xx class CPU                                
x86 Penryn                (alias configured by machine type)                        
x86 Penryn-v1             Intel Core 2 Duo P9xxx (Penryn Class Core 2)              
x86 SandyBridge           (alias configured by machine type)                        
x86 SandyBridge-IBRS      (alias of SandyBridge-v2)                                 
x86 SandyBridge-v1        Intel Xeon E312xx (Sandy Bridge)                          
x86 SandyBridge-v2        Intel Xeon E312xx (Sandy Bridge, IBRS update)             
x86 Skylake-Client        (alias configured by machine type)                        
x86 Skylake-Client-IBRS   (alias of Skylake-Client-v2)                              
x86 Skylake-Client-noTSX-IBRS  (alias of Skylake-Client-v3)                              
x86 Skylake-Client-v1     Intel Core Processor (Skylake)                            
x86 Skylake-Client-v2     Intel Core Processor (Skylake, IBRS)                      
x86 Skylake-Client-v3     Intel Core Processor (Skylake, IBRS, no TSX)              
x86 Skylake-Server        (alias configured by machine type)                        
x86 Skylake-Server-IBRS   (alias of Skylake-Server-v2)                              
x86 Skylake-Server-noTSX-IBRS  (alias of Skylake-Server-v3)                              
x86 Skylake-Server-v1     Intel Xeon Processor (Skylake)                            
x86 Skylake-Server-v2     Intel Xeon Processor (Skylake, IBRS)                      
x86 Skylake-Server-v3     Intel Xeon Processor (Skylake, IBRS, no TSX)              
x86 Skylake-Server-v4     Intel Xeon Processor (Skylake, IBRS, no TSX)              
x86 Snowridge             (alias configured by machine type)                        
x86 Snowridge-v1          Intel Atom Processor (SnowRidge)                          
x86 Snowridge-v2          Intel Atom Processor (Snowridge, no MPX)                  
x86 Westmere              (alias configured by machine type)                        
x86 Westmere-IBRS         (alias of Westmere-v2)                                    
x86 Westmere-v1           Westmere E56xx/L56xx/X56xx (Nehalem-C)                    
x86 Westmere-v2           Westmere E56xx/L56xx/X56xx (IBRS update)                  
x86 athlon                (alias configured by machine type)                        
x86 athlon-v1             QEMU Virtual CPU version 2.5+                             
x86 core2duo              (alias configured by machine type)                        
x86 core2duo-v1           Intel(R) Core(TM)2 Duo CPU     T7700  @ 2.40GHz           
x86 coreduo               (alias configured by machine type)                        
x86 coreduo-v1            Genuine Intel(R) CPU           T2600  @ 2.16GHz           
x86 kvm32                 (alias configured by machine type)                        
x86 kvm32-v1              Common 32-bit KVM processor                               
x86 kvm64                 (alias configured by machine type)                        
x86 kvm64-v1              Common KVM processor                                      
x86 n270                  (alias configured by machine type)                        
x86 n270-v1               Intel(R) Atom(TM) CPU N270   @ 1.60GHz                    
x86 pentium               (alias configured by machine type)                        
x86 pentium-v1                                                                      
x86 pentium2              (alias configured by machine type)                        
x86 pentium2-v1                                                                     
x86 pentium3              (alias configured by machine type)                        
x86 pentium3-v1                                                                     
x86 phenom                (alias configured by machine type)                        
x86 phenom-v1             AMD Phenom(tm) 9550 Quad-Core Processor                   
x86 qemu32                (alias configured by machine type)                        
x86 qemu32-v1             QEMU Virtual CPU version 2.5+                             
x86 qemu64                (alias configured by machine type)                        
x86 qemu64-v1             QEMU Virtual CPU version 2.5+                             
x86 base                  base CPU model type with no features enabled              
x86 host                  KVM processor with all supported host features            
x86 max                   Enables all features supported by the accelerator in the current host

Recognized CPUID flags:
  3dnow 3dnowext 3dnowprefetch abm ace2 ace2-en acpi adx aes amd-no-ssb
  amd-ssbd amd-stibp apic arat arch-capabilities avic avx avx2
  avx512-4fmaps avx512-4vnniw avx512-bf16 avx512-fp16 avx512-vp2intersect
  avx512-vpopcntdq avx512bitalg avx512bw avx512cd avx512dq avx512er avx512f
  avx512ifma avx512pf avx512vbmi avx512vbmi2 avx512vl avx512vnni bmi1 bmi2
  bus-lock-detect cid cldemote clflush clflushopt clwb clzero cmov
  cmp-legacy core-capability cr8legacy cx16 cx8 dca de decodeassists ds
  ds-cpl dtes64 erms est extapic f16c flushbyasid fma fma4 fpu fsgsbase
  fsrm full-width-write fxsr fxsr-opt gfni hle ht hypervisor ia64 ibpb ibrs
  ibrs-all ibs intel-pt intel-pt-lip invpcid invtsc kvm-asyncpf
  kvm-asyncpf-int kvm-hint-dedicated kvm-mmu kvm-msi-ext-dest-id
  kvm-nopiodelay kvm-poll-control kvm-pv-eoi kvm-pv-ipi kvm-pv-sched-yield
  kvm-pv-tlb-flush kvm-pv-unhalt kvm-steal-time kvmclock kvmclock
  kvmclock-stable-bit la57 lahf-lm lbrv lm lwp mca mce md-clear mds-no
  misalignsse mmx mmxext monitor movbe movdir64b movdiri mpx msr mtrr
  nodeid-msr npt nrip-save nx osvw pae pat pause-filter pbe pcid pclmulqdq
  pcommit pdcm pdpe1gb perfctr-core perfctr-nb pfthreshold pge phe phe-en
  pks pku pmm pmm-en pn pni popcnt pschange-mc-no pse pse36 rdctl-no rdpid
  rdrand rdseed rdtscp rsba rtm sep serialize sha-ni skinit
  skip-l1dfl-vmentry smap smep smx spec-ctrl split-lock-detect ss ssb-no
  ssbd sse sse2 sse4.1 sse4.2 sse4a ssse3 stibp svm svm-lock svme-addr-chk
  syscall taa-no tbm tce tm tm2 topoext tsc tsc-adjust tsc-deadline
  tsc-scale tsx-ctrl tsx-ldtrk umip v-vmsave-vmload vaes vgif virt-ssbd
  vmcb-clean vme vmx vmx-activity-hlt vmx-activity-shutdown
  vmx-activity-wait-sipi vmx-apicv-register vmx-apicv-vid vmx-apicv-x2apic
  vmx-apicv-xapic vmx-cr3-load-noexit vmx-cr3-store-noexit
  vmx-cr8-load-exit vmx-cr8-store-exit vmx-desc-exit vmx-encls-exit
  vmx-entry-ia32e-mode vmx-entry-load-bndcfgs vmx-entry-load-efer
  vmx-entry-load-pat vmx-entry-load-perf-global-ctrl vmx-entry-load-pkrs
  vmx-entry-load-rtit-ctl vmx-entry-noload-debugctl vmx-ept vmx-ept-1gb
  vmx-ept-2mb vmx-ept-advanced-exitinfo vmx-ept-execonly vmx-eptad
  vmx-eptp-switching vmx-exit-ack-intr vmx-exit-clear-bndcfgs
  vmx-exit-clear-rtit-ctl vmx-exit-load-efer vmx-exit-load-pat
  vmx-exit-load-perf-global-ctrl vmx-exit-load-pkrs
  vmx-exit-nosave-debugctl vmx-exit-save-efer vmx-exit-save-pat
  vmx-exit-save-preemption-timer vmx-flexpriority vmx-hlt-exit vmx-ins-outs
  vmx-intr-exit vmx-invept vmx-invept-all-context vmx-invept-single-context
  vmx-invept-single-context vmx-invept-single-context-noglobals
  vmx-invlpg-exit vmx-invpcid-exit vmx-invvpid vmx-invvpid-all-context
  vmx-invvpid-single-addr vmx-io-bitmap vmx-io-exit vmx-monitor-exit
  vmx-movdr-exit vmx-msr-bitmap vmx-mtf vmx-mwait-exit vmx-nmi-exit
  vmx-page-walk-4 vmx-page-walk-5 vmx-pause-exit vmx-ple vmx-pml
  vmx-posted-intr vmx-preemption-timer vmx-rdpmc-exit vmx-rdrand-exit
  vmx-rdseed-exit vmx-rdtsc-exit vmx-rdtscp-exit vmx-secondary-ctls
  vmx-shadow-vmcs vmx-store-lma vmx-true-ctls vmx-tsc-offset
  vmx-unrestricted-guest vmx-vintr-pending vmx-vmfunc
  vmx-vmwrite-vmexit-fields vmx-vnmi vmx-vnmi-pending vmx-vpid
  vmx-wbinvd-exit vmx-xsaves vmx-zero-len-inject vpclmulqdq waitpkg
  wbnoinvd wdt x2apic xcrypt xcrypt-en xgetbv1 xop xsave xsavec xsaveerptr
  xsaveopt xsaves xstore xstore-en xtpr

The number of supported flags grew enormously compared to the old versions of QEMU and in fact, they include almost all available CPU flags. The supported CPUs are also several times more than before! The above list of supported CPUs means the virtual guest machine could use one of them and the guest operating system will have all the flags the CPU supports. In fact, the guest virtual system will report to the OS it has the selected CPU from the list above.
Keep on reading!

Minimal network installation of Fedora 35 Server

This tutorial will show you the simple steps of installing a modern Linux Distribution Fedora 35 Server edition. Fedora line offers many bleeding-edge Linux technologies than the more enterprise CentOS of the same RPM Linux family.

In fact, if the user needs a server with the latest Linux stable software Fedora server is the right and easy choice for a server!

For example, the Fedora 35 Server comes and updates to the latest stable Linux:

  • Linux kernel : 5.16.
  • Python : 3.10.2
  • GLibc : 2.34
  • OpenSSL : 1.1.1l
  • systemd : 249.9

Of course, one can expect latest version of GCC (11.2.x), PHP (8.0.16), GO (1.16.14), MySQL Server (8.0.27), PostgreSQL (13.4), Nginx (1.20.2), Apache (2.4.52) and so on. Almost all of them are the latest stable version in their Internet sites.
Just be careful, the Fedora life cycle is 13 months from the release to the EOL (End of Life)! Of course, a dist-upgrade is supported and indeed, it has been flawless for years!

We used the following ISO for the installation process from https://getfedora.org/en/server/download/:

https://download.fedoraproject.org/pub/fedora/linux/releases/35/Server/x86_64/iso/Fedora-Server-netinst-x86_64-35-1.2.iso

It is a LIVE image so you can try it before installing it. The easiest way is just to download the image and burn it to a DVD disk and then follow the installation below (USB flash drive could be also created from this ISO):

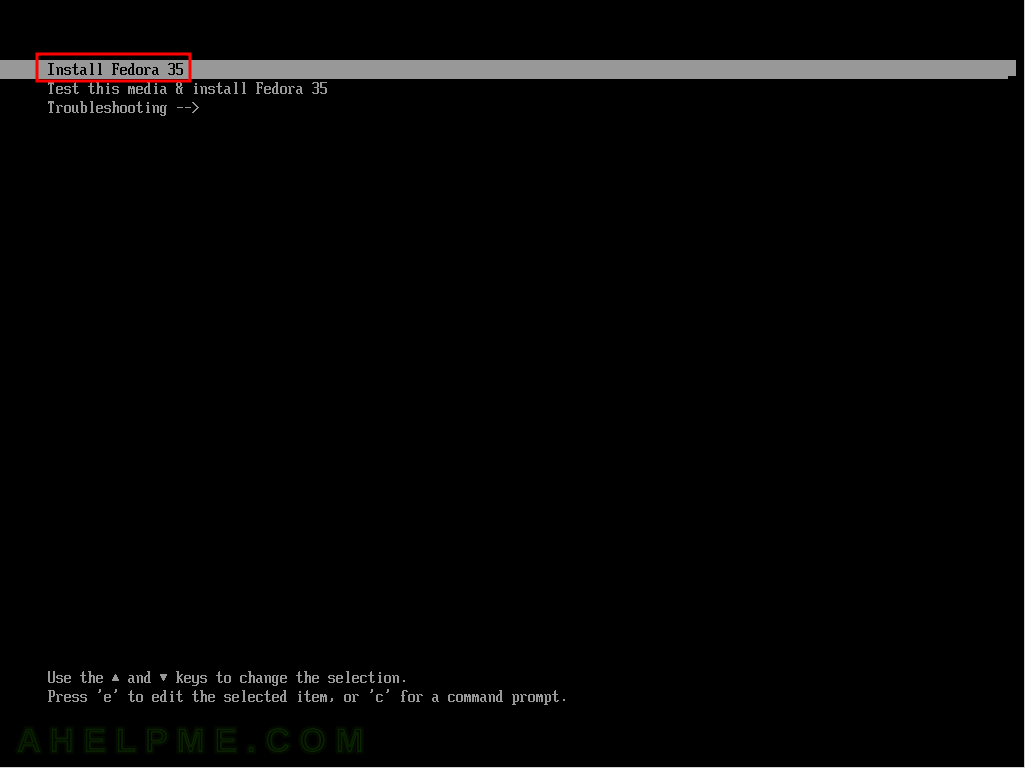
SCREENSHOT 1) If you booted from the DVD you would get this first screen – select “Install Fedora 35” and hit Enter

main menu
Start Fedora 35 Server

Keep on reading!

Change found sources for kernel version when packages need the kernel sources to compile

Multiple Gentoo packages may need kernel sources to compile. There are packages, which are external modules such as virtualbox-modules or video drivers or wifi drivers or more. All these packages expect the current loaded kernel sources are present and to use them when compiling the external kernel module. But sometimes the proper kernel sources are missing, those needed to compile the kernel module in such a way to load it in the currently loaded kernel.

This article is valid not only for Gentoo Linux distribution but any Linux and kernel sources. So, if the user needs to have properly configured kernel sources for the currently loaded kernel, this is one way to do it right.

Here is an example: Updated kernel, but no sources are kept and then the VirtualBox needs to update to a newer version, but with the missing kernel sources of the currently loaded kernel updating the VirtualBox will cause the VirtualBox to stop working!

root@srv ~ # uname -a
Linux srv 5.15.5-gentoo #2 SMP Tue Nov 30 16:08:49 EET 2021 x86_64 Intel(R) Core(TM) i7-5500U CPU @ 2.40GHz GenuineIntel GNU/Linux
root@srv ~ # emerge -va app-emulation/virtualbox-modules

These are the packages that would be merged, in order:

[ebuild     U  ] app-emulation/virtualbox-modules-6.1.32:0/6.1::gentoo [6.1.26:0/6.1::gentoo] USE="dist-kernel -pax-kernel" 660 KiB

Total: 1 packages (1 upgrades), Size of downloads: 0 KiB

Would you like to merge these packages? [Yes/No] yes

>>> Verifying ebuild manifests

>>> Running pre-merge checks for app-emulation/virtualbox-6.1.32-r1

>>> Emerging (1 of 1) app-emulation/virtualbox-modules-6.1.32::gentoo
 * Fetching files in the background.
 * To view fetch progress, run in another terminal:
 * tail -f /var/log/emerge-fetch.log
 * vbox-kernel-module-src-6.1.32.tar.xz BLAKE2B SHA512 size ;-) ...                                                                                                                   [ ok ]
 * Determining the location of the kernel source code
 * Found kernel source directory:
 *     /usr/src/linux
 * Found sources for kernel version:
 *     5.14.2-gentoo-x86_64-genkernel-NEW2
 * Checking for suitable kernel configuration options...                                                                                                                              [ ok ]
>>> Unpacking source...
>>> Unpacking vbox-kernel-module-src-6.1.32.tar.xz to /var/tmp/portage/app-emulation/virtualbox-modules-6.1.32/work
>>> Source unpacked in /var/tmp/portage/app-emulation/virtualbox-modules-6.1.32/work
>>> Preparing source in /var/tmp/portage/app-emulation/virtualbox-modules-6.1.32/work ...
>>> Source prepared.
>>> Configuring source in /var/tmp/portage/app-emulation/virtualbox-modules-6.1.32/work ...
>>> Source configured.
>>> Compiling source in /var/tmp/portage/app-emulation/virtualbox-modules-6.1.32/work ...

Here is the problem: the currently loaded kernel is version 5.15.5-gentoo and the emerge system finds only sources for 5.14.2-gentoo-x86_64-genkernel-NEW2, which will use to produce modules for the 5.14.2-gentoo-x86_64-genkernel-NEW2. It is obvious enough the modules compiled against kernel sources of 5.14.2-gentoo-x86_64-genkernel-NEW2 version won’t be possible to be loaded under the currently load kernel with version 5.15.5-gentoo.
Here is how to fix this:

  1. Get the kernel sources for 5.15.5-gentoo in /usr/src/linux
  2. Save the currently loaded kernel config in /usr/src/linux/.config
  3. Load the configuration and prepare the kernel sources. No need to compile the kernel sources.

STEP 1) Get the kernel sources for 5.15.5-gentoo

emerge -v =gentoo-sources-5.15.5
rm -f /usr/src/linux
ln -s /usr/src/linux-5.15.5-gentoo /usr/src/linux

These commands will install the needed kernel version and a link to the kernel sources will be created.
Of course, change the kernel version to the proper version if needed.

STEP 2) Save the currently loaded kernel config in /usr/src/linux/.config

zcat /proc/config.gz > /usr/src/linux/.config

If the /proc/config.gz is missing, copy the configuration from the /boot for the currently loaded kernel:

cat /boot/config-5.15.5-gentoo > /usr/src/linux-5.15.5-gentoo/.config

STEP 3) Load the configuration and prepare the kernel sources.

No need to compile the whole kernel source tree. Just to commands to configure and prepare the kernel sources:

cd /usr/src/linux-5.15.5-gentoo
make oldconfig
make prepare

The commands take Here is the output of the last commands:

root@srv1 ~ # cd /usr/src/linux-5.15.5-gentoo
root@srv1 linux # make oldconfig
  HOSTCC  scripts/basic/fixdep
  HOSTCC  scripts/kconfig/conf.o
  HOSTCC  scripts/kconfig/confdata.o
  HOSTCC  scripts/kconfig/expr.o
  HOSTCC  scripts/kconfig/lexer.lex.o
  HOSTCC  scripts/kconfig/menu.o
  HOSTCC  scripts/kconfig/parser.tab.o
  HOSTCC  scripts/kconfig/preprocess.o
  HOSTCC  scripts/kconfig/symbol.o
  HOSTCC  scripts/kconfig/util.o
  HOSTLD  scripts/kconfig/conf
#
# configuration written to .config
#
root@srv1 linux # make prepare
  SYNC    include/config/auto.conf.cmd
  HOSTCC  arch/x86/tools/relocs_32.o
  HOSTCC  arch/x86/tools/relocs_64.o
  HOSTCC  arch/x86/tools/relocs_common.o
  HOSTLD  arch/x86/tools/relocs
  HOSTCC  scripts/selinux/genheaders/genheaders
  HOSTCC  scripts/selinux/mdp/mdp
  HOSTCC  scripts/bin2c
  HOSTCC  scripts/kallsyms
  HOSTCC  scripts/sorttable
  HOSTCC  scripts/asn1_compiler
  HOSTCC  scripts/extract-cert
  UPD     include/config/kernel.release
  UPD     include/generated/utsrelease.h
  CC      scripts/mod/empty.o
  HOSTCC  scripts/mod/mk_elfconfig
  MKELF   scripts/mod/elfconfig.h
  HOSTCC  scripts/mod/modpost.o
  CC      scripts/mod/devicetable-offsets.s
  HOSTCC  scripts/mod/file2alias.o
  HOSTCC  scripts/mod/sumversion.o
  HOSTLD  scripts/mod/modpost
  CC      kernel/bounds.s
  UPD     include/generated/bounds.h
  CC      arch/x86/kernel/asm-offsets.s
  UPD     include/generated/asm-offsets.h
  CALL    scripts/checksyscalls.sh
  CALL    scripts/atomic/check-atomics.sh
  DESCEND objtool
  HOSTCC  /usr/src/linux-5.15.5-gentoo/tools/objtool/fixdep.o
  HOSTLD  /usr/src/linux-5.15.5-gentoo/tools/objtool/fixdep-in.o
  LINK    /usr/src/linux-5.15.5-gentoo/tools/objtool/fixdep
  CC      /usr/src/linux-5.15.5-gentoo/tools/objtool/exec-cmd.o
  CC      /usr/src/linux-5.15.5-gentoo/tools/objtool/help.o
  CC      /usr/src/linux-5.15.5-gentoo/tools/objtool/pager.o
  CC      /usr/src/linux-5.15.5-gentoo/tools/objtool/parse-options.o
  CC      /usr/src/linux-5.15.5-gentoo/tools/objtool/run-command.o
  CC      /usr/src/linux-5.15.5-gentoo/tools/objtool/sigchain.o
  CC      /usr/src/linux-5.15.5-gentoo/tools/objtool/subcmd-config.o
  LD      /usr/src/linux-5.15.5-gentoo/tools/objtool/libsubcmd-in.o
  AR      /usr/src/linux-5.15.5-gentoo/tools/objtool/libsubcmd.a
  CC      /usr/src/linux-5.15.5-gentoo/tools/objtool/arch/x86/special.o
  CC      /usr/src/linux-5.15.5-gentoo/tools/objtool/arch/x86/decode.o
  LD      /usr/src/linux-5.15.5-gentoo/tools/objtool/arch/x86/objtool-in.o
  CC      /usr/src/linux-5.15.5-gentoo/tools/objtool/weak.o
  CC      /usr/src/linux-5.15.5-gentoo/tools/objtool/check.o
  CC      /usr/src/linux-5.15.5-gentoo/tools/objtool/special.o
  CC      /usr/src/linux-5.15.5-gentoo/tools/objtool/orc_gen.o
  CC      /usr/src/linux-5.15.5-gentoo/tools/objtool/orc_dump.o
  CC      /usr/src/linux-5.15.5-gentoo/tools/objtool/builtin-check.o
  CC      /usr/src/linux-5.15.5-gentoo/tools/objtool/builtin-orc.o
  CC      /usr/src/linux-5.15.5-gentoo/tools/objtool/elf.o
  CC      /usr/src/linux-5.15.5-gentoo/tools/objtool/objtool.o
  CC      /usr/src/linux-5.15.5-gentoo/tools/objtool/libstring.o
  CC      /usr/src/linux-5.15.5-gentoo/tools/objtool/libctype.o
  CC      /usr/src/linux-5.15.5-gentoo/tools/objtool/str_error_r.o
  CC      /usr/src/linux-5.15.5-gentoo/tools/objtool/librbtree.o
  LD      /usr/src/linux-5.15.5-gentoo/tools/objtool/objtool-in.o
  LINK    /usr/src/linux-5.15.5-gentoo/tools/objtool/objtool

And from now on whenever the kernel sources are needed to compile modules or libraries against, the proper kernel sources will be used of the currently loaded kernel.
The Gentoo emerge command from the begging of this article, but this time with the properly configured kernel sources. The VirtualBox modules are compiled against the loaded kernel, so loading them is not an issue anymore!

root@srv ~ # uname -a
Linux srv 5.15.5-gentoo #2 SMP Tue Nov 30 16:08:49 EET 2021 x86_64 Intel(R) Core(TM) i7-5500U CPU @ 2.40GHz GenuineIntel GNU/Linux
root@srv ~ # emerge -va app-emulation/virtualbox-modules

These are the packages that would be merged, in order:

[ebuild     U  ] app-emulation/virtualbox-modules-6.1.32:0/6.1::gentoo [6.1.26:0/6.1::gentoo] USE="dist-kernel -pax-kernel" 660 KiB

Total: 1 packages (1 upgrades), Size of downloads: 0 KiB

Would you like to merge these packages? [Yes/No] yes

>>> Verifying ebuild manifests

>>> Running pre-merge checks for app-emulation/virtualbox-6.1.32-r1

>>> Emerging (1 of 1) app-emulation/virtualbox-modules-6.1.32::gentoo
 * Fetching files in the background.
 * To view fetch progress, run in another terminal:
 * tail -f /var/log/emerge-fetch.log
 * vbox-kernel-module-src-6.1.32.tar.xz BLAKE2B SHA512 size ;-) ...                                                                                                                   [ ok ]
 * Determining the location of the kernel source code
 * Found kernel source directory:
 *     /usr/src/linux
 * Found sources for kernel version:
 *     5.15.5-gentoo-gentoo
 * Checking for suitable kernel configuration options...                                                                                                                              [ ok ]
>>> Unpacking source...
>>> Unpacking vbox-kernel-module-src-6.1.32.tar.xz to /var/tmp/portage/app-emulation/virtualbox-modules-6.1.32/work
>>> Source unpacked in /var/tmp/portage/app-emulation/virtualbox-modules-6.1.32/work
>>> Preparing source in /var/tmp/portage/app-emulation/virtualbox-modules-6.1.32/work ...
>>> Source prepared.
>>> Configuring source in /var/tmp/portage/app-emulation/virtualbox-modules-6.1.32/work ...
>>> Source configured.
>>> Compiling source in /var/tmp/portage/app-emulation/virtualbox-modules-6.1.32/work ...
....
....
root@srv ~ # modprobe vboxdrv
Feb 15 14:15:10 www kernel: vboxdrv: loading out-of-tree module taints kernel.
Feb 15 14:15:10 www kernel: vboxdrv: Found 4 processor cores
Feb 15 14:15:10 www kernel: vboxdrv: TSC mode is Invariant, tentative frequency 2394461773 Hz
Feb 15 14:15:10 www kernel: vboxdrv: Successfully loaded version 6.1.32 r149290 (interface 0x00320000)
Feb 15 14:15:10 www kernel: VBoxNetFlt: Successfully started.

Virtualbox machine boots from usb drive

First, at present, booting from USB is impossible with VirtualBox! But there is a really easy workaround to use VMDK, which is just a container file describing physical devices (or files) to use in virtual machines like VirtualBox or VMware.
Because the USB is just another physical device attached to the machine this article will help to attach the USB drive to a virtual machine – Add a raw disk to a virtualbox virtual machine. Then boot from the newly attached disk.

Here is the quick tip for the USB drive:

  1. Attach the USB drive and find its device path. Under Windows, it would be something like “\\.\PhysicalDrive3” (open “Disk Management” if not sure) and under Linux it would be /dev/sdc, for example. This is the third disk device (including USB disk devices) connected to the machine.
  2. Make the VMDK from the USB physical device.
    Under Windows:

    VBoxManage.exe internalcommands createrawvmdk -filename "c:\Users\homer\.VirtualBox\windows11pro-install-usb.vmdk" -rawdisk \\.\PhysicalDrive3
    

    Under Linux:

    VBoxManage internalcommands createrawvmdk -filename /home/myuser/.VirtualBox/windows11pro-install-usb.vmdk.vmdk -rawdisk /dev/sdc
    
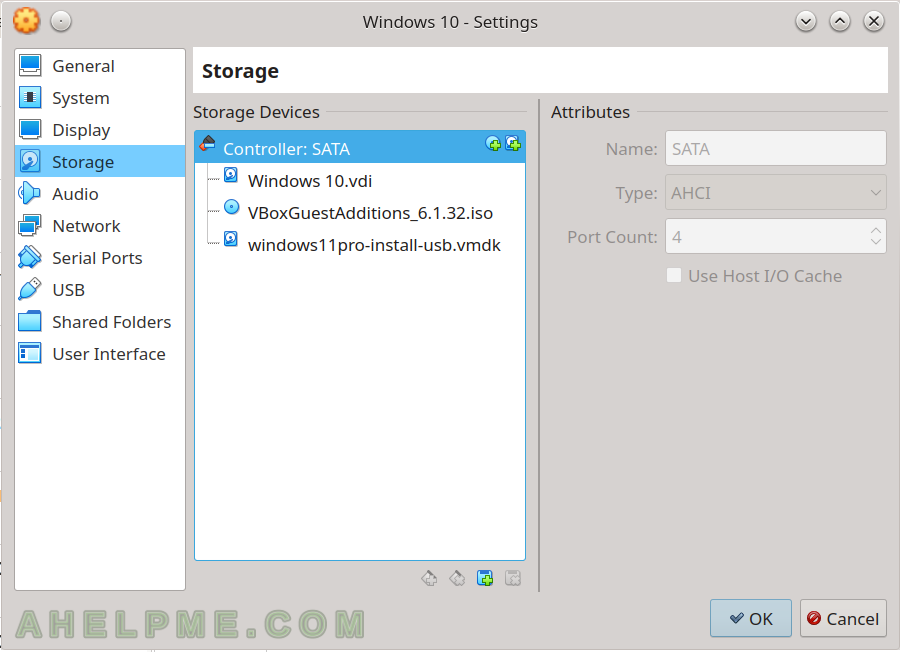
  3. Attach it the virtual machine: Settings -> Storage -> Storage Devices.

    First, a click on “Adds hard disk” would show a menu to add a new hard disk and then a click on “Add” (“Add Disk Image”) shows a file browse dialog to locate the VMDK file.

    main menu
    Storage Devices
  4. Boot from this device by selecting it manually from the boot menu (F12 would boot in Boot menu) or set the VMKD disk to be on the Port 0 in the above step.

For more details (not just the commands to generate the VMDK container file) follow the above URL to the proposed article – Add a raw disk to a virtualbox virtual machine

Install and deploy MySQL 8 InnoDB Cluster with 3 nodes under CentOS 8 and MySQL Router for HA

This article is going to show how to install a MySQL server and deploy a MySQL 8 InnoDB Cluster with three nodes behind a MySQL router to archive a high availability with MySQL database back-end.

In really simple words, MySQL 8.0 InnoDB Cluster is just MySQL replication on steroids – i.e. a little more additional work between the servers in the group before committing the transactions. It uses MySQL Group Replication plugin, which allows the group to operate in two different modes:

  1. a single-primary mode with automatic primary election. Only one server gets the updates.
  2. a multi-master mode – all servers accept the updates. For advanced setups.

Group Replication is bi-directional, the servers communicate with each other and use row replication to replicate the data. The main limitation is that only the MySQL InnoDB engine is supported, because of the transactions support. So the performance (and most features and caveats) of MySQL InnoDB is not impacted by cluster setup and overhead compared to the MySQL in replication mode (or a single server setups) from the previous MySQL versions. Still, all read-write transactions commit only after they have been approved by the group – a verification process providing consensus between the servers. In fact, most of the features like GUIDs, row-based replication (i.e. different replication modes) are developed and available to older versions. The new part is handled by Group Communication System (GCS) protocols, which provide a failure detection mechanism, a group membership service, and a safe and completely ordered message delivery (more on the subject here https://dev.mysql.com/doc/refman/8.0/en/group-replication-background.html).
In addition to the group replication, MySQL Router 8.0 provides the HAhigh availability. The program, which redirects, fails over, balances to the right server in the group is the MySQL Router. Clients may connect directly to the servers in the group, but only if the clients connect using MySQL router will have HA because Group Replication does not have a built-in method for it. It is worth noting, there could be many MySQL Routers in different servers, they do not need to communicate or synchronize anything with each other. So the router could be installed in the same place, where the application is installed or on a separate dedicated server, or on every MySQL server in the group.

Key points in this article of MySQL InnoDB Cluster deployment:

  • CentOS 8 Stream is used for the operating system
  • SELinux tuning to allow MySQL process to connect the network.
  • CentOS 8 firewall tuning to unblock the nodes traffic between them.
  • Disable mysql package system module to use the official MySQL repository.
  • Three MySQL 8.0.28 server nodes will be installed
  • To create and manage the cluster MySQL Shell 8.0 and dba object in it are used.
  • Three MySQL routers on each MySQL node will be installed.
  • Each server will have the domains of the all three servers in /etc/hosts file – db-cluster-1, db-cluster-2, db-cluster-3.
  • The cluster is in group replication with one primary (i.e. master) and two secondary nodes (i.e. slaves)

STEP 1) Install CentOS 8 Stream.

There is an article with the CentOS 8 – How to do a network installation of CentOS 8 (8.0.1950) – minimal server installation, which installation is essentially the same as CentOS 8 Stream.

STEP 2) Prepare the CentOS 8 Stream to install MySQL 8 server.

At present, the latest MySQL Community edition is 8.0.28. The preferred way to install the MySQL server is to download the RPM repository file from MySQL web site – https://dev.mysql.com/downloads/repo/yum/
Keep on reading!

conda command-line search and install a package in a new environment – tensorflow

Using conda from Anaconda is really easy to install complex environments even like TensorFlow on many different Linux distributions and Windows.
conda utility and its multiple environments guarantee no changes from the package system of the current Linux distribution. Installing operating system updates may break fine-tuned and complex development environments. Installing packages from conda minimizes the OS-related problems and offers the user to use of complex development setups in various Linux distributions like CentOS, Fedora, Manjdaro, Mint, Debian, Ubuntu, Elementary OS with the same command line interface.
Using pip instead of conda may lead to a broken environment after simple OS package updates.

STEP 1) Install conda command line utility.

The install is easy enough, just follow this article – Installing conda command line in various systems with miniconda and create a simple python environment
The conda command-line utility is installed by Miniconda3.

STEP 2) Search for conda packages.

Use the search command to find packages. All available versions are displayed supported for the current installation.
Keep on reading!

conda export environment and conda import environment

conda export and import feature is ideal functionality to build a predefined environment from a list in a text file.
Here are some caveats (or features), which may stumble the user to build a working conda environment list file:

  • There are packages, which are not available for all OS platforms. There are packages, which are only available in Linux platforms and other only under Windows platform!
  • There are package names, followed by version and build version. All three a valid entries in the list file – only the name of the package, the name of the package with version and the name of the package with version and build version. For example,
      - setuptools=58.0.4=py38h06a4308_0
      - sqlite=3.37.0=hc218d9a_0
      - tk=8.6.11
      - wheel
    
  • Builds’ versions are specific for the OS and they are different for every Operating systems.
  • Packages’ versions do tend to deprecate, so the old environment may not be possible to replicate because of a missing package version. Exported list with version, which are unavailable any more and so it cannot be imported.
  • A good practice is to update the current working environment with the latest updates before exporting it.
  • Export environment list without build versions. Edit the exported environment list if some version is missing. The version of the packages could be removed, too.
  • The exported environment list uses yaml format.

1) Here is the command to export an environment list of a python environment with and without builds and versions of the packages:

  1. With builds versions
    (base) myenv@srv ~ $ conda env export -n mypython37
    name: mypython37
    channels:
      - defaults
    dependencies:
      - _libgcc_mutex=0.1=main
      - _openmp_mutex=4.5=1_gnu
      - ca-certificates=2021.10.26=h06a4308_2
      - certifi=2021.10.8=py37h06a4308_2
      - ld_impl_linux-64=2.35.1=h7274673_9
      - libffi=3.3=he6710b0_2
      - libgcc-ng=9.3.0=h5101ec6_17
      - libgomp=9.3.0=h5101ec6_17
      - libstdcxx-ng=9.3.0=hd4cf53a_17
      - ncurses=6.3=h7f8727e_2
      - openssl=1.1.1m=h7f8727e_0
      - pip=21.2.2=py37h06a4308_0
      - python=3.7.11=h12debd9_0
      - readline=8.1.2=h7f8727e_1
      - setuptools=58.0.4=py37h06a4308_0
      - sqlite=3.37.0=hc218d9a_0
      - tk=8.6.11=h1ccaba5_0
      - wheel=0.37.1=pyhd3eb1b0_0
      - xz=5.2.5=h7b6447c_0
      - zlib=1.2.11=h7f8727e_4
    prefix: /home/myenv/miniconda3/envs/mypython37
    

    By default, the output is in the console with YAML syntax. There is a JSON option and a file option to output it in a file:
    Keep on reading!