This article is to show how simple is to use an SSD cache device to a hard disk drive. We also included statistics and graphs for several days of usage in one of our streaming servers.
Our setup:
- 1 SSD disk Samsung 480G. It will be used for writeback cache device!
- 1 Hard disk drive 1T
We included several graphs of this setup from one of our static media servers serving HLS video streaming.
The effectiveness of the cache is around 2-4 times at least!
STEP 1) Install lvm2
Only this step is different on different Linux distributions. We included three of them:
Ubuntu 16+:
sudo apt update && apt upgrade -y
sudo apt install lvm2 -y
systemctl enable lvm2-lvmetad
systemctl start lvm2-lvmetad
CentOS 7:
yum update
yum install -y lvm2
systemctl enable lvm2-lvmetad
systemctl start lvm2-lvmetad
Gentoo:
emerge --sync
emerge -v sys-fs/lvm2
/etc/init.d/lvm start
rc-update add default lvm
STEP 2) Add the two partitions to the lvm2.
We are going to use two partitions, not the whole devices because one of the devices we have installed our Operating system. Here is the disk layout – sda is the SSD and where the Operating system is installed and sdb is the storage device.
[root@srv ~]# parted /dev/sda
GNU Parted 3.1
Using /dev/sda
Welcome to GNU Parted! Type 'help' to view a list of commands.

(parted) p
Model: ATA SAMSUNG MZ7KM480 (scsi)
Disk /dev/sda: 480GB
Sector size (logical/physical): 512B/512B
Partition Table: gpt
Disk Flags:

Number  Start   End     Size    File system     Name           Flags
 1      1049kB  2097kB  1049kB                  bios           bios_grub, legacy_boot
 2      2097kB  1076MB  1074MB  ext2            2072968-/boot
 3      1076MB  5371MB  4295MB  linux-swap(v1)  2072968-swap
 4      5371MB  9666MB  4295MB  ext4            2072968-/tmp
 5      9666MB  43.0GB  33.3GB  ext4            2072968-/
 6      43.0GB  480GB   437GB                   primary

(parted) q
[root@srv ~]# parted /dev/sdb
GNU Parted 3.1
Using /dev/sdb
Welcome to GNU Parted! Type 'help' to view a list of commands.
(parted) p
Model: ATA WDC WD10JPLX-00M (scsi)
Disk /dev/sdb: 1000GB
Sector size (logical/physical): 512B/4096B
Partition Table: gpt
Disk Flags:

Number  Start   End     Size    File system  Name     Flags
 1      1049kB  1000GB  1000GB               primary

(parted) q
Add partitions to the devices and create an LVM Volume Group.
[root@srv ~]# pvcreate /dev/sda6
  Physical volume "/dev/sda6" successfully created.
[root@srv ~]# pvcreate /dev/sdb1
  Physical volume "/dev/sdb1" successfully created.
[root@srv ~]# pvdisplay
  "/dev/sda6" is a new physical volume of "407.08 GiB"
  --- NEW Physical volume ---
  PV Name               /dev/sda6
  VG Name
  PV Size               407.08 GiB
  Allocatable           NO
  PE Size               0
  Total PE              0
  Free PE               0
  Allocated PE          0
  PV UUID               pOXsNP-dhCa-G7ml-jiZP-lnv3-mA36-4Sh28o

  "/dev/sdb1" is a new physical volume of "931.51 GiB"
  --- NEW Physical volume ---
  PV Name               /dev/sdb1
  VG Name
  PV Size               931.51 GiB
  Allocatable           NO
  PE Size               0
  Total PE              0
  Free PE               0
  Allocated PE          0
  PV UUID               ouryYh-iCB1-eXGA-NthQ-cEzf-7S3F-pCVb9v

[root@srv ~]# vgcreate VG_storage1 /dev/sda6 /dev/sdb1
  Volume group "VG_storage1" successfully created
[root@srv ~]# vgdisplay
  --- Volume group ---
  VG Name               VG_storage1
  System ID
  Format                lvm2
  Metadata Areas        2
  Metadata Sequence No  1
  VG Access             read/write
  VG Status             resizable
  MAX LV                0
  Cur LV                0
  Open LV               0
  Max PV                0
  Cur PV                2
  Act PV                2
  VG Size               <1.31 TiB
  PE Size               4.00 MiB
  Total PE              342679
  Alloc PE / Size       0 / 0
  Free  PE / Size       342679 / <1.31 TiB
  VG UUID               NpXuAd-rc1K-LECB-O620-ysTN-u877-uy1mJf
STEP 3) Create cache and cache-pool logical devices.
First create the cache-pool, which consists of the cache device – the fast device like SSD. Then create the cache logical volume – the main device is the slow one like hard disk drive and attach the cache-pool device to it tuning the cache mode. Option “-l 100%FREE” uses the how available free space on the device.
[root@srv ~]# lvcreate --type cache-pool -l 100%FREE -n lv_cache VG_storage1 /dev/sda6
  Using <1.38 MiB chunk size instead of default 64.00 KiB, so cache pool has less than 1000000 chunks.
  Logical volume "lv_cache" created.

[root@srv ~]# lvdisplay
  --- Logical volume ---
  LV Path                /dev/VG_storage1/lv_cache
  LV Name                lv_cache
  VG Name                VG_storage1
  LV UUID                7ACQH9-anfN-Zp3P-9ZvK-RoZZ-rwnF-e3Gfr9
  LV Write Access        read/write
  LV Creation host, time srv-115698, 2019-03-21 16:42:30 +0000
  LV Pool metadata       lv_cache_cmeta
  LV Pool data           lv_cache_cdata
  LV Status              NOT available
  LV Size                <406.99 GiB
  Current LE             104189
  Segments               1
  Allocation             inherit
  Read ahead sectors     auto
[root@srv ~]# lvcreate --type cache -l 100%FREE -n lv_storage1 --cachepool lv_cache VG_storage1 --cachemode writeback
  Logical volume "lv_storage1" created.
[root@srv ~]# lvdisplay
  --- Logical volume ---
  LV Path                /dev/VG_storage1/lv_storage1
  LV Name                lv_storage1
  VG Name                VG_storage1
  LV UUID                mQXqxG-wchJ-c9Co-2R18-DwJn-4inA-ixdjnI
  LV Write Access        read/write
  LV Creation host, time srv-115698, 2019-03-21 17:03:41 +0000
  LV Cache pool name     lv_cache
  LV Cache origin name   lv_storage1_corig
  LV Status              available
  # open                 0
  LV Size                <931.51 GiB
  Cache used blocks      0.00%
  Cache metadata blocks  5.05%
  Cache dirty blocks     0.00%
  Cache read hits/misses 0 / 22
  Cache wrt hits/misses  0 / 0
  Cache demotions        0
  Cache promotions       0
  Current LE             238466
  Segments               1
  Allocation             inherit
  Read ahead sectors     auto
  - currently set to     8192
  Block device           253:0

[root@srv ~]# lvs
  LV          VG          Attr       LSize    Pool       Origin              Data%  Meta%  Move Log Cpy%Sync Convert
  lv_storage1 VG_storage1 Cwi-a-C--- <931.51g [lv_cache] [lv_storage1_corig] 0.01   5.05            0.00
[root@srv ~]# ls -altr /dev/VG_storage1/lv_storage1
lrwxrwxrwx. 1 root root 7 Mar 21 17:03 /dev/VG_storage1/lv_storage1 -> ../dm-0
Now format the device with the file system of your choice and add the mount point in the /etc/fstab. We use here ext4:
[root@srv ~]# mkfs.ext4 -m 0 /dev/VG_storage1/lv_storage1
mke2fs 1.42.9 (28-Dec-2013)
Discarding device blocks: done
Filesystem label=
OS type: Linux
Block size=4096 (log=2)
Fragment size=4096 (log=2)
Stride=352 blocks, Stripe width=352 blocks
61054976 inodes, 244189184 blocks
0 blocks (0.00%) reserved for the super user
First data block=0
Maximum filesystem blocks=2392850432
7453 block groups
32768 blocks per group, 32768 fragments per group
8192 inodes per group
Superblock backups stored on blocks:
        32768, 98304, 163840, 229376, 294912, 819200, 884736, 1605632, 2654208,
        4096000, 7962624, 11239424, 20480000, 23887872, 71663616, 78675968,
        102400000, 214990848

Allocating group tables: done
Writing inode tables: done
Creating journal (32768 blocks): done
Writing superblocks and filesystem accounting information: done

[root@srv ~]# blkid |grep lv_storage1
/dev/mapper/VG_storage1-lv_storage1: UUID="1f63164b-5c3c-4e2a-b12d-f58c439e1087" TYPE="ext4"
[root@srv ~]# cat /etc/fstab
# /dev/sda5
UUID=fed2d03e-6bd8-44b5-ad16-12881364aad5       /               ext4            rw,relatime     0 1
# /dev/sda2
UUID=21fd3744-be83-402a-abf8-74b04bc5623b       /boot           ext2            rw,relatime,block_validity,barrier,user_xattr,acl       0 2
# /dev/sda4
UUID=0755d105-3084-4b56-9dd8-9f6603175882       /tmp            ext4            rw,nosuid,nodev,noexec,relatime 0 2
# /dev/sda3
UUID=db55b9bd-7bbf-472b-906b-9786e4b67880       none            swap            defaults,pri=-2 0 0
# lvm - /dev/mapper/VG_storage1-lv_storage1
UUID=1f63164b-5c3c-4e2a-b12d-f58c439e1087       /mnt/storage1       ext4            defaults,noatime 0 3
Mount the device and some more information:
[root@srv ~]# mount /mnt/storage1/
[root@srv ~]# df -h
Filesystem                           Size  Used Avail Use% Mounted on
/dev/sda5                             30G  1.8G   27G   7% /
devtmpfs                              16G     0   16G   0% /dev
tmpfs                                 16G     0   16G   0% /dev/shm
tmpfs                                 16G  113M   16G   1% /run
tmpfs                                 16G     0   16G   0% /sys/fs/cgroup
/dev/sda2                           1008M  182M  775M  20% /boot
/dev/sda4                            3.9G   17M  3.6G   1% /tmp
tmpfs                                3.2G     0  3.2G   0% /run/user/0
/dev/mapper/VG_storage1-lv_storage1  917G   77M  917G   1% /mnt/storage1

[root@srv ~]# lvs -a
  LV                  VG          Attr       LSize    Pool       Origin              Data%  Meta%  Move Log Cpy%Sync Convert
  [lv_cache]          VG_storage1 Cwi---C--- <406.99g                                0.29   5.05            53.21
  [lv_cache_cdata]    VG_storage1 Cwi-ao---- <406.99g
  [lv_cache_cmeta]    VG_storage1 ewi-ao----   48.00m
  lv_storage1         VG_storage1 Cwi-aoC--- <931.51g [lv_cache] [lv_storage1_corig] 0.29   5.05            53.21
  [lv_storage1_corig] VG_storage1 owi-aoC--- <931.51g
  [lvol0_pmspare]     VG_storage1 ewi-------   48.00m
Bonus – lvm cache statistics after several days of use in a video streaming web server
[root@srv ~]# lvdisplay
  --- Logical volume ---
  LV Path                /dev/VG_storage1/lv_storage1
  LV Name                lv_storage1
  VG Name                VG_storage1
  LV UUID                mQXqxG-wchJ-c9Co-2R18-DwJn-4inA-ixdjnI
  LV Write Access        read/write
  LV Creation host, time srv-115698, 2019-03-21 17:03:41 +0000
  LV Cache pool name     lv_cache
  LV Cache origin name   lv_storage1_corig
  LV Status              available
  # open                 1
  LV Size                <931.51 GiB
  Cache used blocks      99.99%
  Cache metadata blocks  7.48%
  Cache dirty blocks     23.60%
  Cache read hits/misses 5619143 / 1509996
  Cache wrt hits/misses  3511291 / 2459165
  Cache demotions        37151
  Cache promotions       331501
  Current LE             238466
  Segments               1
  Allocation             inherit
  Read ahead sectors     auto
  - currently set to     256
  Block device           253:3
And 24 hours later than the above command (93% storage used). The read effectiveness (read hits/misses) is with ratio 3.717 and the write ratio is 1.675. The dirty blocks grew to 33% and the IO was pretty good.
[root@srv ~]# df -m|grep storage1
/dev/mapper/VG_storage1-lv_storage1    938764 870506     68242  93% /storage1
[root@srv ~]# lvdisplay
  --- Logical volume ---
  LV Path                /dev/VG_storage1/lv_storage1
  LV Name                lv_storage1
  VG Name                VG_storage1
  LV UUID                mQXqxG-wchJ-c9Co-2R18-DwJn-4inA-ixdjnI
  LV Write Access        read/write
  LV Creation host, time srv-115698, 2019-03-21 17:03:41 +0000
  LV Cache pool name     lv_cache
  LV Cache origin name   lv_storage1_corig
  LV Status              available
  # open                 1
  LV Size                <931.51 GiB
  Cache used blocks      99.99%
  Cache metadata blocks  7.48%
  Cache dirty blocks     33.71%
  Cache read hits/misses 7027486 / 1890497
  Cache wrt hits/misses  4912962 / 2931596
  Cache demotions        110107
  Cache promotions       404459
  Current LE             238466
  Segments               1
  Allocation             inherit
  Read ahead sectors     auto
  - currently set to     256
  Block device           253:3
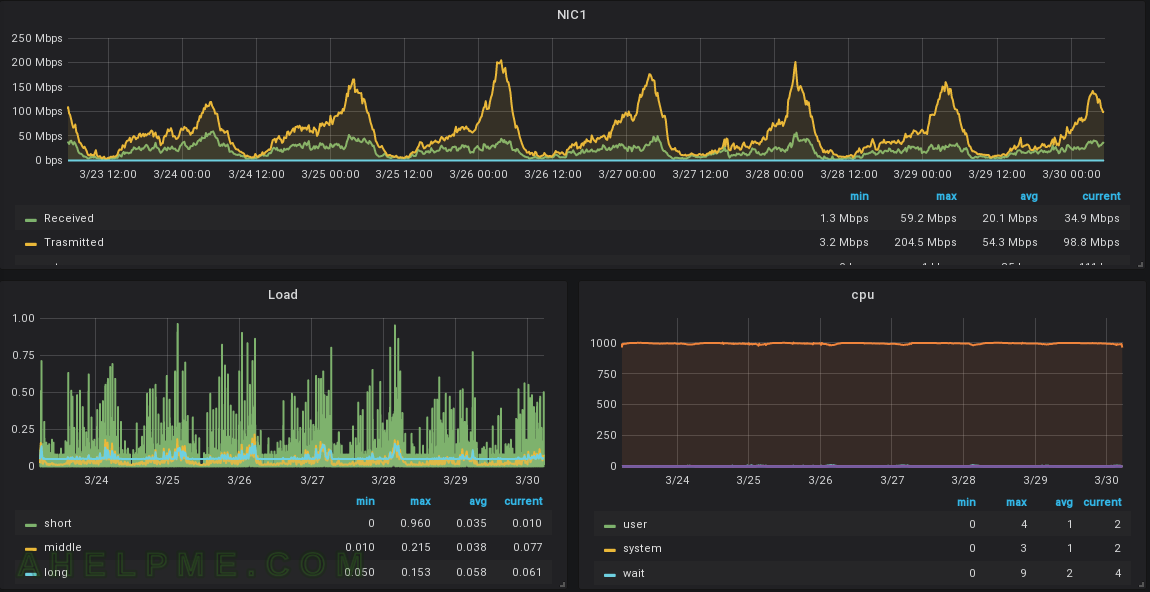
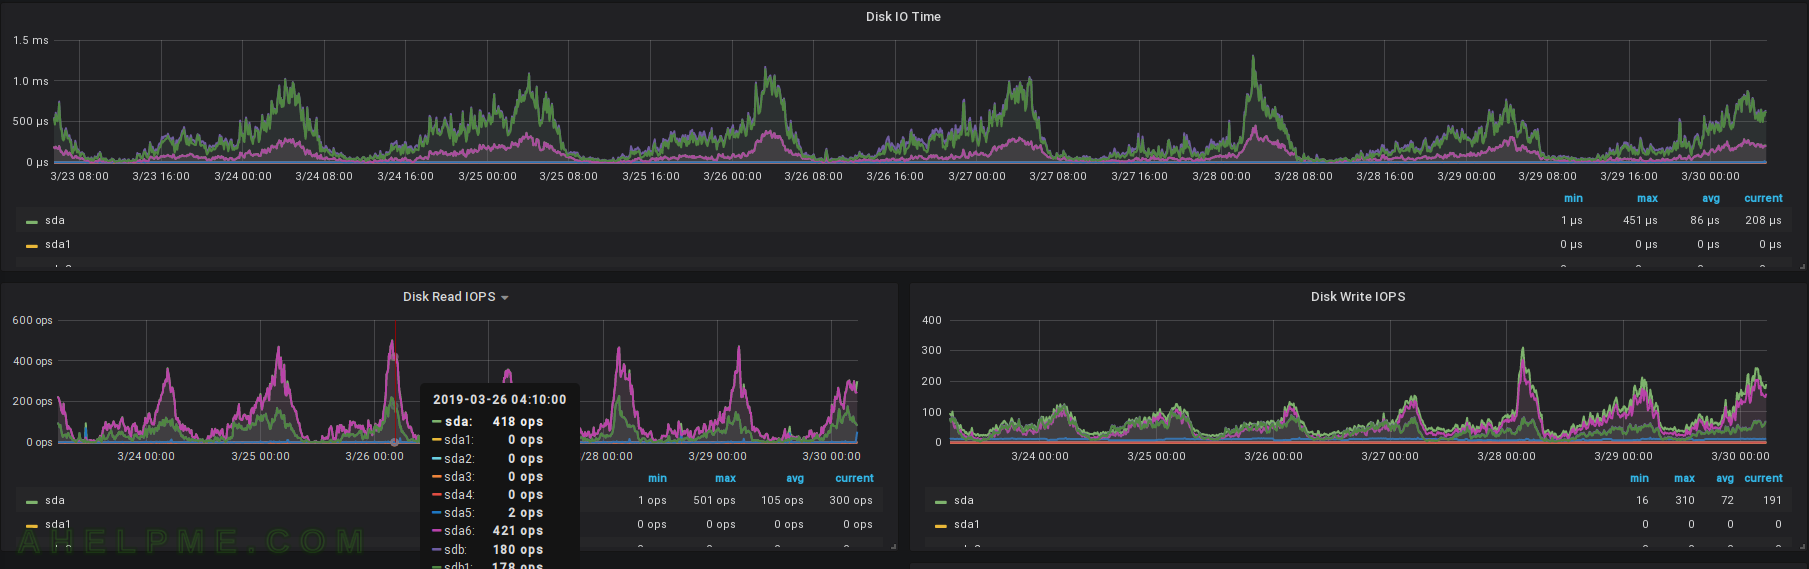
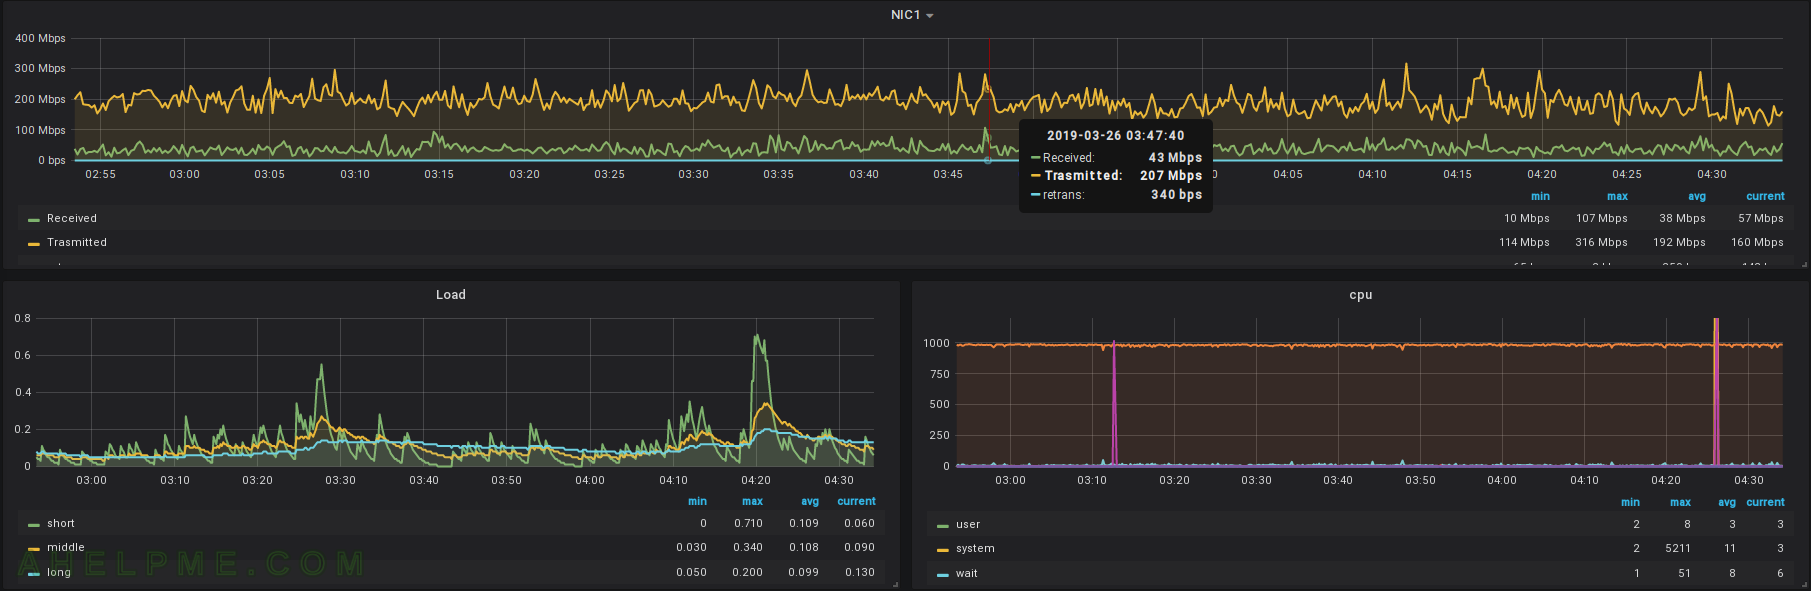
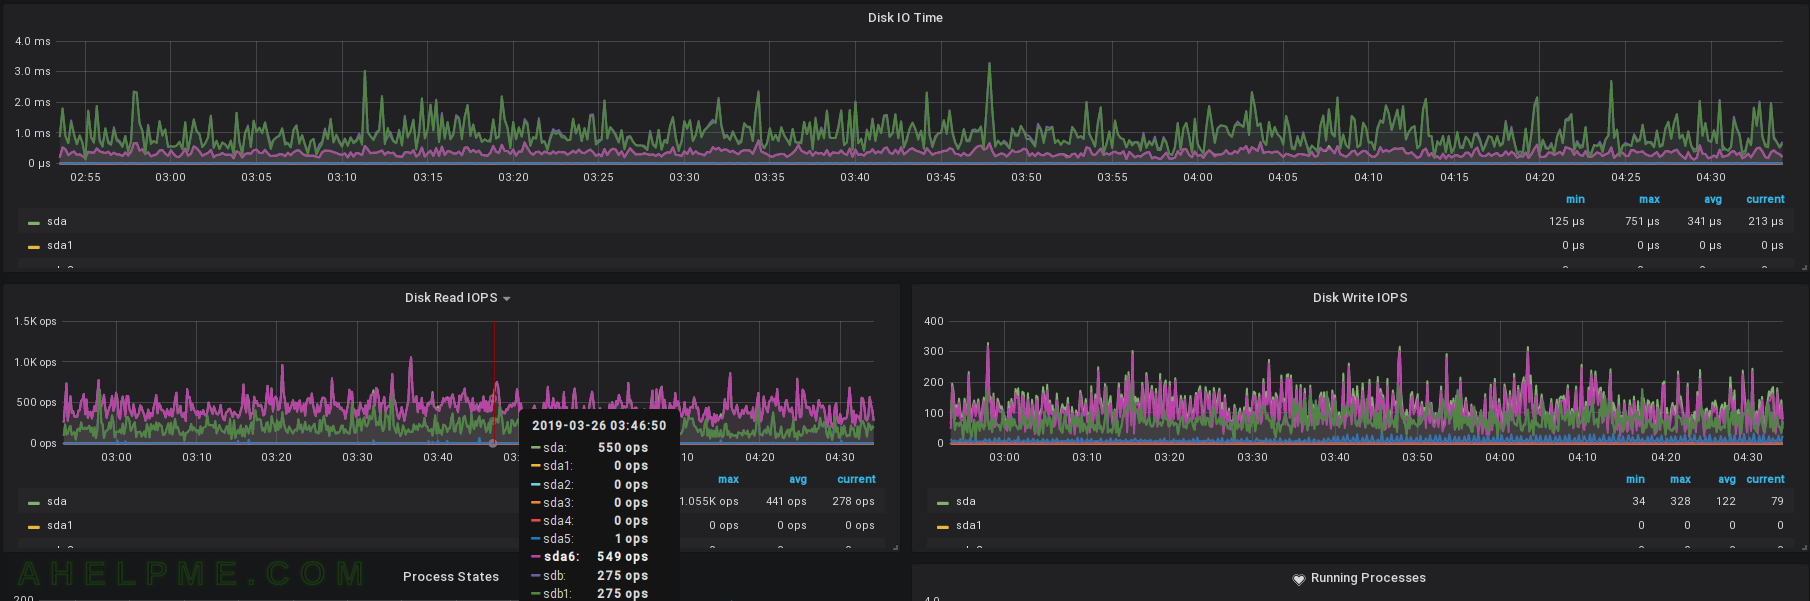
HLS streaming with a peak of 200Mbits, here are the graphs. You can clearly see the advantage of the caching device. The caching device has 3-5 times more reads than the slow device, which lower the IO pressure against it and the load average is really low.
SCREENSHOT 1) Around 200Mbits at peak and load under 0.75.
SCREENSHOT 2) The fast (cache) device sda6 has 2~5 times the slow device sdb1 (hard disk drive) reads and writes.
SCREENSHOT 3) Around 200Mbits at peak and load under 0.2 in 95%. Almost half of the time the server’s load avarage is below 0.1.
SCREENSHOT 4) The fast (cache) device sda6 has 2~5 times the slow device sdb1 (hard disk drive) reads and writes.
Hello there, thanks for this great tutorial.
I have tried this on a Raspberry Pi 4 using an SSD partition of c220GB and a physical disk of c7.1TB formatted. I am finding that the read performance tested with hdparm is slower with the cache than of the physical disk alone (300mb/s vs 100mb/s) – is this an unfair/bad test or is my configuration just not a good idea (i.e. the cost of the caching processes is outweighing the benefit)? Is there a better way to compare before and after?
Many thanks.
I don’t have this setup anymore to test it. But personally I would’ve tested it with fio not hdparm if I had it. As far as I remember it had a really good effect on a proxy streaming server related to IO and therefore the load of the server. Without the SSD cache, the IO just killed it during peak hours, but in fact, we had 10% top, which is well fitted in the SSD…
You may try to lower the chunk size, too…