Transfer only a list of files with rsync

Transferring a list of files from one server to another maybe not so easy as it looks like, if the list consists of files with symlinks in the paths. Consider the following example:

/mnt/storage1/dir1/subdir1/file1
/mnt/storage1/dir1/subdir2/file2
/mnt/storage1/dir1/subdir3/file3

But what if the subdir3 is a symlink to a sub-directory:

/mnt/storage1/dir1/subdir3 -> /mnt/storage2/dir1/subdir3

STEP 1) Generate a list of only files following the symlinks if they exist.

The best way is to use Linux command find:

find -L /mnt/storage1/ -type f &> find.files.log

The option “-L” instructs the find to follow symbolic links and the test for the file (-type f) will always match against the type of the file that the symbolic link points to and not the symlink itself.

STEP 2) rsync the list of the files

There are several options (–copy-links –copy-dirlinks), which must be used with rsync command to be able to transfer the list of files, which may include symlink directories in the files’ paths:

rsync --copy-links --copy-dirlinks --partial --files-from=/root/find.files.log --verbose --progress --stats --times --perms --owner --group 10.10.10.10::storage /

The command above uses the rsync daemon started on the source server with shared root under the name “root” in the rsync configuration. Here is a sample rsync daemon configuration (/etc/rsyncd.conf):

pid file = /run/rsyncd.pid
use chroot = yes
read only = yes
hosts allow = 10.10.10.10/24
hosts deny = *

[root]
        uid=0
        gid=0
        path = /
        comment = root partition
        exclude = /proc /sys

Of course, a relative path could be used in the rsync daemon configuration if the file generated is also a relative path. For simplicity, here the whole real path is used.

In addition, the rsync could be used without a rsync daemon, but in conjunction with ssh daemon:

rsync --rsh='ssh -p 22 -l root' --copy-links --copy-dirlinks --partial --files-from=/root/find.files.log --verbose --progress --stats --times --perms --owner --group 10.10.10.10:/ /

Again, because the files in the find.files.log are with absolute paths the root / must be used in the rsync command. Relative paths may be used, too.

Stopping the glusterfs volume releases disk sleep process hangs

A quick tip for GlusterFS volume. There are multiple possible reasons for a Linux process to hang in “Disk Sleep” state, which even the KILL -9 cannot interrupt:

  • a bug in GlusterFS
  • just bad options turn on online
  • other device relying on a GlusterFS, which is unavailable.
[17294588.184470] INFO: task gdisk:12505 blocked for more than 120 seconds.
[17294588.184538] "echo 0 > /proc/sys/kernel/hung_task_timeout_secs" disables this message.
[17294588.184628] gdisk           D ffff8ce01fb9acc0     0 12505  26866 0x00000080
[17294588.184780] Call Trace:
[17294588.184844]  [<ffffffffbaed3d81>] ? __wake_up_common_lock+0x91/0xc0
[17294588.184910]  [<ffffffffbb585da9>] schedule+0x29/0x70
[17294588.184974]  [<ffffffffbb5838b1>] schedule_timeout+0x221/0x2d0
[17294588.185037]  [<ffffffffbaed3dc3>] ? __wake_up+0x13/0x20
[17294588.185102]  [<ffffffffc0a05d2e>] ? loop_make_request+0x12e/0x210 [loop]
[17294588.185169]  [<ffffffffbaf06d32>] ? ktime_get_ts64+0x52/0xf0
[17294588.185232]  [<ffffffffbb58549d>] io_schedule_timeout+0xad/0x130
[17294588.185304]  [<ffffffffbb5863dd>] wait_for_completion_io+0xfd/0x140
[17294588.185369]  [<ffffffffbaedb990>] ? wake_up_state+0x20/0x20
[17294588.185468]  [<ffffffffbb157e64>] blkdev_issue_flush+0xb4/0x110
[17294588.185533]  [<ffffffffbb08d335>] blkdev_fsync+0x35/0x50
[17294588.185598]  [<ffffffffbb082f57>] do_fsync+0x67/0xb0
[17294588.185671]  [<ffffffffbb083240>] SyS_fsync+0x10/0x20
[17294588.185734]  [<ffffffffbb592ed2>] system_call_fastpath+0x25/0x2a
[17294708.187598] INFO: task gdisk:12505 blocked for more than 120 seconds.
[17294708.187664] "echo 0 > /proc/sys/kernel/hung_task_timeout_secs" disables this message.
[17294708.187753] gdisk           D ffff8ce01fb9acc0     0 12505  26866 0x00000080
[17294708.187905] Call Trace:
[17294708.187968]  [<ffffffffbaed3d81>] ? __wake_up_common_lock+0x91/0xc0
[17294708.188033]  [<ffffffffbb585da9>] schedule+0x29/0x70
[17294708.188096]  [<ffffffffbb5838b1>] schedule_timeout+0x221/0x2d0
[17294708.188159]  [<ffffffffbaed3dc3>] ? __wake_up+0x13/0x20
[17294708.188223]  [<ffffffffc0a05d2e>] ? loop_make_request+0x12e/0x210 [loop]
[17294708.188289]  [<ffffffffbaf06d32>] ? ktime_get_ts64+0x52/0xf0
[17294708.188352]  [<ffffffffbb58549d>] io_schedule_timeout+0xad/0x130
[17294708.188416]  [<ffffffffbb5863dd>] wait_for_completion_io+0xfd/0x140
[17294708.188480]  [<ffffffffbaedb990>] ? wake_up_state+0x20/0x20
[17294708.188545]  [<ffffffffbb157e64>] blkdev_issue_flush+0xb4/0x110
[17294708.188624]  [<ffffffffbb08d335>] blkdev_fsync+0x35/0x50
[17294708.188690]  [<ffffffffbb082f57>] do_fsync+0x67/0xb0
[17294708.188754]  [<ffffffffbb083240>] SyS_fsync+0x10/0x20
[17294708.188828]  [<ffffffffbb592ed2>] system_call_fastpath+0x25/0x2a

The above example of dmesg log shows the gdisk process stuck in “Disk Sleep” state, because of a loop device from a file on an unavailable GlusterFS volume! Kill -9 won’t help, the process will remain in this bad state and even a restart would be difficult to perform!

[root@srv1 ~]# gluster volume stop VOL2 
Stopping volume will make its data inaccessible. Do you want to continue? (y/n) y
volume stop: VOL2: success
[root@srv1 ~]# gluster volume start VOL2 
volume start: VOL2: success

The solution is to stop the GlusterFS Volume and all the blocked processes on bad devices such as above would be released. The processes will carry on executing or will end their execution after issuing a stop command to the volume. No problem to start the GlusterFS volume immediately after the stop!
NOTE: executing STOP command would affect all servers using this volume. The volume becomes inaccessible for all!

Repairing damaged backup GPT with gdisk

Problem with network shared storage could lead to a damaged file system or even GPT tables, so the gdisk may help in this case.
Here it is a nasty the error:

[root@srv1 ~]# kpartx /dev/loop0
Alternate GPT is invalid, using primary GPT.
loop0p1 : 0 83881984 /dev/loop0 2048
[root@srv1 ~]# parted /dev/loop0
GNU Parted 3.1
Using /dev/loop0
Welcome to GNU Parted! Type 'help' to view a list of commands.
(parted) p                                                                
Error: The backup GPT table is corrupt, but the primary appears OK, so that will be used.
OK/Cancel? OK                                                             
Model: Loopback device (loopback)
Disk /dev/loop0: 42.9GB
Sector size (logical/physical): 512B/512B
Partition Table: gpt
Disk Flags: 

Number  Start   End     Size    File system  Name     Flags
 1      1049kB  42.9GB  42.9GB               primary

(parted)

So parted reports the backup GPT is damaged, but how to fix it? The solution is to use gdisk and use write “w” command in it. gdisk also shows the exact error with the GPT table with “v” option:

[root@srv1 ~]# gdisk 
GPT fdisk (gdisk) version 0.8.10

Type device filename, or press <Enter> to exit: /dev/loop0
Warning! Main and backup partition tables differ! Use the 'c' and 'e' options
on the recovery & transformation menu to examine the two tables.

Warning! One or more CRCs don't match. You should repair the disk!

Partition table scan:
  MBR: protective
  BSD: not present
  APM: not present
  GPT: damaged

****************************************************************************
Caution: Found protective or hybrid MBR and corrupt GPT. Using GPT, but disk
verification and recovery are STRONGLY recommended.
****************************************************************************

Command (? for help): p
Disk /dev/loop0: 83886080 sectors, 40.0 GiB
Logical sector size: 512 bytes
Disk identifier (GUID): 7EDF123B-FBC4-4C09-B636-922BD165F862
Partition table holds up to 128 entries
First usable sector is 34, last usable sector is 83886046
Partitions will be aligned on 2048-sector boundaries
Total free space is 4029 sectors (2.0 MiB)

Number  Start (sector)    End (sector)  Size       Code  Name
   1            2048        83884031   40.0 GiB    0700  primary

Command (? for help): v

Caution: The CRC for the backup partition table is invalid. This table may
be corrupt. This program will automatically create a new backup partition
table when you save your partitions.

Identified 1 problems!

Command (? for help): p
Disk /dev/loop0: 83886080 sectors, 40.0 GiB
Logical sector size: 512 bytes
Disk identifier (GUID): 7EDF123B-FBC4-4C09-B636-922BD165F862
Partition table holds up to 128 entries
First usable sector is 34, last usable sector is 83886046
Partitions will be aligned on 2048-sector boundaries
Total free space is 4029 sectors (2.0 MiB)

Number  Start (sector)    End (sector)  Size       Code  Name
   1            2048        83884031   40.0 GiB    0700  primary

Command (? for help): w

Final checks complete. About to write GPT data. THIS WILL OVERWRITE EXISTING
PARTITIONS!!

Do you want to proceed? (Y/N): Y
OK; writing new GUID partition table (GPT) to /dev/loop0.

Warning: The kernel is still using the old partition table.
The new table will be used at the next reboot.
The operation has completed successfully.

And the GPT backup in this loop device is fixed. Executing parted again reports no problems:

[root@srv1 ~]# parted /dev/loop0 print
Model: Loopback device (loopback)
Disk /dev/loop0: 42.9GB
Sector size (logical/physical): 512B/512B
Partition Table: gpt
Disk Flags: 

Number  Start   End     Size    File system  Name     Flags
 1      1049kB  42.9GB  42.9GB               primary

Verify also reports nor error. More options are available:

[root@srv1 ~]# gdisk /dev/loop0
GPT fdisk (gdisk) version 0.8.10

Partition table scan:
  MBR: protective
  BSD: not present
  APM: not present
  GPT: present

Found valid GPT with protective MBR; using GPT.

Command (? for help): h
b  back up GPT data to a file
c  change a partition's name
d  delete a partition
i  show detailed information on a partition
l  list known partition types
n  add a new partition
o  create a new empty GUID partition table (GPT)
p  print the partition table
q  quit without saving changes
r  recovery and transformation options (experts only)
s  sort partitions
t  change a partition's type code
v  verify disk
w  write table to disk and exit
x  extra functionality (experts only)
?  print this menu

Command (? for help): v

No problems found. 4029 free sectors (2.0 MiB) available in 2
segments, the largest of which is 2015 (1007.5 KiB) in size.

Command (? for help): q

Force losetup detach of local file after it became unavailable

Mounting a file as loop devices is simple enough operation! But what if the file just disappears because of the network storage got unreachable?

In our case the shared network storage had got unavailable and the ext4 file system of the loop device got read-only! Unfortunately after the reset of the shared network storage and mounting it in the same place, the loop device (/dev/loop0) still maintained the old file descriptor to the unavailable file. And the losetup could not detach the device, at all.

root@srv ~# losetup -d /dev/loop0
root@srv ~# losetup -l
NAME       SIZELIMIT OFFSET AUTOCLEAR RO BACK-FILE
/dev/loop0         0      0         0  0 /mnt/storage4/servers/test_raw_image.img
[root@lsrv1 ~]# kpartx -df /dev/loop0
read error, sector 0
read error, sector 1
read error, sector 29

The above command could not detach the device. Unfortunately, the losetup does not have the force detach, so the server ended with blocked loop0 device pointing to unavailable file. kpartx does not work, neither.

The solution is to use dmsetup!

root@srv ~# dmsetup remove /dev/mapper/loop0p1
root@srv ~# losetup -l
root@srv ~#

And there is no loop device any more. The wrong pointing loop device has been removed successfully! Now the user can use the loop0 for another device and in many cases, this helps to umount the filesystem!

removing the default kernel in CentOS 8 – remove elrepo kernel

Removing the default kernel aka the loaded kernel in CentOS 8 maybe challenging because the package is protected and cannot be removed by the yum or dnf.
Here is the case: an elrepo kernel-ml loaded and the dnf prints it cannot remove the package, because it is protected:

[root@srv ~]# dnf remove kernel-ml kernel-ml-core kernel-ml-modules
Error: 
 Problem: The operation would result in removing the following protected packages: kernel-ml-core
(try to add '--skip-broken' to skip uninstallable packages or '--nobest' to use not only best candidate packages)
[root@srv ~]# uname -a
Linux srv.localhost 5.10.4-1.el8.elrepo.x86_64 #1 SMP Tue Dec 29 11:04:23 EST 2020 x86_64 x86_64 x86_64 GNU/Linux
[root@srv ~]# grubby --default-kernel
/boot/vmlinuz-5.10.4-1.el8.elrepo.x86_64

The system is booted up with the kernel we are trying to remove, which is impossible.

The solution is to set a new default kernel and load it. Then dnf will be able to remove the first kernel.

For CentOS 7, just use the yum instead of dnf command.
Using grubby is really easy and straightforward:

STEP 1) List all installed and available to boot kernels

[root@srv ~]# grubby --info=ALL |grep ^kernel
kernel="/boot/vmlinuz-5.10.4-1.el8.elrepo.x86_64"
kernel="/boot/vmlinuz-4.18.0-259.el8.x86_64"
kernel="/boot/vmlinuz-4.18.0-257.el8.x86_64"
kernel="/boot/vmlinuz-0-rescue-45e12f0814fd4947b99cbdcb88950361"

STEP 2) Select the kernel to load the next time

[root@srv ~]# grubby --set-default "/boot/vmlinuz-4.18.0-259.el8.x86_64"
The default is /boot/loader/entries/45e12f0814fd4947b99cbdcb88950361-4.18.0-259.el8.x86_64.conf with index 1 and kernel /boot/vmlinuz-4.18.0-259.el8.x86_64

Keep on reading!

Booting network installation from ipxe disk using IPMI KVM

There is a project for extended PXE Boot features https://ipxe.org/. This article is not for describing what this project may offer, but to show how to boot any Linux distribution (in fact, Windows 10, too) network installation wizard using the virtual CD/DVD of an IPMI KVM, DELL’s DRAC, HP iLO, IBM RSA/IMM and in general, KVM over IP.
Using the iPXE CD bootable disk mounted in the virtual CD/DVD of the server’s remote console (IPMI KVM and so on) will allow:

  • Booting from a CD/DVD with only a 1M size.
  • Extends the PXE features of the server’s network card.
  • Manual set IP address, i.e. not relying on DHCP server. In addition of the DHCP feature, but DHCP feature requires DHCP server, which is not always the case.
  • Load a Linux kernel and initramfs from a URL.
  • Boot a Linux live or installation CD/DVD from an URL. The server could load the instllation wizard from an official mirror in the Internet.
  • Manual install – boot from 1M CD and continue with multi gigabyte installation from an URL. For comparision the CentOS 8 network installation disk is more than 600M versus 1M iPXE CD disk. Booting directly from a 600M CentOS 8 network installation disk is unstable and really slow when the disk is mounted in user’s KVM. And not alwyas is possible to mount a disk next to the server location (or in the same co-location).
  • Automated install – simple unattended installation with kickstart files without the need of speacial features of the dedicated service provider.
  • No software installation or code writting needed.

This article uses the iPXE CD to boot and manually set an IP and then load the Linux kernel and initramfs of the CentOS 8 installation disk using an official URL mirror on the Internet. All types of server’s KVM, which supports CD/DVD virtual device, can be used.

Just 1 Mbytes of CD/DVD is required to boot an installation of a (connected to the Internet) server/machine.

Here are the steps and correct (all lines are tested) command lines to boot an installation wizard. The server is a SUPERMICRO server with IPMI KVM for remote management.
The iPXE ISO file is located here http://boot.ipxe.org/ipxe.iso

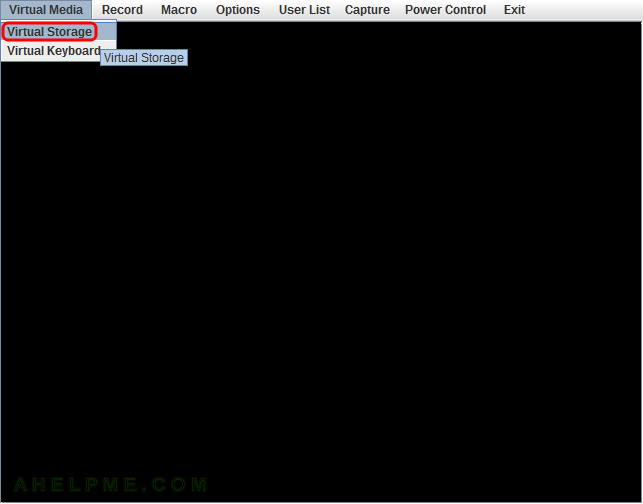
SCREENSHOT 1) Open the IPMI KVM and click on “Virtual Storage” menu to open the image mount dialog.

main menu
Virtual Storage menu

Keep on reading!

xdg and autostart in Linux X server regardless the desktop environment

There is a tool xdg, which manages application integration with the different GUI Desktops in the Linux world. One of the features it offers is to autostart an application when the X window system starts and it is perfectly normal to have a bunch of running programs that cannot be found in the Windowing manager settings like KDE System Settings -> Autostart, GNOME Tweak tool and Autostart and so on.

xdg offers autostart of Linux appilcations mainly Desktop when the GUI windowing system starts

There two main paths to look for entries to autostart:

  1. /etc/xdg/autostart – called system-wide and most of the application will place files when they are installed.
  2. [user’s home]/.config/autostart – user’s applications to start when the user logs in .

With xdg autostart feature the user can explain himself why the Windowing systems like KDE or GNOME start tens of applications (not exactly related to the base GUI windowing system).

There is a security problem here, which is sometimes installing a package will place an autostart file there because the maintainer decided it is important but the package might be just a dependency and the next time the user logs in unwanted program might execute and open ports!

For example, Rygel is an open-source UPnP/DLNA MediaServer and it might be installed as a dependency but it places an autostart file, which starts a UPnP/DLNA server and exports the /home/[user’s directory]/Videos, /home/[user’s directory]/Pictures and more to the local network. Another example is with the GNOME index system tracker and the tracker-store, which may easily eat the RAM, disk, CPU, battery on a system without GNOME but with a different GUI!

Here is what a typical Ubuntu 18.04 system might autostart

Keep on reading!

multiple random crashes of firefox in a docker container under Linux

Multiple random crashes in Firefox under Linux, when started in a docker container with errors of the kind:

[myuser@92ee57f7f63a ~]$ Exiting due to channel error.
Exiting due to channel error.
[myuser@92ee57f7f63a ~]$ firefox 
ExceptionHandler::GenerateDump cloned child 4864
ExceptionHandler::SendContinueSignalToChild sent continue signal to child
ExceptionHandler::WaitForContinueSignal waiting for continue signal...
Exiting due to channel error.
Bus error (core dumped)
[myuser@92ee57f7f63a ~]$ 
###!!! [Parent][MessageChannel] Error: (msgtype=0x5A001C,name=PHttpChannel::Msg_DeleteSelf) Channel error: cannot send/recv

The chances to stop these multiple random crashes if you just increase the memory for the /dev/shm device in the docker container is really good! The default values in the docker /dev/shm are really low (in the tested machine only 64Mbytes) and the recommended values are at least 2Gbytes. More shared tabs more shared memory is needed.

Such strange and random crashes might cause a testing case to fail in an automation testing suite using the Selenium driver to start a Firefox headless instance.

To increase the shared memory size in the docker container, the container should be started with “–shm-size” option. For example:

docker run -it --shm-size=2048m my-gui-fedora:31

If the option –shm-size is missing (probably an old docker software) mapping an already mounted tmpfs directory in the host machine to the container is also a solution:

mkdir /dev/dockershm
mount -t tmpfs -o size=2048m tmpfs /dev/shmdocker
chmod 1777 /dev/shmdocker
docker run -d -v /mnt/shmdocker:/dev/shm my-gui-fedora:31

Remounting in the docker container is also possible:

srv myuser # docker exec -it my-gui bash
[myuser@92ee57f7f63a ~]$ sudo mount -o remount,size=2048m /dev/shm

Note the container should be run with –privileged option to be able to remount the /dev/shm.

The build docker command also has the –shm-size for the purpose of the building process not changing the default shared memory size in the containers based on the image afterward.

gpg list key and display key details from a file (without importing the key)

Files with GPG keyspublic or private. Here is how to get more information without importing the keys.
GPG cli could give enough information for an explored key in a file:

  • public or private key
  • encrypted or unencrypted key
  • user id description (including email)
  • key id and issuer fpr v4
  • when the key was generated and when it will expire
  • the algo for the encrypted key
  • more

The key may be in binary or ascii format. No difference.
Here is the GNU GPG cli command:

gpg --list-packets < ./filewith.key

All examples below are made with gpg (GnuPG) 2.2.19.
Keep on reading!

Cron missing path – executing docker/podman – adding network: failed to locate iptables

If you have ever happened to execute some complex scripts using the cron system you were inevitable to discover the Linux environment was different than the login or ssh shell. The different environment tends to lead to a missing or different PATH environment! Here is what happens with podman starting a container from a cron script:

time="2020-04-19T20:45:20Z" level=error msg="Error adding network: failed to locate iptables: exec: \"iptables\": executable file not found in $PATH"
time="2020-04-19T20:45:20Z" level=error msg="Error while adding pod to CNI network \"podman\": failed to locate iptables: exec: \"iptables\": executable file not found in $PATH"
Error: unable to start container "onedrive-cli": error configuring network namespace for container d297cf80db20441d4258a1acc7d810444795d1ca8730ab242d9fe8a13eaa697d: failed to locate iptables: exec: "iptables": executable file not found in $PATH

The iptables executable is missing because the PATH variable is different than the login or ssh shell one. Executing the commands or the script under ssh or login will result in no error and a proper podman (docker) execution!

A similar problem could have happened with another software trying to execute iptables or another tool, which is not found in the cron’s PATH environment because cron’s environment is very limited and

To ensure the PATH is like the user’s (root) environment just source the “profile” or “.bashrc” file of the current user before the execution of the script or in the first lines of it.
This would do the trick.

. /etc/profile

Or user’s custom

. ~/.bashrc

Or the default OS bashrc

. /etc/bashrc

The dot may be replaced by “source”:

source /etc/bashrc

All (environment) variables will be available after the source command.

Here is the difference:
The environment without the sourcing profile/bashrc file:

 
LANG=en_US.UTF-8
XDG_SESSION_ID=19118
USER=root
PWD=/root
HOME=/root
SHELL=/bin/sh
SHLVL=1
LOGNAME=root
DBUS_SESSION_BUS_ADDRESS=unix:path=/run/user/0/bus
XDG_RUNTIME_DIR=/run/user/0
PATH=/usr/bin:/bin
_=/usr/bin/env

Sourcing the “/etc/profile” file:

LANG=en_US.UTF-8
HISTCONTROL=ignoredups
HOSTNAME=srv.example.com
XDG_SESSION_ID=19165
USER=root
PWD=/root
HOME=/root
MAIL=/var/spool/mail/root
SHELL=/bin/bash
SHLVL=1
LOGNAME=root
DBUS_SESSION_BUS_ADDRESS=unix:path=/run/user/0/bus
XDG_RUNTIME_DIR=/run/user/0
PATH=/usr/local/sbin:/usr/sbin:/usr/bin:/bin
HISTSIZE=1000
LESSOPEN=||/usr/bin/lesspipe.sh %s
_=/usr/bin/env

Multiple additional envrinment varibles, which could be important for user’s scripts executed by the cron.

And in CentOS 8 the iptables happens to be in “/usr/sbin/iptables” – a path /usr/sbin not included in the default cron environment PATH variable!
Of course, the PATH environment may be edited in the cron scheduler with crontab (by just setting the PATH with a path) till the next path missing in it and included in the user’s path! It’s just better to ensure the two environments are the same every time by sourcing the environment configuration file such as /etc/profile or user’s bashrc (or the default on in /etc/bashrc?).