Install aptly under Ubuntu 18 LTS with nginx serving the packages and the first steps

This article is how to install aptly software, which offers easy Debian repository management.
First, few words for aptly and what tasks are really simple to do:

  • Mirror an existing (remote) repository. Make a local copy of Debian or Ubuntu repostories for all your internal infrastructure.
  • Create your own repositories
  • Create snapshots of repositories and mirrors.
  • Merge repositories
  • Make diff between repositories (in fact snapshots of repositories, but you may make a mirror of an repository and then make a snapshot and then make a diff with some other snapshot to see the changes between the different repositories or the time the snapshots are made).
  • Remove or add individual packages from official mirrored repositories.
  • Use api calls to manage the repositories. HTTP REST API is still in development, but a big part of it works.

For more information you may visit the official documentation page – https://www.aptly.info/doc/overview/

We are going to install the aptly and despite it could be used to serve the repository files we will use the Nginx web server for this work. Nginx is a more fast and reliable web server with easy installation of SSL certificates for our repositories.
The aptly is included in official Ubuntu repositories in the component universe, but at present, it is 2 to 3 versions behind the stable one from the aptly site, so we are going to use their repository to install aptly. Still, if you do not want to use
Keep on reading!

Install Cobbler 2.6 under Ubuntu 16.04 LTS from Cobbler source – manual intallation

This article will show how to install Cobbler 2.6.11 (the last from the 2.6 branches) under Ubuntu 16.04 LTS. There is Cobbler package version 2.4.x in the Ubuntu 16 LTS, but Cobbler 2.4 is really old and some options and features are not available anymore, so installing from the Ubuntu package system Cobbler 2.4 would probably just waste your time and you will move to 2.6 or even later. In fact, Ubuntu 18 LTS removed the Cobbler packages at all and only manual install (aka installation from sources is only available or from an anonymous repository like PPA).
Here are the steps to install a working Cobbler 2.6 under Ubuntu 16.04 (Xenial Xerus).

Note: All commands are executed as root user, so it is much easier to just execute ones “sudo su” before you begin following the steps below.

STEP 1) Update your system to the latest state and install the Cobbler 2.6.11 dependencies

Update the system:

apt update
apt upgrade -y

Install the Cobbler 2.6 dependencies:

apt install -y make git python-yaml python-cheetah python-netaddr python-simplejson libapache2-mod-wsgi python-django atftpd debmirror apache2 python-urlgrabber fence-agents isc-dhcp-server

STEP 2) Download and install the Cobbler 2.6.11 source

cd /root
wget https://github.com/cobbler/cobbler/archive/v2.6.11.tar.gz
tar xf v2.6.11.tar.gz
cd cobbler-2.6.11
make install

This will install Cobbler and Cobbler web by replacing all configurations of old Cobbler install! The python files will be installed under “/usr/local”, so a big part of Cobbler will be installed in /usr/local/lib/python2.7/dist-packages/cobbler.

STEP 3) Enable Cobbler in apache2

a2enconf cobbler cobbler_web
a2enmod proxy proxy_http rewrite ssl
a2ensite default-ssl
systemctl enable apache2

Enable apache2 configuration file for cobbler web, enable the apache2 modules and the default HTTPS apache2 virtual host, because the web interface won’t work with HTTP. Opening the Cobbler web interface using HTTP will result in forbidden error (HTTP error 403). The Cobbler web interface is limited to use HTTPS.
Keep on reading!

Cobbler web – AppRegistryNotReady – Apps aren’t loaded yet

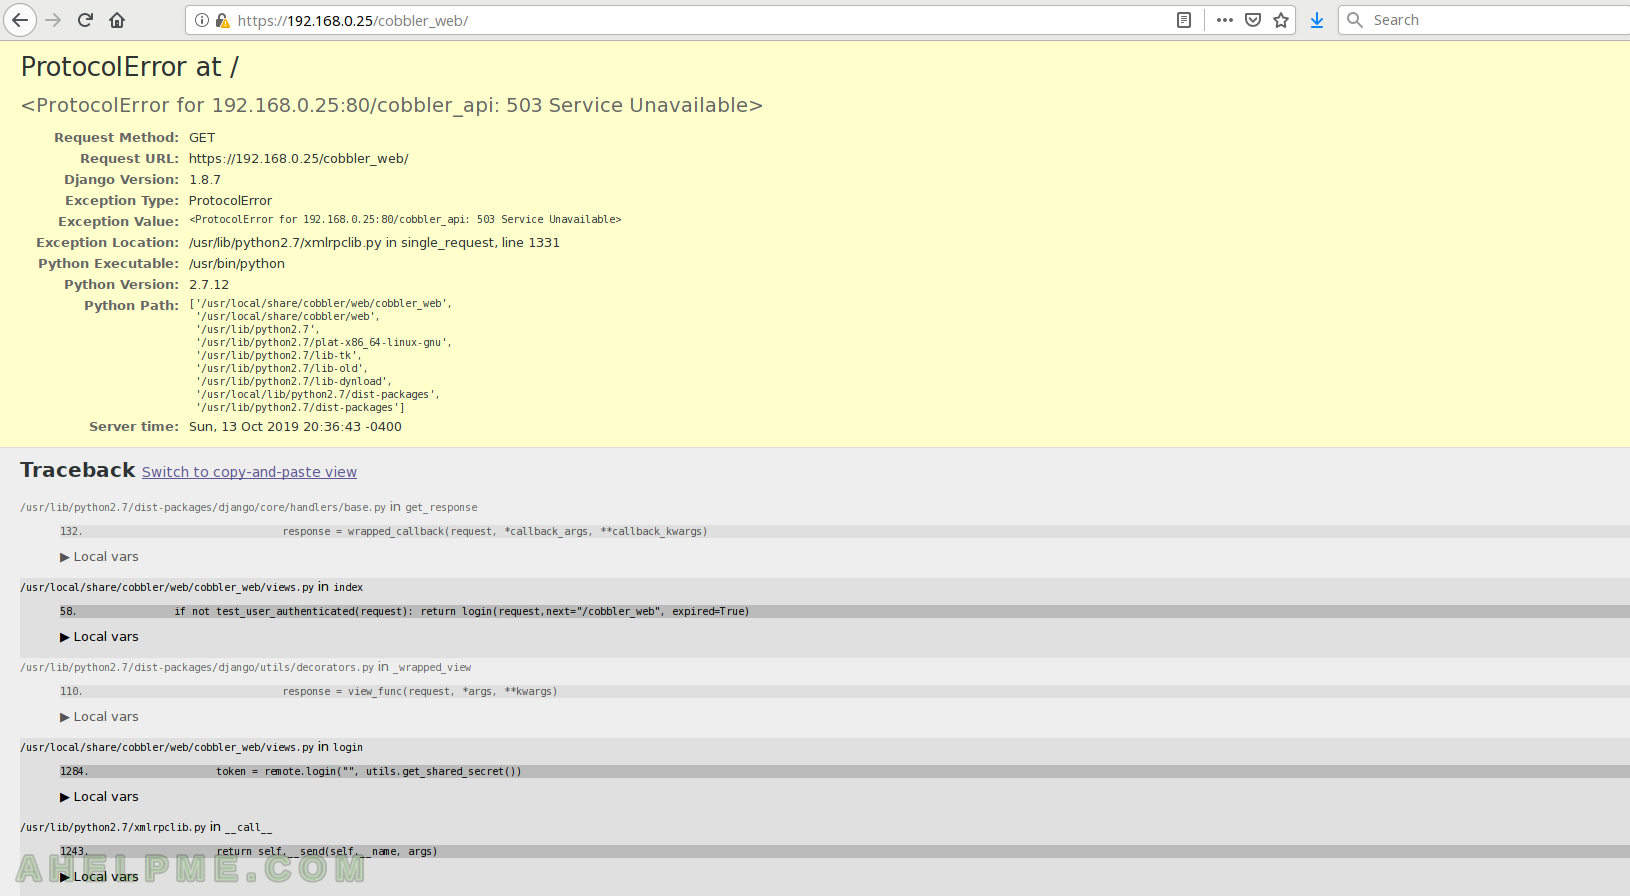
If you happen to use Cobbler 2.6 (even the last release of 2.6 – 2.6.11) you may encounter the following error when you try loading the Cobbler web interface:

AppRegistryNotReady at /distro/list

Apps aren't loaded yet.

Request Method: 	GET
Request URL: 	https://192.168.0.25/cobbler_web/distro/list
Django Version: 	1.8.7
Exception Type: 	AppRegistryNotReady
Exception Value: 	

Apps aren't loaded yet.

Exception Location: 	/usr/lib/python2.7/dist-packages/django/apps/registry.py in check_apps_ready, line 124
Python Executable: 	/usr/bin/python
Python Version: 	2.7.12
Python Path: 	

['/usr/local/share/cobbler/web/cobbler_web',
 '/usr/local/share/cobbler/web',
 '/usr/lib/python2.7',
 '/usr/lib/python2.7/plat-x86_64-linux-gnu',
 '/usr/lib/python2.7/lib-tk',
 '/usr/lib/python2.7/lib-old',
 '/usr/lib/python2.7/lib-dynload',
 '/usr/local/lib/python2.7/dist-packages',
 '/usr/lib/python2.7/dist-packages']

Server time: 	Sun, 13 Oct 2019 21:24:30 -0400

The Cobbler web does not work properly. The Django application is not started properly.

main menu
Cobbler web – web error

It is a known error and it is easily fixable by editing the Cobbler web source file “/usr/local/share/cobbler/web/cobbler.wsgi” (or /usr/share/cobbler/web/cobbler.wsgi) and replacing the two lines:

    import django.core.handlers.wsgi
    _application = django.core.handlers.wsgi.WSGIHandler()

With the code:

    from django.core.wsgi import get_wsgi_application
    _application = get_wsgi_application()

Note the “_application” variable starts with underline.

In fact, Cobbler 2.4 has the same issue, but the variable is “application” without underline in the start and there is no return line at the end of the file (in 2.6 there is a return clause and you must leave it there!)

import django.core.handlers.wsgi
application = django.core.handlers.wsgi.WSGIHandler()

replace with

from django.core.wsgi import get_wsgi_application
application = get_wsgi_application()

It is highly unlikely to use Cobbler 2.4, but still, if you need it and you come across this page this is the fix for the Cobbler web and be careful with the variable name _applicationapplication for the various Cobbler versions.

cobbler import – stderr file: No such file or directory

What a miss here in our docker Cobbler instance! When trying to import a new distro in Cobbler the import finished with failed task and multiple errors of:

running: /usr/bin/file /var/www/cobbler/ks_mirror/ubuntu-18.04.3-server-amd64-x86_64/dists/bionic/Release.gpg
received on stdout: 
received on stderr: /bin/sh: /usr/bin/file: No such file or directory

running: /usr/bin/file /var/www/cobbler/ks_mirror/ubuntu-18.04.3-server-amd64-x86_64/dists/bionic/main/binary-i386/Release
received on stdout: 
received on stderr: /bin/sh: /usr/bin/file: No such file or directory

The “file”? Apparently, the Linux file command is missing and it is just possible because it is a docker container with the minimum installation of packages and dependencies.

Without the “file” command import will fail with “No signature matched” even you have synced with the latest signature just before the execution of the import command.

Install the package “file” in your server.
CentOS 7/Fedora:

yum install -y file

Ubuntu

apt install -y file

Keep on reading!

cobbler – The SECRET_KEY setting must not be empty.

When installing cobbler (in our case 2.6.11, but it might happen with other versions) from source, because they do not offer binary packages anymore, the web showed this error:

[Tue Oct 08 07:41:00.680646 2019] [wsgi:error] [pid 8770:tid 140654161590016] [remote 192.168.0.250:5793] mod_wsgi (pid=8770): Exception occurred processing WSGI script '/usr/local/share/cobbler/web/cobbler.wsgi'.
.....
.....
[Tue Oct 08 07:41:00.687544 2019] [wsgi:error] [pid 8770:tid 140654161590016] [remote 192.168.0.250:5793] ImproperlyConfigured: The SECRET_KEY setting must not be empty.

The solution is simply to add value to the variable SECRET_KEY in file “/usr/local/share/cobbler/web/settings.py” (this file might be in /usr/share/cobbler/web/settings.py)

root@srv:~# grep -n SECRET_KEY /usr/local/share/cobbler/web/settings.py
39:SECRET_KEY = ''

The 39th line put a randomly generated text. You may use openssl to generate the random text like:

root@srv:~# openssl rand -base64 32
NVb09/5TWmCcqfDBLsvyCppza9lJ5Eyb0HWW4HTlSfo=

Edit the cobbler web setting file and put the string there:

root@srv:~# grep SECRET_KEY /usr/local/share/cobbler/web/settings.py
SECRET_KEY = 'NVb09/5TWmCcqfDBLsvyCppza9lJ5Eyb0HWW4HTlSfo='

The whole output error in the apache logs

The error could be seen in Cobbler web installed in Ubuntu 16 when installing cobbler 2.6.11.

[Tue Oct 08 07:41:00.680646 2019] [wsgi:error] [pid 8770:tid 140654161590016] [remote 192.168.0.250:5793] mod_wsgi (pid=8770): Exception occurred processing WSGI script '/usr/local/share/cobbler/web/cobbler.wsgi'.
[Tue Oct 08 07:41:00.680724 2019] [wsgi:error] [pid 8770:tid 140654161590016] [remote 192.168.0.250:5793] Traceback (most recent call last):
[Tue Oct 08 07:41:00.680764 2019] [wsgi:error] [pid 8770:tid 140654161590016] [remote 192.168.0.250:5793]   File "/usr/local/share/cobbler/web/cobbler.wsgi", line 27, in application
[Tue Oct 08 07:41:00.681890 2019] [wsgi:error] [pid 8770:tid 140654161590016] [remote 192.168.0.250:5793]     return _application(environ, start_response)
[Tue Oct 08 07:41:00.682025 2019] [wsgi:error] [pid 8770:tid 140654161590016] [remote 192.168.0.250:5793]   File "/usr/lib/python2.7/dist-packages/django/core/handlers/wsgi.py", line 170, in __call__
[Tue Oct 08 07:41:00.683222 2019] [wsgi:error] [pid 8770:tid 140654161590016] [remote 192.168.0.250:5793]     self.load_middleware()
[Tue Oct 08 07:41:00.683380 2019] [wsgi:error] [pid 8770:tid 140654161590016] [remote 192.168.0.250:5793]   File "/usr/lib/python2.7/dist-packages/django/core/handlers/base.py", line 49, in load_middleware
[Tue Oct 08 07:41:00.685006 2019] [wsgi:error] [pid 8770:tid 140654161590016] [remote 192.168.0.250:5793]     for middleware_path in settings.MIDDLEWARE_CLASSES:
[Tue Oct 08 07:41:00.685168 2019] [wsgi:error] [pid 8770:tid 140654161590016] [remote 192.168.0.250:5793]   File "/usr/lib/python2.7/dist-packages/django/conf/__init__.py", line 48, in __getattr__
[Tue Oct 08 07:41:00.686783 2019] [wsgi:error] [pid 8770:tid 140654161590016] [remote 192.168.0.250:5793]     self._setup(name)
[Tue Oct 08 07:41:00.687047 2019] [wsgi:error] [pid 8770:tid 140654161590016] [remote 192.168.0.250:5793]   File "/usr/lib/python2.7/dist-packages/django/conf/__init__.py", line 44, in _setup
[Tue Oct 08 07:41:00.687111 2019] [wsgi:error] [pid 8770:tid 140654161590016] [remote 192.168.0.250:5793]     self._wrapped = Settings(settings_module)
[Tue Oct 08 07:41:00.687133 2019] [wsgi:error] [pid 8770:tid 140654161590016] [remote 192.168.0.250:5793]   File "/usr/lib/python2.7/dist-packages/django/conf/__init__.py", line 113, in __init__
[Tue Oct 08 07:41:00.687472 2019] [wsgi:error] [pid 8770:tid 140654161590016] [remote 192.168.0.250:5793]     raise ImproperlyConfigured("The SECRET_KEY setting must not be empty.")
[Tue Oct 08 07:41:00.687544 2019] [wsgi:error] [pid 8770:tid 140654161590016] [remote 192.168.0.250:5793] ImproperlyConfigured: The SECRET_KEY setting must not be empty.

cobbler – DisallowedHost: Invalid HTTP_HOST header: ”. You may need to add u” to ALLOWED_HOSTS.

Cobbler web (probably not the latest) uses Django and since version 1.5 (IIUC) if your IP is not in an allowed host directive – ALLOWED_HOSTS you will get 400 and the following apache errors:

[Mon Jan 14 13:44:27.805290 2019] [wsgi:error] [pid 5897:tid 139760386561792] [remote 192.168.0.250:44685] mod_wsgi (pid=5897): Exception occurred processing WSGI script '/usr/share/cobbler/web/cobbler.wsgi'.
.....
.....
[Mon Jan 14 13:44:27.805743 2019] [wsgi:error] [pid 5897:tid 139760386561792] [remote 192.168.0.250:44685] DisallowedHost: Invalid HTTP_HOST header: '192.168.0.25'. You may need to add u'192.168.0.25' to ALLOWED_HOSTS.

The solution is simple enough – add your host in the ALLOWED_HOSTS.

But where? In which cobbler configuration file?

Find the cobbler web setting file and add a line for ALLOWED_HOSTS.

In Ubuntu the file is “/usr/share/cobbler/web/settings.py” and add the following:

DEBUG = True
TEMPLATE_DEBUG = DEBUG

ALLOWED_HOSTS = '*'

ADMINS = (
    # ('Your Name', 'your_email@domain.com'),
)

This will instruct Django to accept requests from all IPs. Now Cobbler web will work.

The whole output error in the apache logs

The error could be seen in Cobbler web installed in Ubuntu 16 with the latest package cobbler-web 2.4.1-0ubuntu2.

[Mon Jan 14 13:44:27.805290 2019] [wsgi:error] [pid 5897:tid 139760386561792] [remote 192.168.0.250:44685] mod_wsgi (pid=5897): Exception occurred processing WSGI script '/usr/share/cobbler/web/cobbler.wsgi'.
[Mon Jan 14 13:44:27.805360 2019] [wsgi:error] [pid 5897:tid 139760386561792] [remote 192.168.0.250:44685] Traceback (most recent call last):
[Mon Jan 14 13:44:27.805381 2019] [wsgi:error] [pid 5897:tid 139760386561792] [remote 192.168.0.250:44685]   File "/usr/lib/python2.7/dist-packages/django/core/handlers/wsgi.py", line 189, in __call__
[Mon Jan 14 13:44:27.805420 2019] [wsgi:error] [pid 5897:tid 139760386561792] [remote 192.168.0.250:44685]     response = self.get_response(request)
[Mon Jan 14 13:44:27.805429 2019] [wsgi:error] [pid 5897:tid 139760386561792] [remote 192.168.0.250:44685]   File "/usr/lib/python2.7/dist-packages/django/core/handlers/base.py", line 207, in get_response
[Mon Jan 14 13:44:27.805442 2019] [wsgi:error] [pid 5897:tid 139760386561792] [remote 192.168.0.250:44685]     return debug.technical_500_response(request, *sys.exc_info(), status_code=400)
[Mon Jan 14 13:44:27.805449 2019] [wsgi:error] [pid 5897:tid 139760386561792] [remote 192.168.0.250:44685]   File "/usr/lib/python2.7/dist-packages/django/views/debug.py", line 97, in technical_500_response
[Mon Jan 14 13:44:27.805463 2019] [wsgi:error] [pid 5897:tid 139760386561792] [remote 192.168.0.250:44685]     html = reporter.get_traceback_html()
[Mon Jan 14 13:44:27.805470 2019] [wsgi:error] [pid 5897:tid 139760386561792] [remote 192.168.0.250:44685]   File "/usr/lib/python2.7/dist-packages/django/views/debug.py", line 384, in get_traceback_html
[Mon Jan 14 13:44:27.805480 2019] [wsgi:error] [pid 5897:tid 139760386561792] [remote 192.168.0.250:44685]     return t.render(c)
[Mon Jan 14 13:44:27.805487 2019] [wsgi:error] [pid 5897:tid 139760386561792] [remote 192.168.0.250:44685]   File "/usr/lib/python2.7/dist-packages/django/template/base.py", line 210, in render
[Mon Jan 14 13:44:27.805499 2019] [wsgi:error] [pid 5897:tid 139760386561792] [remote 192.168.0.250:44685]     return self._render(context)
[Mon Jan 14 13:44:27.805505 2019] [wsgi:error] [pid 5897:tid 139760386561792] [remote 192.168.0.250:44685]   File "/usr/lib/python2.7/dist-packages/django/template/base.py", line 202, in _render
[Mon Jan 14 13:44:27.805516 2019] [wsgi:error] [pid 5897:tid 139760386561792] [remote 192.168.0.250:44685]     return self.nodelist.render(context)
[Mon Jan 14 13:44:27.805523 2019] [wsgi:error] [pid 5897:tid 139760386561792] [remote 192.168.0.250:44685]   File "/usr/lib/python2.7/dist-packages/django/template/base.py", line 905, in render
[Mon Jan 14 13:44:27.805533 2019] [wsgi:error] [pid 5897:tid 139760386561792] [remote 192.168.0.250:44685]     bit = self.render_node(node, context)
[Mon Jan 14 13:44:27.805551 2019] [wsgi:error] [pid 5897:tid 139760386561792] [remote 192.168.0.250:44685]   File "/usr/lib/python2.7/dist-packages/django/template/debug.py", line 79, in render_node
[Mon Jan 14 13:44:27.805563 2019] [wsgi:error] [pid 5897:tid 139760386561792] [remote 192.168.0.250:44685]     return node.render(context)
[Mon Jan 14 13:44:27.805569 2019] [wsgi:error] [pid 5897:tid 139760386561792] [remote 192.168.0.250:44685]   File "/usr/lib/python2.7/dist-packages/django/template/defaulttags.py", line 329, in render
[Mon Jan 14 13:44:27.805582 2019] [wsgi:error] [pid 5897:tid 139760386561792] [remote 192.168.0.250:44685]     return nodelist.render(context)
[Mon Jan 14 13:44:27.805589 2019] [wsgi:error] [pid 5897:tid 139760386561792] [remote 192.168.0.250:44685]   File "/usr/lib/python2.7/dist-packages/django/template/base.py", line 905, in render
[Mon Jan 14 13:44:27.805602 2019] [wsgi:error] [pid 5897:tid 139760386561792] [remote 192.168.0.250:44685]     bit = self.render_node(node, context)
[Mon Jan 14 13:44:27.805609 2019] [wsgi:error] [pid 5897:tid 139760386561792] [remote 192.168.0.250:44685]   File "/usr/lib/python2.7/dist-packages/django/template/debug.py", line 79, in render_node
[Mon Jan 14 13:44:27.805621 2019] [wsgi:error] [pid 5897:tid 139760386561792] [remote 192.168.0.250:44685]     return node.render(context)
[Mon Jan 14 13:44:27.805627 2019] [wsgi:error] [pid 5897:tid 139760386561792] [remote 192.168.0.250:44685]   File "/usr/lib/python2.7/dist-packages/django/template/debug.py", line 89, in render
[Mon Jan 14 13:44:27.805639 2019] [wsgi:error] [pid 5897:tid 139760386561792] [remote 192.168.0.250:44685]     output = self.filter_expression.resolve(context)
[Mon Jan 14 13:44:27.805647 2019] [wsgi:error] [pid 5897:tid 139760386561792] [remote 192.168.0.250:44685]   File "/usr/lib/python2.7/dist-packages/django/template/base.py", line 648, in resolve
[Mon Jan 14 13:44:27.805657 2019] [wsgi:error] [pid 5897:tid 139760386561792] [remote 192.168.0.250:44685]     obj = self.var.resolve(context)
[Mon Jan 14 13:44:27.805663 2019] [wsgi:error] [pid 5897:tid 139760386561792] [remote 192.168.0.250:44685]   File "/usr/lib/python2.7/dist-packages/django/template/base.py", line 789, in resolve
[Mon Jan 14 13:44:27.805673 2019] [wsgi:error] [pid 5897:tid 139760386561792] [remote 192.168.0.250:44685]     value = self._resolve_lookup(context)
[Mon Jan 14 13:44:27.805679 2019] [wsgi:error] [pid 5897:tid 139760386561792] [remote 192.168.0.250:44685]   File "/usr/lib/python2.7/dist-packages/django/template/base.py", line 849, in _resolve_lookup
[Mon Jan 14 13:44:27.805689 2019] [wsgi:error] [pid 5897:tid 139760386561792] [remote 192.168.0.250:44685]     current = current()
[Mon Jan 14 13:44:27.805696 2019] [wsgi:error] [pid 5897:tid 139760386561792] [remote 192.168.0.250:44685]   File "/usr/lib/python2.7/dist-packages/django/http/request.py", line 152, in build_absolute_uri
[Mon Jan 14 13:44:27.805708 2019] [wsgi:error] [pid 5897:tid 139760386561792] [remote 192.168.0.250:44685]     host=self.get_host(),
[Mon Jan 14 13:44:27.805714 2019] [wsgi:error] [pid 5897:tid 139760386561792] [remote 192.168.0.250:44685]   File "/usr/lib/python2.7/dist-packages/django/http/request.py", line 102, in get_host
[Mon Jan 14 13:44:27.805725 2019] [wsgi:error] [pid 5897:tid 139760386561792] [remote 192.168.0.250:44685]     raise DisallowedHost(msg)
[Mon Jan 14 13:44:27.805743 2019] [wsgi:error] [pid 5897:tid 139760386561792] [remote 192.168.0.250:44685] DisallowedHost: Invalid HTTP_HOST header: '192.168.0.25'. You may need to add u'192.168.0.25' to ALLOWED_HOSTS.

nginx remote logging to UDP rsyslog server (CentOS 7)

This article will present to you all the configuration needed to remotely save access logs of an Nginx web server. All the configuration from the client and server sides is included. The client and the server use CentOS 7 Linux distribution and the configuration could be used under different Linux distribution. Probably only Selinux rules are kind of specific to the CentOS 7 and the firewalld rules are specific for those who use it as a firewall replacing the iptables. Here is the summary of what to expect:

  • Client-side – nginx configuration
  • Server-side – rsyslog configuration to accept UDP connections
  • Server-side – selinux and firewall configuration

The JSON formatted logs may be sent to a Elasticsearch server, for example. Here is how to do it – send access logs in json to Elasticsearch using rsyslog

STEP 1) Client-side – the Nginx configuration.

Nginx configuration is pretty simple just a single line with the log template and the IP (and port if not default 514) of the rsyslog server. For the record, this is the official documentation https://nginx.org/en/docs/syslog.html. In addition it worth mentioning there could be multiple access_log directives in a single section to log simultaneously on different targets (and the templates may be different or the same). So you can set the access log output of a section locally and remotely.
Nginx configuration (probably /etc/nginx/nginx.conf or whatever is the organization of your Nginx configuration files.)

server {
     .....
     access_log      /var/log/nginx/example.com_access.log main;
     access_log      syslog:server=10.10.10.2:514,facility=local7,tag=nginx,severity=info main3;
     .....
}

The “main” and “main3” are just names of the logging templates defined earlier (you may check rsyslog remote logging – prevent local messages to appear to see an interesting Nginx logging template).
The error log also could be remotely logged:

error_log syslog:server=10.10.10.3 debug;

STEP 2) Server-side – rsyslog configuration to accept UDP connections.

Of course, if you have not installed the rsyslog it’s high time you installed it with (for CentOS 7):

yum install -y rsyslog

To enable rsyslog to listen for UDP connections your rsyslog configuration file (/etc/rsyslog.conf) must include the following:

$ModLoad imudp
$UDPServerRun 514

Most of the Linux distributions have these two lines commented so you just need to uncomment them by removing the “#” from the beginning of the lines. If the lines are missing just add them under section “MODULES” (it should be near the first lines of the rsyslog configuration file).
Change the 514 with the number you like for the UDP listening port.
Write the client’s incoming lines of information to a different location and prevent merging with the local log messages – rsyslog remote logging – prevent local messages to appear. Include as a first rule under the rules’ section starting with “RULES” of the rsyslog configuration file (/etc/rsyslog.conf):

# Remote logging
$template HostIPtemp,"/mnt/logging/%FROMHOST-IP%.log"
if ($fromhost-ip != "127.0.0.1" ) then ?HostIPtemp
& stop

Logs only of remote hosts are going to be saved under /mnt/logging/.log.
Keep on reading!

nginx proxy cache – log the upstream response server, time, cache status, connect time and more in nginx access logs

The Nginx upstream module exposes embedded variables, which we can use to log them in the Nginx access log files.
Some of the variables are really interesting and could be of great use to the system administrators and in general to tune your systems (content delivery network?). For example, you can log

  • $upstream_cache_status – the cache status of the object the server served. For each URI you will have in the logs if the item is from the cache (HIT) or the Nginx used an upstream server to get the item (MISS)
  • $upstream_response_time – the time Nginx proxy needed to get the resource from the upstream server
  • $upstream_addr – the Nginx upstream server used for the requested URI in the logs.
  • $upstream_connect_time – the connect time to the specific

And many more you may check the documentation at the bottom with heading “Embedded Variables” – http://nginx.org/en/docs/http/ngx_http_upstream_module.html

For example, in peak hours, you can see how the time to get the resource from the upstream servers changes.

And you can substruct the time from the time your server served the URI to the client.

Of course, you can use this with any upstream case not only with proxy cache! These variables may be used with application backend servers like PHP (FastCGI) application servers and more. In a single log in the access log file, there could be information not only for the URI but for the time spent to generate the request in the application server.

Example

Logging in JSON format (JSON is just for the example, you can use the default string):

        log_format main3 escape=json '{'
                '"remote_addr":"$remote_addr",'
                '"time_iso8601":"$time_iso8601",'
                '"request_uri":"$request_uri",'
                '"request_length":"$request_length",'
                '"request_method":"$request_method",'
                '"request_time":"$request_time",'
                '"server_port":"$server_port",'
                '"server_protocol":"$server_protocol",'
                '"ssl_protocol":"$ssl_protocol",'
                '"status":"$status",'
                '"bytes_sent":"$bytes_sent",'
                '"http_referer":"$http_referer",'
                '"http_user_agent":"$http_user_agent",'
                '"upstream_response_time":"$upstream_response_time",'
                '"upstream_addr":"$upstream_addr",'
                '"upstream_connect_time":"$upstream_connect_time",'
                '"upstream_cache_status":"$upstream_cache_status",'
                '"tcpinfo_rtt":"$tcpinfo_rtt",'
                '"tcpinfo_rttvar":"$tcpinfo_rttvar"'
                '}';

We included the variables we needed, but there are a lot more, check out the Nginx documentation for more.
Just add the above snippet to your Nginx configuration and activate it with the access_log directive:

access_log      /var/log/nginx/example.com-json.log main3;

“main3” is the name of the format and it could be anything you like.

And the logs look like:

{"remote_addr":"10.10.10.10","time_iso8601":"2019-09-12T13:36:33+00:00","request_uri":"/i/example/bc/bcda7f798ea1c75f18838bc3f0ffbd1c_200.jpg","request_length":"412","request_method":"GET","request_time":"0.325","server_port":"8801","server_protocol":"HTTP/1.1","ssl_protocol":"","status":"404","bytes_sent":"332","http_referer":"https://example.com/test_1","http_user_agent":"Mozilla/5.0 (Macintosh; Intel Mac OS X 10_10_5) AppleWebKit/603.3.8 (KHTML, like Gecko) Version/10.0.2 Safari/602.3.12","upstream_response_time":"0.324","upstream_addr":"10.10.10.2","upstream_connect_time":"0.077","upstream_cache_status":"MISS","tcpinfo_rtt":"45614","tcpinfo_rttvar":"22807"}
{"remote_addr":"10.10.10.10","time_iso8601":"2019-09-12T13:36:33+00:00","request_uri":"/i/example/2d/2df5f3dfe1754b3b4ba8ac66159c0384_200.jpg","request_length":"412","request_method":"GET","request_time":"0.242","server_port":"8801","server_protocol":"HTTP/1.1","ssl_protocol":"","status":"404","bytes_sent":"332","http_referer":"https://example.com/test_1","http_user_agent":"Mozilla/5.0 (Macintosh; Intel Mac OS X 10_10_5) AppleWebKit/603.3.8 (KHTML, like Gecko) Version/10.0.2 Safari/602.3.12","upstream_response_time":"0.242","upstream_addr":"10.10.10.2","upstream_connect_time":"0.000","upstream_cache_status":"MISS","tcpinfo_rtt":"46187","tcpinfo_rttvar":"23093"}
{"remote_addr":"10.10.10.10","time_iso8601":"2019-09-12T13:36:41+00:00","request_uri":"/flv/example/test_1.ts?st=E05FMg-DSIAgRfVhbadUWQ&e=1568381799&sopt=pdlfwefdfsr","request_length":"357","request_method":"GET","request_time":"0.960","server_port":"8801","server_protocol":"HTTP/1.0","ssl_protocol":"","status":"200","bytes_sent":"3988358","http_referer":"","http_user_agent":"Lavf53.32.100","upstream_response_time":"0.959","upstream_addr":"10.10.10.2","upstream_connect_time":"0.000","upstream_cache_status":"MISS","tcpinfo_rtt":"46320","tcpinfo_rttvar":"91"}
{"remote_addr":"10.10.10.10","time_iso8601":"2019-09-12T14:09:34+00:00","request_uri":"/flv/example/aee001dce114c88874b306bc73c2d482_1.ts?range=564-1804987","request_length":"562","request_method":"GET","request_time":"0.613","server_port":"8801","server_protocol":"HTTP/1.0","ssl_protocol":"","status":"200","bytes_sent":"5318082","http_referer":"","http_user_agent":"AppleCoreMedia/1.0.0.16E227 (iPad; U; CPU OS 12_2 like Mac OS X; en_us)","upstream_response_time":"","upstream_addr":"","upstream_connect_time":"","upstream_cache_status":"HIT","tcpinfo_rtt":"45322","tcpinfo_rttvar":"295"}

It’s easy to print them beatiful in the console with the “jq” tool

[root@srv logging]# tail -f 10.10.10.10.log|awk 'BEGIN {FS="{"} {print "{"$2}'|jq "."
{
  "remote_addr": "10.10.10.10",
  "time_iso8601": "2019-09-12T13:36:33+00:00",
  "request_uri": "/i/example/bc/bcda7f798ea1c75f18838bc3f0ffbd1c_200.jpg",
  "request_length": "412",
  "request_method": "GET",
  "request_time": "0.325",
  "server_port": "8801",
  "server_protocol": "HTTP/1.1",
  "ssl_protocol": "",
  "status": "404",
  "bytes_sent": "332",
  "http_referer": "https://example.com/test_1",
  "http_user_agent": "Mozilla/5.0 (Macintosh; Intel Mac OS X 10_10_5) AppleWebKit/603.3.8 (KHTML, like Gecko) Version/10.0.2 Safari/602.3.12",
  "upstream_response_time": "0.324",
  "upstream_addr": "10.10.10.2",
  "upstream_connect_time": "0.077",
  "upstream_cache_status": "MISS",
  "tcpinfo_rtt": "45614",
  "tcpinfo_rttvar": "22807"
}
{
  "remote_addr": "10.10.10.10",
  "time_iso8601": "2019-09-12T13:36:33+00:00",
  "request_uri": "/i/example/2d/2df5f3dfe1754b3b4ba8ac66159c0384_200.jpg",
  "request_length": "412",
  "request_method": "GET",
  "request_time": "0.242",
  "server_port": "8801",
  "server_protocol": "HTTP/1.1",
  "ssl_protocol": "",
  "status": "404",
  "bytes_sent": "332",
  "http_referer": "https://example.com/test_1",
  "http_user_agent": "Mozilla/5.0 (Macintosh; Intel Mac OS X 10_10_5) AppleWebKit/603.3.8 (KHTML, like Gecko) Version/10.0.2 Safari/602.3.12",
  "upstream_response_time": "0.242",
  "upstream_addr": "10.10.10.2",
  "upstream_connect_time": "0.000",
  "upstream_cache_status": "MISS",
  "tcpinfo_rtt": "46187",
  "tcpinfo_rttvar": "23093"
}
{
  "remote_addr": "10.10.10.10",
  "time_iso8601": "2019-09-12T13:36:41+00:00",
  "request_uri": "/flv/example/test_1.ts?st=E05FMg-DSIAgRfVhbadUWQ&e=1568381799&sopt=pdlfwefdfsr",
  "request_length": "357",
  "request_method": "GET",
  "request_time": "0.960",
  "server_port": "8801",
  "server_protocol": "HTTP/1.0",
  "ssl_protocol": "",
  "status": "200",
  "bytes_sent": "3988358",
  "http_referer": "",
  "http_user_agent": "Lavf53.32.100",
  "upstream_response_time": "0.959",
  "upstream_addr": "10.10.10.2",
  "upstream_connect_time": "0.000",
  "upstream_cache_status": "MISS",
  "tcpinfo_rtt": "46320",
  "tcpinfo_rttvar": "91"
}
{
  "remote_addr": "10.10.10.10",
  "time_iso8601": "2019-09-12T14:09:34+00:00",
  "request_uri": "/flv/example/aee001dce114c88874b306bc73c2d482_1.ts?range=564-1804987",
  "request_length": "562",
  "request_method": "GET",
  "request_time": "0.613",
  "server_port": "8801",
  "server_protocol": "HTTP/1.0",
  "ssl_protocol": "",
  "status": "200",
  "bytes_sent": "5318082",
  "http_referer": "",
  "http_user_agent": "AppleCoreMedia/1.0.0.16E227 (iPad; U; CPU OS 12_2 like Mac OS X; en_us)",
  "upstream_response_time": "",
  "upstream_addr": "",
  "upstream_connect_time": "",
  "upstream_cache_status": "HIT",
  "tcpinfo_rtt": "45322",
  "tcpinfo_rttvar": "295"
}

3 misses and 1 hit, the hit 3 of the upstream variables we used are blank, because the server took the item from the cache.

rsyslog remote logging – prevent local messages to appear

A tip for those who have a remote user server for their log files. When you set up a remote server you probably don’t want local messages to appear in the logging directory (directories) and here is how you can archive it:
Above all the rules in the configuration file “/etc/rsyslog.conf” (or where it is in your system) you include “if” statement for the local server like this:

# Remote logging
$template HostIPtemp,"/mnt/logging/%FROMHOST-IP%.log"
if ($fromhost-ip != "127.0.0.1" ) then ?HostIPtemp
& stop

The name of the template is “HostIPtemp” and the starting part of the path “/mnt/logging/” may be anything you like.
All the remote messages will be redirected to the template and all the rules after won’t be applied to them because we use the “stop instruction”.

That’s why this rule must be above all rules in the whole rule configuration. Above all rules – probably you will find a commented line with “#### RULES ####”

The above configuration will have the following directory structure:

[root@srv ~]# ls -altr /mnt/logging/
total 2792
drwxr-xr-x. 7 root root    4096 12 Sep 10,05 ..
drwxr-xr-x. 2 root root    4096 12 Sep 13,01 .
-rw-------. 1 root root 2844525 12 Sep 13,01 10.10.10.10.log
-rw-------. 1 root root 1245633 12 Sep 13,01 10.10.10.11.log
-rw-------. 1 root root 9722578 12 Sep 13,01 10.10.10.12.log
-rw-------. 1 root root 1127231 12 Sep 13,01 10.10.10.13.log

Live status information like used space and more for nginx proxy cache

Using the Nginx virtual host traffic status module you can have extended live information for your proxy cache module and the proxy cache upstream servers. We have covered the topic of how to install the module here – Install Nginx virtual host traffic status module – traffic information in Nginx and more per server block and upstreams and this article is just to show you what information you could have using the module with proxy cache (and the upstream servers) module.
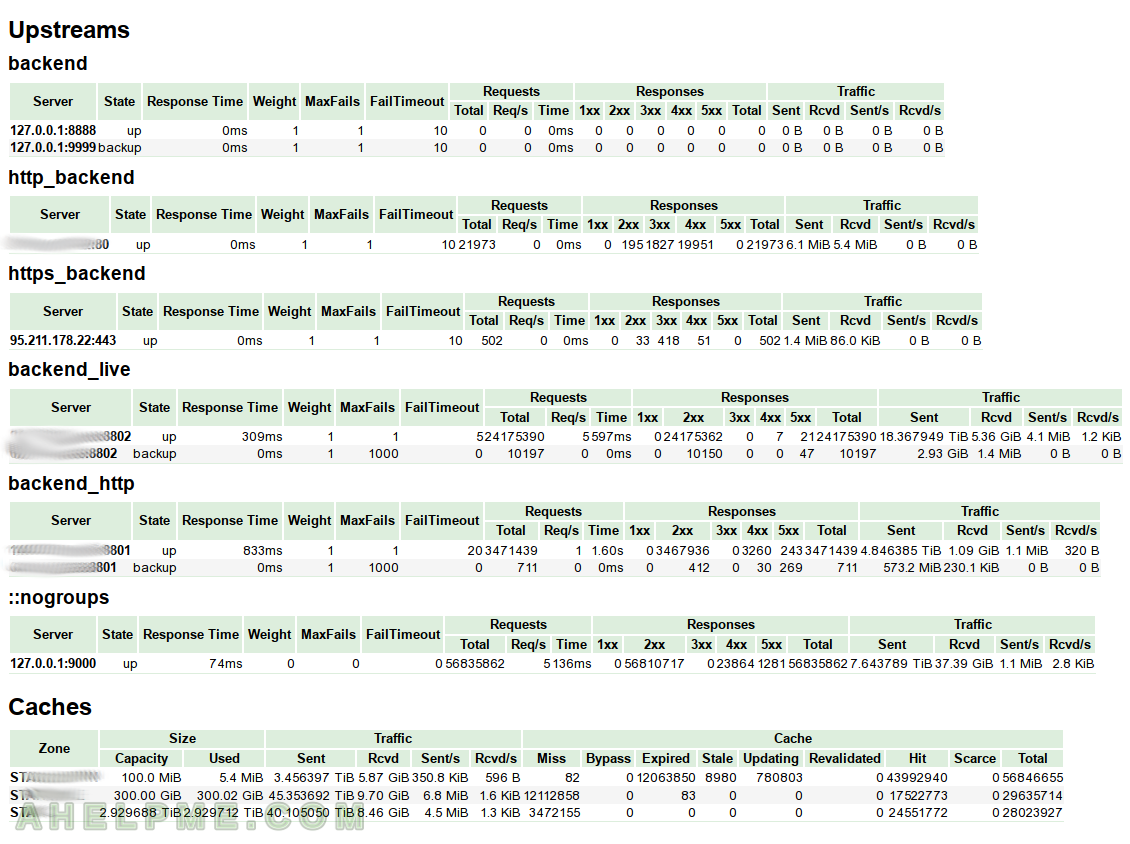
In general, there is no live information about Nginx proxy cache. Of course, by the space it is occupied in the disk you can guess how much space is taken by your Nginx cache (or when you restart or upgrade the Nginx it would reinitialize the cache and when finished the numbers would be written in the error log). With this module “Nginx virtual host traffic status module” – https://github.com/vozlt/nginx-module-vts you would have additional status information page containing information for the proxy cache module (we included only for the proxy cache here, for more look at the other article mentioned above), too:

Per upstream server

  • state – up, down, backup server and so on.
  • Response Time – the time the server responded last time. You can use this to see how far away is your server and to detect problems with your upstreams connectivity.
  • Weight – the weight of the server in the group. It’s from the configuration file.
  • Max Fails – the max fail attempts before it blacklists the upstream for “Fail Timeout” time. It’s from the configuration file.
  • Fail Timeout – the time, which the server will be blacklisted and the time the all fails (from Max Fails) must occur. It’s from the configuration file.
  • RequestsTotal – from the start of the server, Req/s – Requests per second at the moment of loading the extended status page, Time.
  • ResponsesTotal and split by error codes – 1xx, 2xx, 3xx, 4xx, 5xx.
  • TrafficSent – total sent from the start of the server), Rcvd – total received from the start of the server, Sent/s – sent per second at the moment, Rcvd/s – received per second at the moment.

Per cache – i.e. key zone name

  • SizeCapacity – the capacity from the configuration file, Used – used space lively updated! With this you can have access to the used space of your zones with only loading a page – the extended status page of this module!
  • TrafficSent – total sent from the start of the server, Rcvd – total received from the start of the server, Sent/s – sent per second at the moment, Rcvd/s – received per second at the moment.
  • CacheMiss, Bypass, Expired, Stale, Updating, Revalidated, Hit, Scarce, Total – they all are self-explanatory and all counters are from the start of the server.

You can compute the effectiveness of your cache for a period of time. For example, you can make different graphs based on this data for long periods and for different short periods like in peaks of off-peaks. We might have an article on the subject.

SCREENSHOT 1) Cache with three cache zones and two upstream servers – main and backup

As you can see our biggest zone has 2.92T occupied and it is 100% of the available space, so probably the cache manager is deleteing at the moment. The hits are 24551772 and the total is 28023927 so the ratio in percentages is 87.6%! 87.6% of the hits of this zone is servered by the server without the need of touching the upstream servers. In the first cache zone we have more aggressive time expiring, so there were 21% requests, which were updated.

main menu
Cache with three cache zones and two upstream servers – main and backup

Keep on reading!